Fair Isle Wrist Warmers
Description of Pattern:
Thinking about trying Fair Isle, but you aren't ready for a large project? Try a simple four-stitch Fair Isle pattern and knit up these beautiful wrist warmers or a wrist band. The top and bottom edges have corrugated ribbing to keep the warmers snug and can be shortened or lengthened for a different effect. This pattern assumes you have basic Fair lsle experience or a Fair isle book that has images of the technique as well as experience knitting in the round (either with the magic loop method or on dpns). There are several tutorials on line as well to help you out. Fair Isle stitch patterns or variations are from The Art of Fair Isle Knitting: History, Technique, Color & Patterns by Ann Feitelson, Interweave Press, 1996 (ISBN: 1883010209). Size: child (woman's extra small, small, medium, large)
Finished Measurements:
Wrist circumference 6 $(6\;^{1}\!/\!2,\,7,\,7\;^{1}\!/\!/\!2,\,8^{\ast}\!)$ Lengths: 2" (short wrist warmer); 2.5" (wider wrist warmer)
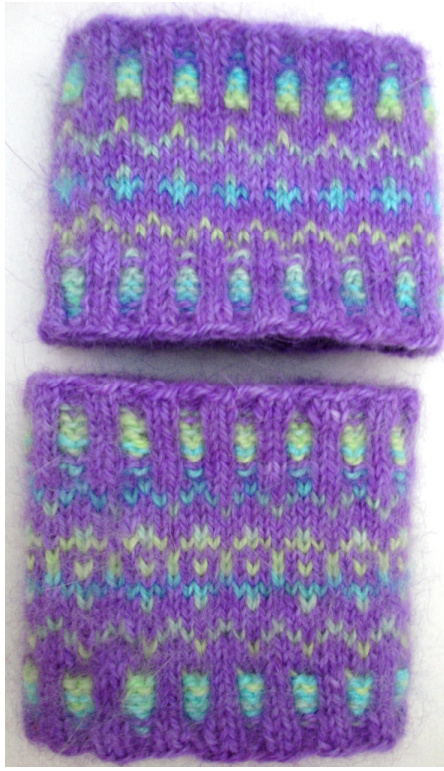
Figure 1. Short wrist warmer on top; wider wrist warmer below.
Materials Needed:
Yarn needed - 100-200 yds of fingering weight yarn. Yarn shown is from Avillion Farm - 2-ply; $85\%$ Angoral $15\%$ Shetland wool; 16-18 wpi; 100 yd. Available at htp://www.avillionfarm.com/. Any fingering or sock weight yarn will work if you can match gauge. You can even use leftovers from your socks. Multi-colored striping sock yarn works wonderfully for the patterned stitches and a solid or semi-solid works well for the background. - Circular or Double point needles - size US 0 $(2.0\;\mathsf{m m})$ I or size needed to match gauge. Circular needles need to be at least $32^{\mathfrak{s}}$ long as the Magic loop method is used. - stitch markers
Gauge:
10 sts/inch and 11.5 rows/inch on US 1 following chart A or B. These wrist warmers are small enough that you can check gauge as you knit - also can check fit as you knit. Please read before you begin patternor dyeing: ecause you are kniting in the round, the charts are read in one direction only, from the right to the left. Keep the yarn that is your background color $\scriptstyle\left(=\mathsf{B C}\right)$ , solid color) above the yarn that is your foreground or contrast color $\scriptstyle(=\complement\complement)$ ; rainbow colorway). Many knitters use the right hand for the background color and the left hand for the foreground/contrast color. Please take a look at references if you are not sure what this means. The 4-st patterns would also work well on the cuff of a sock. Use the rainbow yarn at the heels and toes and have lovely unique socks. ToFit: Forlarger hand sizes,tryusing alarger needle and gauge. Another option is to add sts in a multiple of 4. To adjust length of wrist warmers, add more ribbing rows or add another solid row before and afterChart A.
Dyeing Instructions:
Note: Before doing any dyeing, wind off yarn into your appropriate skeins (see belw) and pre soak both skeins in a vinegar/water bath for at least 20 minutes (for acid dyes). Use about $^1\!/\!_{2}$ cup vinegar to a gallon of water. Solid color- wind off half the skein to be dyed a solid color. To dye the yarn a solid color, follow the directions for your chosen dye. I use an immersion bath for the solid color. Note: Angora may not take color well so you may have a heathery look to the yarn. Rainbow colorway- the other half of the skein is to be dyed in 36" (or 3 ft) colored increments as follows (see #2 for how I determined this increment length). 1. Determine how many colors you want in your colorway. An odd number is better than an even. I chose 3 colors for the warmers. a. When choosing colors, use a color wheel to help you choose. Remember, you really have 4 colors: 1 solid that should show up against your colorway. b. Example colorways: sunset over the ocean (blue solid with a red, orange, and yellow colorway); violets (dark purple solid with a pale lime green, darker green, and an aqua blue); rocky beach colors (chestnut solid or one of the lovely natural shades available at Avillion Farms with a pale sand, light aqua, and darker blue colorway). C. Obviously nature is a good inspiration, but color wheels are great, as are colored pencils. You can test the colors out together with colored pencils before dyeing. d. Shades of colors are wonderful in colorways. For example, shades of red, such as red, pink, and light pink look good against a blue solid color. Don't limit yourself to one shade of color. 2. To determine the increment length, I normally measure my wrist and multiply this number by three for gloves. This is approximately the amount of yarn needed for one row of solid color. This is a common multilier, and I use it often because I know it will give me at least 1 row of each color. However, to make the pattern fit any sized wrist, use 36" as your increment. This will give you at least one row of color. a. If you truly want to know how many inches of yarn is needed per row for a particular pattern, knit a swatch in the Fair Isle pattern (tension is different otherwise) and measure the amount of yarn you used across all the rows of your swatch, for both the background color and your contrast color. This will give you the number of inches of yarn needed per row. Multiply the number of inches/row by how many rows of each color you want. This is the length of each color needed in your skein. 3. Assuming 36" increments of color and three colors, then we need a skein with a circumference of 9 feet (3 ft x 3 colors $=9$ ft). a. I used my warping board, but you may use chairs, fence posts, doorknobs, whatever is the exact distance apart that you need (in this case 4.5 ft apart to get the full 9 foot circumference [divided by 2]). Just remember that you have to be able to remove the skein when you are done! 4. After winding off your 9 ft skein. Tie the skein every 36". You should now have a skein with three sections measuring 36". 5. Handpaint each section of your skein with color. a. This is a long skein, so take this part slowly and carefully dye each section. Lay out a piece of plastic wrap on a table you can clean up easily. If this is your dining room table, use a plastic table cloth below the plastic wrap. b. Squeeze out the excess water/vinegar from the yarn and lay one section of the skein out on the plastic wrap. Since there are three sections to dye, I suggest following the scheme below for dyeing each section. Lay out the long skein so that each tied offincrement is in a separate area on the plastic wrap. Use two sheets of wrap if needed. c. Use a squeeze bottle or sponge to pour the dye across each section (indicated by different types of lines in drawing). Dye each section slowly. Fold the plastic wrap over each dyed section and squeeze a bit, pushing dye into the yarn. Unfold the plastic wrap and use paper towels to pick up excess moisture. You do not want any bleeding. d. At the place where your colors join, be careful to not overlap colors. e. After dyeing each section of color, fold the plastic wrap over each section, sealing each section. Fold the entire bundle up and place in a steamer (pot of boiling water with an inverted pie plate with holes punched in it works welli you don't have a steamer). Steam for at least 30 minutes or follow the directions for your dye. f. I prefer to use plastic wrap and the steamer when handpainting fiber. If you use a microwave, make sure it is designated for dyeing only.

g. For cleanup of dye, try WindexTM. It works well on all plastics.
Pattern Directions:
Ribbing: With main background color (BC), CO 60 (64, 68, 72, 76) sts. With either the magic loop method or dpns, you can use your tail to indicate the beginning of the round or use a stitch marker or row marker. Rows 1 & 2: In BC, $^{\star}\mathsf{K}_{2}$ , P2, repeat from \* around round. Row 3: Join contrast color (CC). With $^{\star}\mathsf{B C}$ , K2, with CC, P2, repeat from \* around row. Rows 4-6: With $^{\star}\mathsf{B C}$ , K2, with CC, P2, repeat from \* around. Ribbing should measure $^{1}\!/\!_{2}^{\,,\,\,\,}$
Pattern Rows:
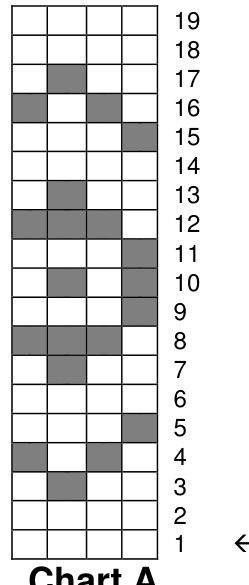
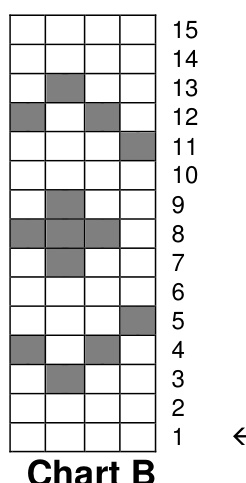
Follow Chart A for the wider bands and Chart B for narrow bands. It may be easier to place stitch markers between each repeat or every few repeats. $\copyright$ 2009 Annette M. G. Pray Updated 1/13/2009 After either Chart A or B are complete, continue as follows. Ribbing: Rows 1-4: With $^{\star}\mathsf{B C}$ , K2, with CC, P2, repeat from \* around. Rows 5&6: In BC only, $^{\star}\mathsf{K}2$ , P2, repeat from \* around round. Bind off in ribbing pattern. Finishing: Weave in any ends. Soak wrist warmers in warm water with your favorite fiber soap. Lay them out flat to dry. If your stitches are puckered, try turning the wrist wamers inside out and tugging gently on the edges to pull stitches into alignment. Soak and turn rightside out when done soaking.
Abbreviations
· CO - cast on - long-tail is preferred. ·K -knit. · pm - place stitch marker. ·P-purl. · RS - Right side row. · Ws - Wrong side row. Charts A and B (4 st patterns): Shaded boxes indicate CC; unshaded boxes indicate BC. Read from right to left.
Other references used:
3udd, Ann. 2002. The Knitter's Handy Book of Patterns: basicdesigns in multiple sizes and gauges. Interweave Press Inc. Colorado, USA. Pp. 112. ISBN: 1931499047 $\circledcirc$ 2009 Annette Golonka Praay. You may make one working copy of the pattern but may not use this pattern to make the Fair Isle Wrist Warmers for retail purposes. All rights reserved. You may not copy or distribute this pattern without author's written permission. For pattern questions or problems, please contact Annette Praay at knittinganet@gmail.com.


