Dishcloth in Mosaic for a Beginner
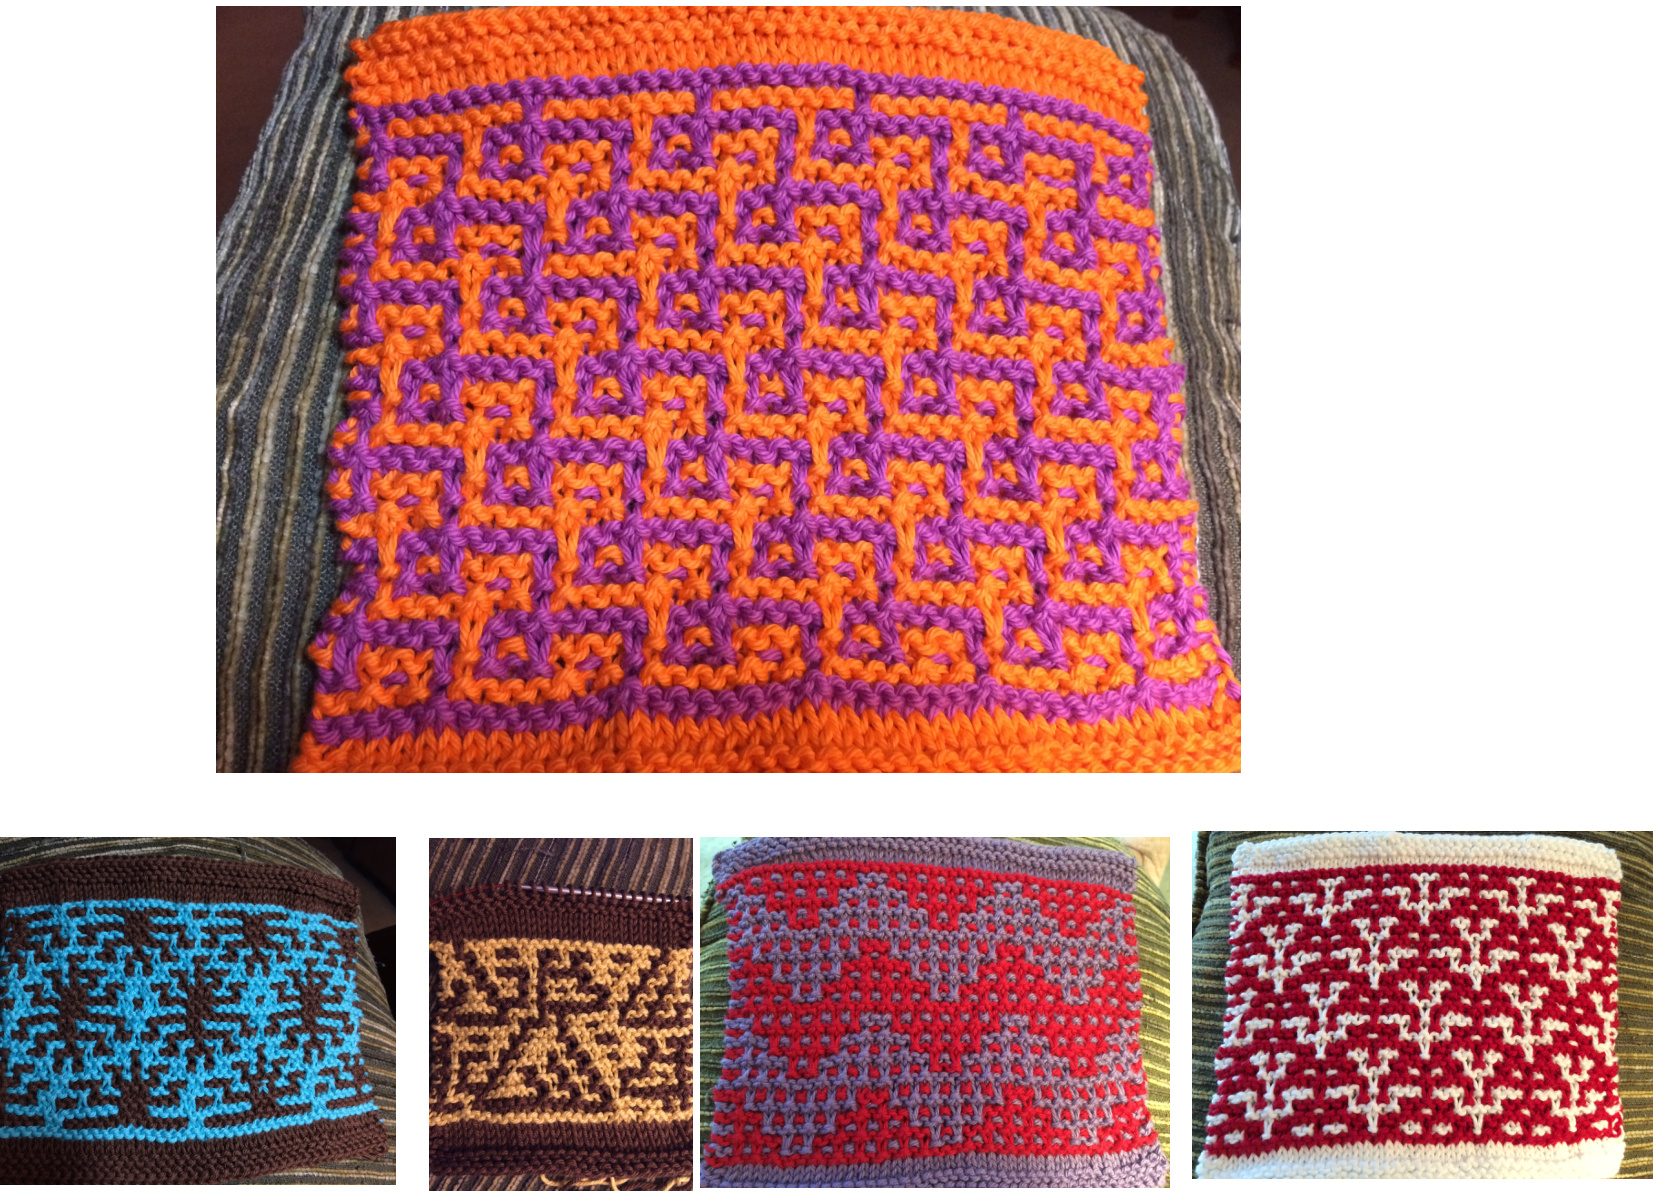
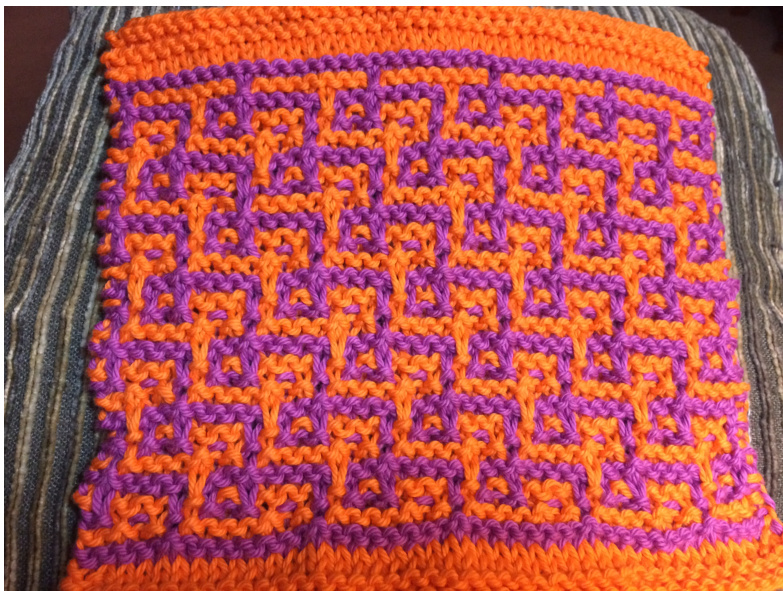
I get on kicks where I do a lot of something - to which my husband and sister can both attest (Hi Sis!) So, by "Dishcloth in Mosaic for a Beginner," I mean, I'm a beginner who has fallen in love with Mosaic Knitting and thought I would share some of the things I've learned through trial and error (mostly error). I have never written a pattern before and am not a designer or master knitter. This will probably be a lot more simplistic than most of you need but I'm going to try to put in every detail, for those who need it. This will be really long, but if you are brave and adventurous, just skip to the pattern part. The pattern part will be long too because I like just about everything written out so I can put check marks, highlight, or whatever, to keep track of where I am. First of all, Mosaic Kniting is SUPER easy. If you can do a knit stitch, a purl stitch and slip a stitch, you can do MosaicKnitting. Here's a picture of the cloth this pattern is for. Below are a few other examples of Mosaic Kniting. These were all patterns adapted from Barbara Walker's Mosaic Knitting Book.
For the purposes of this pattern and the explanations below, you will be using 2 colors of yarn - a main color (mc) and a contrast color (cc).
Stuff You'll Need to Know
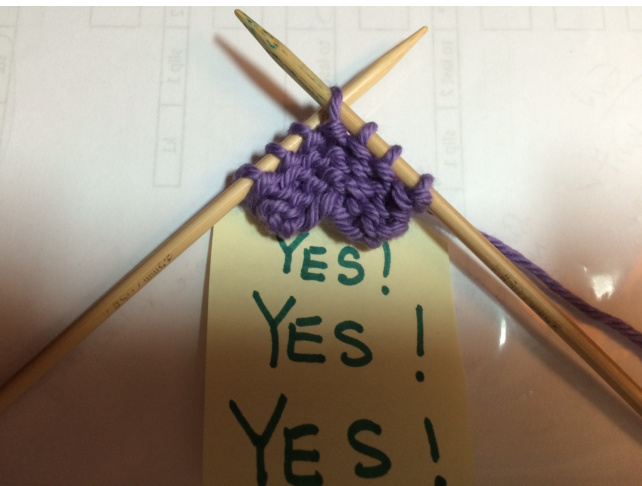
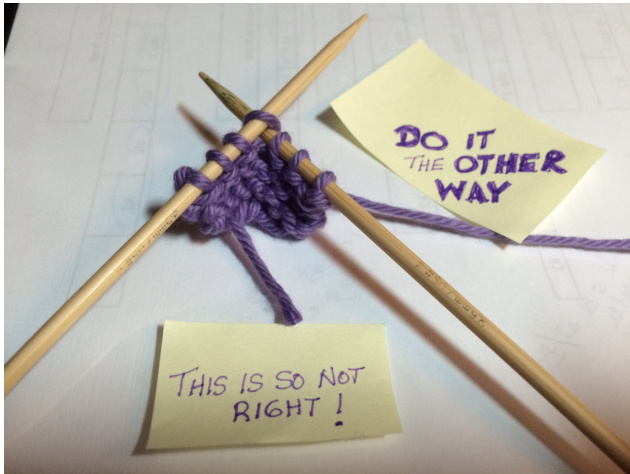
e When you slip stitches, you should always (unless a pattern indicates otherwise), slip them purlwise, or as if you were going to purl. In this pattern, you will ALWAYS slip the stitches purlwise. This keeps the stitch from twisting and looking wonky. We LiKE slipping stitches purlwise because it is easier, and easier is good (remember, I told you Mosaic Knitting was easy). Here are a couple of pictures.
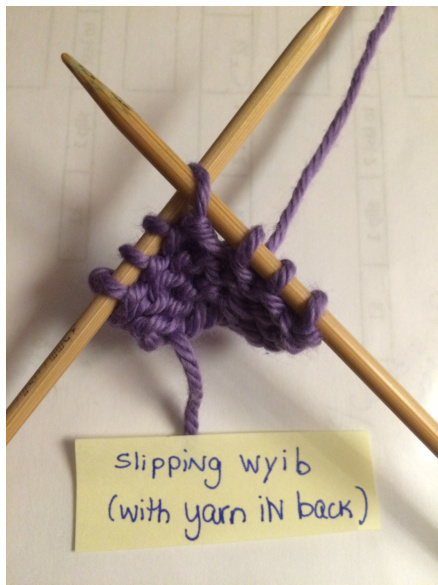
wyib This means with yarn in back, which means that when you slip the stitch (purlwise - remember - see above) you slip the stitch with the yarn in the back (like you were about to knit the next stitch). See picture.
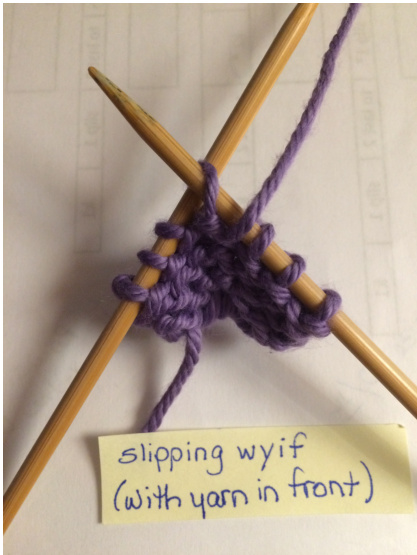
wyif This means with yarn in front, which means that when you slip the stitch (purlwise - you didn't forget already did you?!) you slip the next stitch with the yarn in the front (like you were going to purl the next stitch). See picture. You'll be doing this on the back (wrong) side of your work. This helps keep all the colors in the right places. Believe me, you'll notice pretty quickly if you slip those stitches on the back with the yarn in the wrong place.
Understanding the asterisks This pattern has 1 extra stitch at the beginning of the row, 5 repeats of 8 stitches and 2 extra stitches at the end of the row. So, it will be written like this. k1 \* k4 sl-1 k3 \* repeat \*.\* to last 2 k2 Here's what all that means k1 (this is the extra stitch at the beginning of the row) \* k4 sl-1 k3 \* (this is the 8 stitch repeat) repeat \* \* to last 2 (this means you repeat the stuff between the two asterisks over and over until you have only 2 stitches left) k2 (these are the extra 2 stitches at the end of the row) So - if this pattern were written out completely for a 43 stitch row, it would look like this:
| k1 | k4 | sl-1 | k3 | k4 | sl-1 | k3 | k4 | sl-1 | k3 |
| k4 | sl-1 | k3 | k4 | sl-1 | k3 | k2 |
See how those asterisks make it simpler.
A Brief Explanation of Mosaic Knitting (for a dishcloth type fabric)
You start your piece with a main color. You do a few border rows. You do 2 rows to get your contrast color going. Now is the fun and easy part. You typically knit 2 rows (front and back) with the main color. While you are doing this, your contrast color is calmly and patiently waiting at the edge of the work. Really, it just hangs there. When you finish the 2 rows with your main color, you drop the yarn and let it rest. You pick up the contrast color (there is a way to do this which we'll discuss below - this is the only moderately tricky thing and it isn't hard!). Now, using the contrast color, you knit 2 rows (front and back) with the contrast color. While you are doing this, your main color just hangs there. You just keep repeating these until you are done. But how, you ask, does this make a Mosaic? Wouldn't this just give me rows and rows of alternating colors? This is where the magic comes in. Following your pattern, you are going to do this. Main Color rows, you will do the following: Right Side: On the front (right side) row, following the pattern, you will knit the stitches indicated. For the others, you will simply slip the stitch from the left needle to the right purlwise (without knitting it). You will always be slipping the opposite color of what you are currently working with. On the right side, you will slip the stitches wyib (with the yarn in back) which makes this really easy. For those of you who have done linen stitch, this is very familiar to you. YOU ALWAYS SLIP THE STITCHES PURLWISE. Wrong Side: On the back (wrong side) row, you don't have to count at all! You just knit the main color stitches, and WITH YARN IN FRONT, slip the contrast color stitches (again purlwise). Contrast Color rows, you will do the following: It is basically the same for the contrast color as it was for the main color, but Ill write it out. Right Side: On the front (right side) row, following the pattern, you will knit the stitches indicated, for the others, you will simply slip the stitch (purlwise) from the left needle to the right without knitting it (wyib). Wrong Side: On the back (wrong side) row, no counting allowed! Just knit the contrast color stitches and (with yarn in front) slip the main color stitches (purlwise) from the left needle to the right without knitting them. I know this sounds complicated but it really isn't!If you read this through and give it a try, youll get the hang of it right away, I promise.
Why Mosaic Knitting is Cool
1. You are only EVER knitting with one color yarn at a time. 2. It's an easy way to add color to your knitting. Two color is super easy and you can even add more colors when you get adventurous. With Fair Isle you have to carry the yarn along the back and worry about floats. With Intarsia you have hanging bobbins of different colors to worry about. Don't get me wrong, those are both wonderful techniques and for hats, I actually prefer the Fair Isle over Mosaic (although you can easily do Fair Isle using a Mosaic Pattern...but more on that another time). 3. You only have to count on the right side rows. The wrong side is pretty self explanatory once you get the hang of it. You are just knitting along and then, wham, like magic, this cool pattern appears! 5. There is enough pattern for me to pay attention to and not get bored, but not so much that I must exist in the cone of silence. 6. This is a very neat way to try out different color combinations.
Little Tips
(which may make more sense after you've done a few rows) 1. The first stitch of your Main Color rows will always be (wait for it.) the Main Color. The first stitch of your Contrast Color rows will always be (l shouldn't even have to tell you now) - the Contrast Color. 2. When you are changing colors (that is, letting one rest and picking up the other one to get your money's worth out of it, knit 2-3 stitches, THEN, gently tug and tighten the first few stitches if they need it. You want the edge where both colors hang out to be snug but not strangling. 3. Stitch markers are a lifesaver!! No really, you could be lost at sea and a stitch marker .. If you are distracted by an adorable dog, whining child or cranky spouse, you may need to count to remember where you are in your pattern. If you put a stitch marker, this will make your life SO mucheasier. PLUS, PLUS, PLUS - if your knitting doesn't match the pattern, you will usually know by the end of the first section (delineated by your handy, dandy stitch marker) - so you will catch any error early. A note about multiples: this particular pattern is a multiple of 8 + 3. What that means is to figure out how wide you want it (which I've already done for you this time), you'd multiple 8 by some number (so 8 x 5 = 40) then add 3 to whatever your final number is (40 + 3 = 43). So, for this pattern, you are going to cast on 43 stitches. If you wanted wider, you could do 8 x 6 = 48 + 3 = 51. 5. If you see a mistake, it's better if you can tink (which is "knit" spelled backwards and means taking your work out stitch by stitch) rather than frogging (taking the work off the needles and rrippp, rrripp, ripping the work out). If you take your work off the needles and frog it, when you are trying to put the work back on the needles, it's hard to tell which are just knit stitches and which are slipped ones. 5. When I'm knitting and finish with a color, before I even look at the pattern for my next right side row, I move my yarn around so I'm ready to go with the new color. Less chance for me to use the wrong color. 5. The yarn you are working with should be the one farthest away from you. 6. I find it helpful, once I have both colors started, to pin or clip the tails so they are out of the way.
Choosing Color
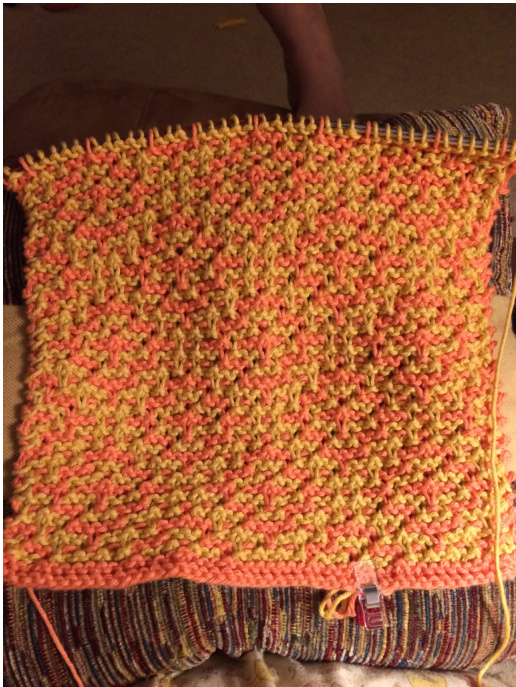
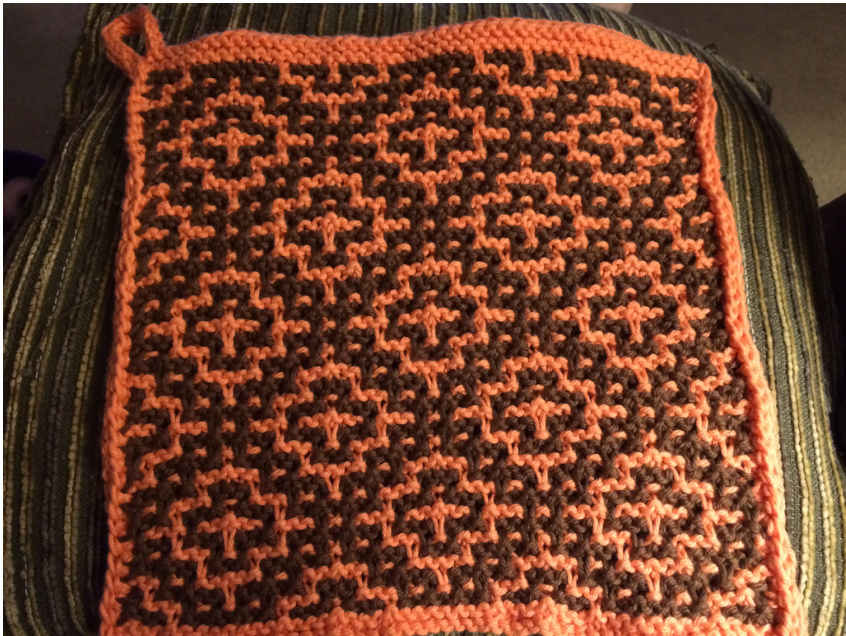
You wouldn't think this should be a big deal, and I don't want to make you freak, but check this out. The two pieces below were knit using EXACTLY the same pattern. The first one was knit using orange and yellow yarns. The second one was knit using orange and brown yarns. Vive la difference (l had to look up how to spell that!). Just choose contrasting colors and you'll be fine.
Joining the Contrast Color for the First Time
When you add your contrast color in on the bottom border, you don't want to tie it to anything. Youll just drape it over the needle and start knitting. Here is some help with that.
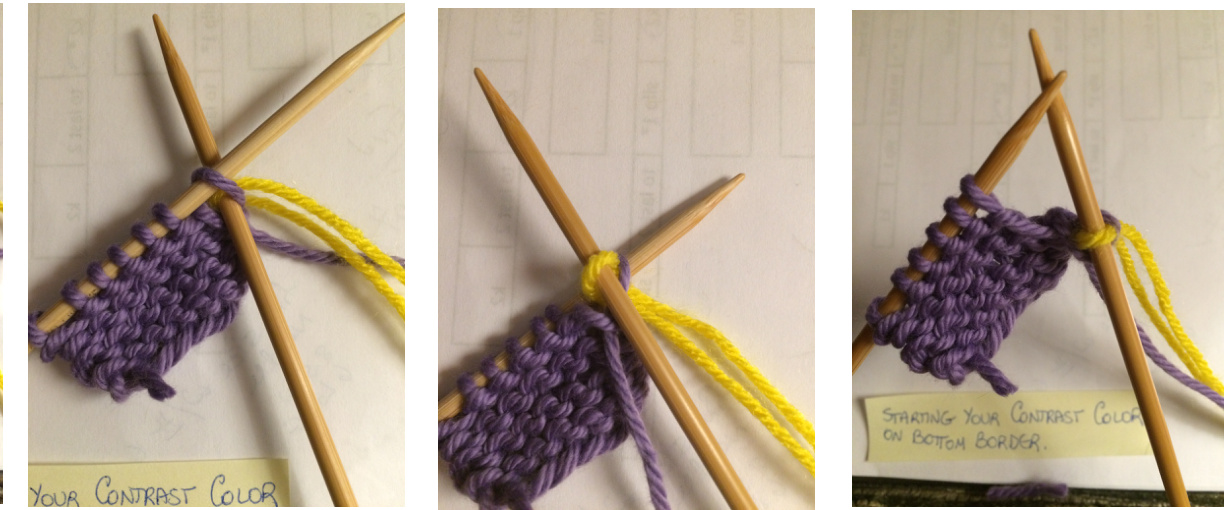
To make the next stitch, you may need to hold onto both the old (purple) and the new (yellow) tail for a stitch or two, but that won't last long. Leave yourself a long enough tail that you can sew it in later.
Changing Colors While Knitting
Okay, you've finished your first 2 pattern rows with the main color. Now you're ready to pick up that contrast color and knit 2 rows with it. Here's how you do it. If you are holding your knitting up, your needle should be pointing to the right and the 2 colors are hanging off the right side.
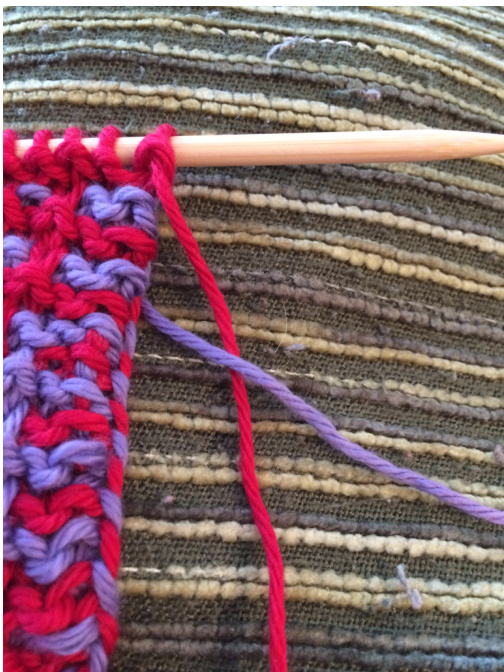
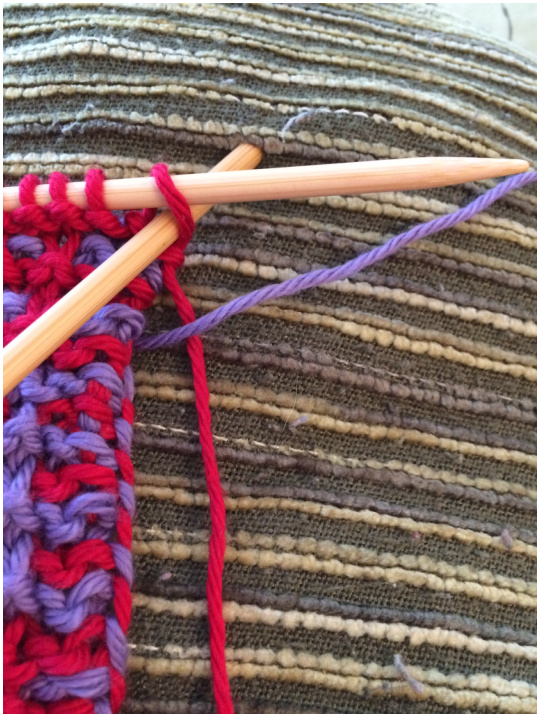
In this picture, you have just finished knitting with the red yarn and now you need to begin knitting with the purple one. See how the red yarn is coming from the last stitch you did and the purple yarn is down farther? Cross the new yarn (in this case purple) over the old yarn (red) like it shows in the pictures.
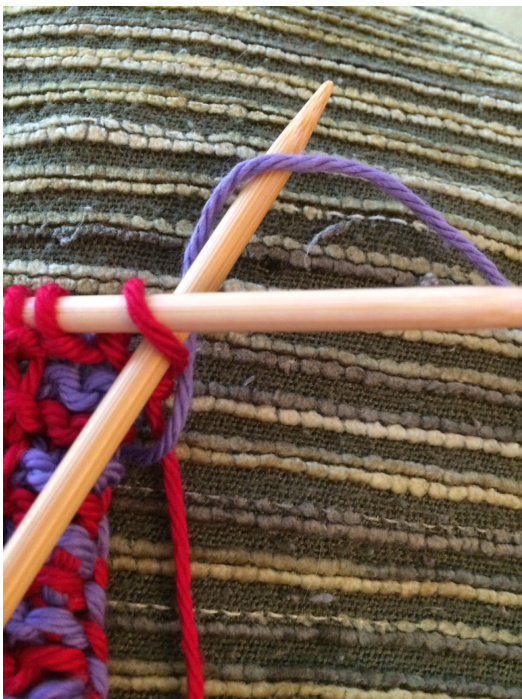
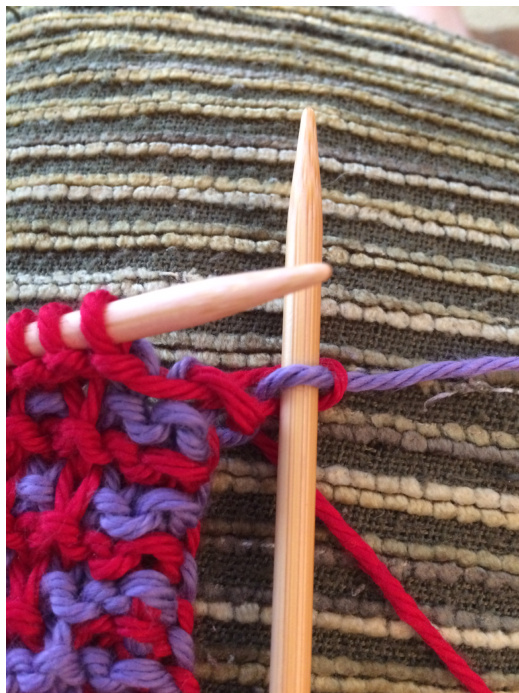
Now, take that new yarn (purple) and knit the first stitch like it shows in the picture below. The second picture shows the stitch completed. Repeat this every time you change color. It's just that easy.
Ok, you ready to get going? You have your yarn picked out, your needle ready to go. Let's pretend I know how to write out a pattern and get going. This pattern is adapted (i.e. copied shamelessly) from Barbara Walker's book of Mosaic Knitting, Mosaic # 7. She uses charts but I'm easily confused, so I wrote it all out.
'arn
Any 2 colors of worsted weight (medium, #4) 100% cotton yarr (for this one, I used Hobby Lobby I Love This Cotton, main color orange was #102 (Glowing) and contrast color pink was #312 (Hot Orchid) Needle #7 (when I used #7, I got a cloth roughly 8.25" square) but feel free to experiment Note: Odd number rows are the right side, even number rows are the wrong side In other words, if you are knitting an odd number row, you should be looking at the right side
Making the Dishcloth
Casting on main color Using your main color yarn, cast on 43 stitches (Il used long tail cast-on in my sample)
Doing the Bottom Border
Row 1 mc all knit (remember mc = main color cc = contrast color) Row 2 mc all knit Row 3 mc all knit Row 4 mc purl 2 knit until 2 stitches are left purl the last 2 stitches Now let the Main Color yarn hang. Pick up the new color and start knitting with it. Look back at those pictures from earlier if you forget how to do it. Row 5 CC all knit Row 6 CC all knit
Pattern Rows
REMEMBER - on the right side (odd numbered rows) slip with yarn in back (like you were going to knit) on wrong side (even numbered rows) slip with yarn in front (like you were going to purl)
| Row1 | with mc | k1 | put a stitch marker after this stitch | ||
| slipwyib | |||||
| k4 | sl-1 k3 | put stitch marker after each repeat | |||
| repeat *.* to last 2 | put stitch marker k2 | ||||
| Row2 | with mc | knit the mc stitches and wyif, slip the cc stitches | |||
Change colors
| Row3 | withcc k1 | 大 k3 | sl-1 k1 | sl-1 k1 | sl-1 大 |
| slip wyib | |||||
| repeat t *.* until last 2 | k2 | ||||
| Row 4 | withcc knit the cc stitches and wyif slip | themcstitches |
Change colors
| Row5 | withmc | k1 | * sl-1 k1 | sl-1 k1 | sl-1 k3 * | |
| slipwyib | ||||||
| repeat*.*tolast2 | sl-1 k1 | |||||
| Row6 | withmc | knit the mc stitches and wyif, slip the cc stitches | ||||
Change colors
| Row 7 | with cc | k1 | 大 k3 sl-1 k4 | 大 | |
| slipwyib | |||||
| repeattolast2 | k2 | ||||
| Row 8 | withcc | knit the cc stitches and wyif slip | the mc stitches |
| Row9 | withmc | k1 | 大 sl-1 k7 | ||
| slip wyib | |||||
| repeat *.* to last 2 | sl-1 k1 | ||||
| Row10 | with mc | knit the mc stitches and wyif, slip the cc stitches | |||
Change colors
| Row11 | with cc k1 | ¥ k1 | sl -1 k1 | sl-1 k3 | sl-1 大 |
| slipwyib | |||||
| repeattolast2 | k2 | ||||
| Row12 | withcc | knit the cc stitches and wyif slip | themcstitches |
Change colors
| Row13 | withmc | k1 | ¥ sl-1 k3 | sl-1 k1 | sl-1 k1* | |
| slip wyib | ||||||
| repeat *.*to last 2 | sl-1 k1 | |||||
| Row14 | withmc | knit the mc stitches and wyif, slip the cc stitches | ||||
Change colors
| Row15 | withcc | k1 | 大 k7 | sl-1 | ||
| slipwyib | ||||||
| repeattolast2 | k2 | |||||
| Row16 | withcc | knit the cc stitches and wyif slip the mc stitches | ||||
Now you've completed one whole set of the pattern (which is 16 rows long). Repeat rows 1-16 a second time. Repeat rows 1-16 a third time. Repeat rows 1-10. Do 2 rows (with contrast color) of all knit. You are done with the contrast color yarn (but I usually wait until I've done a few more rows before cutting it). Leave a long enough tail to sew it in later. Now you are done with the pattern and ready to do the top border. Youll do it all with the main color yarn.
Doing the Top Border
Row 1 mc all knit Row 2 mc purl 2 knit until the last 2 stitches purl 2 Row3 mc all knit Row 4 mc all knit Row 5 mc all knit Row 6 mc all knit Bind off. Sew in ends. If you want another cool thing to practice, look up how to do an applied iCord on the sides! I did that on the orange and brown cloth I showed you earlier where I talked about choosing colors. Yahoo! Yippee! Yeehaw! You did it! Finally, here are some notes about adapting your own pattern (which can get a little tricky). You may not want to read this part until you're done with one project, I don't want to scare you. Of course now, some of you, being contrary, will have to readon...
Final Notes about Adapting Your Own Pattern
Barbara Walker's book of Mosaic Knitting is amazing! I highly recommend it. But when you are adapting patterns for your own use, there are a couple of things to keep in mind. Read her instructions at the beginning of the chapter. For instance, the picture of the cloth at the beginning of this document (purple and red, kind of big zig zags) is a shadow mosaic - which means that after the first set of rows, you REVERSE the main color and contrast color to create the shadow effect. Again, not hard, just something to remember. Choosing pattern length (the number of rows). You can't always just add a few rows to the end of your pattern and have it turn out right. The pattern as written is centered all around. So if you just repeat the first 6 rows to add a little length to a dishcloth, your final pattern won't be centered anymore. You might be better off just making larger borders. It can be done, but involves a bit of thinking (and in my case, copying, enlarging, cutting, starting over, etc). The picture of the brown and turquoise cloth at the beginning (her book calls it a pseudoscorpion) involved this process. Math is not only not my strong suit, it isn't even in my wheelhouse (how's that for mixing sayings up?). I'm sure there are easier ways and it isn't that hard, just think about it before you start. That being said, when you are choosing a pattern and thinking about length, patterns that have around 60 pattern rows (then you add on around 6 border rows on the bottom and 6 on the top) seem to give me about the right length (I'm looking for around 8ish inches). Many of them are close to 30 rows, s0 are easy to double. Some of them the pattern repeats lengthwise are short and easy to spot and you can just add whatever rows make up a single repeat. Choosing a multiple. For dishcloth size (and a #7 needle) I found that pattern multiples of 8, 10, 14, and 20 (they are usually that number +3) which have multiples (or should it be factors? math!l) of around 40 work well. 8x5=40 (+3). 10x4=40 (+3). 14x3=42 (+3). 20x2=40 (+3). You get the drift. If you use these, it makes it easier. Now, you can divide and add, just remember that centered thing from above, the same holds true for the width as for the length. You want to try to keep your pattern centered. How many slipped stitches are in the pattern? I personally prefer patterns that only have slipped stitches which are 1 or 2 slips wide, although 3 isn't horrible. The less you have, the prettier I think the back looks. The floats (that means the piece of yarn from where you've slipped instead of knitting a stitch) will be longer the more stitches you slip.
Shorter multiples are easier.
Anyway, that's about it. Have fun playing with colors and making magic happen!


