Nalbinding Hats and Mittens
There are three main units of nalbinding, the spiral, the tube and flat. By combining these, mittens and socks were constructed in the SCA period. There is a moderately high probability that hats were also made using this technique but at this stage no extant nalbinded hats have been found. In some of the more remote areas of Scandinavia nalbinding has stayed a common hand craft until the 2o" Century, in other parts of Europe, nalbinding lot favour to faster two needle knitting techniques as early as the 14" Century. The continuation of the craft means that there are people who are part of a continuous teaching tradition stretching back well over a thousand years. The advantages of this are that the construction methods and stitch techniques have been kept alive, the disadvantages are that it is more difficult to separate the more recent developments from the historical methods. These notes assume that you can make a spiral and a tube.
Practice pieces
Please consider making some smallish pieces and then washing them and possibly trying to full them. This will give you an idea of the changes you may need to make so that the garments fit when washed or fulled. To prevent shrinking, remember to wash items gently in cold water with wool wash.
Fulling
Fulling is the term used to describe the felting of a cloth (rather than the felting of unspun fibre). It will only work with animal fibres that have not been treated to become “super wash" yarn. Please remember that garments made of super wash yarn may get bigger when washed. Fulled garments become stiffer, more wind resistant and shrink To full you items, three things are needed: ?Warm water Agitation Alkali (generally in the form of soap) To full by hand Dunk your item in warm very soapy water Rub item against a knobbly surface (I find a sink draining board a useful surface) repeat the process until it is the texture that you are after To full in a washing machine ?Place items in machine with either soap or standard washing powder (not wool wash) Set to a warm to hot wash with a medium to high level of agitation and spinning Please note that hotter more agitated washes will lead to greater levels of fulling
Hats
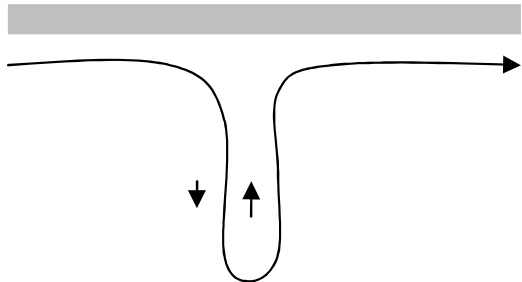
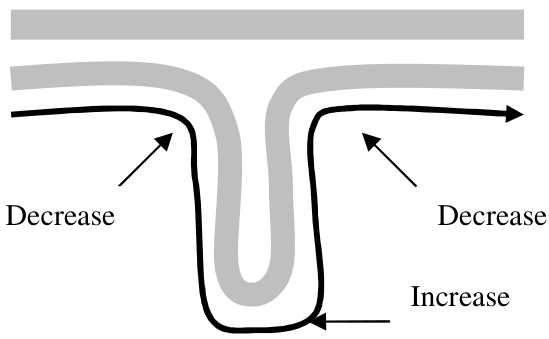
As best I can tell, no extant nalbinded hats have been found for the medieval period (there is one known as the Tarim Cap from about 1000BC). There are devices made of horse hair, often referred to as milk strainers that have the same general conical shape. There are also plenty of pictures of people wearing pointed warm looking hats. Therefore I think it is reasonable to suppose that nalbinding may have been used to produce hats. The method described below can be summarised as a top down spiral Start with the rosette start by making a loop with a diameter of about 5cm and then using that as a foundation to knit about 20 half hitches. Pull the initial loop tight. For the next round, increase every stitch. Round 1 - make a rosette about 20 stitches, do not trim the end of your yarn - this will be used to make the start of round marker - see the diagram Round 1B - Optional for pointy toped hat - one or more rounds that do not increase or only increase slightly Round 2 - Increase every stitch, in other words after making one stitch, use the same stitch from the previous row (stitch 1) to make the next stitch. After this, move on to the next stitch of the previous row (stitch 2) and do the same thing. Round 3 - Increase every third stitch (that is there will be three normal stitches then the forth will be made into the same stitch of the previous round as the third). At the end of this round, run the beginning of your yarn through to keep the top o the hat together. If you are making a single colour hat and then use the leftover yarn to mark the beginning of the round, 1 usually do this by sewing a line of large slightly loose stitches from the top of the hat to near the edge. Round 4 - If you wish to create a spiral sriped hat, this is a good place to start with your second colour. On this row, increase every 5' stitch For subsequent rows, increase every 7, 9", 11 etc until the hat's diameter is one third of the final circumference or larger if you are going to full (felt) it. After this, knit until the hat is level with about the top of your ears. At this point follow the ear flap instructions if you wish otherwise keep going until it is the length you want. Stop knitting each stitch into one on the previous row so that you end up with a worm about 10cm long then turn and knit back down until you are back at the previous row, then add a couple of stitches to prevent a gap forming and then go back to knitting around the hat
For each subsequent row, decrease 4 stitches (in other words only put a stitch into every second stitch of the previous row) in the top corners and increase around the bottom curve (increase at about 1 stitch in 2 for a fairly circularbottom edge)
Follow the same general pattern until it is the right size
Mittens
Extant mittens have been found. The most famous is the Asle mitten. The Asle mitten uses one of the more complicated stitches to produce extremely thick fabric. Other mittens have been found throughout Scandinavia. From the number of finds it appears that nalbinded mittens were the most common nalbinded garment.
Fitted Mittens
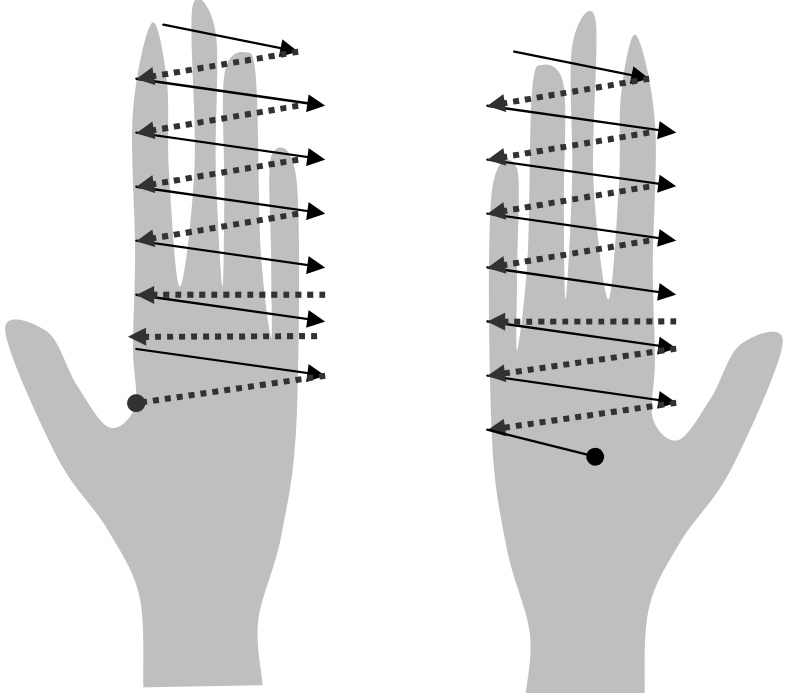
My preferred method for making mittens is from the finger tips upas this allows for custom fitting all the way along. I also make then at the same time, each time I get to the end of a piece of yarn, I work the same section on the other mitten, this helps to create a pair of matching mittens without having to record every stitch. Therefore the instructions below are going to assume that you work in the same way, generally left mitten first. It does assume that you are right handed, if you are left handed, I think the instructions will work if you turn the mittens inside out when trying the mittens on. m of nalbinding equal in length to the width of your three middle fingers, turn and work bacl

2.Increase by about 6 to 8 stitches as you work around the starting end, do not thread the dangling line though as this is marker for the index finger side of your mitten

3. Keep going, increasing by about 3 stitches on the index finger side and about 6 stitches on the little finger side until the finger section of the mitten fits your fingers and reaches to the bottom of the webbing between your thumb and forfinger on your left hand , and ending in the middle of the palm of your right hand - the diagrams below show the hands palm up and the dashed lines are at the back of the hand
4.Make sure that both mittens fit your fingers, the next bit requires more thought and so fixing fit issues now is less irritating then having to redo the start of the thumb 5. Make a worm that runs from the point where you finished (on left mitten the back of thumb webbing and on the right, the middle of the palm) around the thumb and to the equivalent point where you left from on the other hand (middle of palm on the left mitten and the back of the thumb webbing on the right), add several extra stitches so that there is free movement space for the thumb and then join back on to the mitten
6. Make two entire rounds without any increases or decreases, this reduces the chances of too much pace being allowed for the thumb 7.Start on the thumbs at the beginning of the wrist side of the thumb, (back of hand side of thumb strap for left had and palm side of thumb strap for right hand), leaving a 20cm tail (this is to fix any holes that appear when the thumb is flexed), being particularly careful to add extra stitches to the join between the thumb and the palm. Work up the thumb decreasing as required for reasonable fit (generally more decreases on the inside of the thumb than the outside). Sew together the tops of the thumbs 9. Knit a couple of rounds and then start increasing slightly so that the mittens fit over the forearm (allowing for a watchif necessary) 10. Finish when the mittens reach the desired length.
Basic Mittens

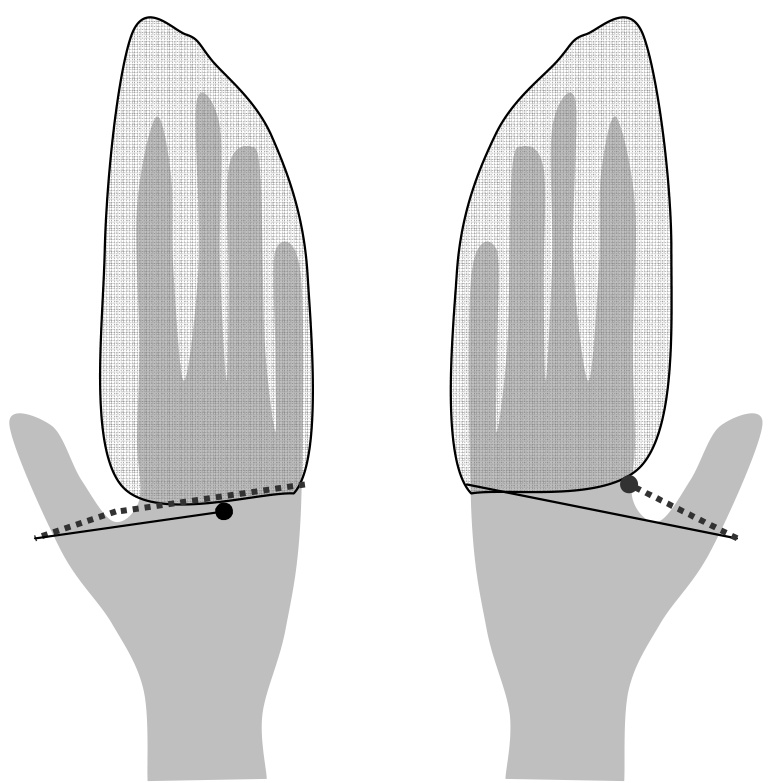
1. Follow steps 1 and 2 of the fitted mittens. 2. Increase by about 4 stitches on each side so that it fits from the joint at the base of your little finger to the joint at the base of your thumb when your thumb is held out sideways at about 60°(the width of the folded mitten should have a width about distance A + 2.5cm) and work down to the bottom of the webbing between thumb and forefinger 3. On the left mitten, once the edge of the hand is reached, work a worm of stitches free of the mitten that will fit around the back of the thumb joint and join onto the palm at a point level with the 1" and 2"d fingers (C), (the width of the folded mitten for this loop will be approximately width B + 3cm). 4. Continue the body and wrist of the mitten down about 4 rows 5. Work the thumb without any shaping until about level with the top thumb joint, then decrease one stitch in 3 until the thumb is the correct length, then sew up the top of the thumb 6. Continue with the wrist of the mitten until it reaches the length you want.
Conditions of use
OJennifer Blaikie Unless otherwise stated, the diagrams are ones I sketched. If you would like to make suggestions for improvement please contact me at jennifer_ blaikie @hotmail.com. If you do find the notes useful, please consider making a contribution to any organisation that undertakes research into Alzheimer's disease (some suggestions include Alzheimer's Research Trust in the UK, the Garvan Institute in Australia and the Alzheimer's Association in the USA. Feel free to use these notes in any not for profit context


