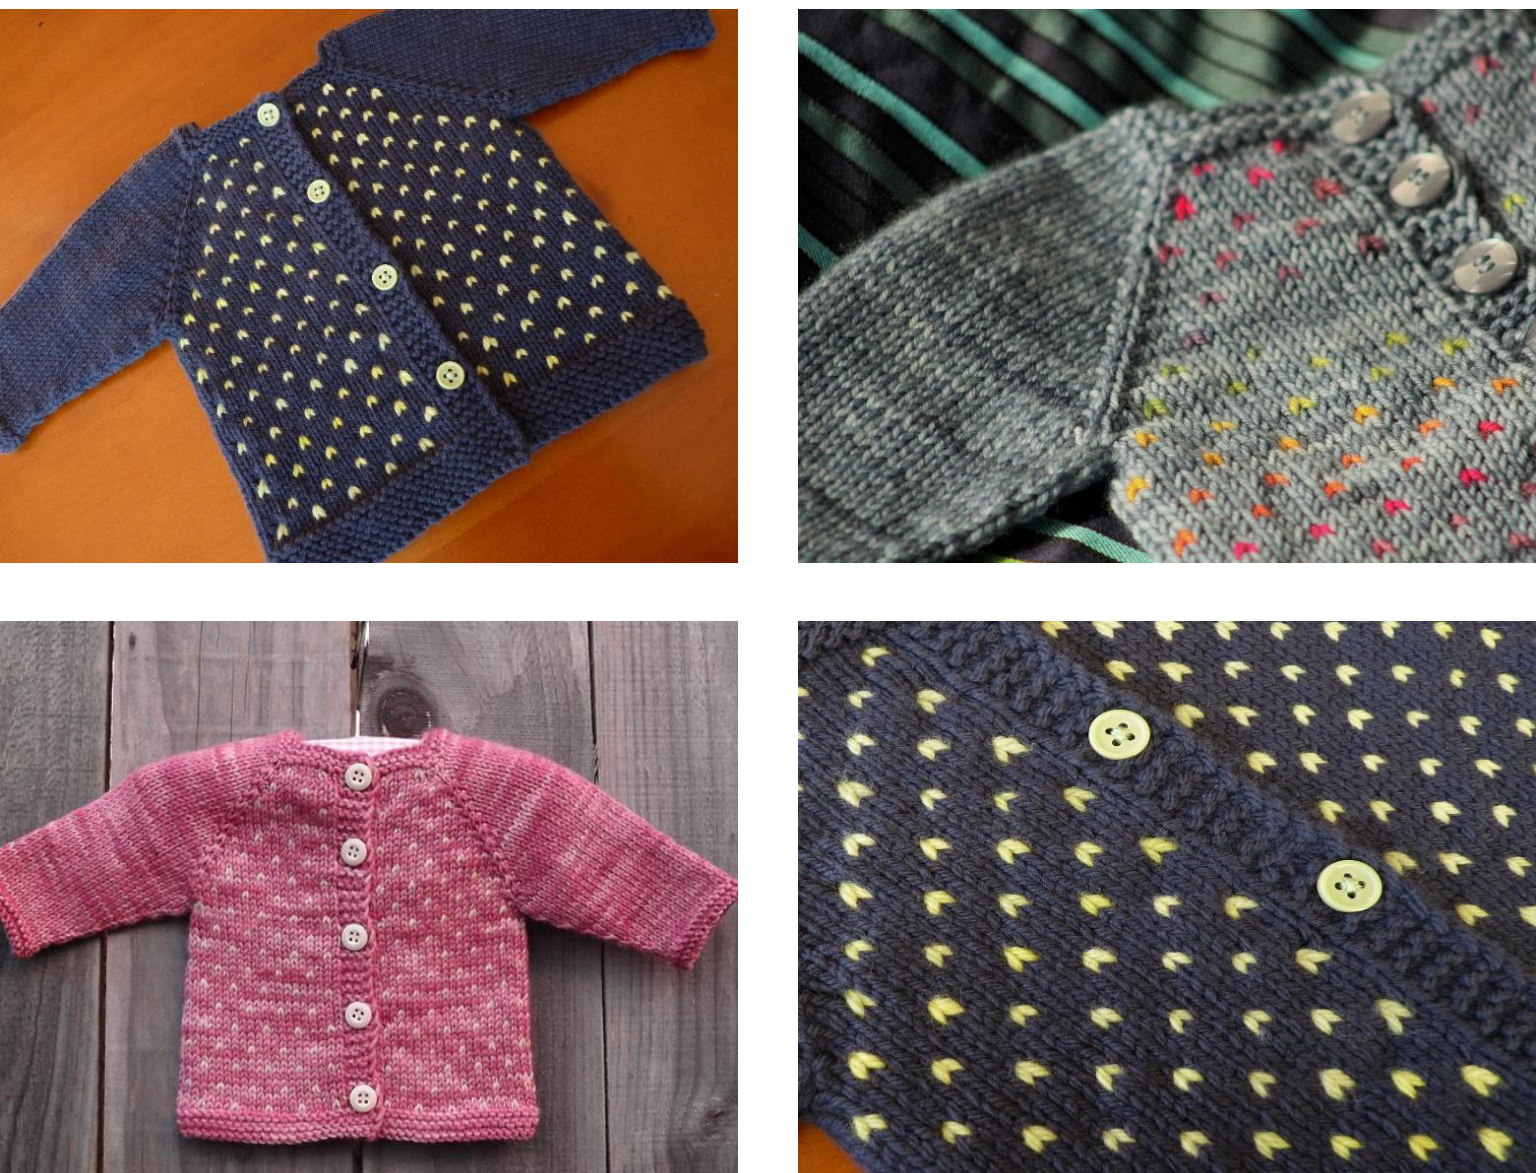
Hundreds
a free knitting pattern, designed by Kelly Brooker sourced fromRavelry.com
@2014 Kelly Brooker all rights reserved
Hundreds
a free knitting pattern, designed by Kelly Brooker sourcedfromwww.ravelry.com 100s & 1000s are highlights of a childhood growing up in New Zealand. The wee colourful balls are sprinkled all over sweet treats, and invoke excitement in kids, countrywide. As an adult, I am lucky enough to have a South African partner; one with a fluent slang tongue. Hundreds is also a SA slang word heard frequently in our house, meaning 'good' or fine? This free pattern is written for 8ply/DK weight yarn, and to fit a newborn babe 3-4kg (7-9lb) in weight, with an approximate chest circumference of 37.5cm.
Construction
This pattern has you cast on at the neckline, and work flat utilising raglan increases and perform basic colourwork, until you reach the required chest size. From here the arm stitches are put on to waste yarn (or a stitch holder), and the body finished, working the garter stitch button band as you go. Once the body is completed, the sleeve stitches are returned to the needles and worked ir the round to the required length.
Skills required
knitting small circumferences in the round long tail cast on simple stranded colourwork working top down raglan construction If you are not familiar with these techniques you may need to reference a knitting guide book, or view videos on the internet. Abbreviations k....knit k2tog...knit 2 stitches together (a decrease) kfo....knit into the front and back of a stitch (an increase) ...purl sl1p...lip stitch as if to purl yo....yarn over (an increase; in this case used to create abuttonhole) Gauge (in stocking stitch) 22sts/10cm on 4.0mm needles Materials 5-6x 12mm buttons (dependent upon row gauge) 8ply/dk weightyarn (210-250m/100g) This pattern is suitable for yarn with good elasticity and memory - a wool or wool blend. Suggested yarn: Augustbird White Gum Wool 8ply (236m/100g) 1 skein main colour, plus up to 20m contrast colour - split your contrast yarn into 2x 10m balls
Equipment
80cm 4.0mm circular needles (or needle size required to achieve gauge) 6 stitch markers 2 stitch holders, or small lengths of waste yarn darning needle for sewing in ends Note: ifyou are not working your sleeves via 'Magic Loop' you will not need an 80cm circular needle, however you will need whatever other needles you use to work small circumferences in the round (ieDoublePointedNeedles) @2014 Kelly Brooker all rights reserved
The Pattern
Part A: Neck edging
Using main colour, and long tail cast on, cast on 52stitches Rows 1 and 2: sl1p, knit all stitches to end of row Row 3: s1p, k3, place marker, k5, kfb (Left front), place marker, kfb, k6, kfb (sleeve), place marker, kfb, k14, kfb (back), place marker, kfb, k6, kfb (sleeve), place marker, kfb, k5, place marker, k4 (Right front) Row 4 (buttonhole row): s1p, k1, yo, k2tog, knit to end of row, slipping markers asyou pass them
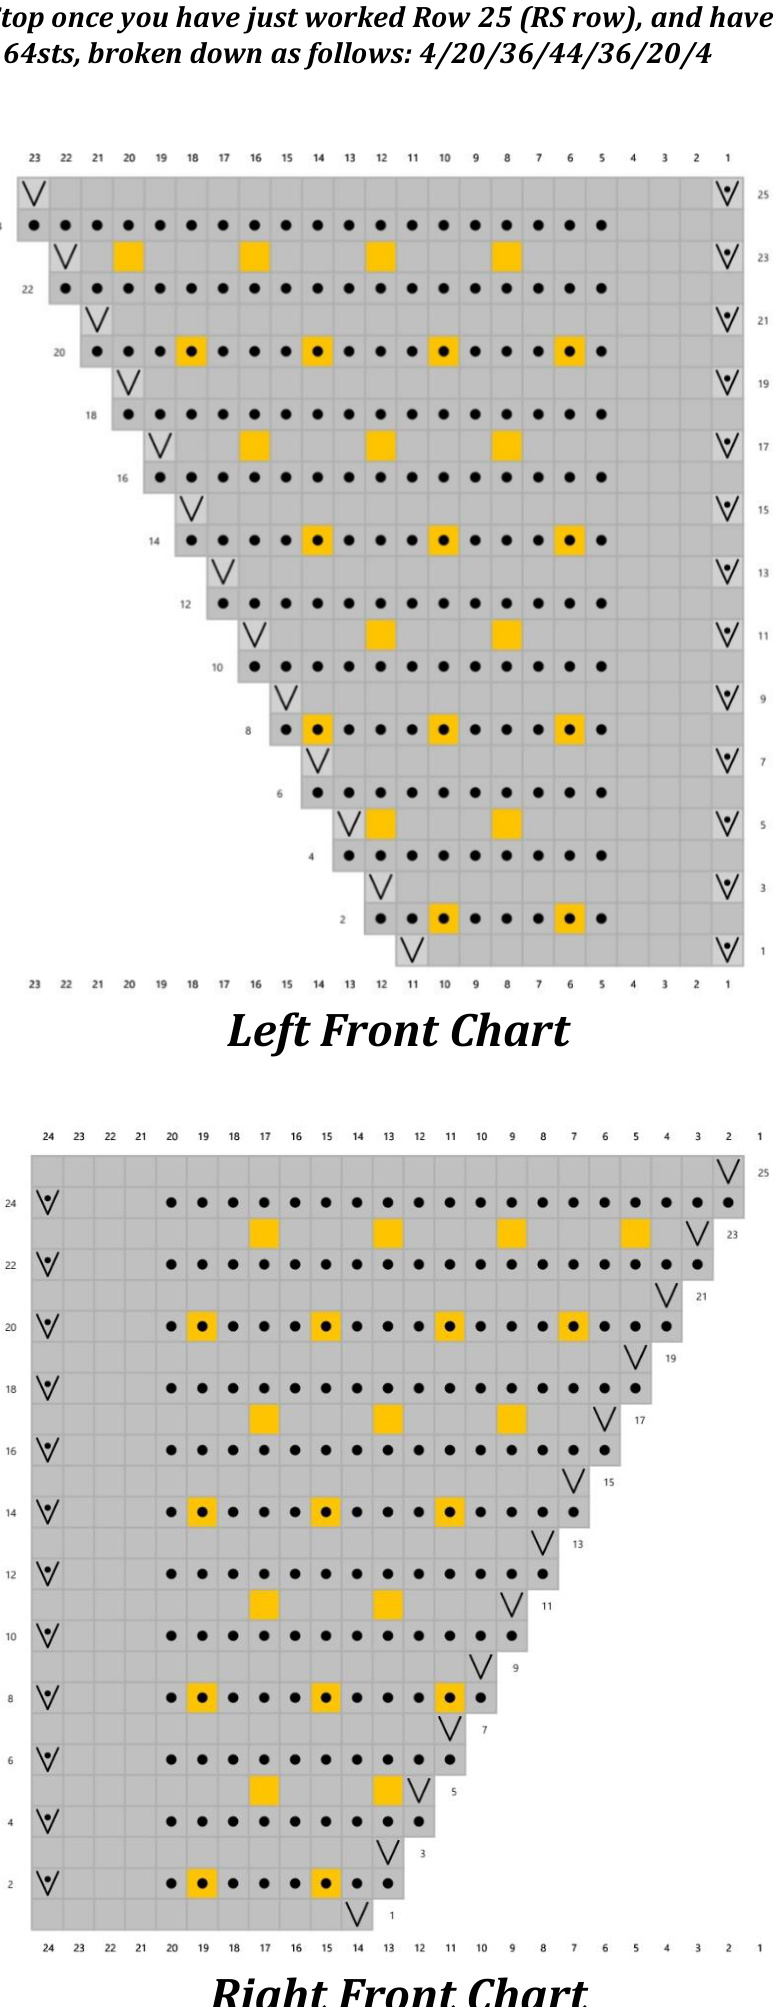
Part B: Chest
Row 1 (Right Side): Work Left Front Chart Row 1, slip marker, (kfb, knit to 1 stitch left before next marker, kfb, slip marker)x3, work Right FrontChartRow1 Row 2 (Wrong Side): Work Right Front Chart Row 2, slip marker, purl to Left front, slipping markers as you pass them, work Left Front Chart Row2 Row 3 (RS): Work Left Front Chart Row 3, slip marker, (kfb, knit to 1 stitch left before next marker, kfb, slip marker)x3, work Right Front ChartRow3 Row 4 (WS): Work Right Front Chart Row 4, slip marker, purl to Left front, slipping markers as you pass them, work Left Front Chart Row 4 NOTE: Buttonholes are worked on Neck Edging Row 4, then evenly spaced every 4-5cm throughout the chest and body on a WS row. Substitute the "s1p, k3"at the start of each of these rows with "s1p, k1, yo, k2tog" then work remainder of row as normal (Neck Edging Row 4 has been written in this manner to serve as an example).
Chart Abbreviations
Use Main colour. Knit on right side and wrong sides, unless specified otherwise (ie with a kfb or sl1p symbol) Use Contrast colour. Work as a knit stitch, unless specified otherwise (ie with a purl symbol) kfb - knit into the front and back of a stitch purl sl1p - slip 1 stitch purlwise Continue alternating Right Side and Wrong Side rows, progressively moving up the Front Charts, and workingbuttonholesasdirected above.
@2014 Kelly Brooker all rights reserved
Hundreds, page 2 Part C: Sleeve separation s1p, k3, remove marker, work Right Sleeve Separation Chart from right to left (front), remove marker,placestitchesbetweenthismarkerand next marker onto waste yarn (sleeve), slip marker, purl to next marker (back), slip marker, place stitchesbetween thismarker and nextmarker onto waste yarn (sleeve), remove marker, work Left Sleeve Separation Chart from right to left (front), purl to next marker, remove marker, knit to end of row (front).

Left Sleeve Separation Chart
After working sleeve separation row, you will have 92sts on the needles as follows: 24 stitches, stitch marker, 44 stitches, stitch marker, 24 stitches. You will have 36sts on each piece of wasteyarn.
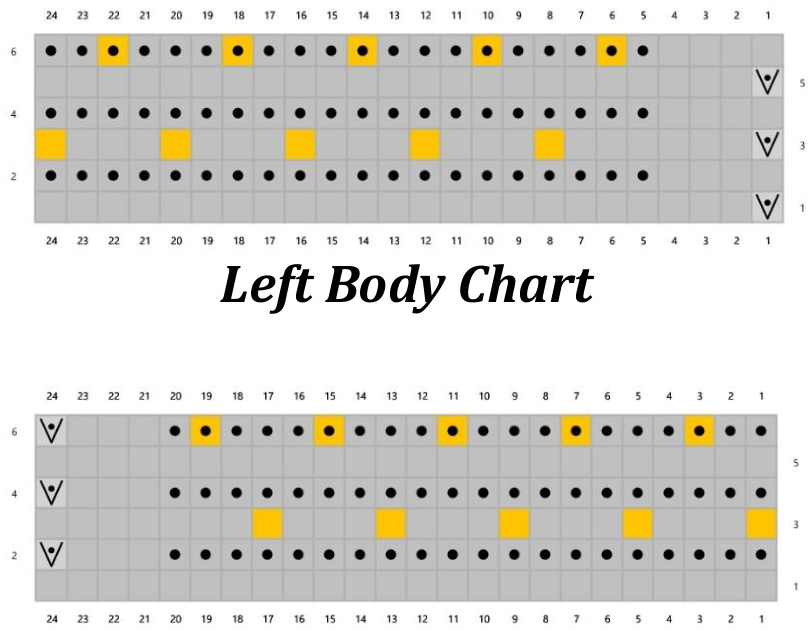
Part D: Body
Row 1 (Right Side): Work Left Body Chart Row 1, slip marker, knit to next marker, slip marker, work Right Body Chart Row 1 Row 2 (Wrong Side): Work Right Body Chart Row 2, slip marker, purl to marker, slip marker work LeftBody Chart Row 2 Row 3 (RS): Work Left Body Chart Row 3, slip marker, knit to next marker, slip marker, work RightBody Chart Row 3 Row 4 (WS): Work Right Body Chart Row 4, slip marker, purl to marker, slip marker, work Left Body Chart Row 4 NOTE: Do not forget buttonholes evenly spaced every 4-5cm throughout the chest and body on a WSrow. Substitute the "s1p, k3"at the start of each of these rows with "s1p, k1, yo, k2tog" then work remainder ofrow as normal. Part D: Body continued Continue alternating Right Side and Wrong Side rows, progressively moving up the Body Charts, and working buttonholes as previously directed, until your work measures approximately 12-13cm from theunderarm. Ensure you finish having worked a plain main colourrow.
Right Body Chart
Chart Abbreviations
Use Main colour. Knit on right side and wrong sides, unless specified otherwise (ie with a kfb or sl1p symbol) Use Contrast colour. Work as a knit stitch, unless specified otherwise (ie with a purl symbol) kfb - knit into the front and back of a stitch purl sl1p - slip 1 stitch purlwise Part E: Edging Edging Row: s1p, k to end of row. Repeat Edging Row until you have a 1.5-2cm edging.
Part E: Sleeves
Return stitches from one piece of waste yarn to your needle, and pick up 4sts under each arm, placing a marker in the centre of these 4sts just picked up (40sts). You will be working sleeve in the round. The marker sits under the arm and marks the start/finish of round. @2014 Kelly Brooker all rights reserved Knit in stocking stitch (knit all stitches, every round) until sleeve measures approximately 1.25cm fromunderarm Decrease round: ssk, knit until 2 stitches from end of round, k2tog Alternate working 1cm stocking stitch with a decrease round until you have a stitch count of 28sts Knit in stocking stitch until sleeve measures approximately10cmfrom underarm Work 4 rounds of garter stitch (knit one round, purl one round). Castoff Repeat for second sleeve Finishing Sew in all ends Wash in a gentle wool wash, then lay flat and in shape, to dry Securely sew on buttons to garter stitch button band, corresponding with the buttonholes
Augustbird - www.augustbird.com.au
Augustbird was created for creative types and for the lovers of handmade. Augustbird began with Rebecca Robinson, who's artistic flare and overwhelming desire to knit-one purlone lead her into the magical world of yarn dyeing. Rebecca's hand-dyed yarn received a wonderful response from the get-go and is now sought after by many a knitter, both in Australia and overseas. Rebecca is an expert dyer of White Gum 8ply Ethical Superfine Merino.
White Gum Wool - www.whitegumwool.com.au
The story behind White Gum Wool is one of mamas and babies, of diversity and abundance, and of ethics—for the land, the animals and the people involved in making this yarn. And the story includes you, because you, oryour grandmother or friend will create something beautiful and lasting from this magical fibre. White Gum Wool sheep are raised on a single farm, in the high midlands of Tasmania. They graze in mostly native pastures where they can find the plants they need to keep healthy. Mamas teach their babies how to forage in this landscape, hanging out in family groups of grandmas, mamas and lambkins. Sheep are highly social animals, and keeping families together means the sheep are just plain happier. The abundant, diverse landscapes are healthy, too—they are real ecosystems doing what ecosystems do best—turning sunlight and water into energy through a squillion different animal and plant pathways. No fertilisers, pesticides or fungicides are used in growing White Gum Wool. White Gum Wool is made into yarn by Design Spun Ltd in New Zealand having first been scoured by Canterbury Wool Scourers. NewMerino @ Chain of Custody (http://newmerino.com.au/wp/) certifies the sustainability and traceability of the yarn. So, when you buy White Gum Wool, you are making a choice that honours the landscape, animals and peoplewhomake it possible. White Gum Wool sheep have never been mulesed, and now they also wag their (undocked) tails behindthem!
Hundreds, by Kelly Brooker, of PEKAPEKA design studio 2014KellyBrooker all rightsreserved
I give my blessing for you to knit and sell as many items using this pattern as you wish! Need pattern support? Visit http:/www.ravelry.com/groups/pekapeka-design-studio


