Bootiful Button Mittens
www.beakerbutton.co.uk @Copyright Jen Best 2014
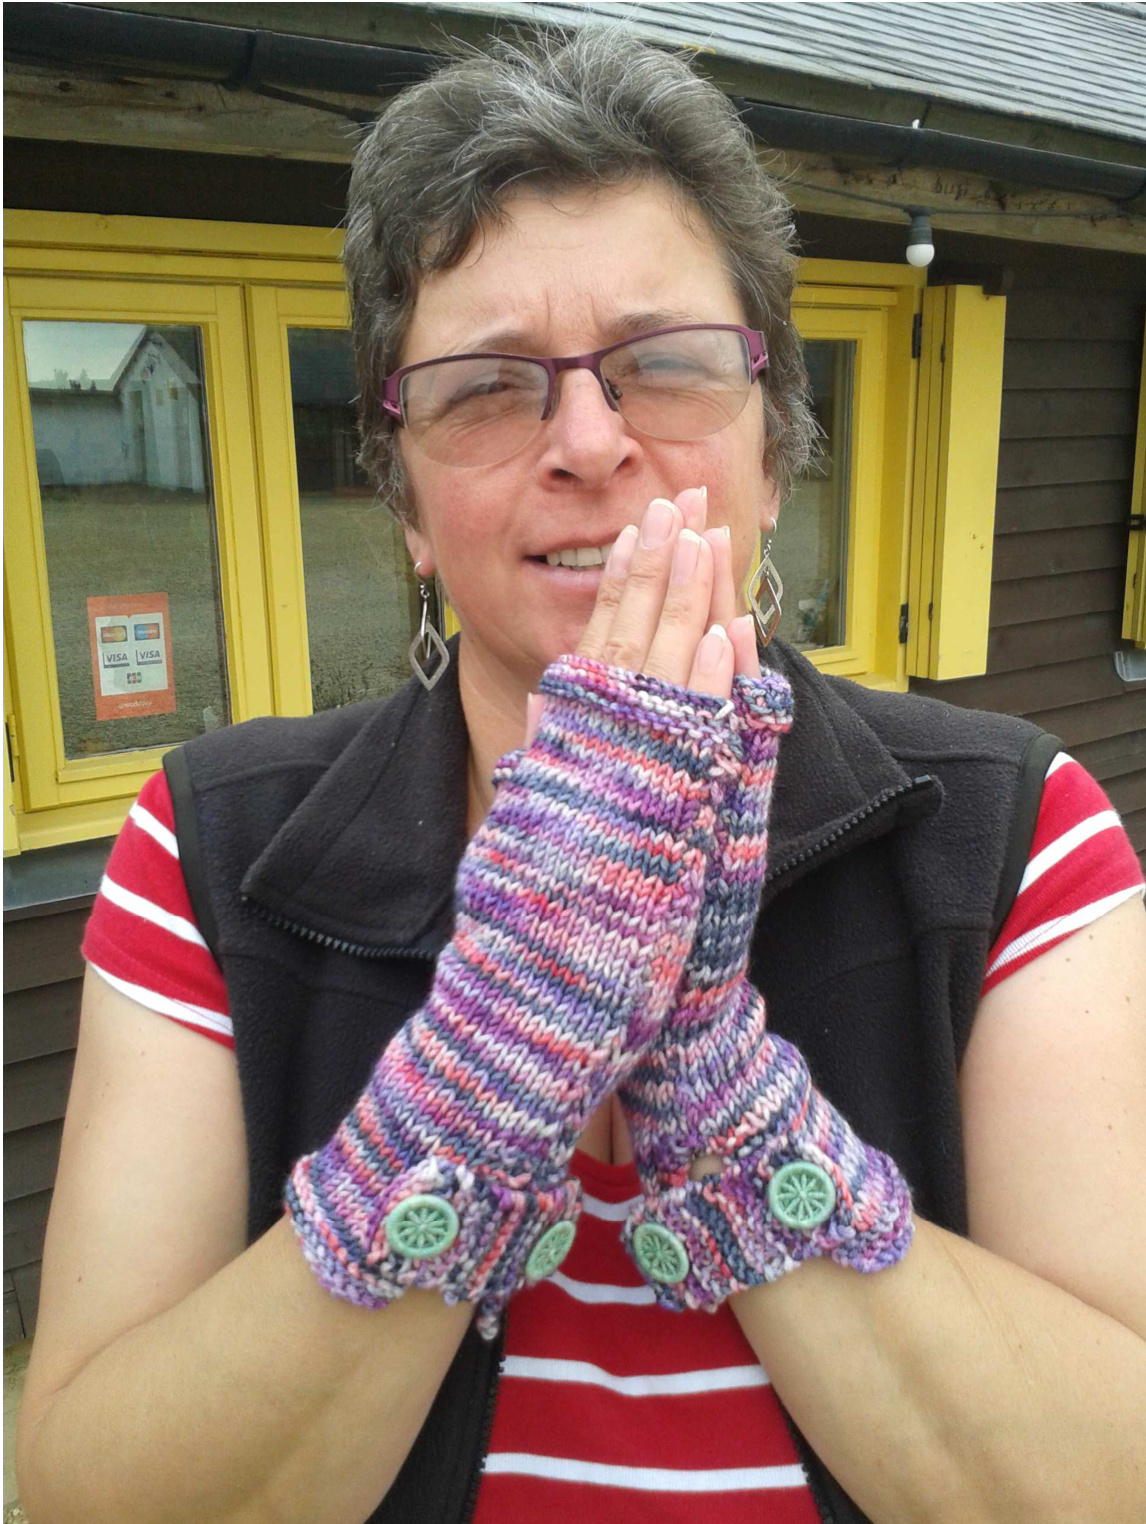
Tension: 5cm x 5cm square = 9 sts x 13 rows in stocking stitch, Size 4m needles or appropriate size to achieve the correct tension, yarn needle for sewing up. 100g Unbelieva-wool DK. 1 size fits most. 4 Dorset buttons 2cm. I used a contrasting thread for my buttons. You will need 4 brass rings 2cm across and 10m of perle cotton or 4ply thread. You will also need a bluntneedle. Abbreviations K-Knit P- Purl M 1 - pick up bar between stitches from back to front and knit into the front to make one stitch pm-placemarker BL cast on - backwards loop cast on. With the working needle in your right hand and the yarn in your left, wrap the yarn round your left thumb anti-clockwise from top to bottom creating a loop. Insert the needle as if to knit and withdraw the thumb. This makes 1 stitch.
Left glove
Cast on 34 sts Knit 5 rows. Row 6: K3, purl to last 3 sts, K3 Row7:knit Repeat rows 6 and 7 six more times. Repeat row 6 again. Stocking stitch for 10 rows starting with a knit row. Thumb: K14, pm, M1, K1, M1, pm, knit to end Stocking stitch for 3 rows, slipping markers as you go so they remain marking the increase for the thumb. Next row: K14, slip marker, M1, knit to next marker, M1, slip marker, knit to end. Repeat the last four rows (stocking stitch for 3 rows and then the increase row) until there are 9 stitches between markers. Purl next row. On the next right side row knit to 2nd marker, turn and BL cast on 2st, purl to the other marker, turn and BL cast on 2 sts, 13sts in total. Work 6 rows (or desired length for thumb) using these 13 stitches in stocking stitch. Work 4 rows in knit. Cast off and leave a long tail. Use long tail to sew thumb together, weaving in ends and sewing up holes. Pick up and knit 4 stitches across thumb, pattern to end of row. Continue in stocking stitch across the whole row. Stocking stitch for 6cm ending with the wrong side facing. Knit 4 rows. Cast off in knit, leaving a long tail for sewing up the sides. Weave in ends, sewing up any holes as you do. Use the long tail to sew the side of the glove from the top to the garter stitch edge at the base of the glove.
Right glove
Follow pattern for left glove up to thumb. Thumb: K19, pm, M1, K1, M1, pm, knit to end Stocking stitch for 3 rows, slipping markers as you go so they remain marking the increase for the thumb. Next row: K19, slip marker, M1, knit to next marker, M1, slip marker, knit to end. Repeat the last four rows (stocking stitch for 3 rows and then the increase row) until there are 9 stitches between markers. Purl next row. On the next right side row knit to 2nd marker, turn and BL cast on 2 st, purl to the other marker, turn and BL cast on 2 sts, 13 sts in total. Work 6 rows (or desired length for thumb) using these 13 stitches in stocking stitch. Work 4 rows in knit. Cast off and leave a long tail. Use long tail to sew thumb together, weaving in ends and sewing up holes. Pick up and knit 4 stitches across thumb, pattern to end of row. Continue in stocking stitch across the whole row. Stocking stitch for 6cm ending with the wrong side facing. Knit 4 rows. Cast off in knit, leaving a long tail for sewing up the sides. Weave in ends, sewing up any holes as you do. Use the long tail to sew the side of the glove from the top to the garter stitch edge at the base of the glove.
Straps (make 2)
Cast on 8 stitches Knit 4 rows. Button hole rows Row 1: K3, cast off 2, K2 Row 2: K3, cast on 2, K3 Knit 10 rows Repeat the two button hole rows again. Knit 4 Cast off in knit Sew the buttons on each side of the glove so they sit at the edge of the garter stitch edging half way up. Attach the strap using the buttons. Instructions on how to make a Crosswheel button, sometimes known as a Blandford Cartwheel. ByJenBestofBeakerButton,www.beakerbutton.co.uk
Materials
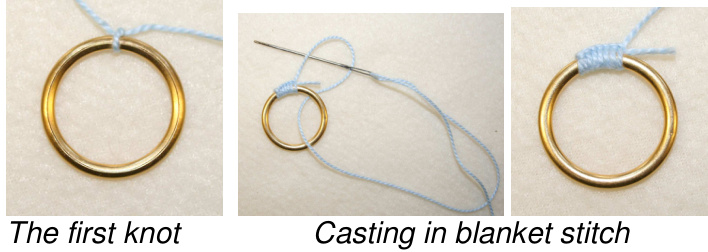
1 brass ring, thread, blunt ended needle, scissors. There are four stages to making a Dorset Button on a ring. Casting, Slicking, Laying and Rounding. Hints and tips: If you find you are running out of thread simply thread the tail of yarn neatly through the back of the button and leave a long tail. Add new yarn by threading it back the opposite way to the first thread, leaving a long tail, and continue rounding, stitching over the tails as well. The tails can be woven into the back of the button at the end. When laying the spokes make sure the spoke you are laying is perfectly in the centre of the ring at the front. Don't worry about the back. This will help to make your spokes central. The holding stitches you put in will pull the back spokes into place. As you are stitching with single ply thread it helps to twist the thread every now and then to stop it unravelling.
Casting
Have a length of yarn appropriate to your button (this information can be found at the end of each pattern). Tie the yarn round the ring in a single knot, leaving a tail of about 1-2cm. Stitch round the entire ring in blanket stitch, covering the tail as you go. Bring the needle towards you through the ring and pass it away from you through the loop created. Make sure to cover the whole ring, moving the stitches along the ring so there are no gaps.
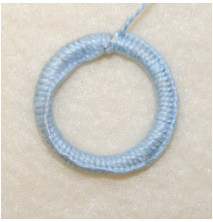
Slicking
Turn all the stitches so that they face inwards, leaving a smooth edge to the button. The thread should drop from the back of the button.
Slicking
Laying
Bring the yarn towards you over the ring then back up. This forms one spoke. Turn the ring and repeat until there are several spokes around the ring. The spacing should be even. For a crosswheel button 10 spokes looks good. Make two or three stitches in the centre of the wheel to hold the spokes in place, being careful to catch all the threads from the back into the middle. I make my second stitch across my first, so they look like a cross. If your spokes are not central and you want them to be, firmly tug the middle until it's placed centrally, using the side of the needle.

Laying
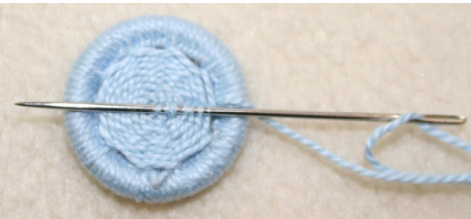
Rounding
Back stitch round the spokes. Bring the needle up from the back. Pass it back down clockwise over the spoke. Bring it back up two spokes anti-clockwise. Pass it down one spoke clockwise. Repeat this until you reach the start of you first round. Continue back stitching rounds in this way until the entire button is filled. To make the button more central push the stitches closest to the edge into the middle with your finger, but leave the stitches furthest away.

Rounding Completed button
Finishing off
Finishing
Thread the tail through the back of the button to the other side and leave for sewing together with the next button


