Frankie's Knitted Stuff
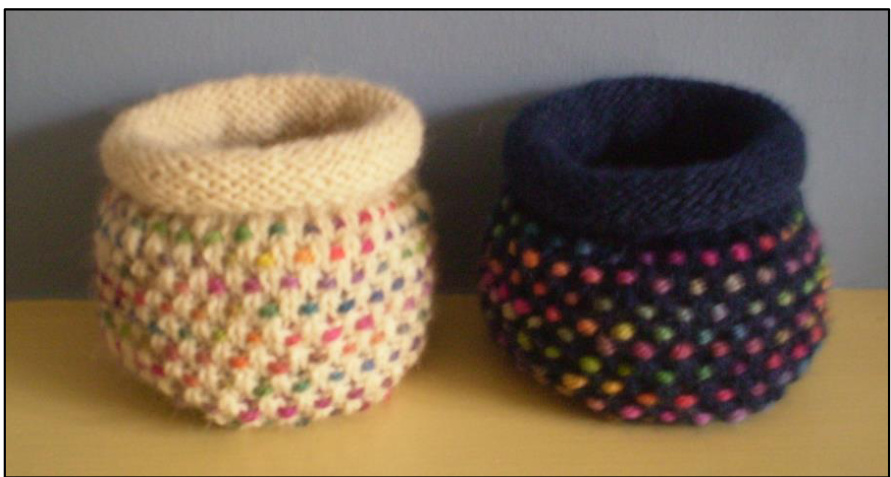
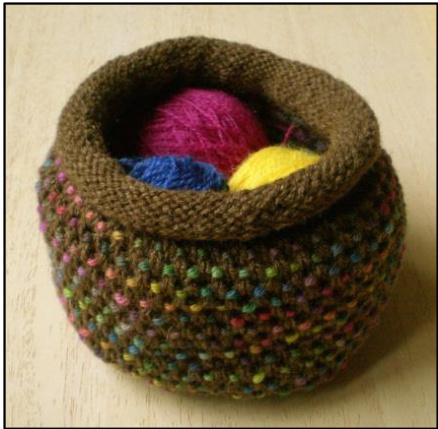
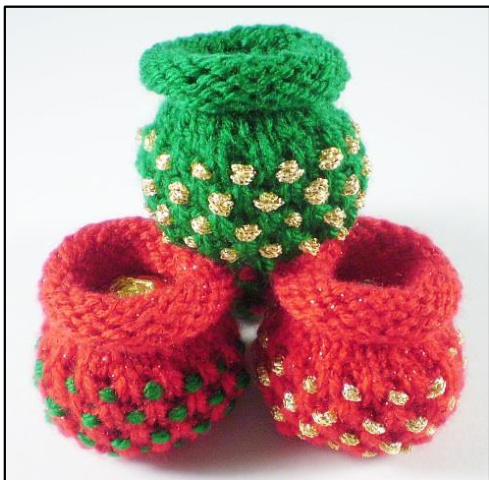
These knitted pots are about 8cm / 3" tall and 8 cm wide. The dotty pattern makes them quite sturdy so they keep their shape well. They're just the right size for holding jewellery or coins, or you can knit a bigger version ...
I invented the dotty stitch pattern to show off those variegated yarns with a short colour run that look lovely in the skein but can be difficult to use. It is a simple slip stitch pattern but, as the variegated yarn is only used for single rows, it must be worked in the round.
A Word about Yarn
I knitted my pots with double knitting weight yarn for the main colours and a slightly thicker variegated yarn for the dots. The two yarns could be the same weight though or you could experiment, perhaps using an aran weight for the main colour with chunky yarn dots. You will need larger needles for the dotty pattern as slip stitch patterns tend to gather the fabric a little. I used 3.25mm / US size 3 for the rim and base and 4mm / US size 6 for the dotty pattern. The small pots take about 15g of the main yarn and the larger one, which measures about 11 cm / 41/2" tall and 11cm wide, uses about 40g. Only very small amounts of the variegated yarn are needed.
Knitting a Small Pot
Using 3.25mm needles and double knitting weight yarn, cast on 50 Sts. Knit 20 rounds for the rim. Next round: \*m1, K5, repeat from \* to end (60 sts). Now change to 4mm needles and begin the dotty pattern. The letter at the start of each round tells you which yarn to use, A is the main colour and B is the variegated colour which will make the dots. Round 1: A Knit. Round 2: B \*K1, sl 1 pwise wyib, repeat from \* to end. Round 3: A \*P1, K1, repeat from \* to end. Round 4: A Knit. Round 5: B \*sl 1 pwise wyib, K1, repeat from \* to end. Round 6: A \*K1, P1, repeat from \* to end. When you have worked all six rounds you will have two rows of dots. Carry on working in dotty pattern until you have completed ten rows of dots. Knit one more round and you are ready to work the base of the pot
The Base
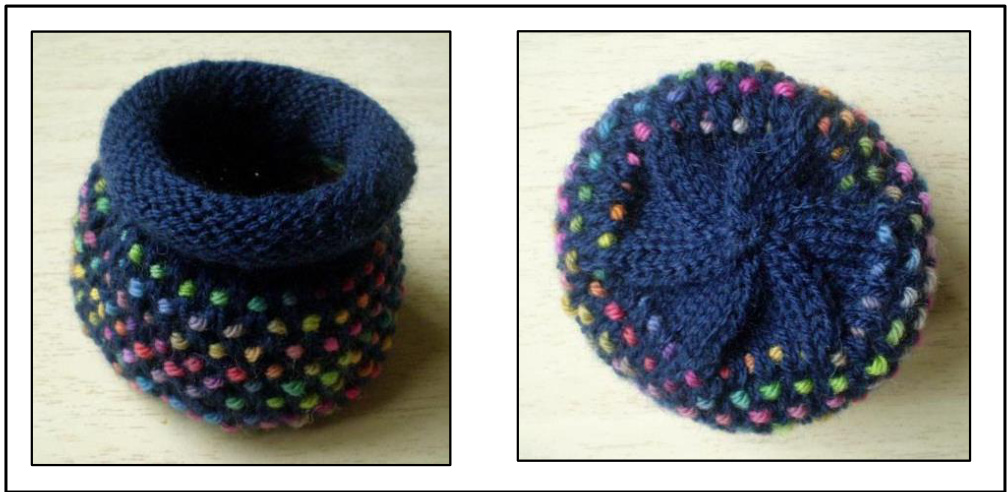
This is worked in the main colour. Change back to 3.25mm needles. Round 1: \*K8, K2 tog, repeat from \* to end (54 sts). Round 2: \*K7, K2tog, repeat from \* to end (48 sts). Round 3: \*K6, K2tog, repeat from \* to end (42 sts). Round 4: \*K5, K2tog, repeat from \* to end (36 sts). Round 5: \*K4, K2tog, repeat from \* to end (30 sts). Round 6: \*K3, K2tog, repeat from \* to end (24 sts). Round 7: \*K2, K2tog, repeat from \* to end (18 sts). Round 8: \*K1, K2tog, repeat from \* to end (12 sts). Thread through the remaining 12 sts and fasten off. Sew in the ends, roll down the rim and your pot is finished. Isn't it lovely? Even the bottom is pretty.
① Frankie Brown, 2011.
A Bigger Pot
You can follow much the same pattern to make the bigger pot. Cast on 75 sts for the rim and knit 20 rounds. The increase round is the same as for the smaller size and will give you 90 sts for the dotty pattern. Follow the dotty pattern as before but, this time work 15 rows of dots rather than 10. When you get to the base, work these rounds before following the original pattern: Round 1: \*K13, K2tog, repeat from \* to end (84 sts). Round 2: \*K12, K2tog, repeat from \* to end (78 sts). Round 3: \*K11, K2tog, repeat from \* to end (72 sts). Round 4: \*K10, K2 tog, repeat from \* to end (66 sts). Round 5: \*K9, K2tog, repeat from \* to end (60 sts). I haven't knitted it but I should think you could work an even bigger pot by casting on 100 sts, increasing to 120 and working 20 rows of dots. You would begin to decrease for the base for this size with a K18, K2tog round. I think this would give you a pot measuring about 15 cm / 6" tall and wide.
Mini Dotty Pots
Another variation on the basic pattern are these Mini Dotty Pots, designed by Pat Sale. They are just the right size to hold one Ferrero Rocher chocolate and would be ideal fundraisers. They use very small amounts of yarn and are quick to knit.
To make a mini pot cast on 20 stitches and knit 12 rounds for the rim. Next round: \*m1, K2, repeat from \* to end (30 sts). Follow the six row dotty pattern given in the main pattern until you have four rows of dots and then knit one round before working the base: Round 1: \*K3, K2tog, repeat from \* to end (24 sts). Round 2: \*K2, K2tog, repeat from \* to end (18 sts). Round 3: \*K1, K2tog, repeat from \* to end (12 sts). Thread through the remaining 12 stitches and fasten off. I bet you can't make just one of these tiny pots.

Abbreviations
st / sts stitch / stitches K knit P purl sl 1 pwise slip one stitch purlwise wyib with yarn in back (as if to knit) K2tog knit two stitches together m1 make 1 by lifting the thread before the next stitch and knitting into the back of it Frankie Brown, 2011. My patterns are for personal use only and should not be used to knit items for sale. Please do not use them for teaching purposes without my permission.


