owlie laptop sleeve
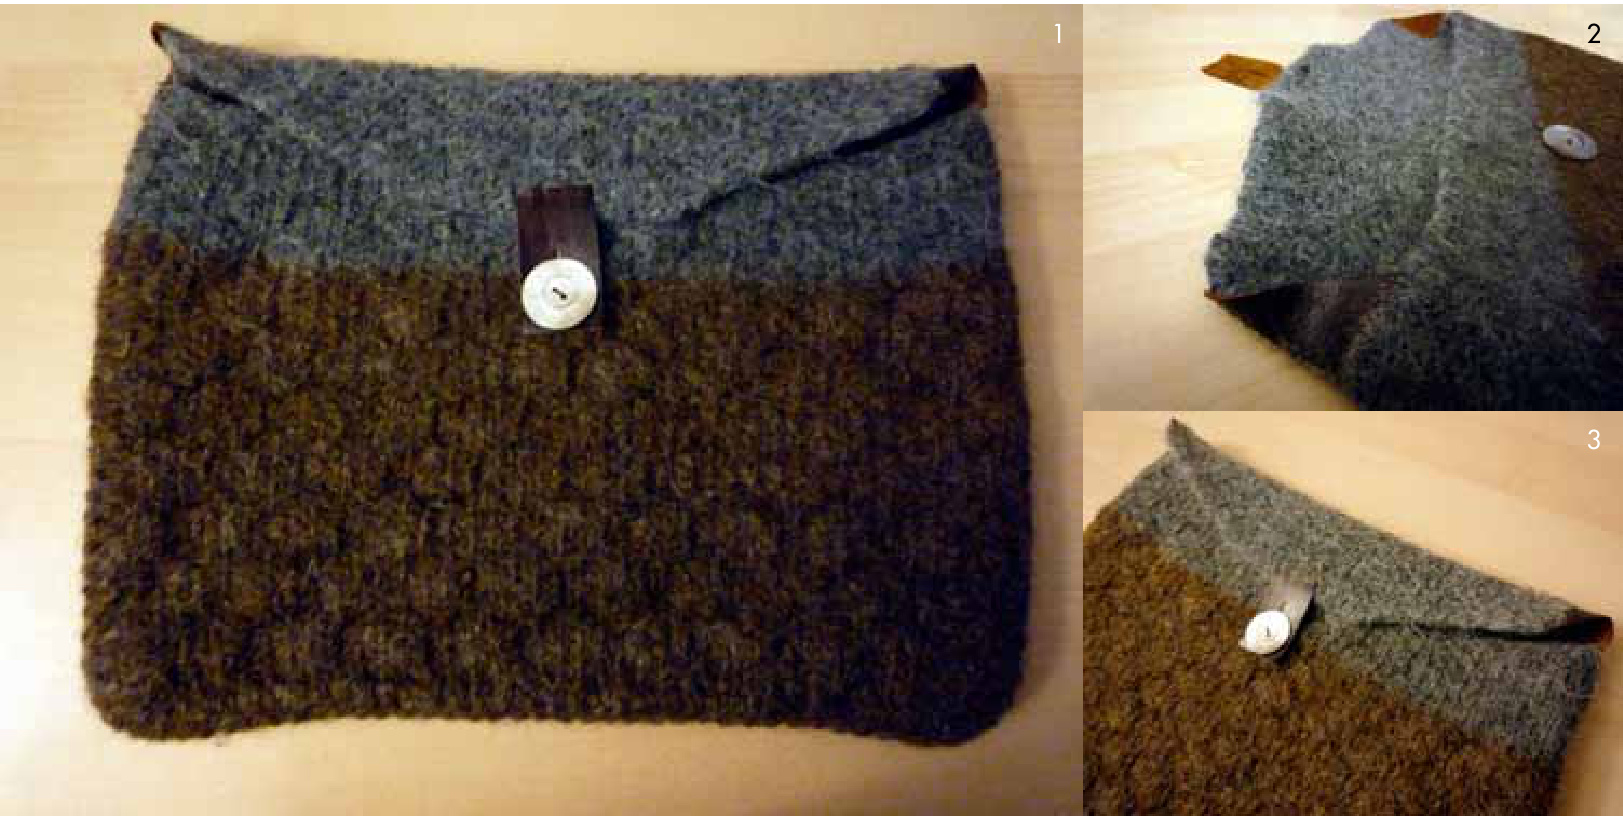
1) A fullfrontal view of the laptop sleeve. 2) A detail shot of the leather corners. 3) Angled shot of the flap. I set upon a journey to knit a laptop sleeve so I could experiment with some fun stitches in a simple format and play with felting. I chose the Blister Check (or Coin Stitch) from Barbara Walker's “A Treasury of Knitting Patterns" because it was bubble wrap in knit form--perfect to protect a laptop! Rather than using two colors to create the fabric as is typical of this stitch, I chose one color to focus on the texture and did a simple color switch two thirds of the way up. Knitted in the round, there are no seams to sew up or worry about. I wanted an envelope-like closure and envisioned a simple, small flap over the main compartment. What I got instead was a laptop sleeve with a flap that, upon felting, was a bit too short and was a wee less in width as compared to the laptop compartment. To make up for the slight opening and ensure a snug, secure fit of the flap over the laptop, I used leather scraps to enclose the sides ofthe flap to the sides of the laptop compartment and finished it off with a leather strap held down with a button. The end result: a felted knit laptop sleeve mildly reminiscent of an owl! SIZE fits 13" Macbooks
FINISHEDMEASUREMENTS 12.5" wide x 9" tallx 1" deep
MATERIALS [MC] Brown Sheep Lamb's Pride Bulky [85% wool, 15% mohair; 125yd per 100g skein]; color: Brown Heather; 1 skein [CC] Brown Sheep Lamb's Pride Bulky [85% wool, 15% mohair; 125yd per 100g skein]; color: Charcoal Heather; 1 skein 32-inch US #9/5.5mm circular needle
NOTIONS REQUIRED
Stitch markers, tapestry needle, sewing needle, sewing thread, (2) 1" x 1.75" right-angle leather triangle pieces, (1) 1.125" x 2.125" rectangular leather piece, (1) 1.125"diamater button
GAUGE
Gauge shouldn't really matter as this piece will be felted to size—-make sure to keep it on the looser side though for more allowance during felting. PATTERN Creating bottom of laptop sleeve: Using US #9/5.5mm circular needle, CO 6 sts with MC. Row l: \* Kl, pl, repeat from \* across row. Row 2: \* Pl, kl, repeat from \* across row. Repeat rows 1 and 2 until work measures 12.5 inches from CO edge. PM to indicate beginning of row knitted in the round. Laptop sleeve compartment: PU 4i stitches along long edge and PM PU 4 stitches along short edge and PM PU 41 stitches along long edge and PM P2tog, K1, P1, K2tog. 90 stitches. Establishing Blister Check: Rows 1-5: \* K 41 stitches, move marker. K1, p1 for next 4 stitches on odd rows; p1, k1 for next 4 stitches on even rows and move marker. K 41 stitches, move marker. K1, pl for next 4 stitches on odd rows; pl, kl for next 4 stitches on even rows and move marker. Repeat from \* for 4 more rows. Row 6: \*\* K2, \* drop next stitch 4 rows and PU stitch from 5th row below, inserting needle into this stitch and under the 4 loose strands. K stitch, catching the 4 loose strands behind stitch. K3. Repeat from \* 9 more times. K3 and move marker. P1, k1 for next 4 stitches and move marker. Repeat from \*\* one more time. Rows 7-1l: \* K 41 stitches, move marker. K1, pl for next 4 stitches on odd rows; pl, kl for next 4 stitches on even rows and move marker. K 41 stitches, move marker. K1, p1 for next 4 stitches on odd rows; p1, kl for next 4 stitches on even rows and move marker. Repeat from \* for 4 more rows. Row 12: \*\* K4, \* drop next stitch 4 rows and PU stitch from 5th row below, inserting needle into this stitch and under the 4 loose strands. K stitch, catching the 4 loose strands behind stitch. K3. Repeat from \* 8 more times. K5 and move marker. P1, k1 for next 4 stitches and move marker. Repeat from \*\* one more time. Repeat rows 1-12 4 more times. PATTERNNOTES Flap, sides and bottom are in Moss Stitch (multiples of 2 stitches) Rows I and 3: \* Kl, pl; rep from \*. Rows 2 and 4: \* Pl, kl; rep from Repeat rows 1-4. Body is in Blister Check (or Coin Stitch), adapted for knitting in the round from Barbara Walker's A Treasury of Knitting Patterns (multiples of 4 stitches plus 1) Rows 1- 5: K Row 6: K2, \*drop next stitch off needle and unravel 4 rows down, PU stitch from Row 1 below; insert needle into this stitch and under the 4 loose strands and K, catching the 4 loose strands behind stitch; K3; rep from \*, end K2. Rows 7-11: K Row 12: K4, \*drop next stitch, unravel, and K stitch from 5th row below as in Row 6; K3; rep from \*, end K1. \* Kl, pl. Repeat from \* across stitches until 2 stitches remain before beginning of next row. P2tog. 89 stitches. \* Pl, kl, repeat from \* across row. Flap: \* K1, pl, repeat from \* for 39 more stitches. Remove marker and BO in pattern to beginning of row, removing rest of markers asyougo. Row l: \* Pl, kl, repeat from \* across row. Row 2: \* Kl, pl, repeat from \* across row. Repeat rows 1 and 2 until work measures 2 inches from BO edge. Decrease 1 stitch on each end on every row until 15 stitches remain. BO 15 stitches and weave in end. Finishing: Felt laptop sleeve in washing machine using gentle detergent and warm water, stopping the machine to measure every 5-10 mins until size of bag needed is reached. Rinse laptop sleeve in cold water and use the spin cycle to remove as muchwater as possible. Block laptop sleeve to desired size (stretch out if necessary) and allow to air dry. Hand sew leather triangles to side of flap and laptop compartment using whipstitch. Hand sew short edge of rectangular leather tab to center of flap using backstitch. Cut 1" vertical slit into leather, O.25" from bottom. Attach button to compartment sleeve and close flap with leather tab. Your felted knit laptop sleeve is now ready to use!


