Nifty Knickers - Top-down Customizable Longie
By Annalea, who blogs at http://www.thePassionateMind.blogspot.com
And now, on to the pattern. ;o)
Pattern Notes:
This is how I knit longies from the top down. It may or may not be refined in the future, but so far this pattern has turned out nicely. Please do read the pattern carefully all the way through before you start, so you know what your options are, and what's coming up. You'll be glad you did. There is a general size chart at the beginning of the pattern, in case you don't have the recipient handy to measure. ;o)
Copyright notice:
This pattern is copyrighted, and I reserve all rights granted to me under copyright law. Us Copyright law does not cover the design of useful articles (including apparel of any kind), so the finished product you knit is yours to do with as you so desire--to sell, gift, burn, etc. I would love it if you would let others know where they can find the pattern that helped you make something as beautiful as you did, and put a link to this pattern or my blog somewhere in your space or listing (if you choose to knit longies to sell). This pattern may be freely reproduced and distributedfor educationaluse,butplease don't sell it. That is a violation of copyright law, and after all, I've made it for free.
Licensing:
There is no license associated with this pattern. Yarn: whichever you like. I prefer Purewool 3-ply, Malabrigo Twist, Cascade 220, or my friend Kim's lovely Hood River hand-dyed. Needles: whichever ones give you the fabric you want.
Longies Sizing Chart
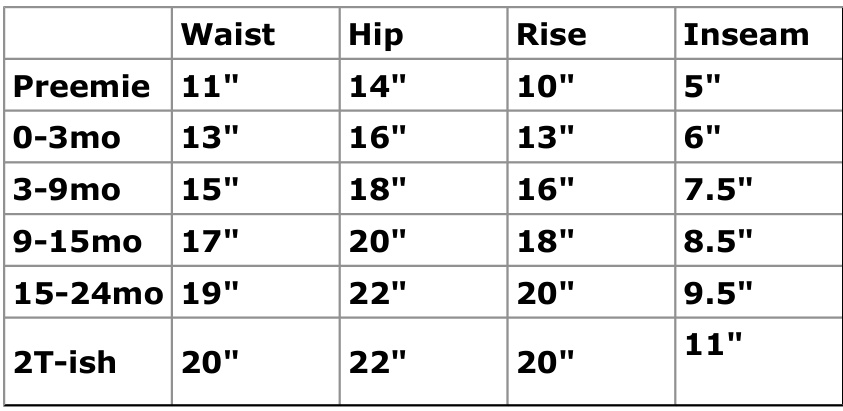
First, establish your gauge. Cast 36-40 stitches on to three dpn's, or enough to get you about a tube that's about 4" when folded flat. Knit a couple rows of something flat (garter, moss, etc), and then motor on for a few inches. (This usually takes me about 10 minutes. If you're wondering how I do it, check out this short video of me knitting on 3 dpn's: http:/www.youtube.com/watch?v=WV0eCYM8Osw.) Once you have enough length to have settled into your rhythm with that yarn/needle combo, knit another few rows of border (try something different, and see what you think of an alternate cuff) and cast off if you want to. I've decided this is a great chance to try out a couple of different bind-offs to see which one I like with the yarn I'm working with. I'm also merciless and frog my swatches almost immediately; so if you do this, casting off is optional. ;o) Just don't tell the knitting fates, or they'll make every last thing I knit for the next six months felt to some degree over the next few moons. Check your gauge carefully over two inches, (or four, if you've got enough width), and fondle your swatch to see if you're happy with what you've got. Is the fabric thick and cushy enough to do the job of a soaker? Is it too dense and stiff? How many stitches do you have per inch? I know that a lot of patterns strongly encourage checking gauge over 4"; longies just aren't that big a project, and usually paying close attention to exactly how many stitches are in two inches works well for me. (Count half and quarter stitches, please!) Now, either get ready to knit, or start swatching again. I even enjoy this part, because it's interesting to me to see how a particular yarn works up over a few inches of stockinette. It can show me any possible pooling problems with variegated yarn, and helps me decide how best to deal with it. (Usually changing the needle size up or down one does the trick beautifully. No really, try it. You'll be amazed at how different the colors stack up with one size up or down.) Since this is a top-down pattern, we'll start with the waistband. You can choose whatever cast-on works for you, but I highly prefer the long-tail cast-on. To find your number of cast-on stitches, fill in the followingblanks:

You can round your cast on number up or down, depending on the type of waistband you'll be using. If you want an encased elastic waistband, then it doesn't matter. For k1p1 ribbing, use a multiple of 2. For k2p2 ribbing, use a multiple of 4, etc. Cast on and knit your waistband. I like a 2" 2x2 rib wasitband with a chained drawstring (more info on that later). But you can knit it to whatever width you want/need. Be sure to use a needle two or more sizes smaller for a ribbed waistband. If you're knitting a hemmed waist or casing for elastic, go ahead and use the same needles as for the body. Knit for just over 1", purl a turning row, and knit until you have the same number of rows after the purl row as before it. You can sew this down at the end of the project, when you've got your elastic ready, or you can pick up the cast-on stitches as you work your next row, knitting them together with each stitch as you go. You can add the elastic just before you finish closing the casing, or if you'll be adding a drawstring to the casing, go ahead and close it up completely. You'li be able to weave a single-chained string between the rows after it's all finished. (It just occurred to me that I could do a fold-over ribbed waistband so none of the drawstring would be against the baby's skin . . : hmmmm.) If you've been using a complimentary trim color for your waistband and cuffs, now is the time to switch to the main body color. Knit a row more, placing a marker at each side of the body, and then you can put in yourshortrows.
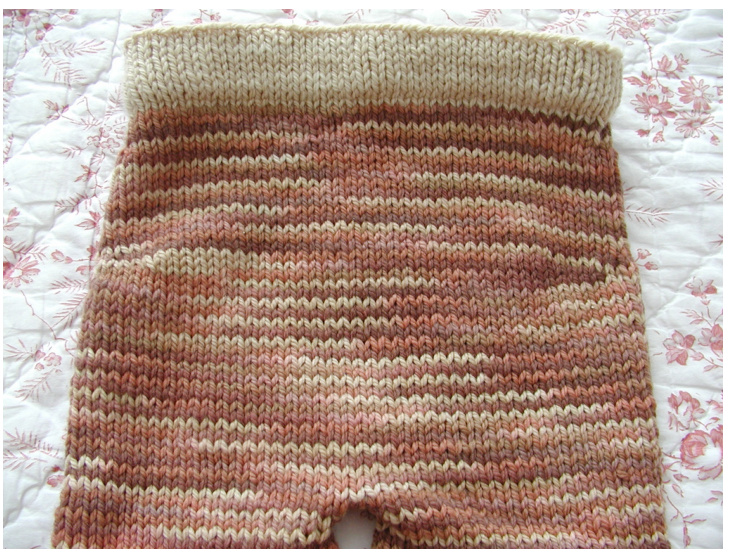
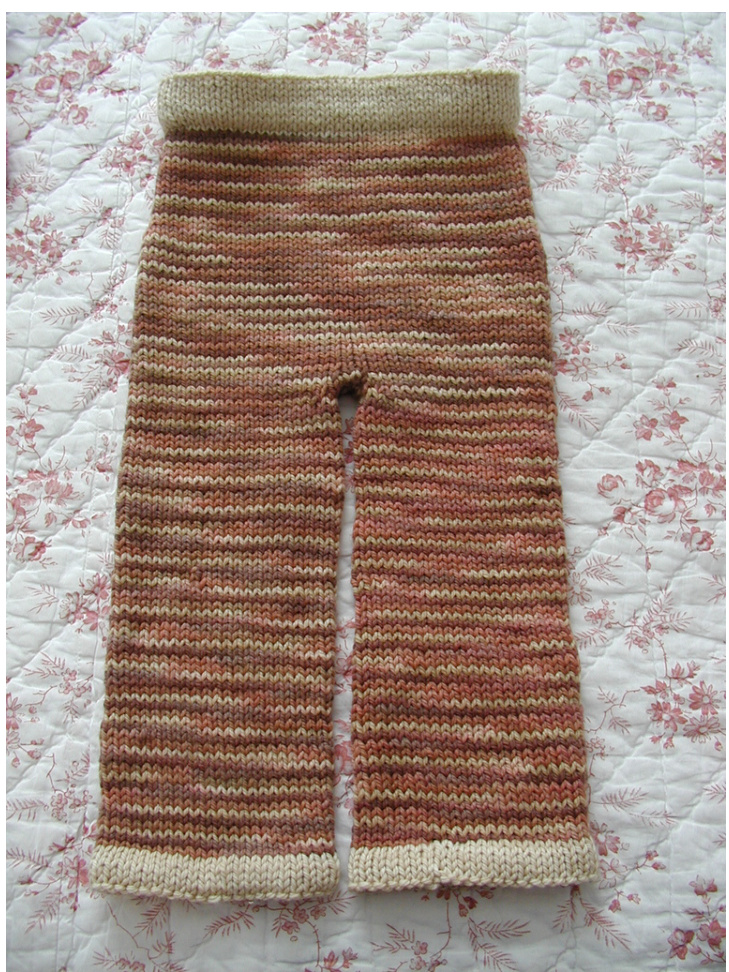
You can see the short rows in this pair--it's where the wedge-shaped stripes are at each side. I have since moved my short rows to the very top of the back, directly below the waistband. It makes for a cleaner look in back (no funny wedge), and is preferred unless you want to use the short rows as a sock monkey/ monster smile. Placement is up to you . .. I just really like the look of them after the first body round is completed. To work the short rows, knit across the back until there are five stitches left before you've knit across the back. (That would be five stitches before the hip marker on the left side of the longies as pictured above.) Yarn forward, slip the next stitch, turn your work, and bring the yarn forward to purl (the slipped stitch is now wrapped). Purl back to within five stitches of the opposite hip marker. Yarn back, slip the next stitch, turn your work, and yarn back again to knit. Knit across to ten stitches before the hip marker. Wrap the next stitch as previously explained, and purl back to within ten stitches of the opposite hip marker. Wrap the next stitch, and then turn and go back to knitting in the round, picking up the wraps, untwisting and reordering them with the stitch they were hugging so you can do a tidy k2tog as you go. (I usually have a slack stitch or two where the short rows begin or end, but a little careful adjusting with a needle tip takes care of that, and it's a lot easier than fiddling with exotic short row techniques. ;o) Now, figure out how many stitches you'll need to increase to get over that fluffy bum.

Or, alternately:
Number of stitches in 2" Number of stitches to increase. You can work the increases at each side, or smack in center front and back, a 'la Elizabeth Zimmerman. I like to increase at the sides--that way the increases aren't as visible. (Although, if you're using a decorative increase, having them at the front and back might be kinda fun.) My favorite, very nearly invisible increase is one I learned from Barbara Walker. You knit into the purl bump of the stitch from the row below just before working the stitch above it. It's much less noticeable for me than the M1 increase is, unless I'm working up a very dense fabric. But, with that said, use whatever increase floats your boat. Now, knit on until your knitted tube measures 1/2" short of half your measured recipient's rise, or your selected rise from the size chart. (If you're using a waistband with drawstring, measure in the front from where the drawstring will go on down to the live stitches on your needle.) Increase one stitch on either side of the markers (that you placed earlier for the short rows) on the next round. Knit one round plain, and repeat until you've increased to meet the numbers you figured above. (If you want a wider crotch gusset, start this process 2-4 rows earlier, and work another increase round or two.) Once you're done increasing, find the center front and back, and put stitches on holders for the crotch. If you just increased ten stitches, put five stitches on each holder, centered. (You don't want the short rows in the back to be off-center.) Don't forget to place the leg stitches on either side on something to hold them. (I like using a couple of 16" circulars.) Now, graft the crotch stitches together like you would the toe of a sock. Alternately, you can use a mattress stitch to hold them together, or a 3-needle bind-off. I like a graft, and work the graft with the stitches completely free. If you have trouble with purl bumps showing on the right side of your fabric when you graft, don't fight it. Just turn your work inside out and go for it. So long as I'm working with a reasonably not-too-tightly-knit fabric, and am careful, it's much easier to just mimic the path of knit stitches this way than it is to remember that odd Kitchener chant that always escapes me. Below is my finished graft, with one leg done. You can see where I will pick up stitches, on the right side of the graft, and where I have already picked them up, on the left.
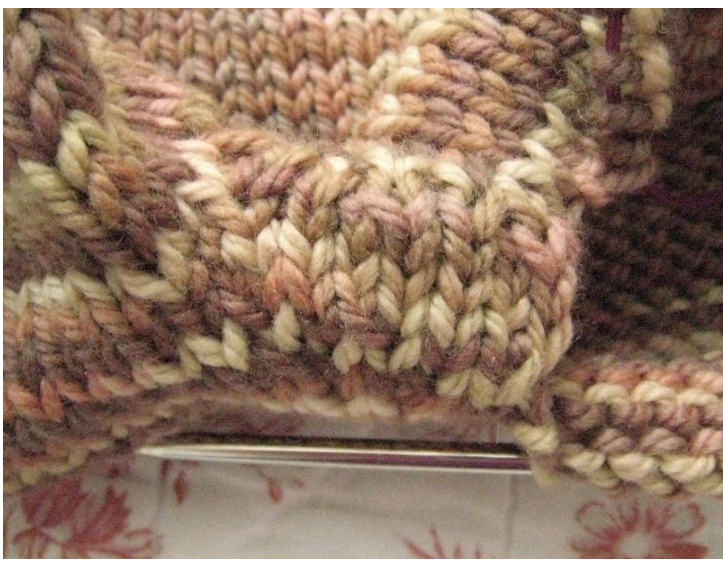
Now you get to knit the legs. ;o) Grab dpn's to match the gauge of the circular needle you've been using, pick up enough stitches along the side of the gusset to prevent holes (see photo), and go to town until you're 1" short of your desired inseam. Switch back to your trim color (if applicable), and knit your cuff. If you're knitting a hemmed cuff, knit for 1", purl a turning row, and then knit for one row short of 1". Cut a tail three times the diameter of the cuff, and whip stitch the live stitches in place to the purl bumps of the top of a row of stitches on the wrong side of the leg. If you're knitting a garter cuff, knit for 6-8 ridges (or whatever looks good to you) and cast off. For ribbed cuffs, I'd stop short at $z"$ ,and then knit 2" of ribbing. Ditto for moss or other decorative stitch. Weave in your ends, post a photo to your blog, Ravelry notebook or online album, and drop me a line so I can see your handiwork! Otherwise I'll just have to stalk the Projects page. ;o)


