Redwing
Julia Riede
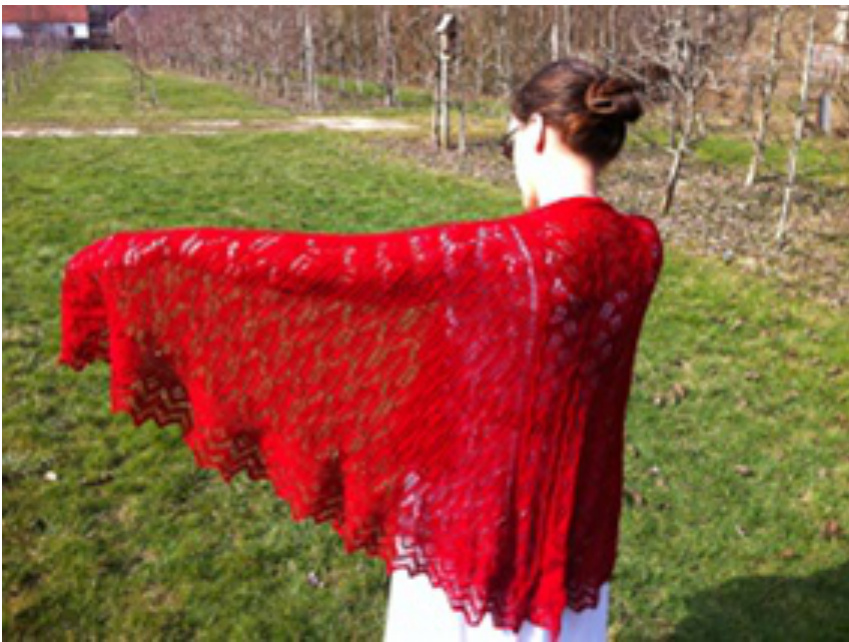
Shown in Wollmeise Lace-Garn, colorway Herzblut
Material
Imeise Lace-Garn [100% Merino, 1740 yards (1591 meters) per 300 grams (10.58 ounces)], 1 skeii
Gauge
21 sts / 29 rows = 4x4 inches (10x10 cm) on US 4 (3.5 mm) needle in stockinette stitch after blocking
Needles and notions
Straight or circular needles in size US 4 (3.5 mm ) or size to obtain correct gauge Stitch markers, darning needle
Finished size
Wingspan: 2.0m (2.2 yards) Length: 1.0m (1.1 yards)
| Abbreviations | Chart symbols | ||||
| sts | stitches | sl | slip | k on RS, p on WS | |
| k | knit | tbl | through back loop | ||
| p | purl | tog | together | p on RS, k on WS | |
| YO ssk | yarn over (sl 1 kw) 2 | kw kfb | knitwise knit into front and back of | 0 | YO |
| times, then k those 2 sts tog tbl | stitch | k2tog | |||
| tfl | through front loop | ssk | |||
| CO | cast on | ktbl | knit tbl | cdd | |
| ptbl slm | purl tbl slip marker | kfb | |||
| k2tog | knit 2 together | BO | bind off | BO n | bind off n stitches |
| p2tog pp3 | purl 2 together central double decrease: sl 2 tog kwise, k1tbl, slip slipped sts over on RS, p3tog on WS | ||||
Setup
Using any provisional cast on method, cast on 5 sts using waste yarn using smaller needle. Next row: sl1 wyb, k3, ktbl. Next row: sll wyf, k3, ktbl. Repeat the last two rows 54 times more (forming a total of 112 rows of garter stitch band).
Main Panel Setup
With RS facing and using working (larger) needle, sl1 wyf, k3, pm, pick up and knit 55 sts along straigth edge of the garter st band, pm, undo provisional cast on and knit 4 sts from the provisional cast on. Turn work. Next row: sll wyf, k3, slm, pl, pm, k2, (p16, k2) 3 times, pm, pl, slm, k3, ktbl. Turn work. (4+56+4 = 64 sts)
Shawl Body, Part I
Please note: additionally to the increases (yarn overs) worked on both sides of the side panels every other row (one next to the center panel and one next to the garter stich band, totalling 4 increases on every other row), additional increase rows are worked in rows 41, 81 and 120. In the side panel charts those additional increases are included, but not in the center panel charts as it would add unneccessary complexity. The increases in the center panels are worked by increasing the number of purl sts between the repeats; more detailed instructions are given below. Row 1 (RS): Sl1 wyb, k3, slm, work first row of side panel chart, slm, work first row of center panel, slm, work first row of side panel chart, slm, k3, ktbl. Row 2 (WS): Sl1 wyf, k3, slm, purl to next marker, slm, work next row of center panel, slm, purl to next marker, slm, k3, ktbl.

Row 3 (RS): Sl1 wyb, k3, slm, work next row of side panel chart, slm, work next row of center panel, slm, work first row of side panel chart slm, k3, ktbl. Row 4 (WS): Sl1 wyb, k3, slm, purl to next marker, slm, work next row of center panel, slm, purl to next marker, slm, k3, ktbl. Continue in established pattern until you have finished row 40 of the Side Panel Chart I. The next row is an additional increase row for both the side panels and the center panel: Next row (RS): Sl1 wyb, k3, slm, work row 41 of side panel chart, slm, \*p1, YO, p1, cdd, k1, YO, k1, YO, k3, YO, k1, YO, k4, cdd\*, repeat from \* to \* 3 times, p1, YO, p1, slm, work row 41 of side panel chart, slm, k3, ktbl. Next row (WS): S11 wyb, k3, slm, purl to next marker, slm, k3, \*p16, k3\*, repeat from \* to \* 3 times, slm, purl to next marker, slm, k3, ktbl. (4+51+60+51+4 = 170 sts)
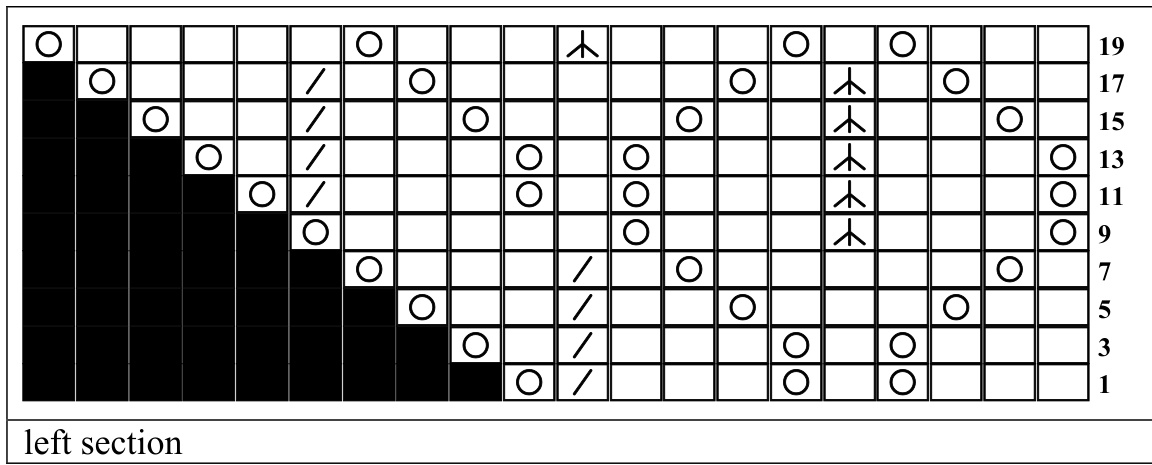
Side Panel Chart I
Please note: all even numbered rows are plain purl rows and not charted.
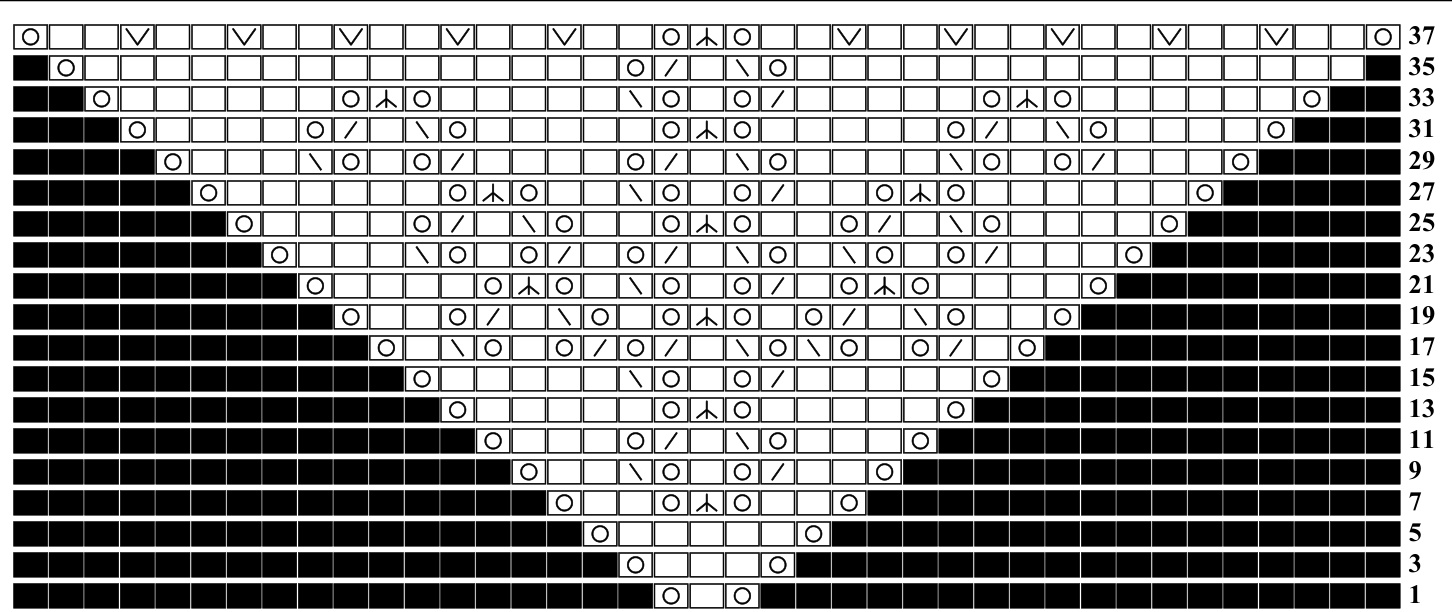

Center Panel Chart I
Shawl Body, Part II
Row 43 (RS): Sl1 wyb, k3, slm, work first row of Fir Cone repeating outlined section three times, slm, work next row of center panel, slm, work first row of Fir Cone repeating outlined section three times, slm, k3, ktbl. Row 44 (WS): Sl1 wyf, k3, slm, purl to next marker, slm, work next row of center panel, slm, purl to next marker, slm, k3, ktbl. Row 45 (RS): S11 wyb, k3, slm, work next row of Fir Cone pattern, slm, work next row of center panel, slm, work work next row of Fir Cone pattern, slm, k3, ktbl. Row 46 (WS): Sl1 wyb, k3, slm, purl to next marker, slm, work next row of center panel, slm, purl to next marker, slm, k3, ktbl. Continue in established pattern until you have finished two full repeats of the Fir Cone pattern. (4+91+60+91+4 = 250 sts) lext row is an additional increase row for both the side panels and the center panel Row 83 (RS): Sl1 wyb, k3, slm, work increase round of Fir Cone chart, slm, \*p1, YO, p2, cdd, k1, YO, k1, YO, k3, YO, k1, YO, k4, cdd\*, repeat from \* to \* 3 times, p2, YO, p1, slm, work increase row of Fir Cone chart slm, k3, ktbl. Row 84 (WS): S11 wyb, k3, slm, purl to next marker, slm, k4, \*p16, k4\*, repeat from \* to \* 3 times, slm, purl to next marker, slm, k3, ktbl. (4+101+64+101+4 = 274 sts)
Center Panel Chart II
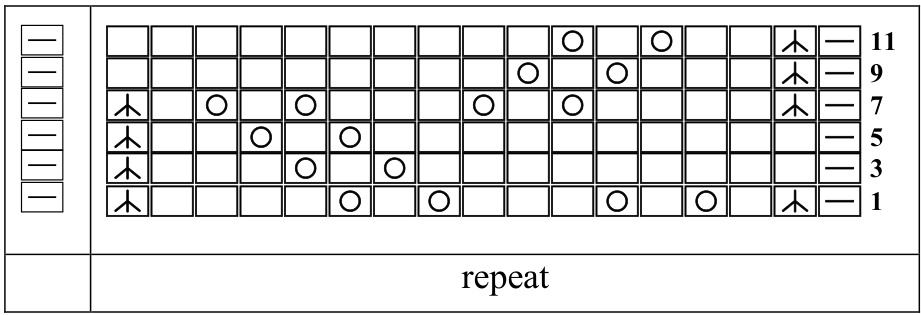
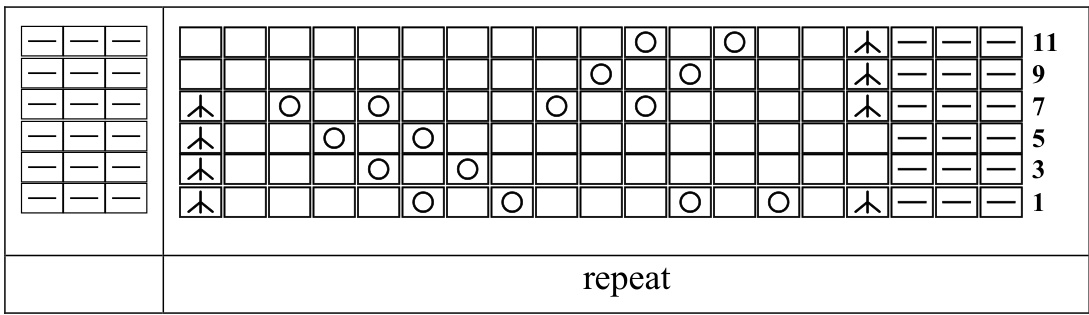
Fir Cone Increase round:
k5, (YO, k8) to last 5 sts, YO, k5.
Fir Cone Chart


Shawl Body, Part III
Row 83 (RS): Sl1 wyb, k3, slm, work first row of Feather pattern repeating outlined section six times, slm, work first row of center panel, slm, work first row of Feather pattern repeating outlined section six times, slm, k3, ktbl. Row 84 (WS): Sl1 wyf, k3, slm, work next row of Feather pattern, slm, work next row of center panel, slm, work next row of Feather pattern, slm, k3, ktbl. Row 85 (RS): Sl1 wyb, k3, slm, work next row of Feather pattern, slm, work next row of center panel, slm, work next row of Feather pattern, slm, k3, ktb1. Row 86 (WS): Sl1 wyb, k3, slm, work next row of Feather pattern, slm, work next row of center panel, slm, work next row of Feather pattern, slm, k3, ktbl. Continue in established pattern until you have finished two full repeats of the Feather pattern. (4+191+68+191+4 = 366 sts) The next row is an additional increase row the center panel only: Row 121 (RS): Sl1 wyb, k3, slm, work next row of Feather pattern, slm, \*p2, YO, p2, cdd, k1, YO, k1, YO, k3, YO, k1, YO, k4, cdd\*, repeat from \* to \* 3 times, p2, YO, p2, slm, work next row of Feather pattern, slm, k3, ktbl. Row 122 (WS): Sl1 wyb, k3, slm, work next row of Feather pattern, slm, k5, \*p16, k5\*, repeat from \* to \* 3 times, slm, work next row of Feather pattern, slm, k3, ktb1. (4+106+68+106+4 = 288 sts)

Continue in established pattern, working the Feather pattern for the side panels and the Center Panel Chart IlI for the center panel until you have finished 4 total repeats of the Feather pattern. (4+191+68+191+4 = 458 sts)
Center Panel Chart III
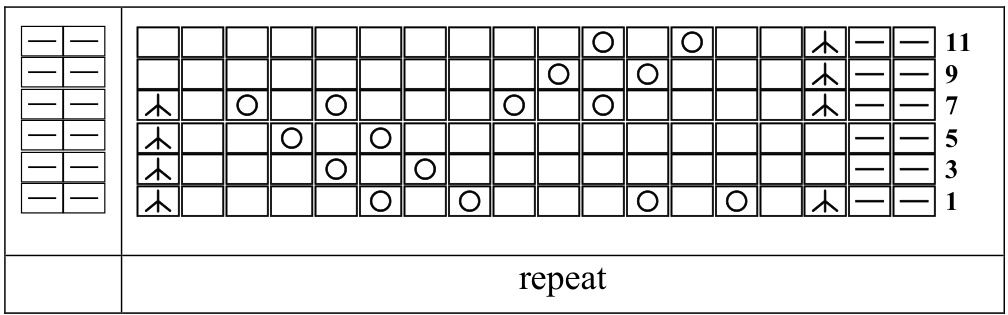
Feather Chart
| 一 | 一 | o | 0 | |||||||||||||||||||||||||||
| 0 | / | \ | o | 0 | o | 0 | o 21 19 | |||||||||||||||||||||||
| 0 | / | 0 | 0 | — | 0 | 17 | ||||||||||||||||||||||||
| 0 | 0 | 0 | / | \ | 0 | 0 | / | 0 | 15 | |||||||||||||||||||||
| 0 | 0 | 0 | 0 | 13 | ||||||||||||||||||||||||||
| 0 | 0 | 0 | 11 | |||||||||||||||||||||||||||
| o | 0 | 0 | 0 | 9 | ||||||||||||||||||||||||||
| 0 | 0 | 0 | 7 | |||||||||||||||||||||||||||
| 0 | 0 | 0 | 0 | 5 | ||||||||||||||||||||||||||
| 0 | 3 | |||||||||||||||||||||||||||||
| 0 | 0 | |||||||||||||||||||||||||||||
| repeat | 1 | |||||||||||||||||||||||||||||
Edging
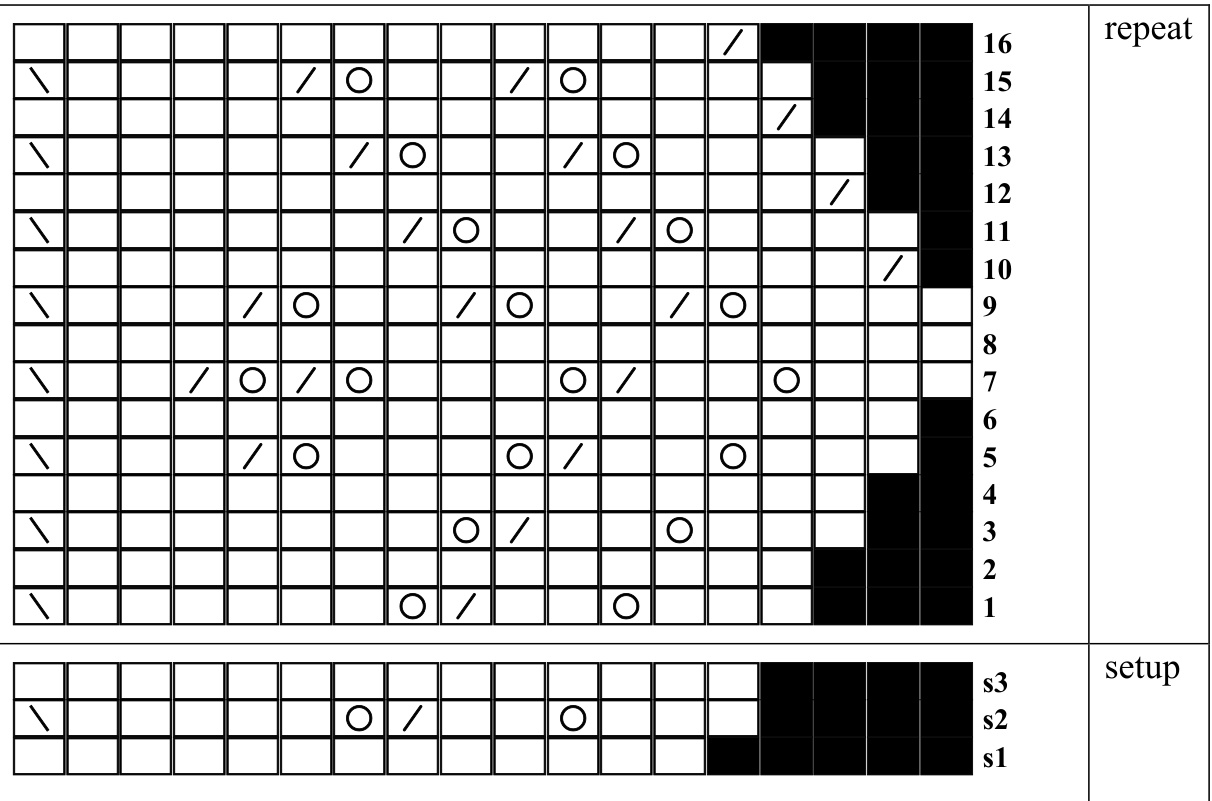
With right side of shawl facing, CO 13 sts and work the edging chart towards the other end of the shawl. (The first three rows (s1-s3) are setup rows and just worked once, they are not part of the repeat. The ssk sts at the innermost side of all odd rows are all worked with one st of the edging and one sts coming from the remaining shawl sts (the edging is knitted on). BO all sts loosely.

Edging Chart
Please note: This edging is worked sideways. On every RS row, the innermost stitch (ssk/k2tog) is worked together with a loose stitch of the main shawl body to attach the edging to the shawl.
Finishing
Weave in ends and block gently.


