Blastoise Pokemon Amigurumi Pattern By: Edward Yong
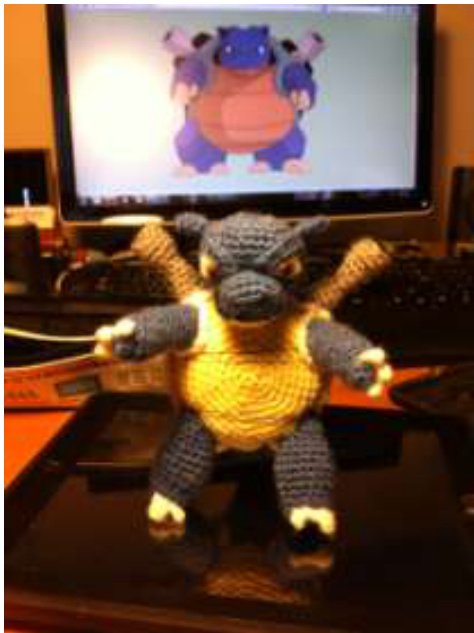
One of my friends asked if I could make Blastoise for him. I'm personally not a fan of the evolved forms of Pokemon because they lose their appeal (i.e. they get ugly). Anyway, I said I would but the only pattern I could find was a translation from a Norwegian site. Also, I didn't really like how the little guy turned out. Instead I decided to create one myself.
Materials Required:
- Brown, tan, white, grey and blue coloured yarn - Fibrefill - Black, white, and brown felt - 3.5mm (E) hook - Yarn needle - Sewing needle and thread Head: Using Blue Rnd 1: 6 sc into magic circle (6) Rnd 2: 6inc (12) Rnd 3: \*sc, inc\* x 6 (18) Rnd 4: \*2sc, inc\* x 6 (24) Rnd 5: \*3sc, inc\* x 6 (30) Rnd 6-9: 30sc (30) Begin stuffing the head. Continue stuffing as you work on the piece. Rnd 10: \*3sc, dec\* x 6 (24) Rnd 11: \*2sc, dec\* x 6 (18) Rnd 12: \*sc, dec\* x 6 (12) Rnd 13: 6dec (6) F/O and leave a long tail for sewing closed the 6st opening and attaching the head to the b Muzzle: Using Blue Rnd 1: ch4 (leave a long tail) Rnd 2: inc in 2"d chain from hook, sc in next chain, inc in the next chain, turn the piece, inc in the other loop of the same chain as before, sc in next chain loop, inc in next chain loop (10) Rnd 3: inc, 3sc, 2inc, 3sc, inc (14) Rnd 4: inc, 5sc, 2inc, switch to tan, 5sc, switch to blue, inc (18) Rnd 5: 9sc, switch to tan, 9sc, switch to blue (18) Rnd 6: 8sc, switch to tan, 10sc (18) Rnd 7: 2sc, turn (2) Row 1: dec, 8sc, dec, turn (10) Row 2: dec, 6sc, dec, turn (8) Row 3: dec, 4sc, dec, turn (6) Row 4: dec, 2sc, dec (4) F/O and leave a long tail to attach the bottom half of the muzzle to head. Weave the tail from the magic circle along the stitches on the inside surface of the muzzle until it reaches the blue section. This will be used to attach the top half of the muzzle to the head. Using black yarn, make the nostrils for the nose. If you wish you can trace the line between the blue and black portions of the muzzle with the black yarn to create a mouth. Eyebrow Ridge: (Make 2) UsingBlue Row 1: ch 7 Row 2: 6sc (6) F/O and leave a long enough tail to sew ridges to head. Ear: (Make 2) Using Blue Rnd 1: 4sc in magic circle (4) Rnd 2: \*sc, inc\* x 2 (6) Rnd 3: \*2sc, inc\* x 2 (8) Fold the piece in half and stitch the bottom together with SC. Leave a long enough tail to attach ears to head. Shell: Using Brown Rnd 1: 6 sc into magic circle (6) Rnd 2: 6inc (12) Rnd 3: \*sc, inc\* x 6 (18) Rnd 4: \*2sc, inc\* x 6 (24) Rnd 5: \*3sc, inc\* x 6 (30) Rnd 6: \*4sc, inc\* x 6 (36) Rnd 7: \*5sc, inc\* x 6 (42) Rnd 8: \*6sc, inc\* x 6 (48) Rnd 9: \*7sc, inc\* x 6 (54) Rnd 10: \*8sc, inc\* x 6 (60) Rnd 11-15: 6sc (60) F/O and weave in tail. Stomach: Using Tan Rnd 1: 6 sc into magic circle (6) Rnd 2: 6inc (12) Rnd 3: \*sc, inc\* x 6 (18) Rnd 4: \*2sc, inc\* x 6 (24) Rnd 5: \*3sc, inc\* x 6 (30) Rnd 6: \*4sc, inc\* x 6 (36) Rnd 7: \*5sc, inc\* x 6 (42) Rnd 8: \*6sc, inc\* x 6 (48) Rnd 9: \*7sc, inc\* x 6 (54) Rnd 10: \*8sc, inc\* x 6 (60) F/O and leave a long enough tail to attached the stomach to the shell. Using embroidery thread or normal sewing thread, create the lines across the stomach. Arms: (Make 2) Using Blue Rnd 1: 4 sc into magic circle (4) Rnd 2: 4sc (8) Rnd 3: 8sc in front loop only (8) Rnd 4: \*3sc, inc\* x 2 (10) Rnd 5-6: 8sc Rnd 7: \*3sc, dec\* x 2 (8) Rnd 8: \*sc, in\* x 4 (12) Rnd 9-10: 12sc (12) Rnd 11: \*sc, dec\* x 4 (8) Rnd 12: \*sc, inc\* x 4 (12) Rnd 13-15: 12sc (12) For the Shoulder: Turn after Rnd 15. Row 1: 6sc, turn (6) Row 2: dec, 2sc, dec (4) For Claws: Using White Attach the white yarn to the bottom stitch between Rnd 2 & 3 on the arm. ss into the next bottom stitch between Rnd 2 & 3. ch 3, ss into the 2nd chain from hook, ss into the 3rd chain from hook. ss into the next st up between Rnd 2 & 3 on the arm. ch 3, ss into the 2nd chain from hook, ss into the 3rd chain from hook. ss into the next st up between Rnd 2 & 3 on the arm. ch 3, ss into the 2nd chain from hook, ss into the 3rd chain from hook. ss into the top st between Rnd 2 & 3 on the arm. F/O Legs: (Make 2) Using Blue Rnd 1: 6sc in magic circle (6) Rnd 2: 6inc (12) Rnd 3: 12sc in back loops only (12) Rnd 4-5: 12sc (12) Rnd 6: \*sc, inc\* x 3 (18) Rnd 7-8: 18sc (18) Rnd 9: \*4sc, dec\* x 3 (15) Rnd 10: 15sc (15) Rnd 11: \*3sc, dec\* (12) Rnd 12: 12sc, turn (12) For the Shoulder: Row 1: 6sc, turn (6) Row 2: dec, 2sc, dec, turn (4) Row 3: 2dec (2) F/O and leave a long enough tail to attach legs to the body.
Note: The larger toe is always on the outside of the leg. It will be easier to figure out where to place the first slip stitch once the legs have been positioned on the body. Attach the white yarn to the bottom stitch between Rnd 3 & 4 on the inside of the leg. ss into the next stitch moving outwards between Rnd 3 & 4. ch 3, ss into the 2"d chain from hook, ss into the 3rd chain from hook. ss into the next stitch moving outwards between Rnd 3 & 4. ch 4, sc into the 2nd chain from hook, hdc into the 3rd chain from hook, and dc into the 4th chain from hook. ss into the next stitch moving outwards between Rnd 3 & 4. F/O and pull the yarn through the leg to the back side between Rnd 3 & 4. ss into the stitch in the back. ch 3, ss into the 2nd chain from hook, ss into the 3rd chain from hook. ss into the next stitch moving inwards between Rnd 3 & 4. For Right "Toes": Note: The larger toe is always on the outside of the leg. It will be easier to figure out where to place the first slip stitch once the legs have been positioned on the body. UsingWhite Attach the white yarn to the bottom stitch between Rnd 3 & 4 on the outside of the leg. ss into the next stitch moving inwards between Rnd 3 & 4. ch 4, sc into the 2nd chain from hook, hdc into the 3rd chain from hook, and dc into the 4th chain from hook. ss into the next stitch moving inwards between Rnd 3 & 4. ch 3, ss into the 2nd chain from hook, ss into the 3rd chain from hook. ss into the next stitch moving inwards between Rnd 3 & 4. F/O and pull the yarn through the leg to the back side between Rnd 3 & 4. ss into the stitch in the back. ch 3, ss into the 2nd chain from hook, ss into the 3rd chain from hook. ss into the next stitch moving outwards between Rnd 3 & 4. Tail: Using Blue Rnd 1: 4sc in magic circle (4) Rnd 2: 4sc (4) Rnd 3: \*sc, inc\* x 2 (6) Rnd 4: 6sc (6) Rnd 5: \*sc, inc\* x 3 (9) Rnd 6: 9sc (9) Rnd 7: \*2sc,inc\* x 3 (12) Rnd 8: 12sc (12) Rnd 9: \*3sc, inc\* x 3 (15) Rnd 10: 15sc (15) Rnd 11: \*4sc, inc\* x 3 (18) Rnd 12: 18sc (18) Rnd 13: \*5sc, inc\* x 3 (21) Rnd 14: 21sc (21) For Tail Flap: Row 1: 11sc Row 2: dec, 7sc, dec (9) F/O and leave a long enough tail to attach the piece to the body. Canons: (Make 2) Using Grey Rnd 1: 4sc in magic circle (4) Rnd 2: 4inc (8) Rnd 3: 8sc in back loop only (8) Rnd 4-6: 8sc (8) Begin stuffing the piece. Continue stuffing as you work the piece. Rnd 7: 4dec (4) Rnd 8: 4sc (4) Rnd 9: \*sc, inc\* x 2 (6) Rnd 10: 6sc (6) Rnd 11: \*sc, inc\* x 3 (9) Rnd 12-13: 9sc (9) F/O leaving a long enough tail to attach cannons to the back of the shell.
Assembly:
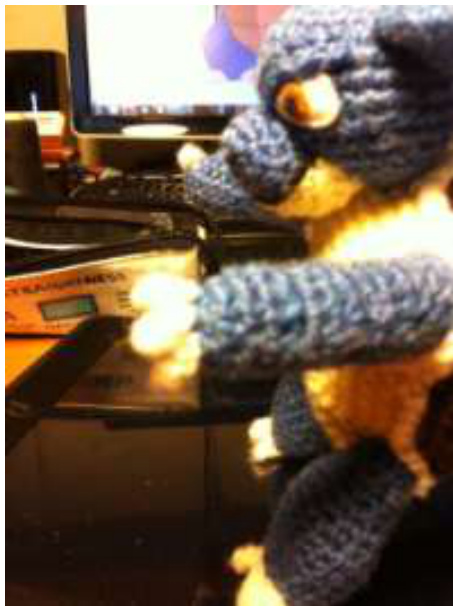
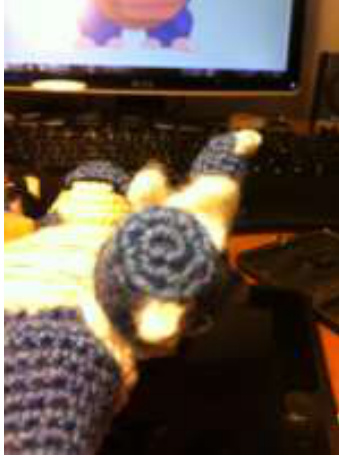
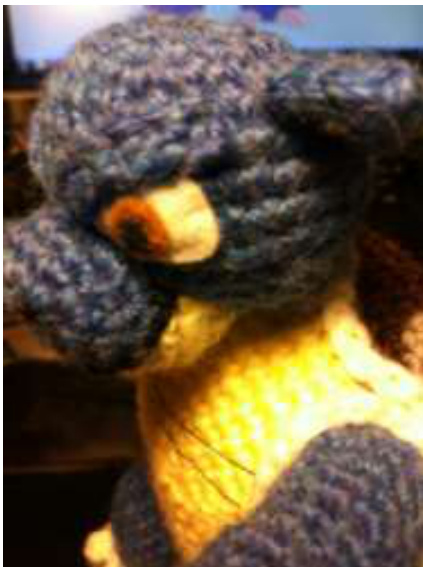
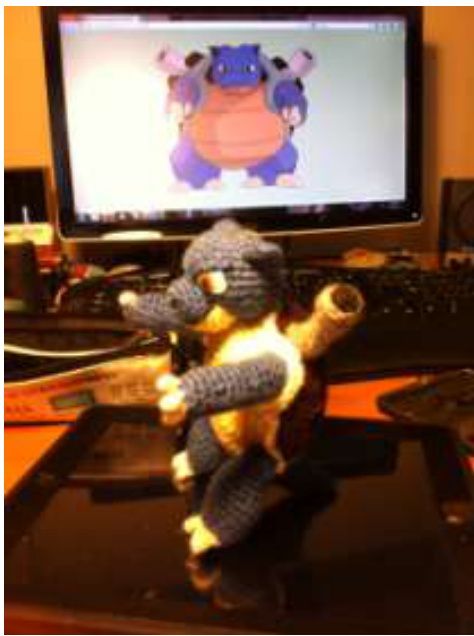
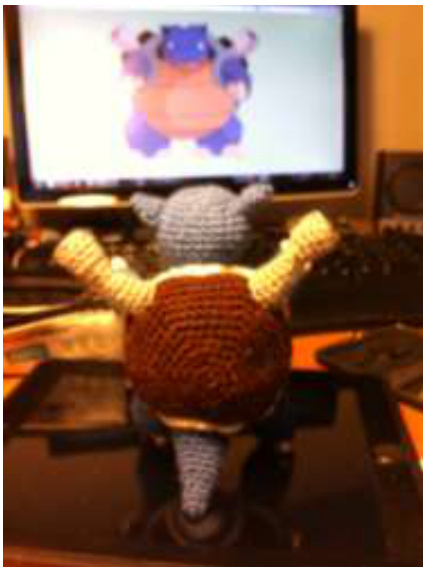
1) Sew together the stomach patch and shell by matching both pieces stitch for stitch. You will be using the tail from the stomach patch. Do not worry about the difference in colour because it will be covered up by the white outline. 2) Lightly stuff the muzzle to get a rough shape. Position the muzzle on the head before securing. The muzzle should stretch across the head and reach down to the bottom last Rnd of stitches (see the photo below). The most important factor of the muzzle is not to over stuff the piece. The muzzle will need to be flattened against the head to give it the proper shape. 3) Attach the head to the body with the tail from the head. I just weaved in and out of each piece with the tail. Position the head so that it sits more on the tan stomach section of the body. 4) Using brown, white and black felt, create the eyes. I cut out a white triangle for the whites of the eyes, brown for the iris, and black for the pupil. 5) Position the eyes are appears on the photo above. It should sit right on where the muzzle attaches to the head and the tip should be in line with the end of the nostril. Sew the eyes to the head. 6) Position the eyebrow ridges above the eyes. The ridges should trace the top of the eye. 7)Attach the ears to the head. Lay the crocheted edge of the ears to the head and attach from there. Remember to give the ears a curved shape. 8) Create the white outline around the edge of the shell. I needed to create chain of 160 in order to wrap around the edges and appendages properly. The legs and tail do not need to be circled entirely in the white while the arms are. I also wrapped around the back part of the head twice to create a thicker white line. 9) Attach the limbs to the body with the various tails from each piece. I used a whip stitch again. Pin all the limbs in the desired position before attaching. Add extra stuffing to the legs while attaching to create the shoulder pieces. 10) Stuff the appendages (i.e. arms, legs, and tail). Attach them to the body with the tails. 1 used a whip stitch to secure them. I also recommend pinning all the pieces in place before securing them to the body. Both the arms and legs should sit halfway between the brown and tan sections of the body. For the arms, do not overstuff them as it will eliminate the subtle bulging between the segments. Do not over stuff the legs as it will be difficult to shapethem.
11) Create the white outline around the edge of the shell. I needed to create chain of 160 in order to wrap around the edges and appendages properly. The legs and tail do not need to be circled entirely in the white while the arms are. I also wrapped around the back part of the head twice to create a thicker white line. Pinning the white chain to the body first before stitching it on helped to position it. I used sewing thread and needle to attach the chain.
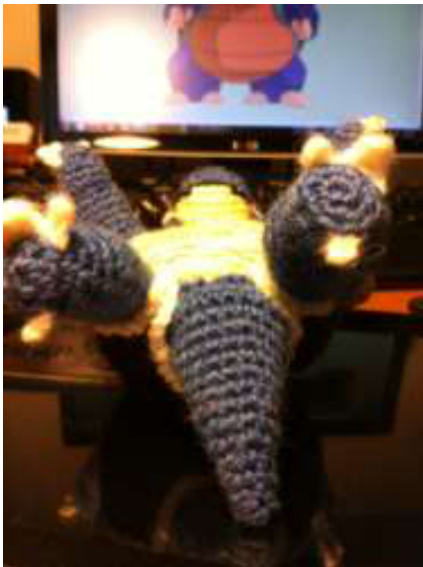
12) Attach the cannons to the back of the shell as seen in the picture below.
13) Cut out small circles in the black felt to fit on the end of the cannons. This will make it look like the barrel of the cannon. Now it's complete! Hope you enjoyed making this as much as I did. I think I reworked each piece on this little guy several times to get the right look. And just in case for legal reasons... Blastoise and Pokemon is copyright Nintendo. This crochet pattern is an original pattern by Edward Yong (June 2013). Please do not claim this pattern as your own. If you wish to share this pattern, you may link to this pattern but please do not reprint it on your site. You may keep a copy for your own personal use but you may not sell or distribute it, or sell items made from this pattern.


