SweetHalloweenPumpkin
Designed by Pingo - The Pink Penguin October 2014
This pattern includes:
Step by step instructions by American crochet technology; Step by step photo tutorial; If you face any problems with this pattern or you just want to share your work, please don't hesitate to contact me: The.Pink.Pingo@gmail.com
Hook size:
8mm - pumpkin body 2.5 mm - stem You will also need needle and sewing threads.
Material:
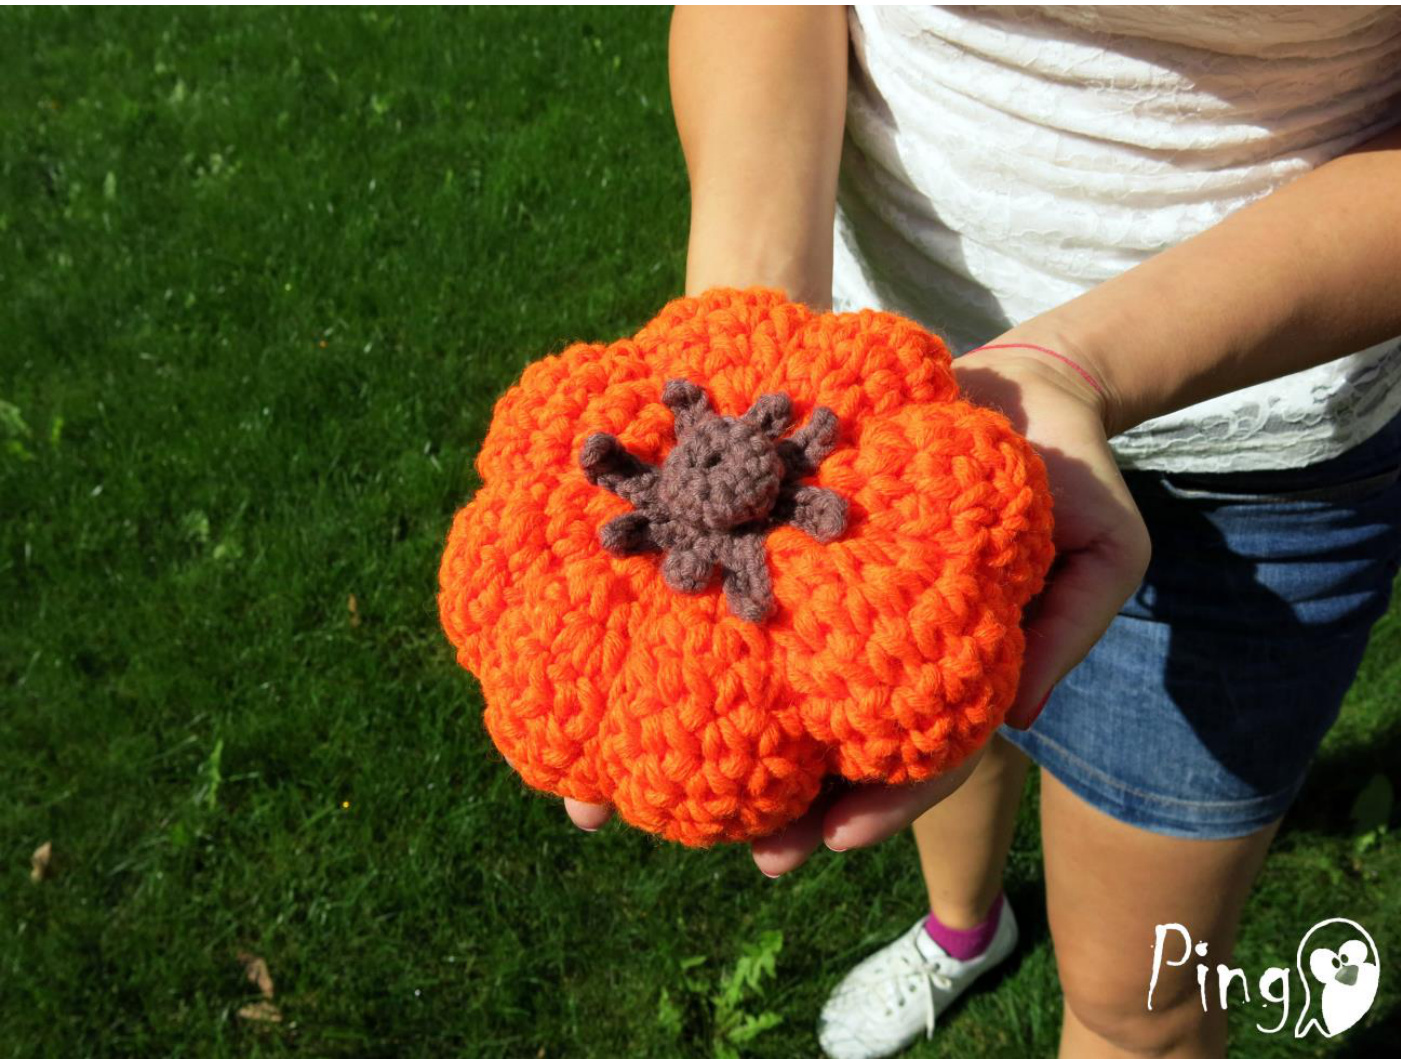
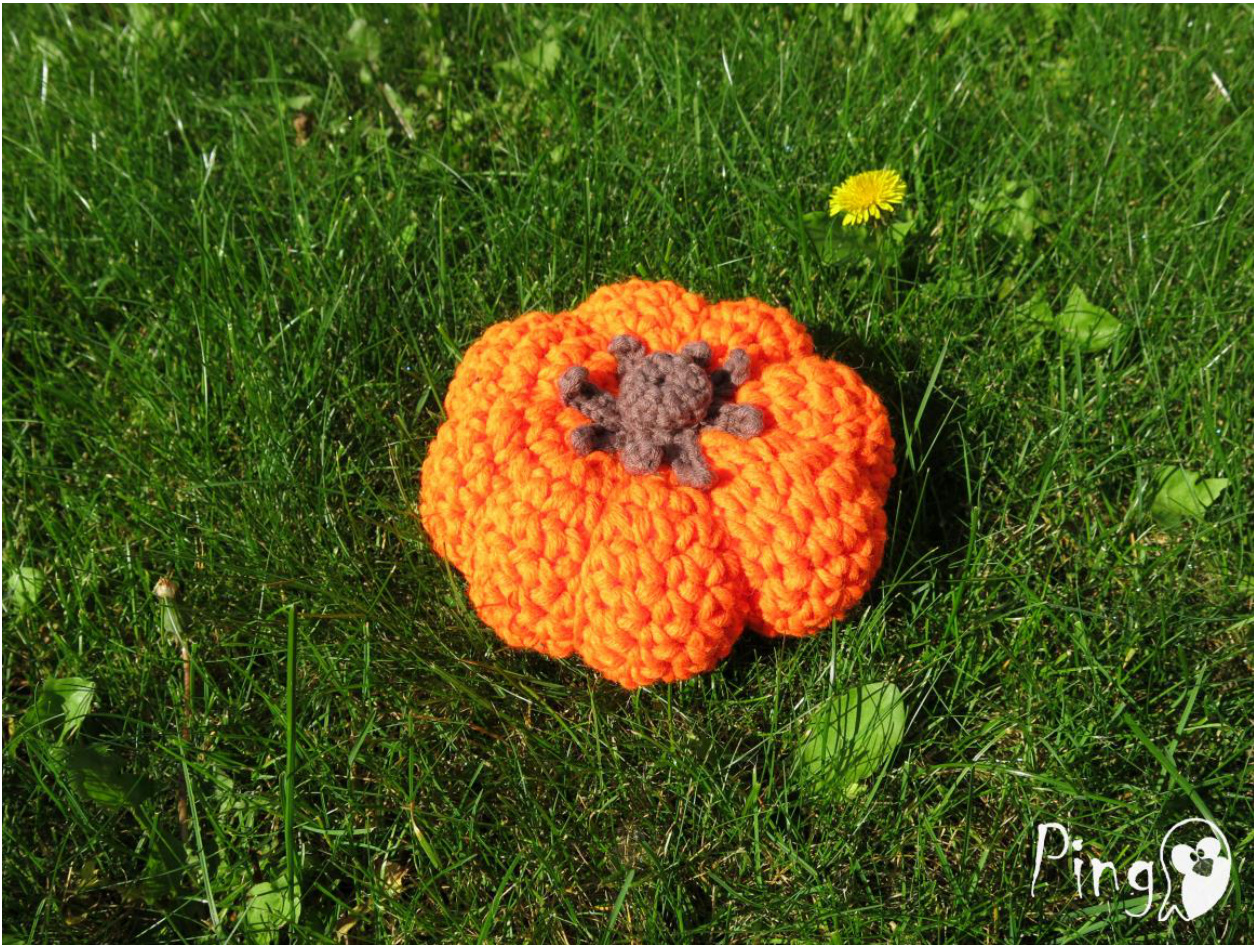
70% acrylic & 30% virgin wool - Boston by Schachenmayr SMC, you will need approximately 5og/55m. Ive chosen the pumpkin body to be in neon orange color - 122. 55% acrylic & 45% cotton - King Cotton by Four Seasons, you will need a small amount of it for the stem. I've used dark brown color - 04. Even that the yarn is recommended to be used with 6-7mm hook size, I've wanted to make the stem more solid, so I've used 2.5 mm hook (you can also use 4-5mm hook - your stem will be a bit bigger than mine but still will look great). Abbreviations used: Chain (CH) Slip stitch (SlSt) Single crochet (SC) Decreasing (DEC): crochet 2 SC together Increasing (INC): crochet 2 SC in same stitch Size of finished pumpkin is: 15.5sm height x 6.5sm width (it depends on the used material and your crocheting style)
Instruction
Pumpkin
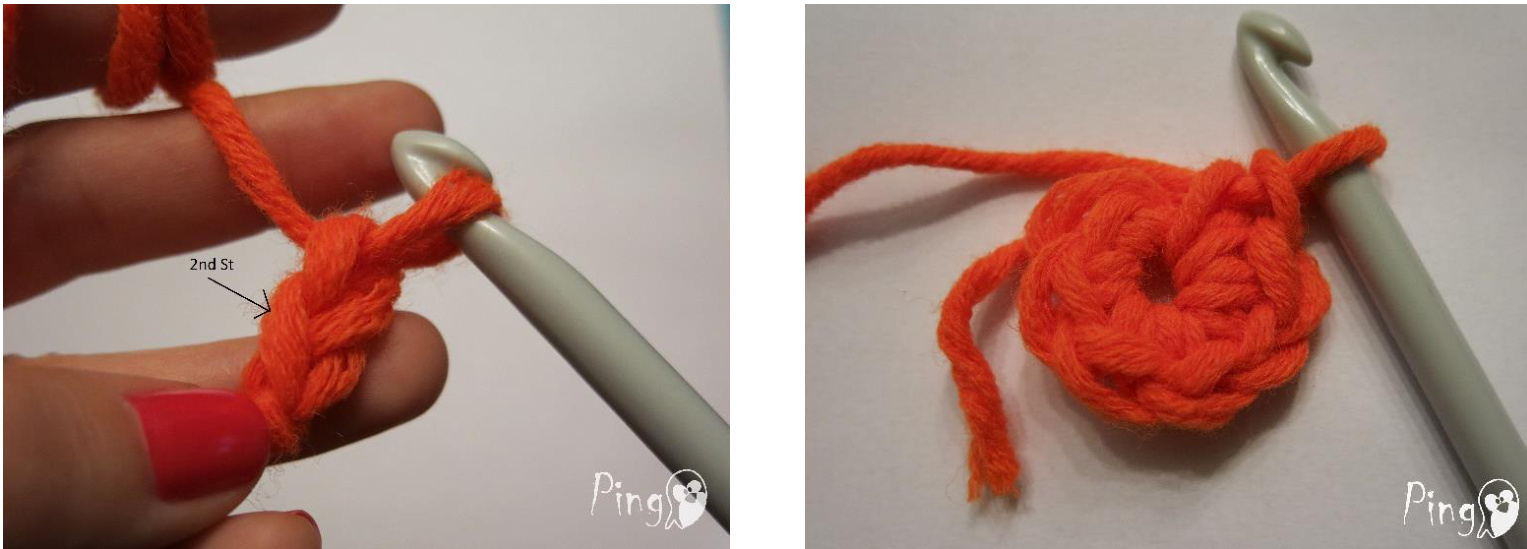
Use orange color yarn, work in circle rounds. Round 1: 2 CH, insert the hook in the second stich from the hook (as shown in the picture below) and make 7 SC, join with 1 SlSt to the first stich to make a ring (7 SC)
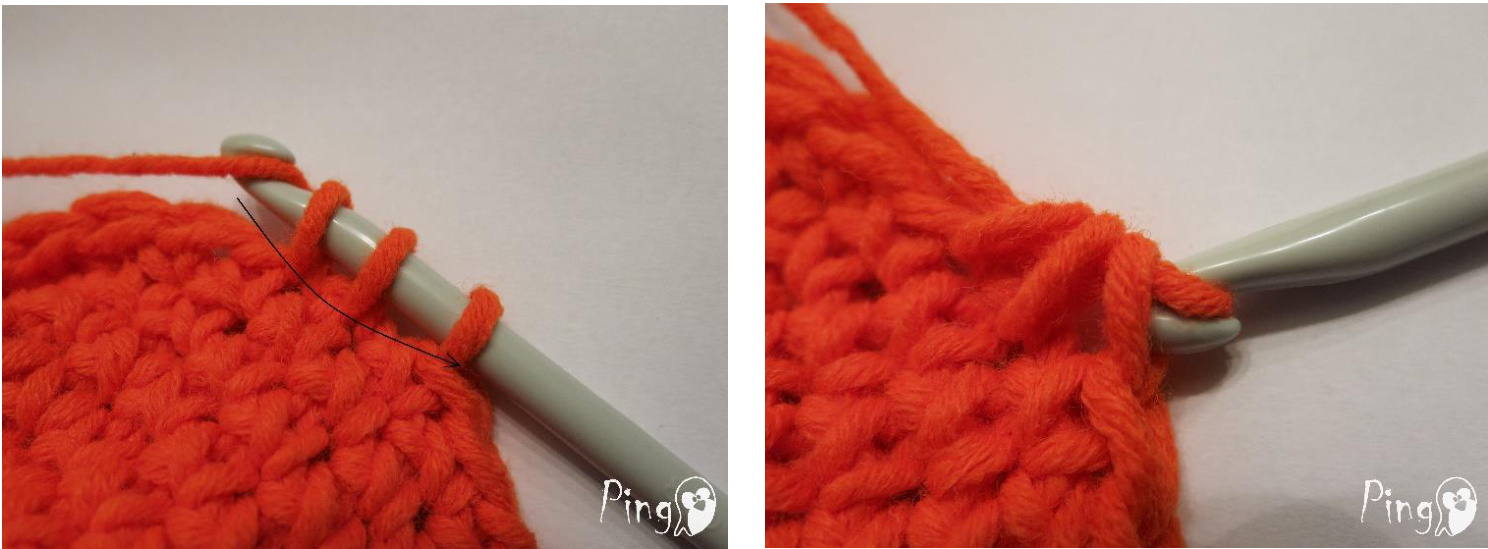
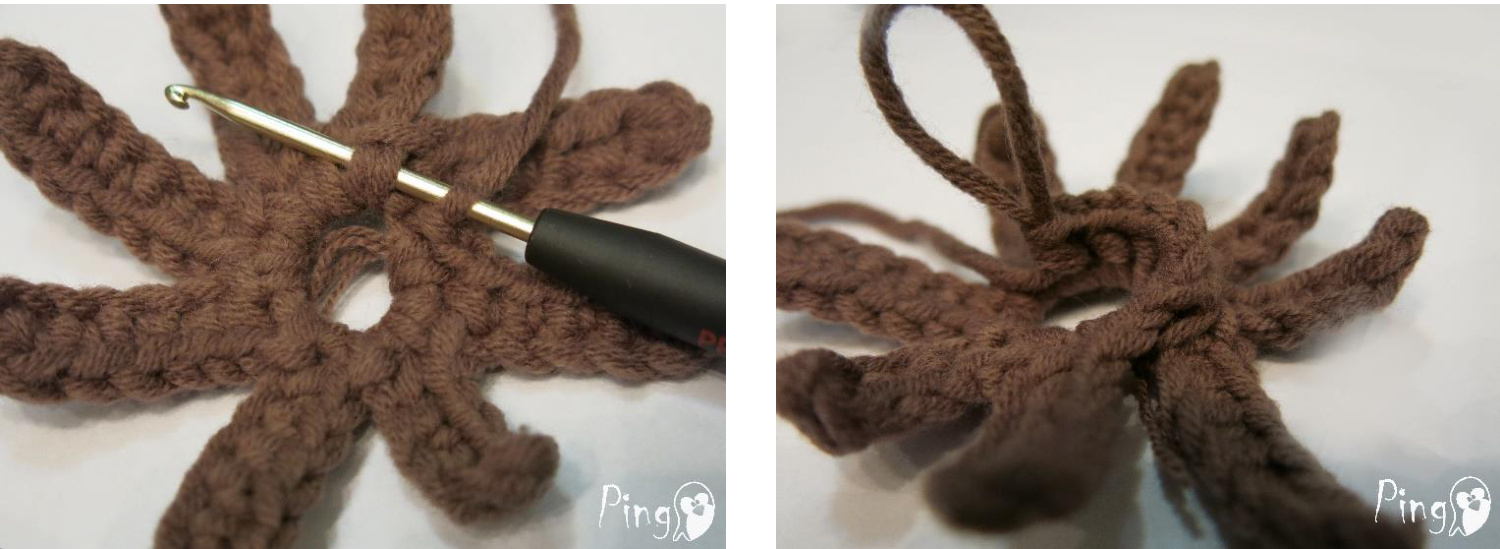
Round 2: 1 CH, INC (crochet 2 SC in one stich) in the next stich and in each stich from the previous round, join with 1 SlSt in the top of the first made SC (14 SC) Round 3: 1 CH, \*1 SC in the next stich, INC in the next stich\* - repeat it 7 times, join with 1 SISt in the top of the first made SC (21 SC) Round 4: 1 CH, \*1 SC in the next two stiches from previous round, INC in the next stich\* - repeat it 7 times, join with 1 SlSt in the top of the first made SC (28 SC) Round 5: 1 CH, \*1 SC in the next three stiches from previous round, INC in the next stich\* - repeat it 7 times, join with 1 SlSt in the top of the first made SC (35 SC) Round 6 - 11: 1 CH, 1 SC in each stich from the previous round, join with 1 SISt in the top of the first made SC (35 SC) If you would like to have a taller pumpkin you can add more rows here - the more rows you add, the higher your pumpkin will be at the end. I've decided to add 6 rows - as you see my pumpkin is with medium high - not too short and not too tall. If you would like to have a scary Halloween pumpkin with month and eyes, most probably you will have to add more rowshere. If you would like your pumpkin bigger, you either can use the same pattern but thicker yarn or just extend the increasing/decreasing parts with a few more rows Gjust follow the increasing/decreasing pattern). In order to make the DEC stich you need to insert the hook from front to back into the next stich, yarn over and draw the yarn through the chain (2 loops on hook), insert the hook into the next stich, yarn over and draw the yarn through the chain (3 loops on hook), yarn over and pull through all the loops on hook as shown in the picture bellow. After the following decreasing rows your pumpkin will have a ball shape.
Round 12: 1 CH, \*1 SC the next three stiches, DEC\* - repeat it 7 times, join with 1 SISt in the top of the first made SC (28 SC) Round 13: 1 CH, \*1 SC the next two stiches, DEC\* - repeat it 7 times, join with 1 SISt in the top of the first made SC (21 SC) Round 14: 1 CH, \*1 SC the next stich, DEC\* - repeat it 7 times, join with 1 SISt in the top of the first made SC (14 SC) You may start stuffing your pumpkin after any of the decreasing rows but most probably after this point the opening will be too small, so use the opportunity to stuff it, if not done yet. You will close the hole after stuffing is complete. Round 15: 1 CH, \*1 SC the next stich, DEC\* - repeat it 7 times, join with 1 SISt in the top of the first made SC (7 SC)

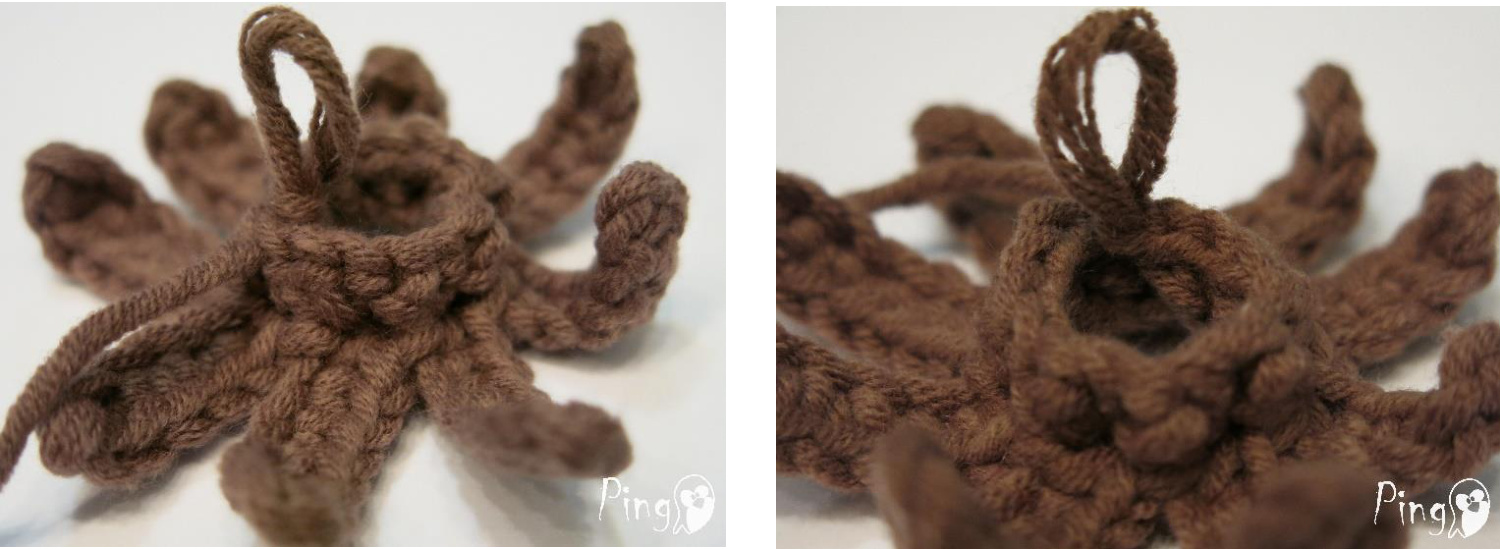
Round 16: 1 CH, continue with DEC stiches around the opening till you can. Close the hole by joining with a SlSt to the opposite side and pull the yarn through to finish closing the hole. This is the bottom of your pumpkin. Leave 40-50 sm. tail for sewing through the center and around the pumpkin as shown in the next pictures.
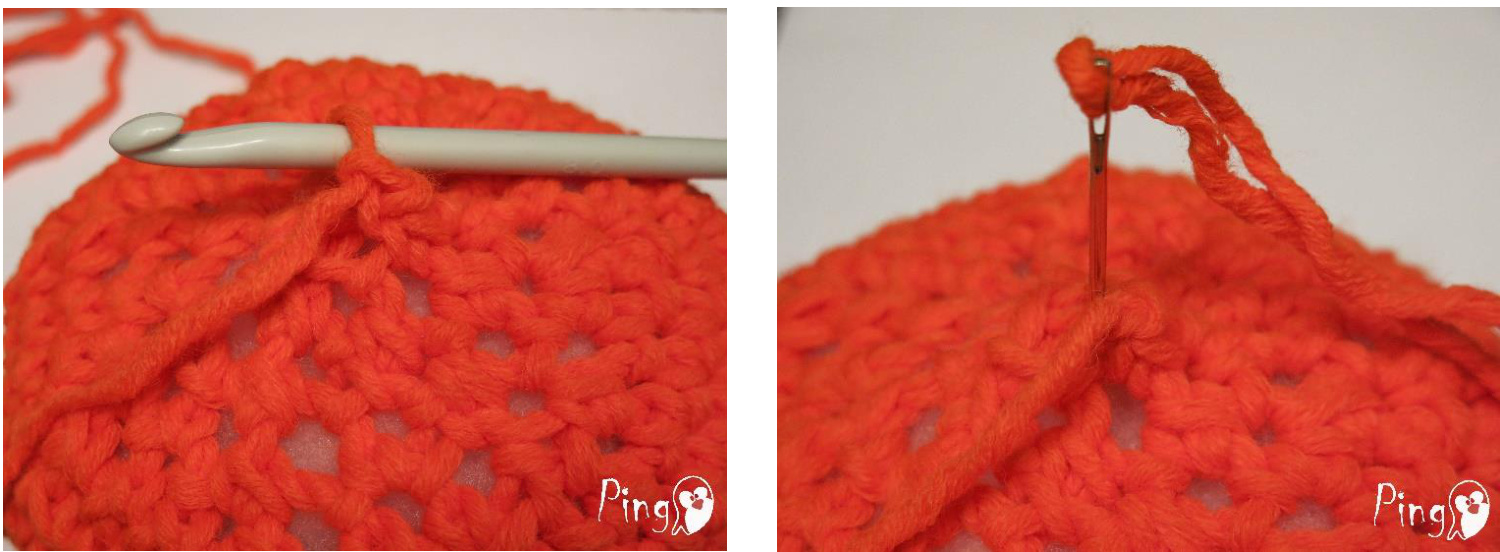
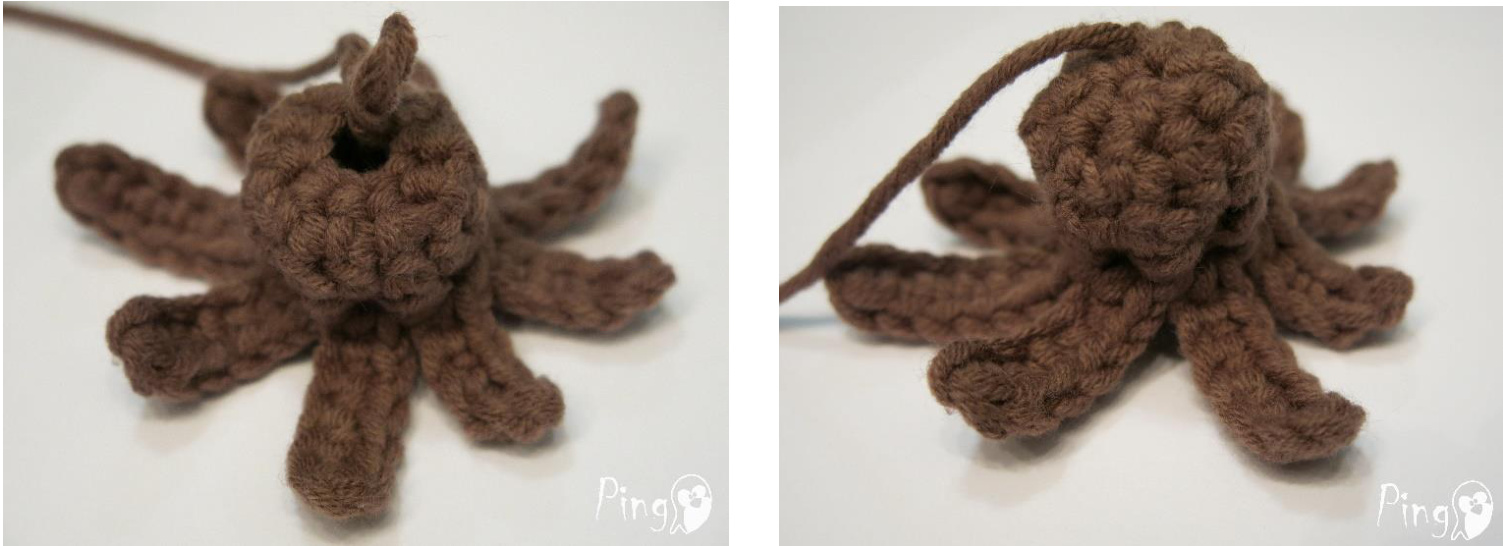
Thread your tail into the yarn needle, insert the needle in the center of the pumpkin and push the needle through the center to the opposite side (the top) of your pumpkin, pulling the yarn through the pumpkin's center will make a dent.
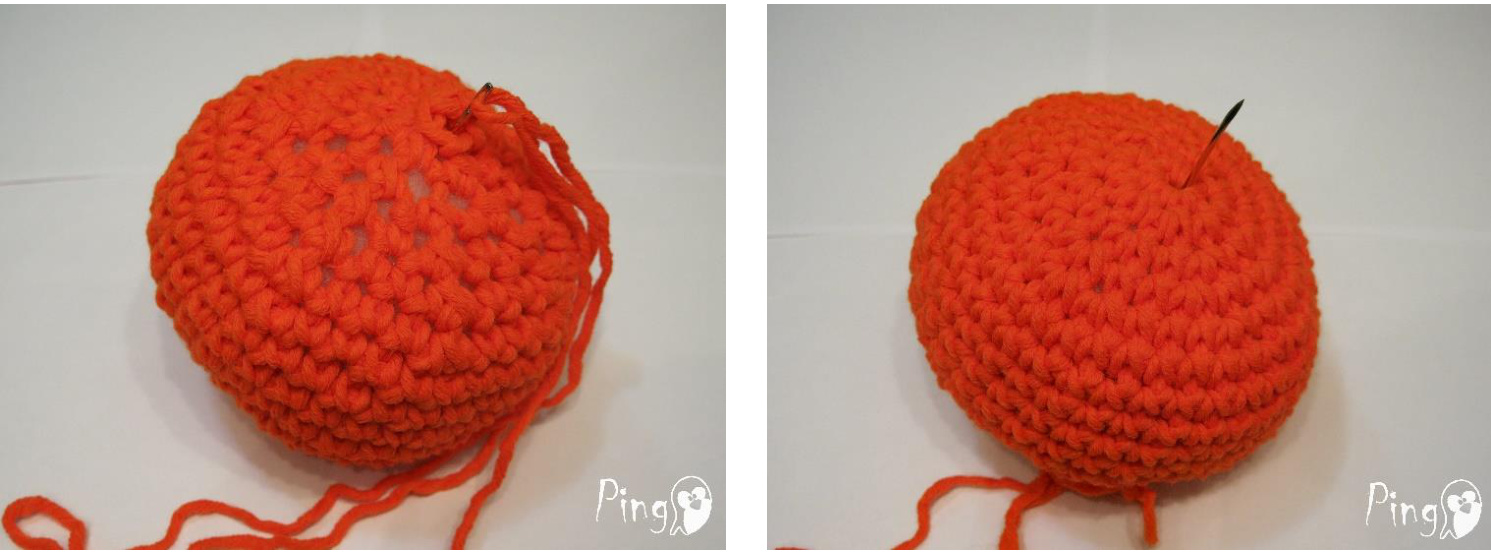
The first dent sequence, will dent 1/2 of the pumpkin. You do this by wrapping the yarn completely around the pumpkin, coming back to the top, making sure your pumpkin is halved and evenly dented.
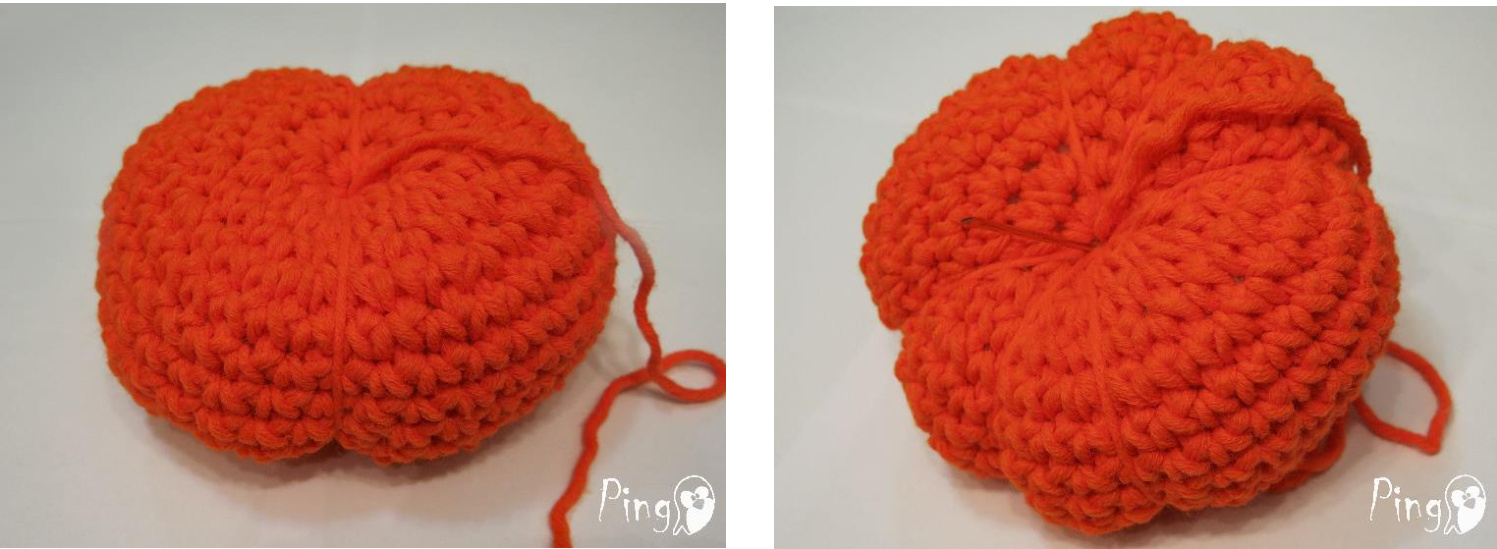
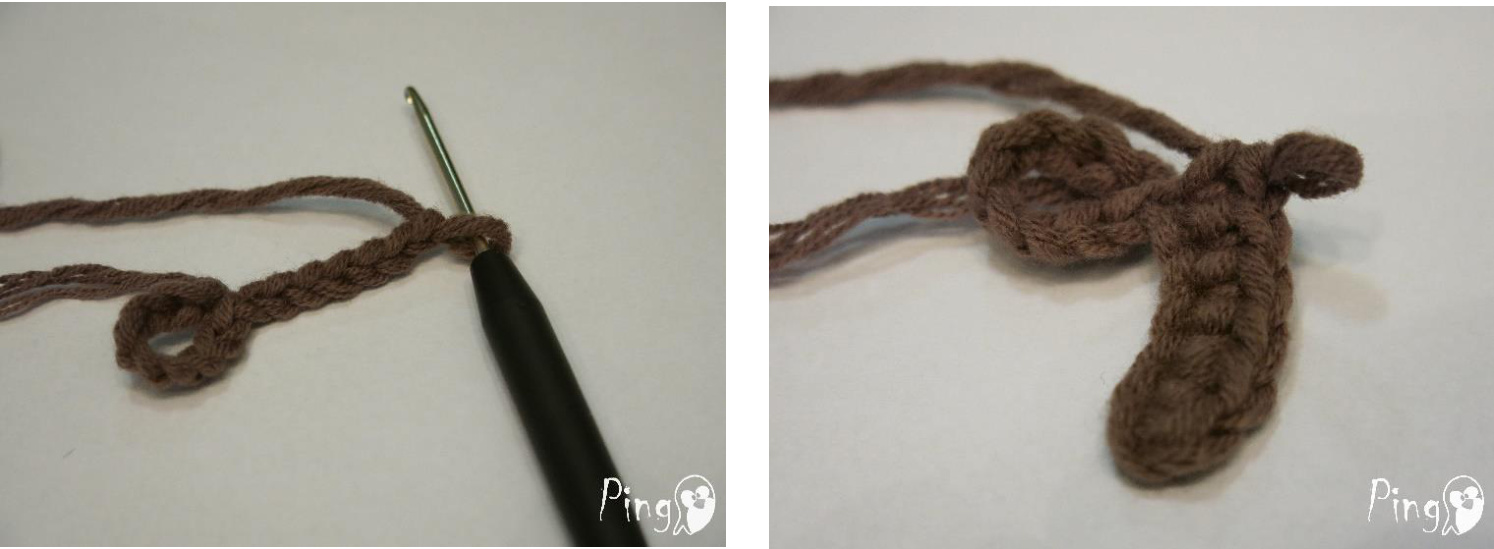
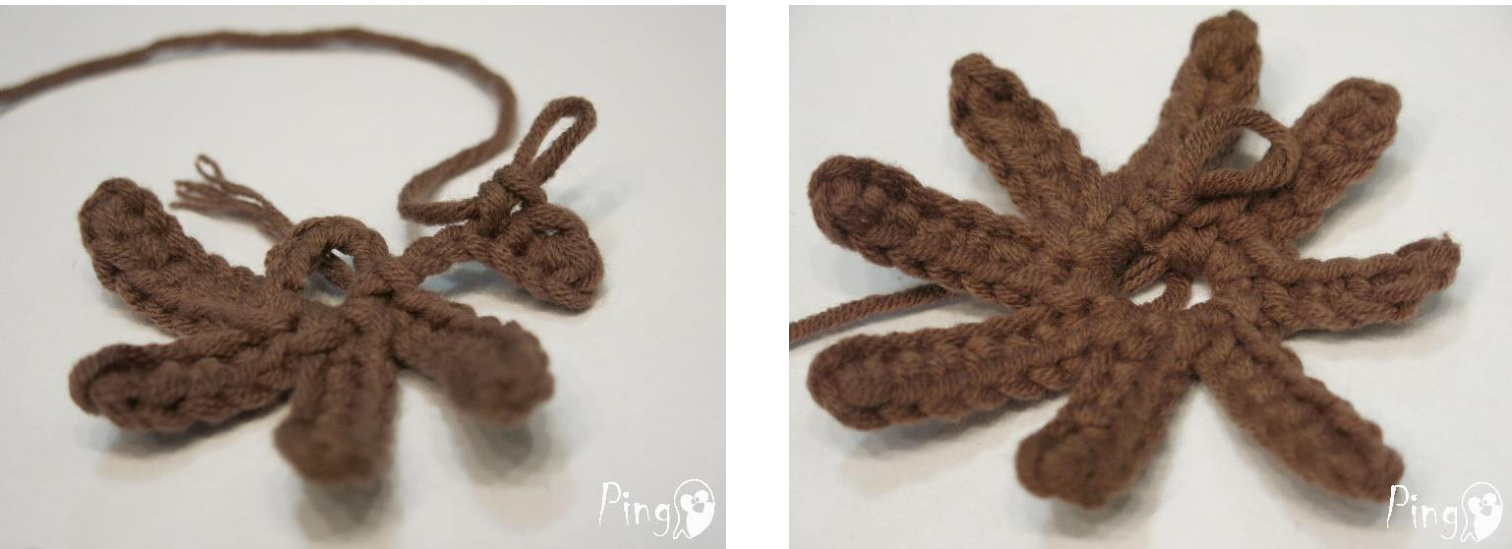
Continue passing through the middle of your pumpkin, pulling and wrapping your yarn, to make and shape the dents. I've used the clock method of shaping - 12 to 6, 3 to 9, 1.5 to 7.5, 4.5 to 1o.5 (you can continue shaping until you are happy with your pumpkin). Tie off and secure your yarn end at the bottom. Use brown color yarn. Beginning: 8 CH, join with 1 SlSt to make a ring

Part 1: 7 CH, insert hook in the second stitch from the hook and make 6 SC (one SC in each of the previous stiches, as shown in the picture below)
In order to attach the first part of the stem to the initial ring, pull the hook through the ring, yarn over and pull through the stich making a CH. Part 2: 6 CH, insert hook in the second stich from the hook and make 5 SC. To attach the second part of the stem to the initial ring, pull the hook though the ring, yarn over and pull it through the stich. Part 3: 7 CH, insert hook in the second stitch from the hook and make 6 SC, attach the third part of the stem to the ring Part 4: 6 CH, insert hook in the second stich from the hook and make 5 SC, attach the fourth part of the stem to the ring Part 5: 7 CH, insert hook in the second stitch from the hook and make 6 SC, attach the fifth part of the stem to the ring Part 6: 6 CH, insert hook in the second stich from the hook and make 5 SC, attach the sixth part of the stem to the ring Part 7: 7 CH, insert hook in the second stitch from the hook and make 6 SC, attach the seventh part of the stem to the ring Part 8: 6 CH, insert hook in the second stich from the hook and make 5 SC, attach the last part of the bottom of the stem to the ring
The bottom of your stem is ready. To make the upper part of it, just follow the instructions below. Stem Row 1: continue crocheting vertically to the bottom of your stem. \*Pull your hook in the attaching stich (as shown in the picture below), yarn over and pull through the stich, yarn over and pull through the two stiches on the hook, pull your hook for second time in the same attaching stich, yarn over and pull through the stich, yarn over and pull through the two stiches on the hook\* - repeat 8 times, join with SlSt to the first stich (16 stiches)
Stem Row 2: 1 CH, 1 SC in each stich from the previous row, end with SlSt in the top of the first made SC (16 SC)
Stem Row 3: 1 CH, \*1 DEC, 1 SC\* - repeat 5 times, end with SISt in the beginning of the row (10SC) Stem Row 4: 1 CH, continue with DEC stiches around the opening till you can. Close the hole by joining with a SlSt to the opposite side and pull the yarn through to finish closing the hole.
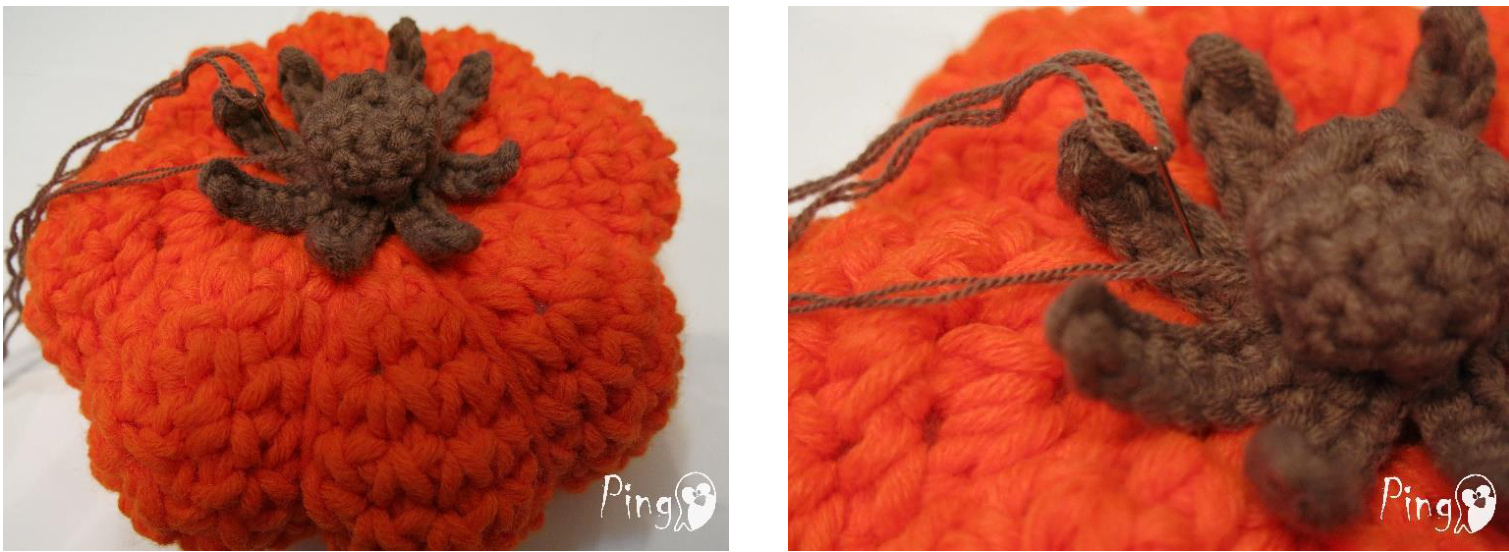
Stuffthe stem and sew it to the body of the pumpkin. Be careful - each part of the bottom of the stem should cover a dent of the pumpkin's body.
Enjoy your pumpkin :0)