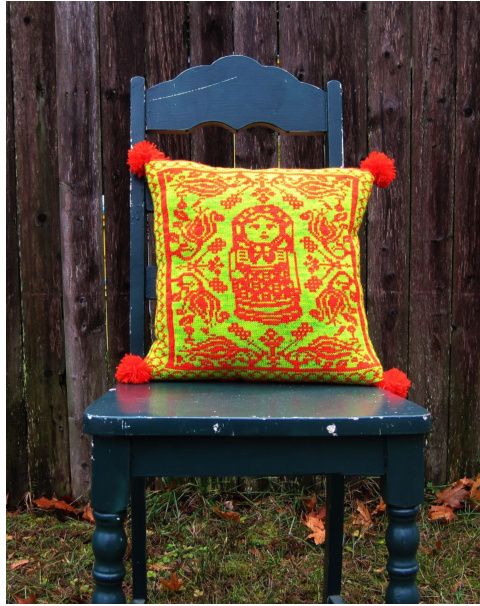
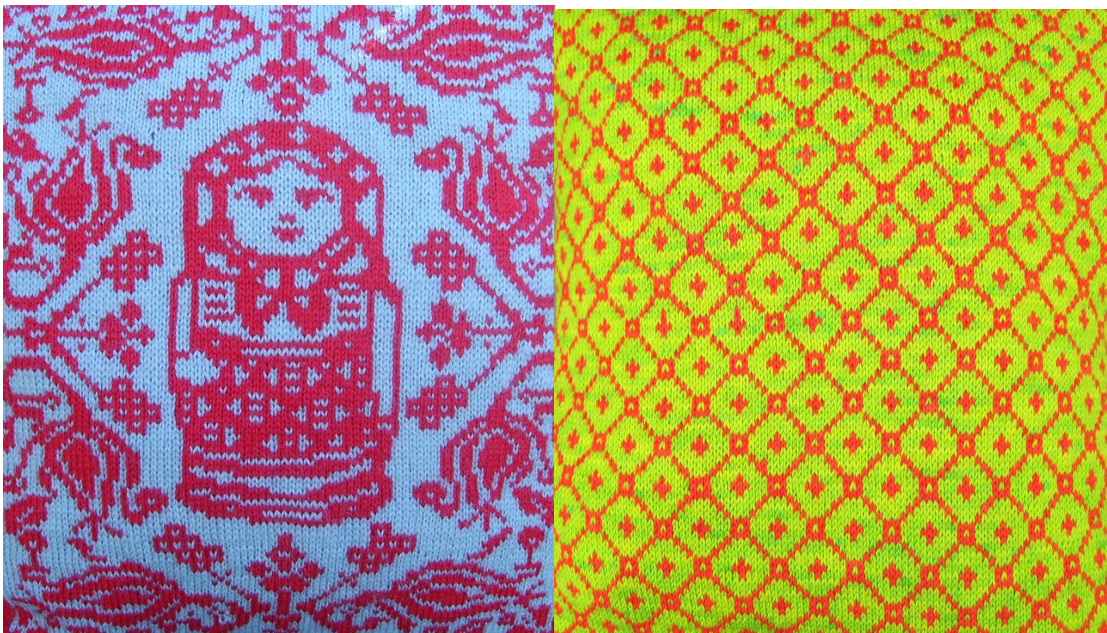
Folkloric Matryoshka Pillow
Worked in the round from the bottom up, and then the top and bottom are stitched closed.
Supplies:
Yarn: 4 ballsof fingering weight yarn:(about 230 yards of color 1, about 230 yards of color 2 For the pillows pictured, I used: blue and red: Knitpicks Palette in red (2 balls) and sky (2 balls) orange and green: Alchemy Juniper in kai's goldfish (2 hanks), and sour grass (2 hanks) some fiberfill or other stuffing
Tools:
One $24^{\circ}$ size 2 $(2.75\,\mathsf{m m})$ circularneedle Stitch markers (2). Needle to weave in ends. Either a commercially available pom-pom maker, or some cardboard (little scraps) and scissors to create your own pom-pom maker (that part is fun- it feels like childhood..) Gauge: 36 st and 44 rows $=4$ inches square in alchemy juniper. 32 st and 40 rows $=4$ inches in knitpicks palette. Gauge is not terribly important for this project. In alchemy juniper, the finished measurements will be about 12 inches wide by 13 inches tall. The pillow will be about an inch larger in all dimensions using knitpicks palette.
Pattern technique:
Wrapping: In traditional fair isle knitting, one only carries the unused yarn color behind the knitted work for a few stitches. There are several spots where this pattern requires you to carry the unused color behind the knitted work for longer stretches. This can create long “floats" of unused yarn behind your work. While this pillow wilbe sewn closed and we won't see the wrong side, long floats, when incorrectly handled, can screw up your tension causing the fabric to buckle, which may interfere with the loveliness of your hard work. We will avoid having dangling floats by using a wrapping method. When to use the wrapping method: whenever a float is going to be more than about 9 stitches long. When done carefully, there is no show-through of the unused color. It works best if you stagger the so that they don't recur in the same spot. How to create the wrap: put your right-hand needle into the next stitch as if to knit. Wrap the unused color once over the used color, then knit the stitch color as normal. Tug the unused "wrapped" yarn gently up toward the top and right-hand side of the work. What direction do I wrap the yarn? The wrap works best if you bring the yarn over the top of the used color. However, if you do only wrap in one direction, you will get very twisted yarn. For convenience sake, I recommend that you sometimes wrap from the bottom, it keeps the yarn from tangling. Abbreviations St Stitch Co Cast on PM place mark K Knit BO Bind Off
Instructions for Pillow
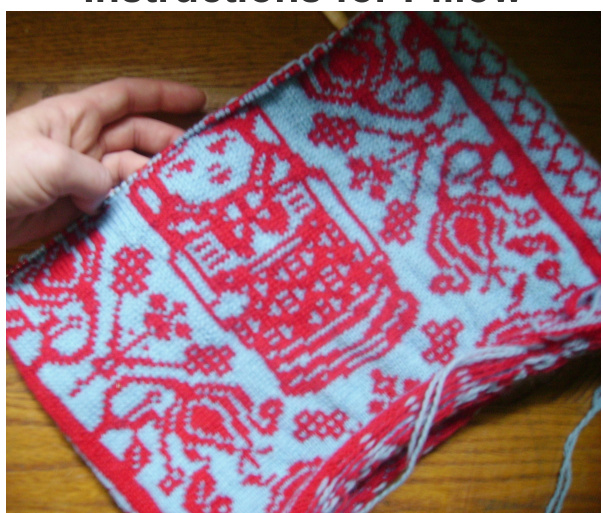
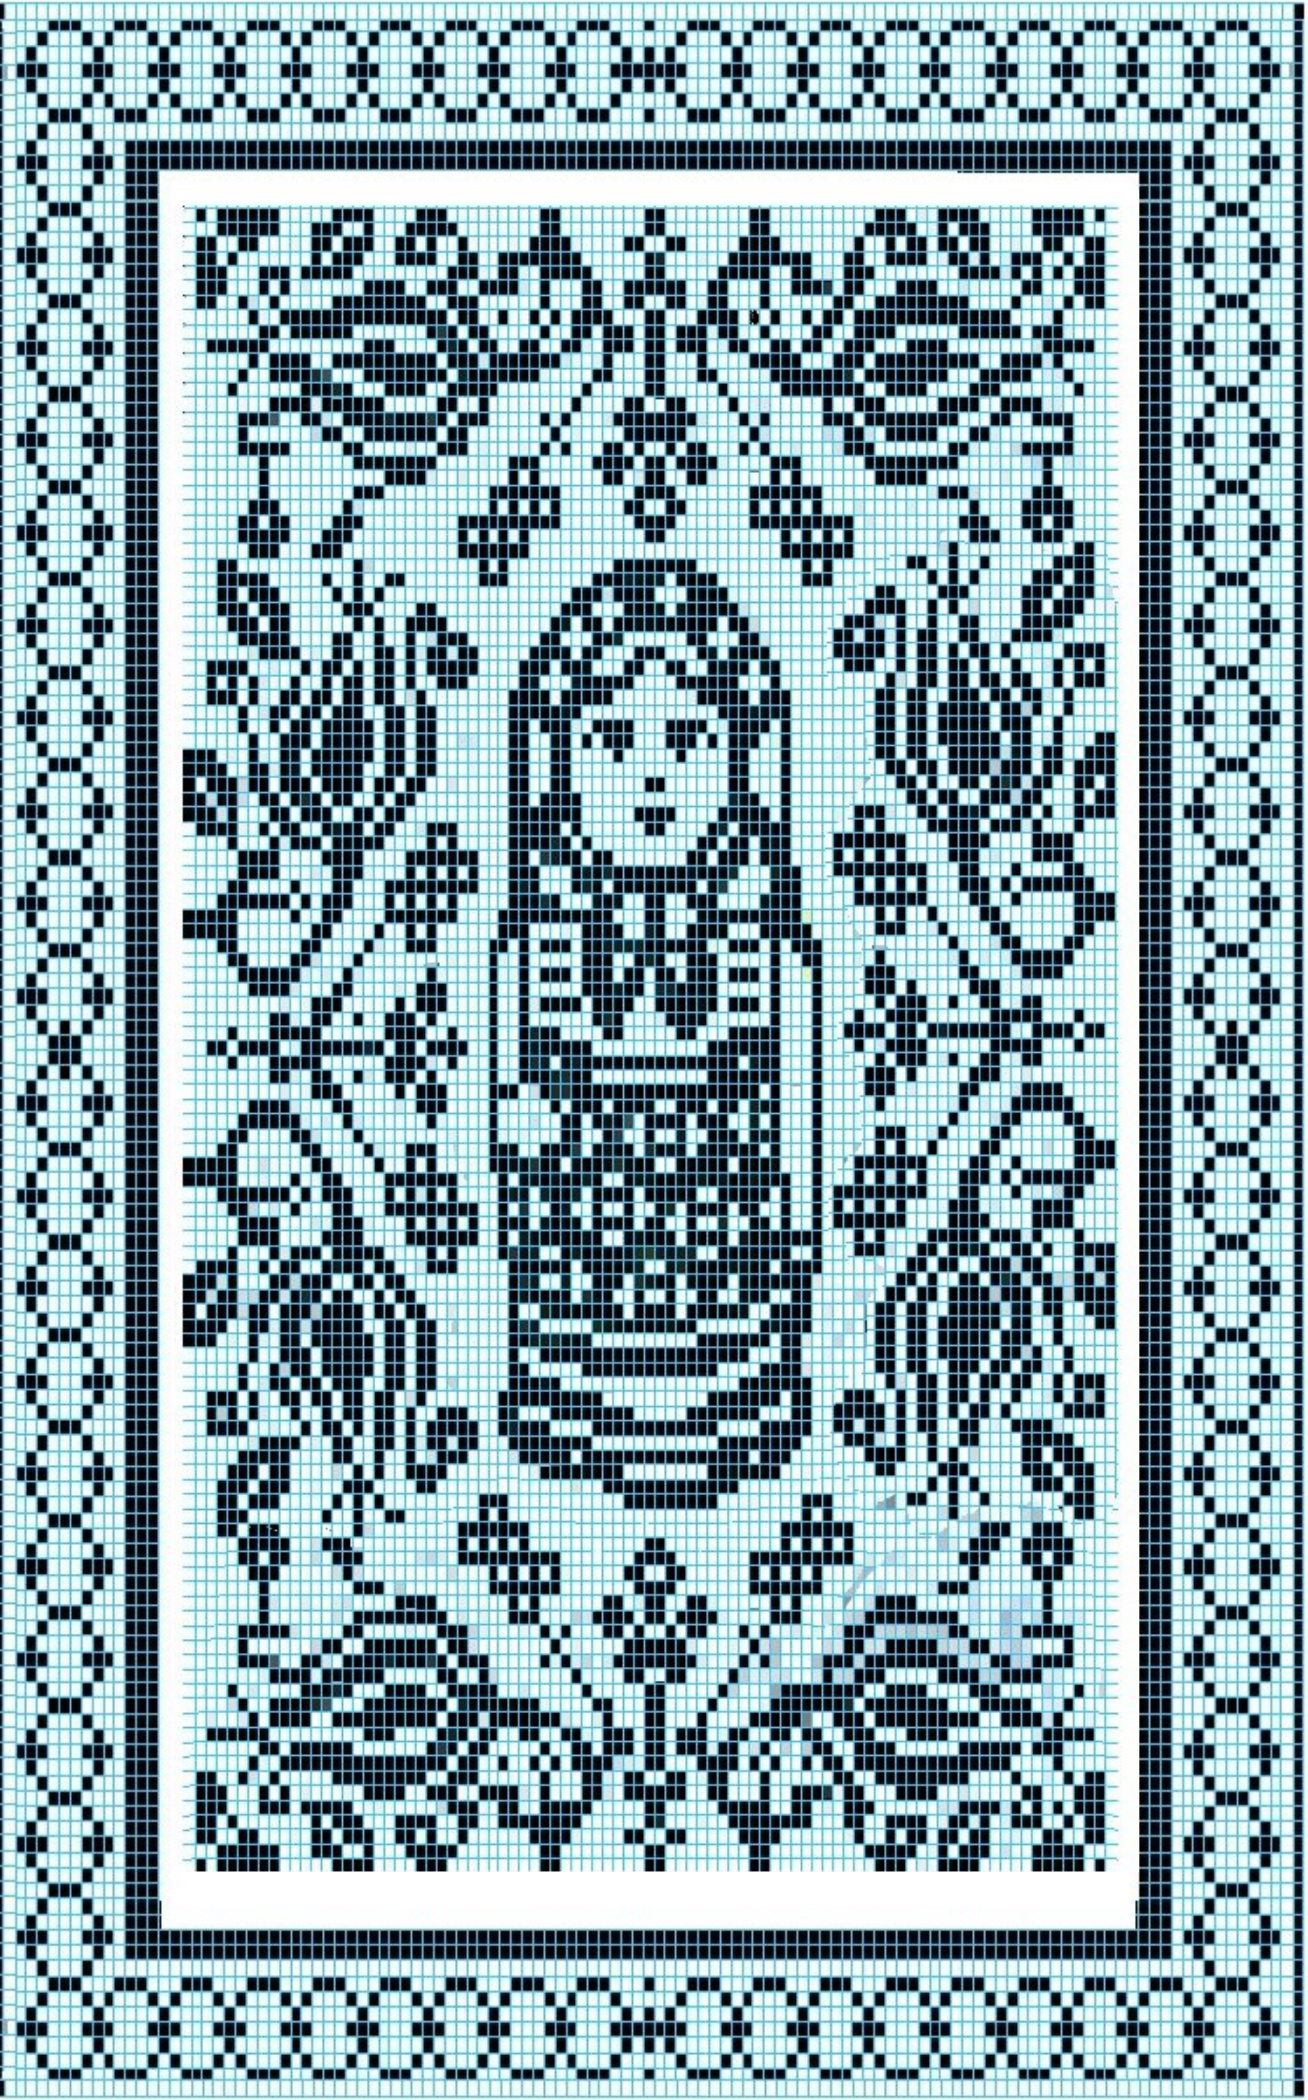
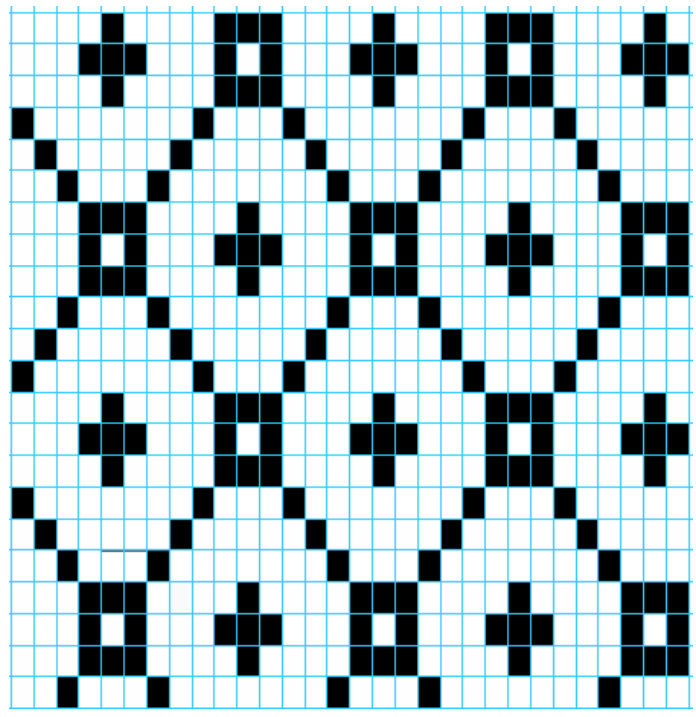
Using color 1, Co119 sts, PM (pilow front), co119 st, PM (pilow back). Join, being careful not to twist. K 4 rounds even in color one. Join color 2. On pillow front, work chart A. Simultaneously, On pillow back, work chart B. Notes about reading chart A: Chart A should be read as one continuous chart. The white space that you see is due to some differences in the scale of the two images. If you find this confusing, it may help you to PM after the first 15 st of chart A (border), work the 89 center stitches, and PM again (border edge) to delineate the “frame." Special instructions for working rows 1 and 9-11 (as well as corresponding 4 rows along top edge) on Chart A (pillow front): These rows, as you can see, are long single color rows that create a frame- when working these rows, you will have to break the unused color, and then re-join to continue in fair isle. Work 4 rows even in color 1. Work bo row. Weave in any ends.
To stuff: leaving the pillw right-side out - using a whipstitch through the selvedge edge, stitch together one edge of pillow. Stuff to desired firmness. Stitch the other edge closed. To make pom-poms: get a couple of pieces of cardboard. Cut 2 circles, each about 1.5 inches in diameter (these do not have to be perfect or neat at all). Next, cut a smaller circle in the middle of each larger circle. Two cardboard donuts. Stack the donuts on top of each other, so you have one double-decker donut. Get a big yarn needle, and thread it up with color A. To make this more eficient, the best way to do this is to thread the needle doubled up- take a long piece of yarn, fold it in half, then thread the whole thing through the eye of the needle- that way you are using 4 strands at once. Wrap your yarn all around your little cardboard donut, tillit is completely covered, with more than one layer of yarn.

Take some scissors, and insert them between the donuts- cut all the yarn around the outside edge, as pictured. Next, secure the pom-pom in the middlelike this: take a piece of yarn, and tie i tightly between the donuts- making a little bundle.
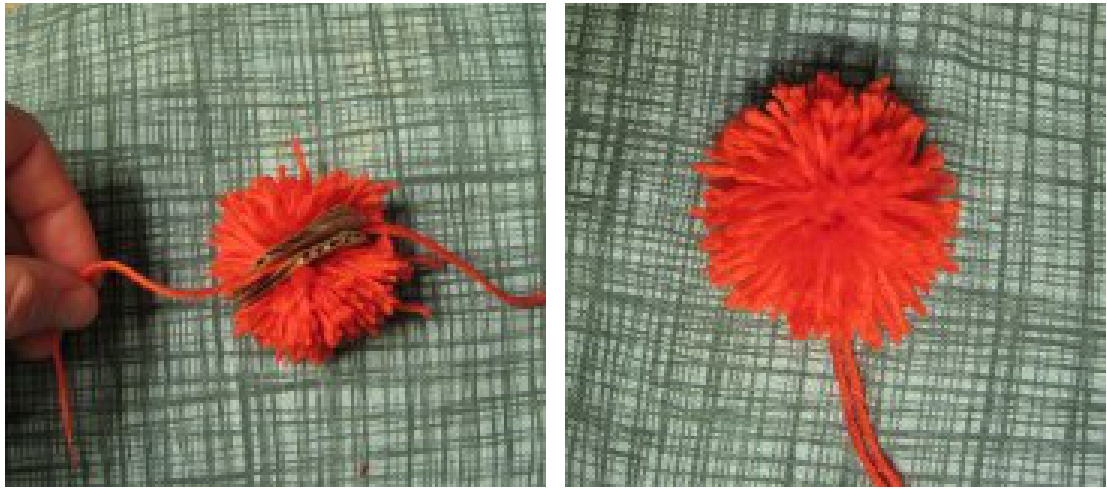
Carefully pull the cardboard off the yarn. Fluff it out and trip it so it looks neat. Make four, and attach them to the corners. See the next page for the charts! This Pattern is for personal or charity use only. Neither it, nor items produced using it are for resale.