Welcome One, Welcome All
How This Works :)
1 BREATHE! This is sooooo relaxed. There is no right or wrong, just interpret the instructions however they seem to read to you. Everyone's freeform will turn out differently anyway :) ery day in March 2012 there'll be a new instruction with changes to the following things. \* Stitch - we'll start off simple and get more complex as we get better acquainted with the freeform. + Yarn - just go with the nearest thing you have to what's suggested. \* Hook size - sometimes this won't match your yarn... that's part of the fun! \* Direction - this will become apparent as we go along \* when to stop - even in the middle of the freeform \* Where to start - this will be an approximate thing, don't get bogged down with being exact :) 3 Sometimes there will be something else thrown into the mix, like adding beads maybe. 4 The number of stitches and/or rows you do will either given to you, or will be chosen using a kind of random number generator, e.g. go and count the number of spoons in your kitchen - that's your amount of stitches, or roll a dice for the number, etc.\* 5 Whether you follow the directions as though they are UK or US stitches is up to you unless stated in that day's directions. 6 This year's instructions will be heavily influenced by a few things... 5 is the magic number! events happening this year Special Anniversaries 7 Occasionally, there will be a DfaD (Designer-for-a-Day) who will give an instruction. This may be in addition to the normal day's instructions and if that's the case you can chose to do one, the other, or both... up to you :) 8 For those of you who find working in one colour too tough, 5 is the magic number for you, allow yourself 5 occasions where you can use contrasting, or complimentary, colours :) 9 For those of you who want to make something larger, 5 is the magic number for you too, multiply any of the instruction numbers by 5
Day 0 of our Freeform - March 0 2012, or Leap Day 29 Feb ;)
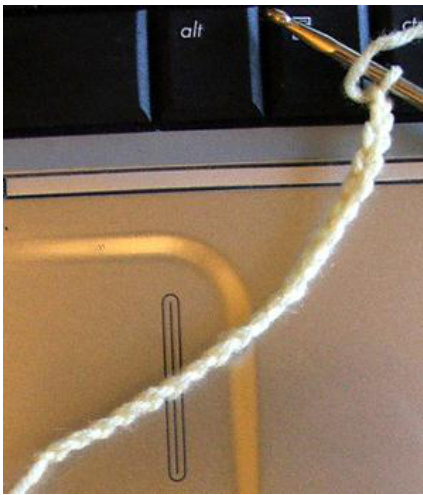
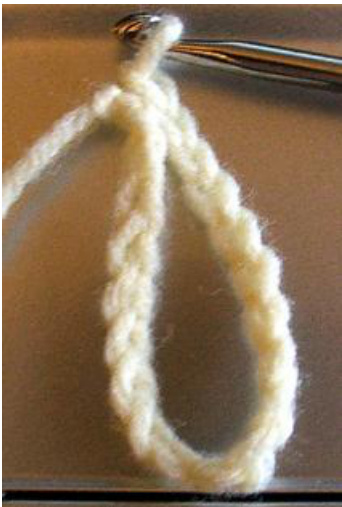
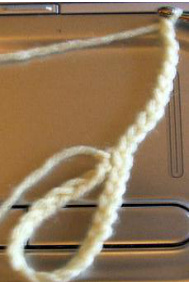
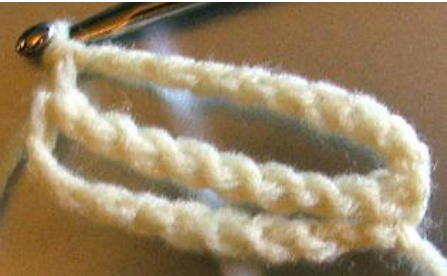
It's a pre-curser to the real stuff; we're just setting ourselves up to begin. So pick a hook and pick some yarn; any hook, any yarn in your chosen colour.
What's going to be your favourite thing about 2012?
+The amount of letters in this is the amount you chain. \* The amount of words is the number of rows you are going to do. If it's about family your stitch is single crochet If it's about pets your stitch is half double crochet If it's about friends your stitch is double crochet + If your favourite thing concerns anything else your stitch is treble crochet Now go and lay the groundwork for your freeform!
Day 1 of our Freeform - March 1 2012 - Hapus Dydd Dewi Sant
...or for non-Welsh speakers... Happy Saint David's Day.
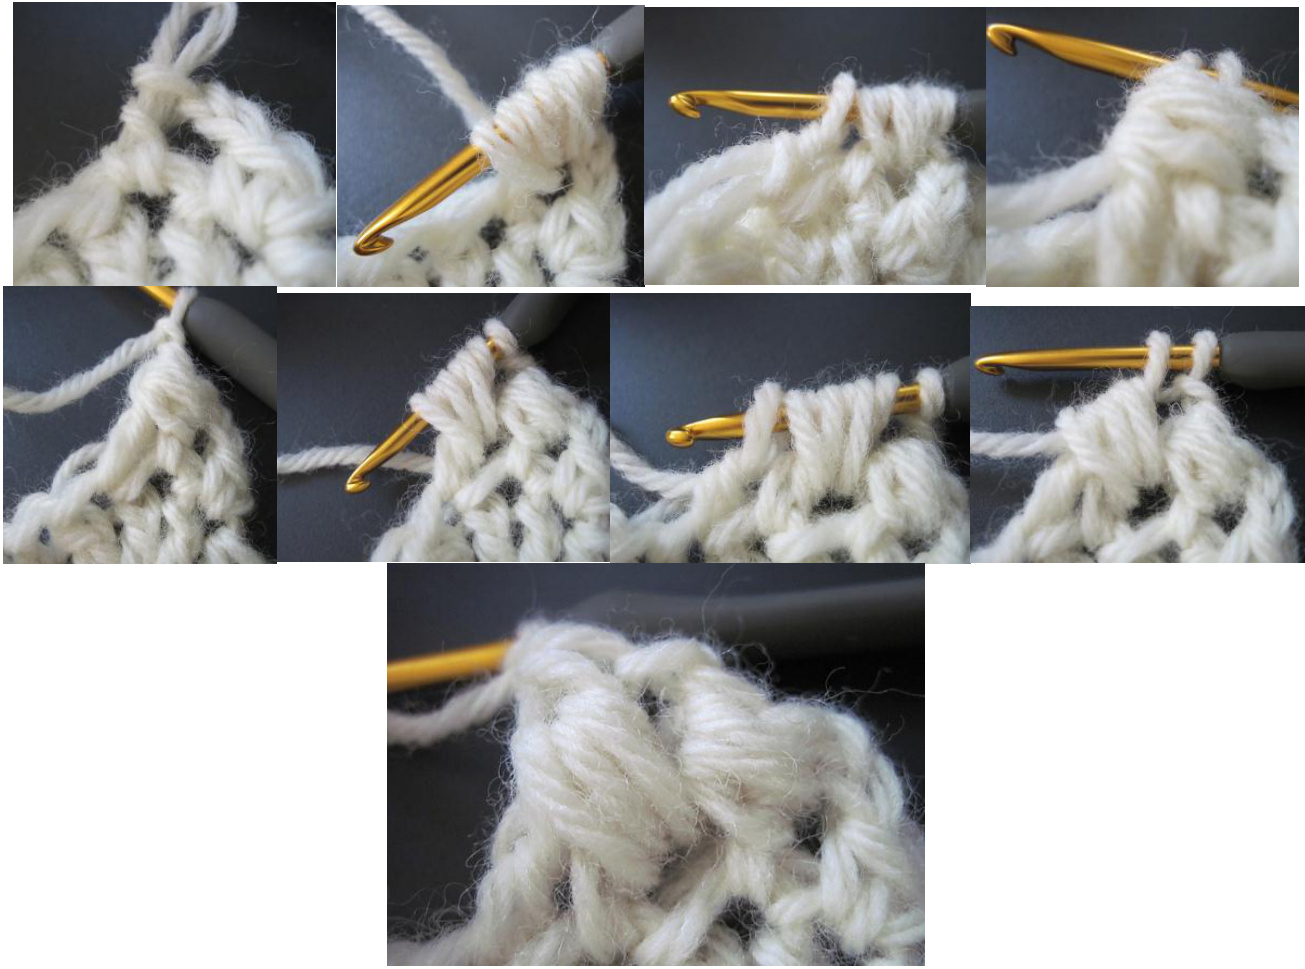
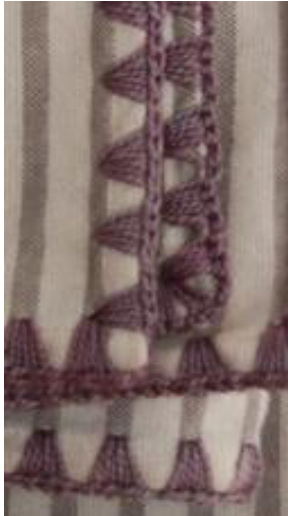
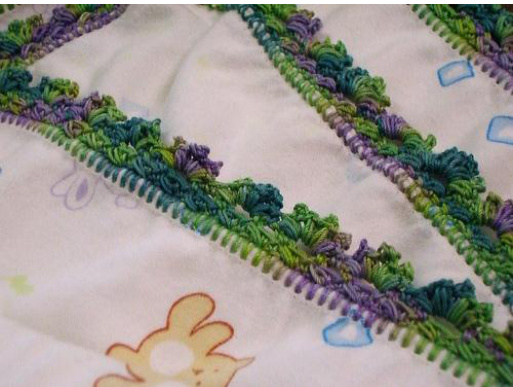
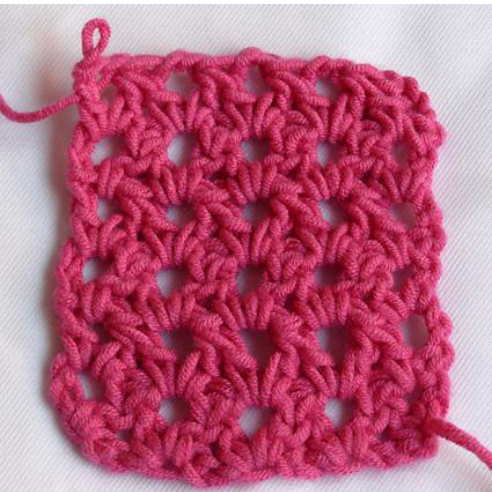
Here in Wales we are celebrating our patron saint, St David (a patron saint advocates in heaven for a nation, place, craft, activity, etc.) and the day is celebrated by the wearing of a daffodil. For today's instruction you need to decide on which flower is your favourite. Hook - Go up a size from yesterday's instruction. Yarn - Unless you are using the same yarn throughout change it now. Direction - if you are about to start with the right side facing, continue across your work as normal, if you are about to start with the wrong side facing you, don't! Instead carry on down the side of your work (and across the bottom if necessary. Stitch - Bobble. There is a description of the stitch here along with video links so you can watch and play along :) Amount of stitches - The amount of letters in your favourite flower. Now, if you're doing this in March 2012, tell us in the chat thread what your favourite flower is and why, post pictures if you like, and suggest someone to be the patron saint of crocheters ;)
Day 2 of our Freeform - March 2 2012 - INSPIRATION
One of our freeformers reminded me today of my love for Charles Rennie Mackintosh designs and it turns out that was fate at work. Why was it fate? Well, 5 years ago (5 is our magic number!) Glasgow City Council agreed to a café bar and live music venue (party anyone?) in a building that Mackintosh designed the facade of... the Daily Record Building... and what month did they give that permission? Why March of course! Here is a drawing of his stylised rose on that building...
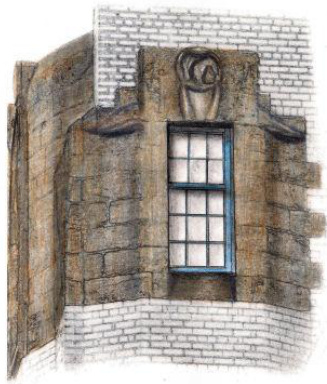
He also had full height tree motifs placed between the bays which were created by the simple use of different coloured bricks.. how freeform-y! So, today's instruction is about someone whose work inspires you.. a designer, an architect, a painter, anything.. but not a crocheter (we'll be using this later!). Hook - keep it the same as yesterday's instruction. Yarn - Unless you are using the same yarn throughout change it now. Direction - Take your current scrumble in both hands and turn it 180 degrees. Join your new yarn in a suitable place there. Stitch - Eyelet. There is a description of the stitch here, ignore row one, just repeat rows 2 and 3 Amount of stitches - The amount of letters in your inspirational person's name. Amount of rows - Count the decades that your inspirational person lived for, that's your amount of rows. Each time you do row 2 of the pattern above it counts as 1 row for you :) Be inspiring, thread ribbon, cord, plarn, anything, through your eyelets; secure ends down or do something different with them... let your inner self shine through... you are inspiring too! Now, if you're doing this in March 2012, tell us in the chat thread who it is that inspires you and why, post pictures of their work if you can... we all love eye candy!
Day 3 of our Freeform - March 3 2012 - Start Again!
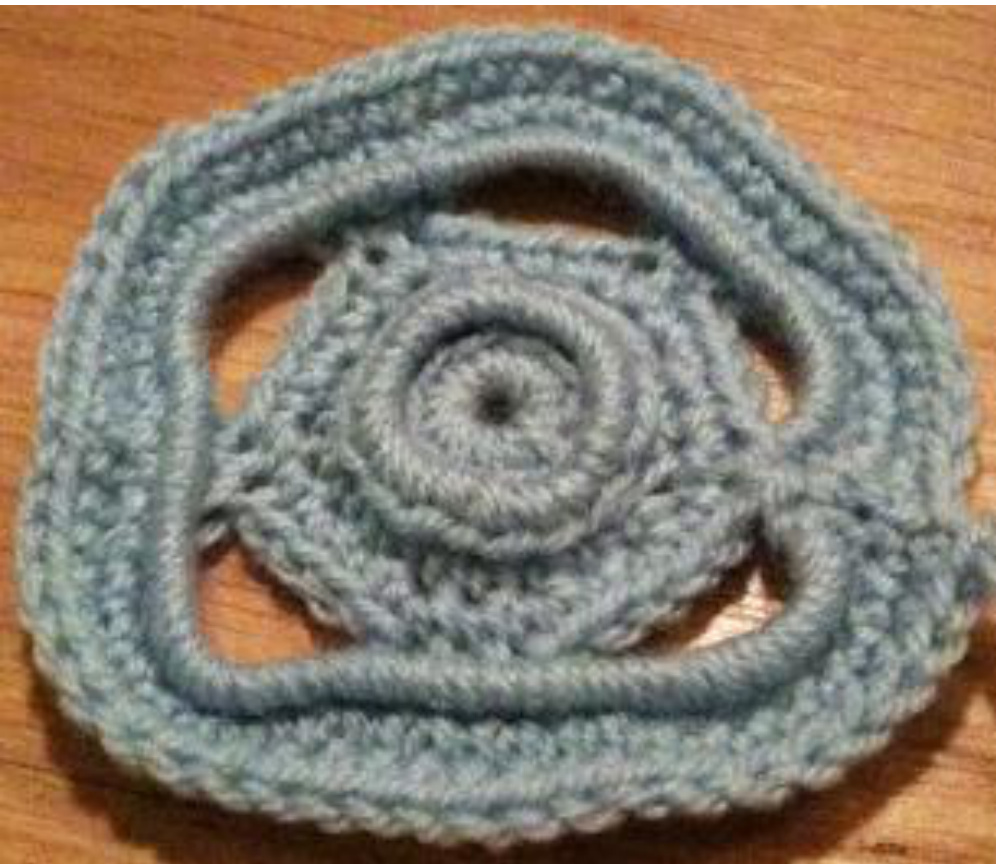
Yep, that's what I said, start again. Put down your current scrumble and start a new one. You can chose how you want to join them later. For our new scrumble we are going to honour the Olympics that are being held in the UK (2012). Hook - You chose. Yarn - You chose. Direction - Round in a circle..5 times, for the 5 Olympic rings. Then find an interesting way to join them together. Stitch -You chose. Amount of stitches - You chose. If you're new to freeform and this is a bit too scary for you, then use the magic ring to make rings. Make US double crochet (DC) into the rings, you will need to start with a chain three to act as your first DC, then make 11 further DC into the ring. You can choose to make allof the rings the same size, same stitch, same yarn, or you can choose to do all of them different, or you can choose to keep some things the same whilst changing others. You can choose to join them in a line, in a ring or in an interesting shape you like...just remember, in freeform there is no right or wrong, it's all just a feeling of what works for You! Have fun my little Olympiads ;)
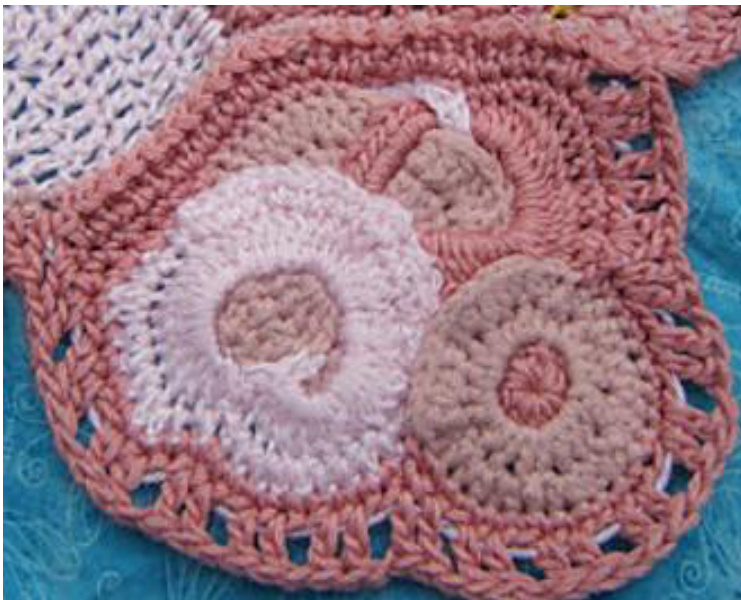
Photo from Victoria's interpretation of the instruction (Ariaya on Ravelry)
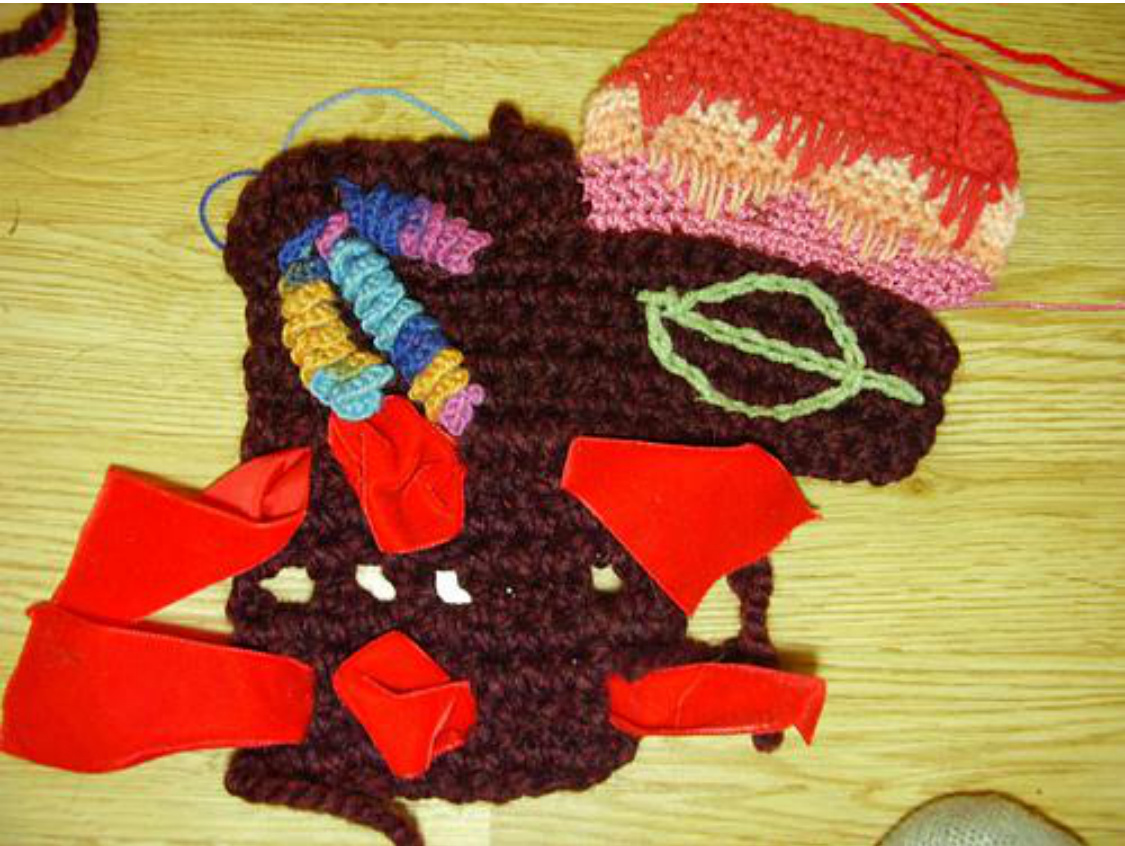
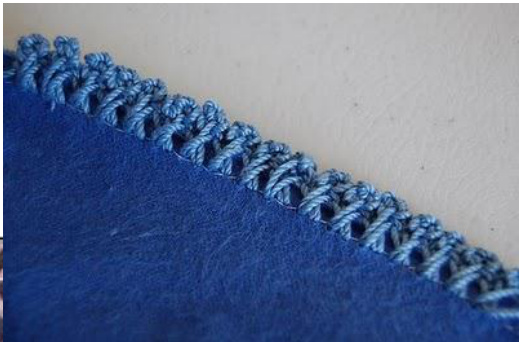
This is day 4 of our Freeform - March 4 2012 - March Forth
It's March Forth and Do Something Day!
So march forth to your craft room, table, box, and grab a piece of material (along with a needle and thread) and something that you wouldn't expect to see with crochet or with sewing. Cut your material to a size and shape you like, and then do buttonhole stitch, back stitch, or a running stitch around it.
Hook - 4mm.
Yarn - Unless you are using the same yarn throughout, pick something fluffy, fuzzy, or with texture Direction - Round in a circle... Round the outside of your material. Crochet Geek shows you how to do this here :) Stitch - You can stick to SC and DC, or do something more expressive, all are just as good :) Amount of stitches - Enough to go right round your piece of material. Amount of rows - The amount of different colours you're wearing (if an item of clothing has more than one colour in it, the colour is "multi" and so counts as one), increase stitches as necessary to make your piece lay flat. If you don't know how to do that (and you're doing this in March 2012) yell out in the chat thread :) Now, "what", I hear you yell, "are we supposed to do with the object not related to crochet or sewing"... find a way to crochet it in to your scrumble... whether that be crochet a basic chain over it in the middle of your stitches, or something different...the choice is yours!
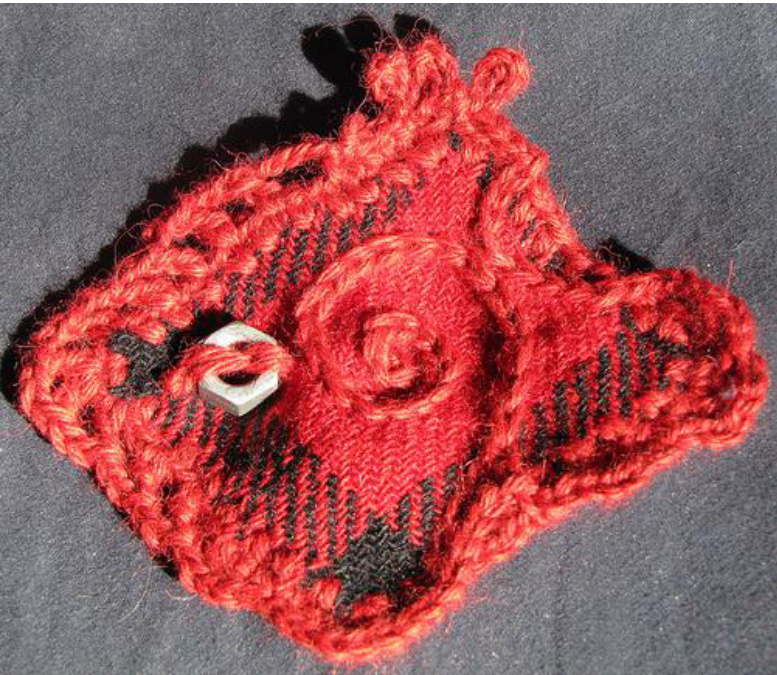
Photo from Sarah's interpretation of the instruction (MsBusyfingers on Ravelry)
This is day 5 of our Freeform - March 5 2012 - Look Back
For today, I'm going easy on you after yesterday's challenging day and this is how it goes... We marched forth yesterday, so today we're going to look back... specifically to 1963 when, sadly, Patsy Cline died in a plane crash. I love her voice; love the sense of heartbreak she brings to her songs - one that we've all been able to identify with at one time or another! So, sit back and listen to Patsy at her best... Patsy's probably best known for her song "Crazy" and whenI put'crazy' +'crochet' together in my mind it always goes... corkscrews! Hook - 1 size smaller than you would normally use for the yarn you pick. Yarn - Unless you are using the same yarn throughout pick something variegated or the most vibrant shade of your chosen colour... something a little, well, crazy! Direction - pick a piece of either of your scrumbles that you think would benefit from some dimensional work, attach your yarn there and begin your foundation chain for the spiral.
Stitch - Corkscrew
Amount of stitches - If you've watched the video you'll know that your corkscrew will end up about half the size of your foundation chain, so decide how long you'd like your spiral and double it for the amount of chains. Amount of spirals - How many does your piece need????? Go crazy and honour a woman who had a great voice and a troubled life (which came through in the pathos of her music) with your screwball spirals! If you're doing this in March 2012, share in the chat thread which vocalist, band, instrument player, really has a profound effect on you and why (link to a video if you can)... we're a bunch who like to broaden our horizons here ;)
This is Day 6 of our Freeform - March 6, 2012 - War of 1812
From twisted1 our Designer-for-a-Day. This year marks the 200th anniversary of the beginning of the War of 1812. For most Americans, it has little significance to us other than a date we have to memorize in school. However, it is being celebrated in a big way in Canada, and after reading about it I learned a lot of things I never knew. The U.S. declared war on Britain in June 1812, over the interference with trade and westward expansion. The U.s. invaded Canada in an attempt to annex those lands. Francis Scott Key was inspired to write our National Anthem as he watched the defence of Baltimore. Dolly Madison was instrumental in saving the portrait of George Washington as the British burned down the original White House.
For today's instructions, pick 3 yarns that "do not play well with others" to represent Britain, The U.S. and Canada at war.Wewill dotheFlameStitch. Hook size: appropriate to yarn Number of full repeats: 2, to mark the length of the war 1812-1814. You may make a free-standing piece to attach later, or find a straight edge on your Freeform. Yarn A=America, Yarn B= Britain, Yarn C=Canada
US terms are used
LSC= long single crochet (insert hook into stitch from row below as specified in instructions, draw up your loop to working height and complete the stitch. Try to keep your loops loose) Row 6 (RS): Drop A, attach B, SC in each of next 2 SC, \* 1 LSC in next st 1 row below, 1 LSC in next st 2 rows below, 1 LSC in next st 3 rows below, 1 LSC in next st 4 rows below, 1 LSC in next st 3 rows below, 1 LSC in next st 2 rows below, 1 LSC in next st 1 row below, 1 SC \* end 1 SC in last st. Ch 1, turn. Rows 7-11: 1 SC in each st across, ch 1, turn Row 12 (Ws): Drop B, attach C. 1 SC, \* 1 LSC in next st 4 rows below, 1 LSC in next st 3 rows below, 1 LSC in next st 2 rows below, 1 LSC in next st 1 row below, 1 SC in next st, 1 LsC in next st 1 row below, 1 LSC in next st 2 rows below, 1 LSC in next st 3 rows below end 1 LSC in next st 4 rows below, sc.Ch 1. Rows 13-17: 1 SC in each st across, ch 1, turn. Repeat rows 5-14 to complete 2 full repeats (optional) It seems strange to think of these 3 countries being at war with each other when we are such allies today. Just as your 3 yarns are now intermeshed.
This is day 7 of our Freeform - March 7 2012 - Try Something New
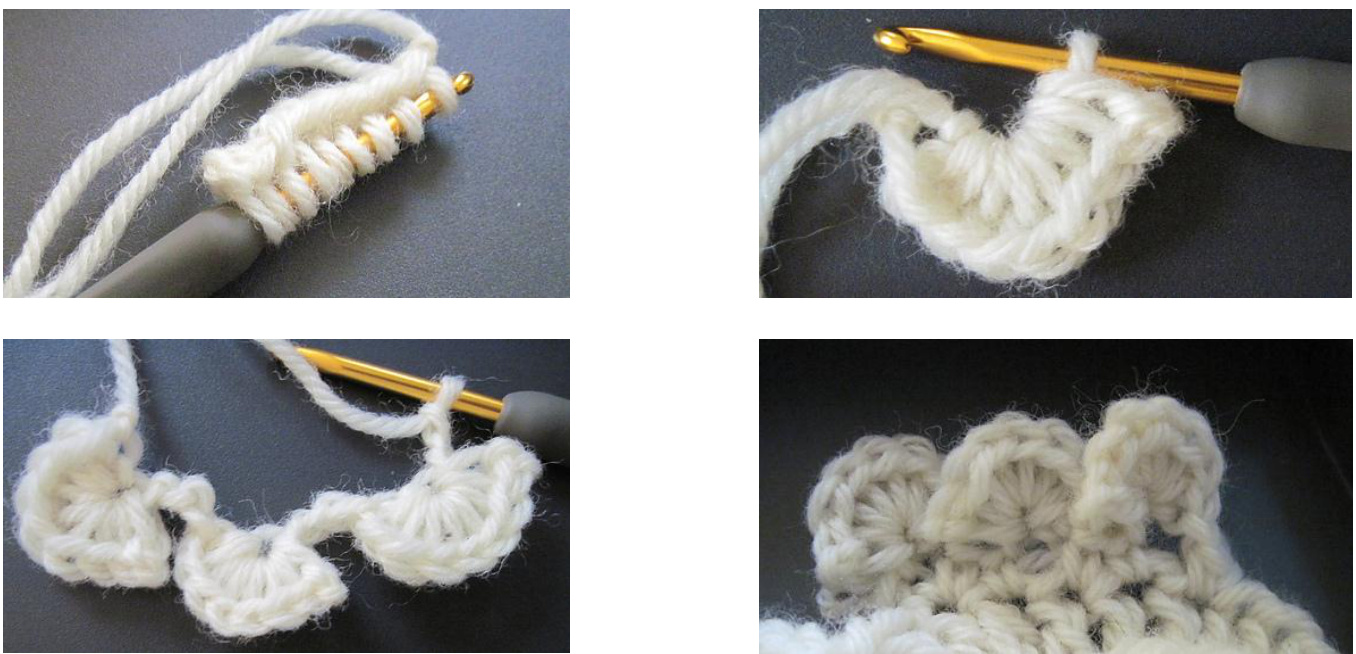
Let's all try something new, is there a stitch that's been scaring you, that you're itching to try out and haven't found the right project, or just a stitch that you keep meaning to get around to? Today's the day for it. Hook - yarn appropriate. Yarn - Unless you are using the same yarn throughout stick with the last yarn you used on yourfreeform. Direction - Start a new scrumble, your new stitch deserves it ;) Stitch - You chose. If you haven't got one in mind then why not join fibredoodle in having a go at Crocodile Stitch. Here you'll find written instructions along with some videos, and here is Crochet Geek with one of her excellent videos. Amount of stitches - count the teaspoons in your drawer (if it's over 10 add the 2 numbers together e.g. 13 is 1+3 and so becomes 4) and times this number by the amount of people who live in your house. That's your number of stitches. It of rows - Do it until you feel it you've shown the stitch off to its best advantage
ay 8 of our Freeform - March 8 2012 - Today is International Women's D:
Surprisingly, this commemorative day dates back to the early 1900s and the time of the suffragettes. It is also 1o0 years this year since the 'Bread and Roses' campaign drew attention to women's working conditions and, although this happened in the Us, the movement spread around the world making it possible for women to aspire to be whatever their dreams lead them towards. It was reported that strikers, led predominantly by women, carried signs saying "We want bread, but we wantroses,too!" Today's women want bread, the essentials in life; but we also need to enrich our lives with things beyond the mundane, the roses of life :) So we will commemorate our grandmother's, our great grandmothers, even our great-great-grandmother's struggle to bring equality to our lives, whilst also teaching us that it's ok to want more than just the basics, teaching us to feed our souls as well. Chose a stitch, motif or edging that symbolises each of these things to you (3 in total) 1. The bread of your life the things that may seem hum-drum, but are so important to your world 2. The roses of life, the things that enrich it and feed your soul 3. The woman in your life who you have most looked up to. f you're doing this in March 2012 tell us in the chat thread about these three things. If you don't have access to a crochet stitch book, here is a selection of stitches, motifs, and trims. Here are some more if you can read charts and here is the best tutorial I've ever seen on reading charts (if that's something you would like to learn to do during this ingredient!). It says it's for Japanese, but then notes that these are actually International. Enjoy! Here is the James Oppenheim poem about the bread and roses strike, I hope you like it :) As we come marching, marching in the beauty of the day, A million darkened kitchens, a thousand mill lofts gray, Are touched with all the radiance that a sudden sun discloses, For the people hear us singing: "Bread and roses! Bread and roses!" As we come marching, marching, we battle too for men, For they are women's children, and we mother them again. Our lives shall not be sweated from birth until life closes; Hearts starve as well as bodies; give us bread, but give us roses! As we come marching, marching, unnumbered women dead Go crying through our singing their ancient cry for bread. Small art and love and beauty their drudging spirits knew. Yes, it is bread we fight for - but we fight for roses, too! As we come marching, marching, we bring the greater days. The rising of the women means the rising of the race. No more the drudge and idler - ten that toil where one reposes, But a sharing of life's glories: Bread and roses! Bread and roses! We've been really challenging ourselves over the last 8 instructions, so it's time to dial it down a notch and be kind to ourselves. We're going to do 2 things... 1. Look at your scrumbles and see if they're calling out for something... anything.. a couple of chains here or there connecting things, a bullion or 2, some V stitches, some picots? Add them on, play, have fun :) 2. Play with spirals, improve your technique. Even if you've done this before, do some more, you can balance out your finished piece by where you place them. I heartily recommend having a look at the Sylvia Cosh James Walters spirals worksheet, along with Prudence Mapstone's Spectacular Spirals, and Crochet Scallops & Spirals E-book from Renate Kirkpatrick.
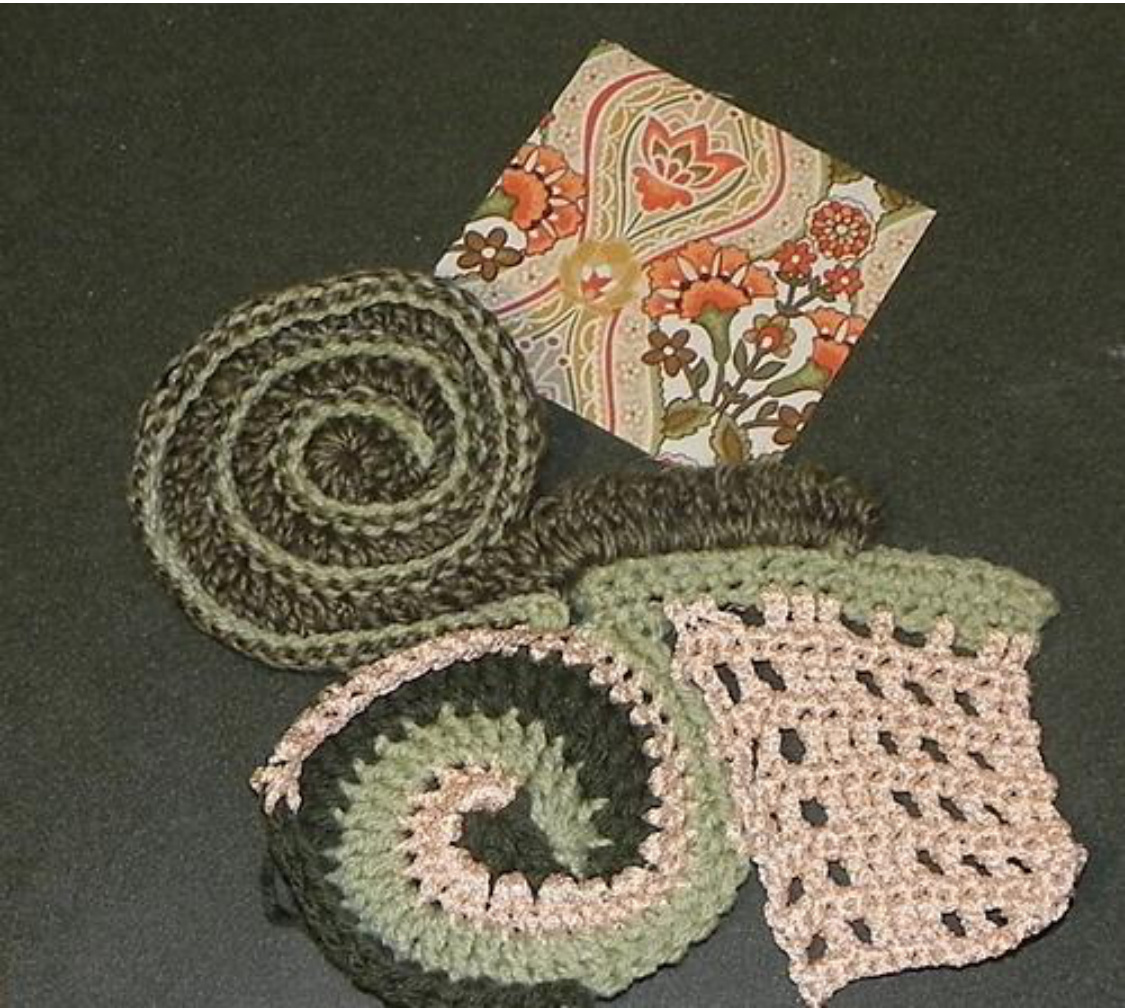
Photo from Becca's interpretation of the instruction (Becca0404 on Ravelry)
Day 10 of our Freeform - March 10 2012- Luck of the dice
From scarlettkitten our Designer-for-a-Day. Yarn: the same or whatever tickles your fancy Hook: what works with your chosen yarn Stitch: go with what you feel will look good with your piece Additional equipment: one 6 sided dice Its five years of Ravelry's IntNatCroMo so why not add a bit a game of chance to your Freeform? Get your yarn and hook and your dice and throw that dice, whatever number you get multiply by 5. This is the number of chains/stitches you'll use. Whatever stitch you choose you add it to your piece or start a new scrumble if you wish or even use it to attach any loose scrumbles if you have any. For the number of rows count how many letters are in your name and that is your number. To add interest and stop it looking too square decrease and increase across the rows to your heart's desire, this is your freeform so go wild.
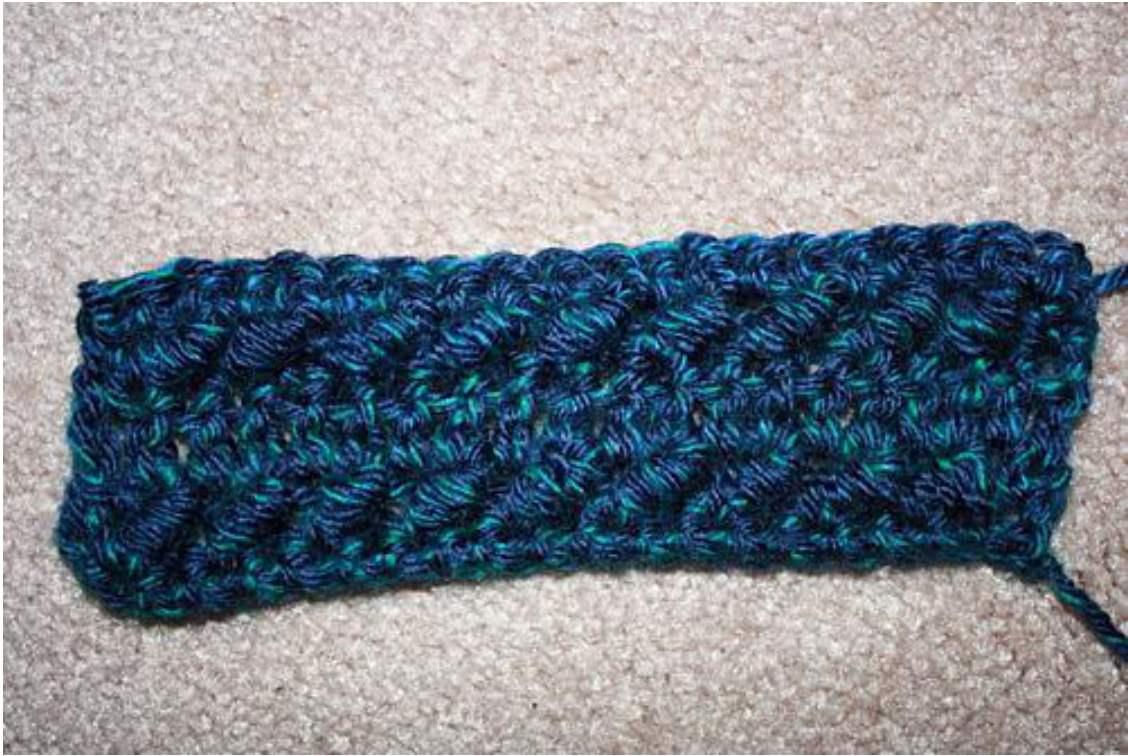
Photo from Juanita's interpretation of the instruction (BoricuaCrochet on Ravelry)
his is day 11 of our Freeform - March 11 2012 - Nemesis and Catch-L
Hook - yarn appropriate. Yarn - Unless you are using the same yarn throughout stick with the last yarn you used on yourfreeform. Direction - Start a new scrumble, so that you can have a play Stitch - You probably guessed from the title... its bullions! And they aren't as tricky as you think once you get used to them :) Amount of stitches - However many you want, or can bear ;) Amount of rows - Do it until you feel it you've shown the stitch off to its best advantage. Here are some good links that you may find helpful in your endeavours.. 1. P Walker comments on, and shows Margaret Hubert's Crocheted Bullion Stitch Video 2. Bullions & Beyond - tips & techniques for the crochet bullion stitch by Prudence Mapstone 3. A video showing an interesting a technique (not English but the pictures make it clear).
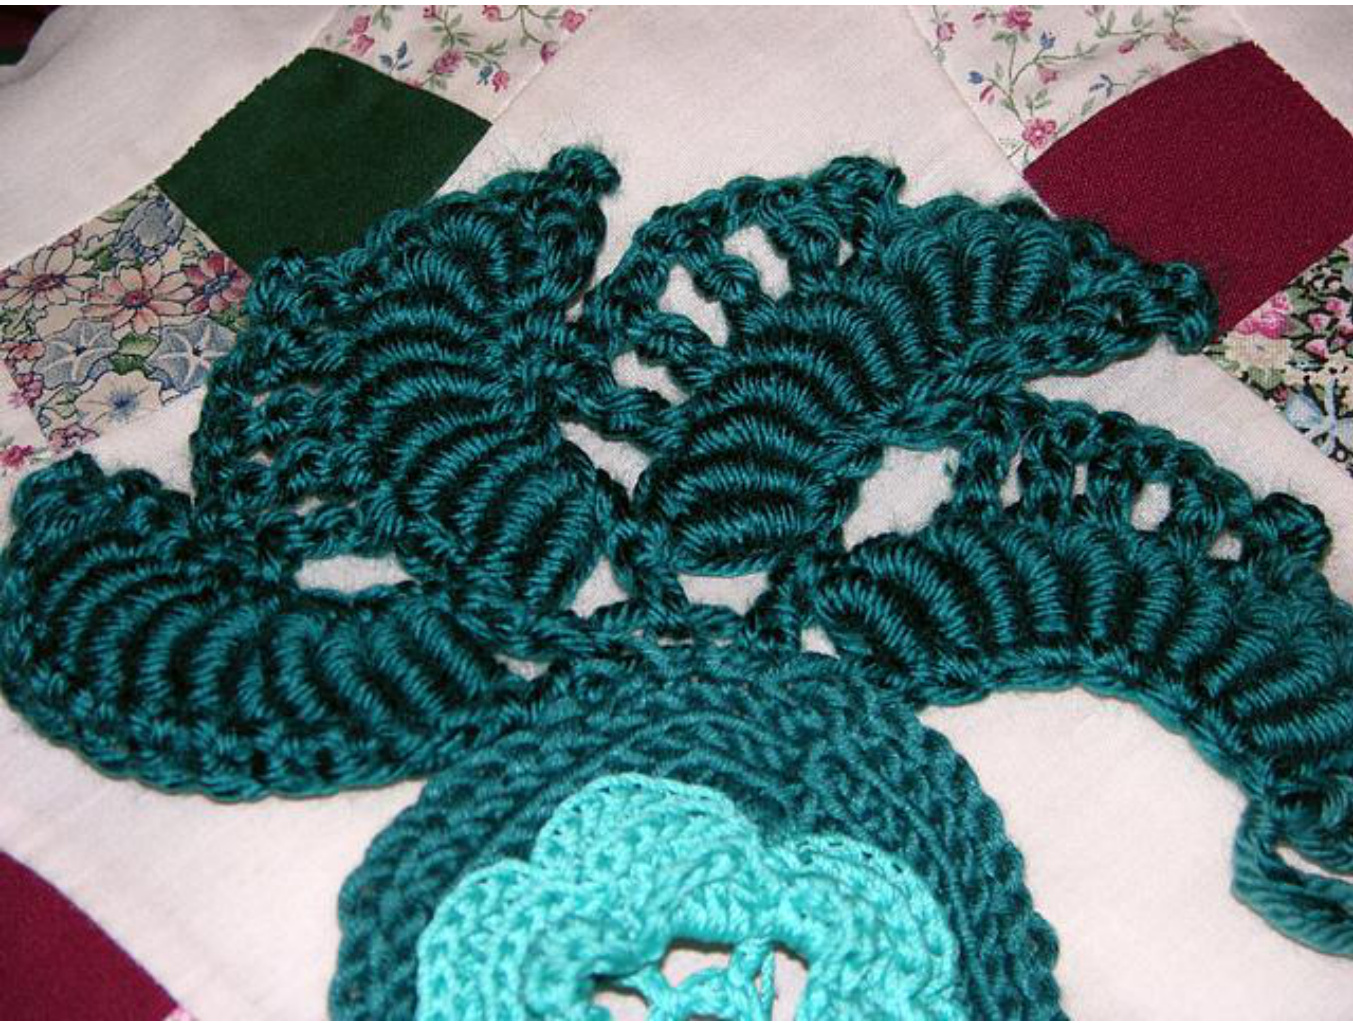
Photo from Melba's interpretation of the instruction (Melbav on Ravelry)
This is day 12 of our Freeform - March 12 2012 - Going Down!!!
April 12 this year sees the 100th anniversary of the sinking of the RMS Titanic. Hmmm, sinking... beneath the waves... hmm, okay... I've got it! Hook - 3mm (1+2...for the date of the sinking) Yarn - Unless you are using the same yarn throughout use one that contrasts with your main colour Direction - Find a piece of your work that looks a little plain. Stitch - Surface crochet, where the yarn comes from beneath your piece of work! Amount of stitches - this is really up to you to decide how much or how little suits your work and what kind of shape you fancy. To help, here is Kim Guzman's video tutorial and here 'and sew it is' photo tutorial Photo from CrochetBelle's interpretation of the instruction (CrochetBelle on Ravelry)
This is day 13 of our Freeform - March 13 2012 - Together again
On this day in 1939, Neil Sedaka was born. It's a double whammy for Neil because it's the 50 year Anniversary of him recording the song (that he also co-wrote) "Breaking-Up Is Hard to Do". So, what does Neil have to do with today's ingredient? Well, breaking up is hard, and I think our scrumbles have been feeling it.. so let's join some of them together using a lacy stitch of some kind... Hook - 2 sizes bigger than your yarn would usually dictate Yarn - Unless you are the same yarn throughout use one that contrasts with your main colour of your 2scrumbles Direction - use one scrumble as the foundation row for your chosen stitch so turn it over and start stitching on the wrong side. When you've done as many rows as you like, join your other scrumble with a row of single crochets. Stitches - 1. Choice A - The stitch used in Karen McKenna auntkaren4's lovely Catch The Wave Blanket Row 1: Dc in first st from hook (does not count as stitch). Dc in next ch, dc2tog over next 2 stitches, dc2tog over next 2 stitches, ch 1. Work hdc puff st, ch 1 over next 5 ch, dc2tog 6times, ch 1, hdc puff st, ch 1, over next 5 ch Ch 1, turn. Row 2: SC in every SC and ch 1 sp across, DO NOT SC in tch. Ch 3, turn. Row 3: Dc in next SC, dc2tog twice. Ch 1. Work hdc puff st, ch 1 over next 5 sc. \*\* dc2tog 6 times. Hdc puff st, ch 1 over next 5 sc. Repeat from to \*\* to end. Ch 1, turn. Repeat rows 2 and 3 until you're happy\*. 2. Choice B - The stich used in Ann Catellqi AnninCT's beautiful Cedar River Flow Shawlette Row 1: SC in second stitch from hook and each stitch across for 30 stitches Row 2: Chain 4, dc, ch, dc in first stitch, place marker (pm), dc2 tog, dc, ch 1, dc, ch 1, dc, dc 2 tog, repeat from three more times, pm, dc ch1 dc ch 1 dc in last stitch. Row 3: Chain 4, dc in first stitch, dc in each chain space and dc to stitch before marker, dc ch1 dc in last stitch before marker, dc2 tog, dc in ch sp, ch 1, dc, ch 1, dc in ch sp, dc 2tog, repeat from three more times, pm, dc ch1 dc, dc in each chain space and dc, dcn ch1 dc in last stitch. Repeat Row 3 until you want to stop 3. Choice C - Lion Brand's Ripples pattern can be found here. Or choose a lacy stitch of your own :) Don't worry if your edges aren't straight do it anyway, but avoid going round a definite corner instead, at this point, do some foundationless single crotchets to give you the required number of stitches.
This is day 14 of our Freeform - March14 2012 - Taking Inspiration from Others
You know when you look at somebody else's work and you think "that looks great, I wish I'd thought to do that" and then you worry about 'copying' them, so you don't do it? Well the great thing about freeformers is that we're very sharing of our skills (and knowledge) and we don't seem to look at things that way, in fact, we're more the "imitation is the highest form of flattery" crowd! So with that in mind we're going to take our inspiration today from one of our own freeformers... Hyke! What to choose? She's done so many lovely things... but there was one in particular that had quite a few of us going "How do you do that then?" Today we're going to find a piece of our work, be it a scrumble, a motif, or the whole piece and we're going to have a go at Hyke's padding cord :) Here is her tutorial, it begins with arches but scroll down you'll find the instructions you need, called "Paddingcord cheat - a tutorial"
This is day 15 of our Freeform - March 15 2012 - Wrap Up Warm? Add some Layers
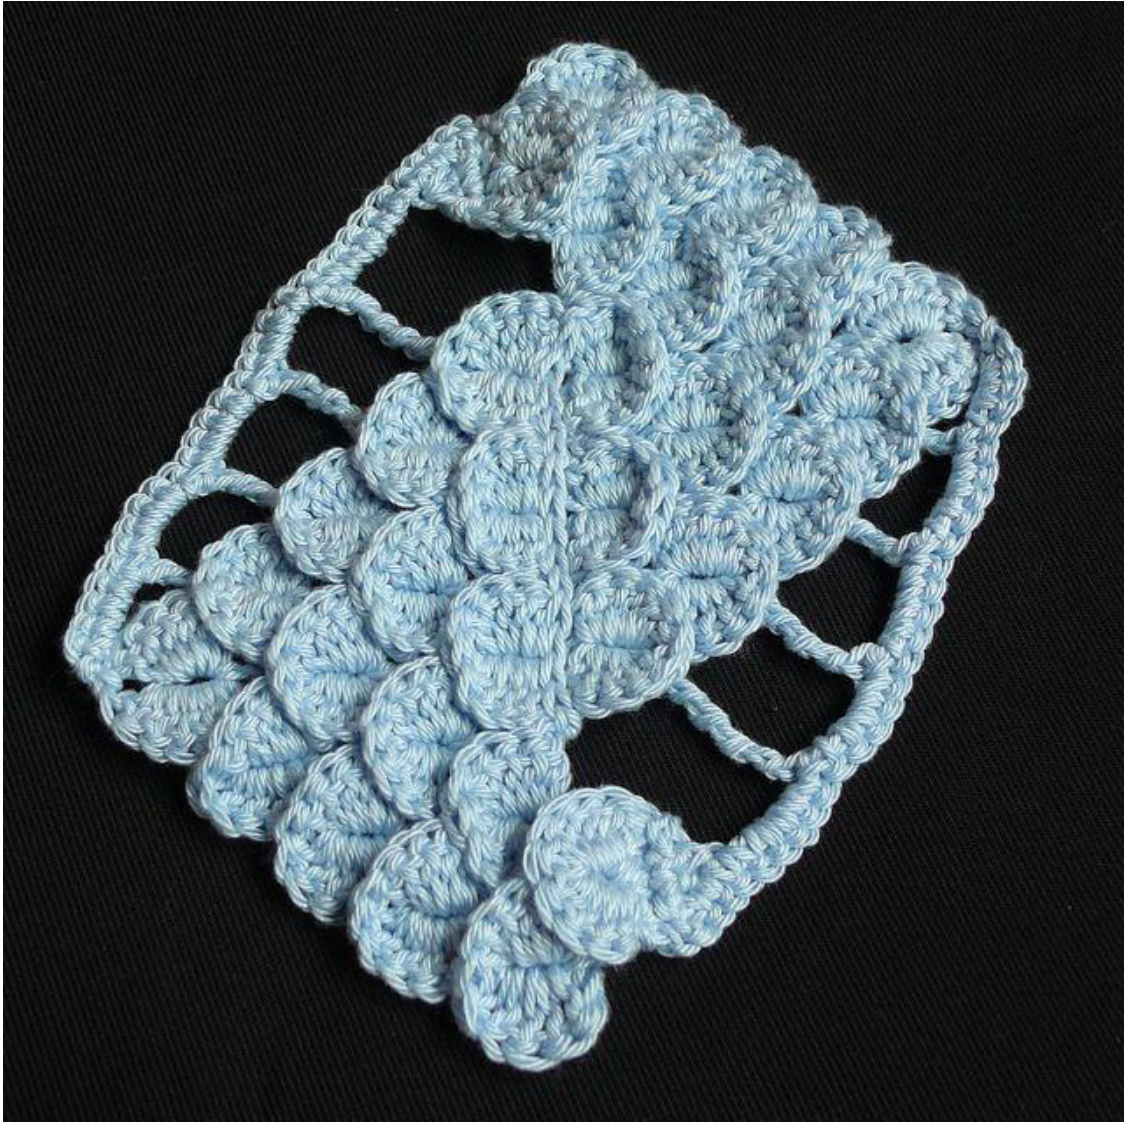
From gwynna our Designer-for-a-Day. If this were a normal March and you lived in the upper regions of the Northern Hemisphere you'd probably be thinking of wearing a few extra layers to keep warm. Well, this month isn't normal - it was 81 degrees yesterday in this part of South Dakota!!! But, no matter, we're going to be layering up anyway. Only we're going to layer our stitches. Layered stitches bring lots of interest to your work. Each successive row helps push the previous row out a bit giving your piece a 3-dimensional look. Hey, we all know what cleavage does for a shirt so let's give our freeforms a bit of a zhoozh! ;) Hook - Pick two hooks. The first one will be slightly smaller than your yarn calls for. The second hook will be way too big for your yarn. For example, I used worsted weight yarn and chose an E/3.5mm hook and an N/10mm hook. Yarn - Pick whatever yarn you'd like. Direction - Go in circles or stitch linearly; wherever your piece is asking for more attention. Stitch -Described below. Amount of stitches - at least 5 Ch3 spaces in the first row or as many as your heart desires. Amount of rows - at least one set of 7 rows. You may repeat the last two rows as many times as your little fingers can stand it or you run out of yarn or until your FF cries, "Uncle!" Where to put this next set of stitches? Use it as an edging. Use it as surface crochet. Use it alongside a flat area to liven things up a bit
US terms used
Ch = chain SI St = slip stitch SC = single crochet DC = double crochet HDC = half double crochet BPSC=Back Post Single Crochet
Instructions:
Row 1 (Setup Row/Right Side): With the small hook, attach your yarn to your work with a slip stitch. \*Ch3; Skip 2 stitches; SC in next stitch\*. Repeat \*to\* until you come to the end of the area you've chosen to work into. NOTE - If your stitches or spaces are large enough for your larger hook to go into, you do not need the set up row and may proceed to Row 2. Row 2: Turn. Change to large hook. Slip stitch into the Ch3 space (or space/stitch-see NOTE). \*Ch3. SC in next Ch3 space\*. Repeat \*to\* to the end. rn. Change to small hook. \*Ch5. BPSC around SC\*. Repeat \*to\* Repeat to the enc Row 4: Turn. Change to large hook. Slip stitch into Ch5 space. Ch2. 2 HDC in same Ch5 space. \*3HDC in next Ch5 space\*. Repeat \*to\* Repeat to the end. Row 5: Turn. Change to small hook. \*Ch5. BPSC around BPSC from Row 3\*. Repeat \*to\* Repeat to the end. Row 6: Turn. Change to large hook. Slip stitch into Ch5 space. Ch2. 4 HDC in same Ch5 space. \*5HDC in next Ch5 space\*. Repeat \*to\* Repeat to the end. Row 7: Turn. Change to small hook. \*Ch5. BPDC around BPSC from Row 5\*. Repeat \*to\* Repeat to the end. Where necessary, adjust the number of chain stitches to accommodate the curve of your piece. You can keep on going or end here. To work your next row of stitches in this area, stitch into theCh5spacesofRow7. Example of layered stitches. The arch above the beads is a full 7 row repeat of this pattern.
Click here to go to my Flickr page showing the progress of the first few rows.
his is day 16 of our Freeform - March 16 2012 - Gems & Jewel:
This year marks our Queen's Diamond Jubilee in the UK, commemorating 60 years since her coronation, much to the disgust of her son and heir ;) Anyway, it gives us a good excuse to play with gems and jewels :) Hook - yarn appropriate. Yarn - Unless you are using the same yarn throughout, chose a yarn that is sparkling in some way, either actually, or just because it sparkles for you (explain why it does that in the chat thread). Direction - Pick up an existing scrumble and start working down the longest side, crocheting your first row of your chosen pattern directly into your scrumble. If you've joined all your scrumbles then start a new one. Stitch - Find a stitch that has something to do with gems or jewels, or something that reminds you of them.. you can be creative with this definition but tell us about it in the chat thread. Amount of stitches - 25 because the Queen's coronation was 02/06/1952 - 0+2+0+6+1+9+5+2=25! Amount of rows - The amount of letters in your favourite gemstone When you've completed your stitch, find something gemstone or jewel-y and attach it to your freeform in any way you want. If you can't think of a stitch then feel free to use one of these..
http://www.youtube.com/watch?v=onKowiog1b0&feature=playerembedded
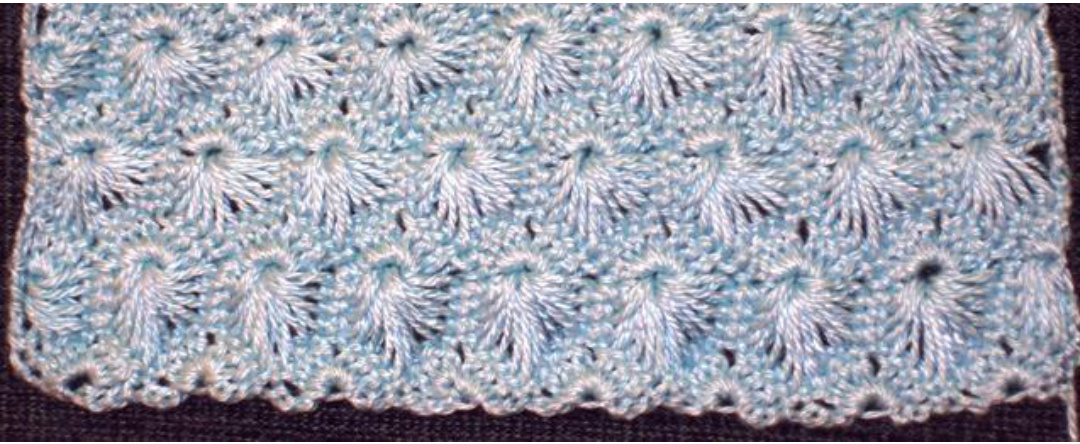
Photo tutorial and chart
his is day 17 of our Freeform - March 17 2012 - Election Time
This year sees the 57th U.S. Presidential Election which will be held on November 06, 2012, but the presidential electors will actually elect the President and the Vice President of the United States on November 17, 2012. So, since today is the 17th we will have our own election! It goes like this... I will give you 2 choices of stitch and you will choose one according to what you think your freeform needs. You will do at least 57 stitches for the 57 elections and 4 rows for the amount of years between elections. In the March 2012 CAL we'll secretly name the stitches Democrats and Republicans which 1 will tell Gwynna... In the spirit of all elections Gwynna can be bribed to tell you... for a price! You will decide which stitch you want to do and I will put a Ballot Card in the chat thread where you can vote for your stitch. When I post tomorrow's ingredient I will tell you which political party won our election ;)
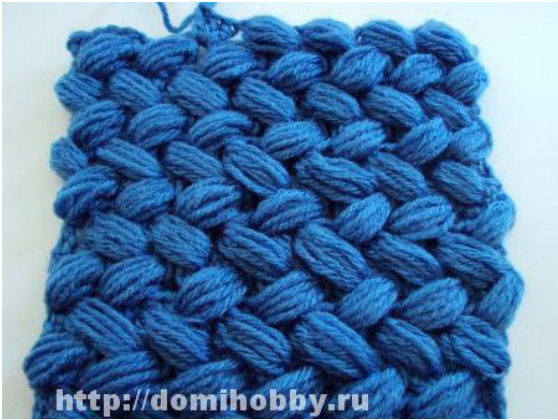
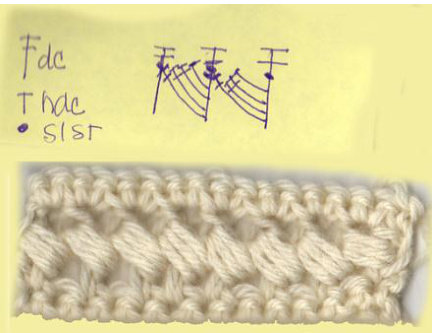
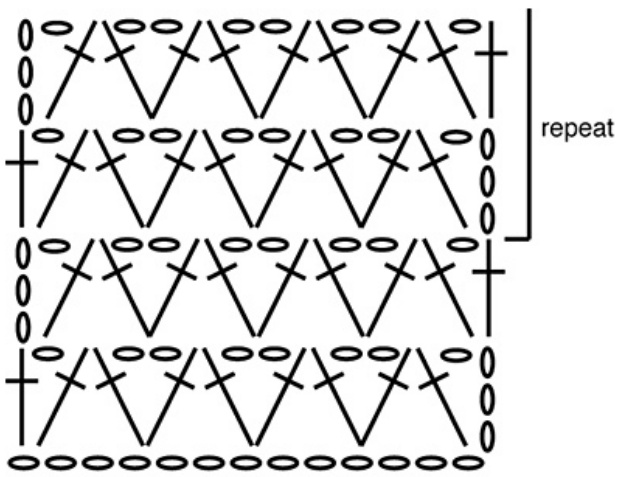
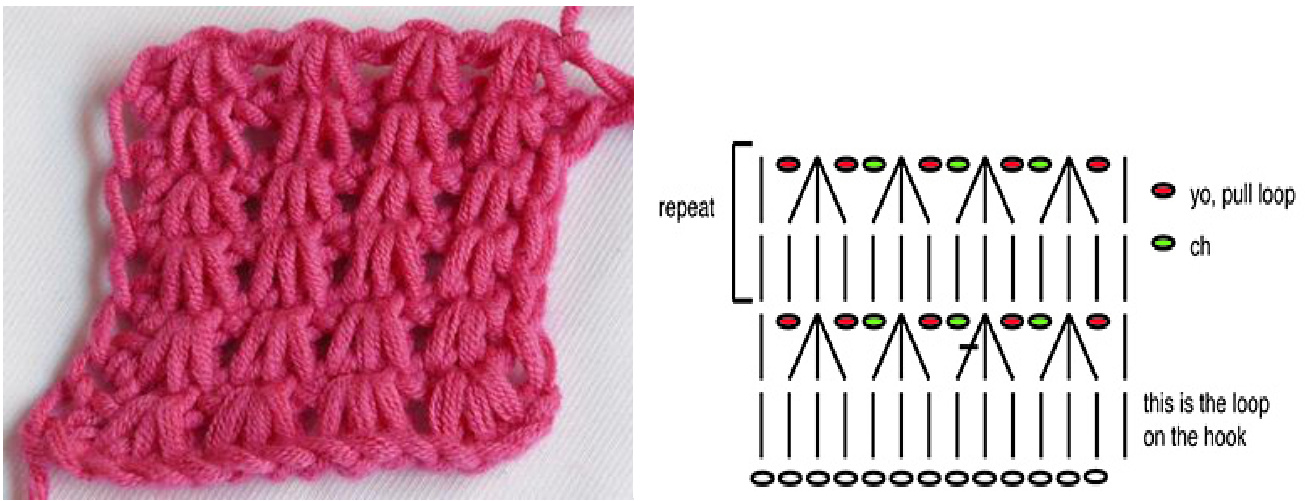
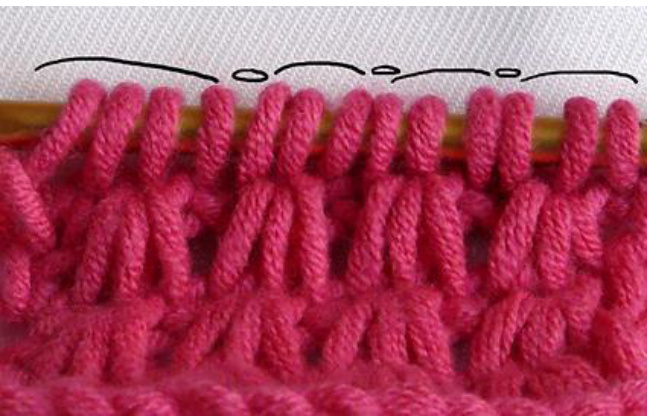
Stitch 1 Volumetric Woven Pattern - US terms used
Base Row: 3 HDC, \*ch 2, 3HDC\*. Repeat \* to \* to end. Next Row: ch 6, [skip 3HDC, 3HDC in next ch 2 space, \*YO, insert hook in between 1st and 2nd HDC of the skipped 3HDC of the row below and bring up a loop\* x6. YO and bring through all loops on hook.] Repeat [to] to end. HDC in last stitch. Repeat "Next Row" as needed.
Stitch 2 Heirloom Lace - US terms used
Row 1: SC in 2nd ch from hook, \* ch 5, skip 3 ch, SC in next SC; repeat from \* across (36 ch-5 loops made). Ch 5, turn. Row 2: \* sC in center ch of next ch-5 loop, work 8 dc over next loop, SC in center ch of next loop, ch 5, repeat from \* across to last loop, ch 2, dc in last sc. Ch 1, turn. Row 3: SC in first dc, \* then dc in first dc of next

8-dc group, (ch 3 and slip st in 3rd ch from hook for picot, dc in next dc of same group) 7 times (shell made), SC in center of next loop; repeat from . Ch 8, turn. Row 4: \* SC in 3rd picot of shell, ch 5, skip 1 picot, SC in next picot of same shell, ch 5, dc in next SC between shells, ch 5, repeat from \* across, ending last repeat with ch 5, dc in last sc. Ch 5, turn.
This is day 18 of our Freeform - March 18 2012 - Necessity is the Mother ofInvention
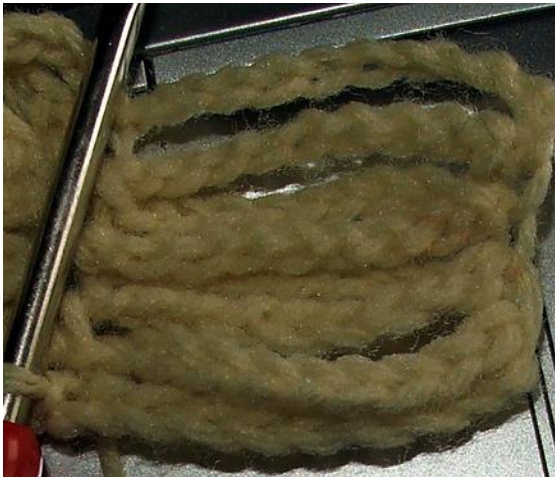
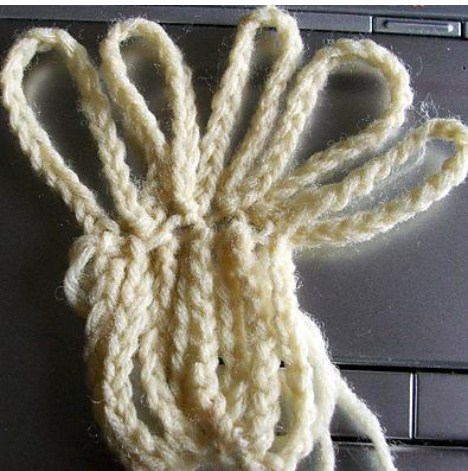
; stitch is another one of those most crocheters shy away from for 3 main reasons 1. They can't see how it could be utilised in the type of crochet they do 2. They are worried that it looks too fiddly /complex / confusing 3.They don't have the necessary tools But we're going to dispel all of these reasons, do it anyway, and be proud to display our hairpin lace in our freeforms. So, let's dispel reason 3 first, don't have the tools? Collect two toilet roll innards and 2 knitting needles and make your own as shown below
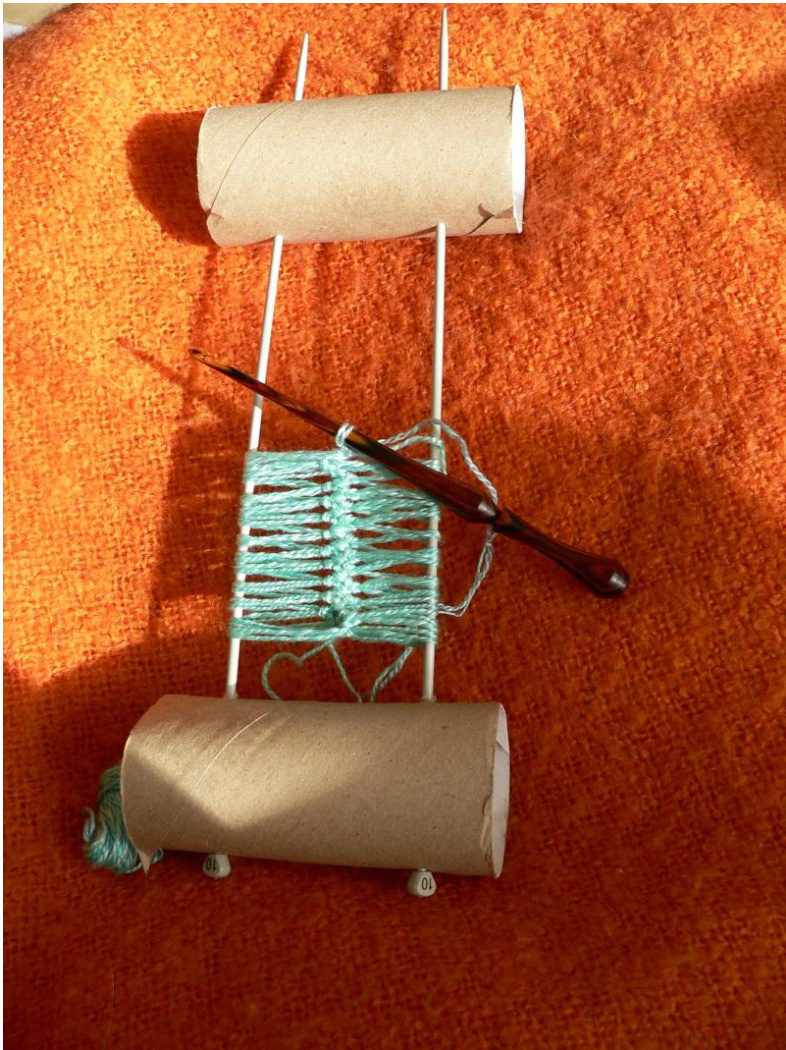
Here are the instructions to make yours, not that you'll need them, the picture is selfexplanatory ;) So, on to its complexity... nah, I did it watching The Three Musketeers keeping an eye on all of the swashbuckling! Lastly, not utilised in your type of crochet? Well if any of you have seen the latest issue of Interweave Crochet, you'll have seen the versatility of this smashing stitch... Yes, I'm a convert ;) So, go make your loom. Come back, cast on using the first few instructions from here and watch this instructional video from Kristin Omdahl on how to actually do hairpin lace. Now chose one of the following pieces to follow... or create your own ;) 1. Create the piece of lace shown by Kristen in her video (link above) 2.Do the beginners bookmark 3. Create the flower shown in this tutorial 4. If you're feeling adventurous there are some lovely motifs using hairpin here (goggle translate again, but with pictures and videos... in Spanish but you can catch the drift). they're worth the effort! 5. Taking it up a notch again is the pattern used on the edge of this doily, but it's still very achievable. Most of all just relax, have fun, learn something new, and change your opinion of hairpin lace :)
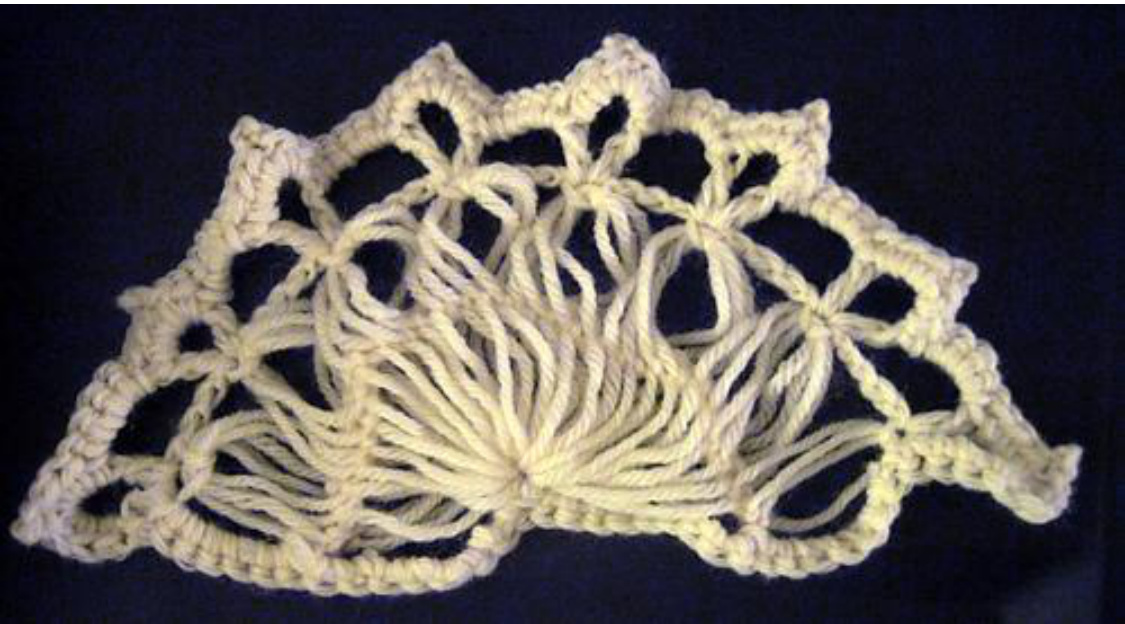
Photo from Akua's interpretation of the instruction (AkuaLezliHope on Ravelry)
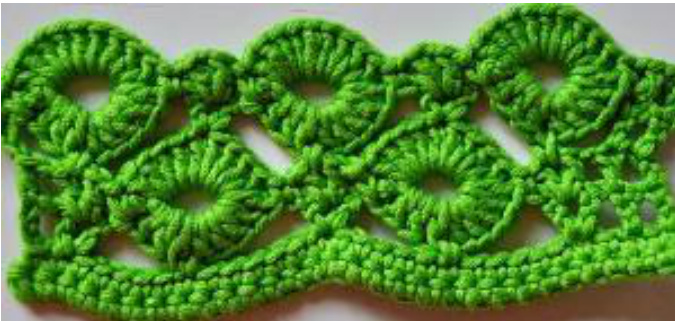
This is day 19 of our Freeform - March 19 2012 - Fillers
Today is the 8Oth anniversary of the opening of the Sydney Harbour Bridge. It joins Sydney's northern and southern shores at Milson's Point and Dawes Point.

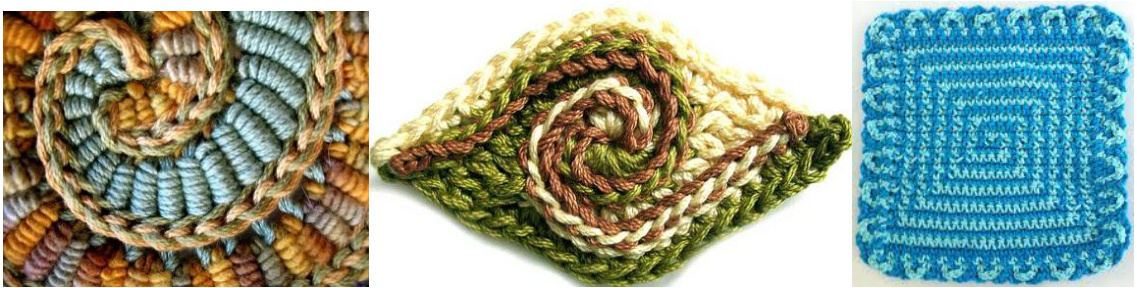
So today in honour of this anniversary we are going to fill some of our smaller gaps; join them together... but make sure you have 2 separate scrumbles for tomorrow's ingredient!!! Here are some thoughts for fillers, or you can create your own... you can even recreate the Sydney Harbour Bridge if you like ;) 1. Wings Chain 10, turn Row 1: SC, hdc, dc, 2dc in next stitch, 1dc, 2tr in next stitch, 1tr, 2dtr in next stitch, dtr Row 2: do not turn work, reverse single crochet all the way back through the front loop only Row 3: repeat row 1 into back loop only Row 4: repeat row 2 Row 5: repeat row 3 2. Bullion Circle Make a magic ring Row 1: Ch3 and make 5-7 wrap bullions into the ring 11 times, join to top stitch of ch3 with a slip stitch 3. Leaf Ch 13 Round 1: DC in 3rd chain from hook, Tr, Tr, Tr, Htr, DC, HDC, HDC, SC, SC, sl st, picot now work down the other side of the starting chain into the back of the chain sl st, SC, SC, HDC, HDC, DC, Htr, Tr, Tr, Tr, (DC, ch2 sl st) in next ch. 4. Textural blobs Magic ring Do turning chain according to the size of stitch you are doing, make at least 9 stitches (for DC) into the magic ring. Adjust number of stitches into the ring according to the stitch you are doing.

Photo from Julie's interpretation of the leaf instruction (fibredoodle on Ravelry)
This is day 20 of our Freeform - March 20 2012
From Melba our Designer-for-a-Day. Coming to you from the San Francisco Bay Area. San Francisco, CA, USA, is celebrating the 75 anniversary of the Golden Gate Bridge. You can get all the details here at

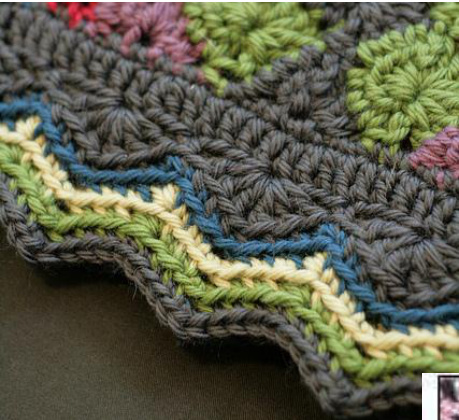
So in honor of this celebration of one of the modern wonders of the world, I'm offering a 3 step process. Step one. Create some waves with the long wave stitch from Donna Kooler's Encyclopaedia of Crochet, page 158, if you have the book. This is worked with a multiple of 14 + 1 stitches. I use 2 pattern repeats, or 29 stitches. US terminology used. Stitches used: sl st, SC, hdc, dc, tr, Optional: If you've already used this stitch, then consider using a zigzag/chevron stitch instead or anything else that might represent water/waves. Yarn: If you're not working in a single color, then choose 3 colors; maybe 1 light and 1 dark and one with a metallic thread in it. Hook: whatever works with your yarns. Pattern Notes: You will be working 2 rows with one color and 2 rows with the other. You will be working stitch for stitch, unless you are working on a curved surface, then you will need to adjust for the curve by working 2 stitches in one stitch periodically. Ask if you need help on how to do this. Directions: set up row. With the wrong side facing, and with color A, work 29 SC across a straight edge, if you have one. Row 1: Turn. Working 1 st in each st and with color A, ch 1. 2 SC, {2 hdc, 2 dc, 3 tr, 2 dc, 2 hdc, 3 SC}, repeat { to } across, ending with 2 sc. Row 2: Turn. Ch 1, SC in each st across, changing to color B, in the last stitch. Row 3: Turn. With color B, ch 3, 2 tr, {2 dc, 2 hdc, 3 SC, 2 hdc, 2 dc, 3 tr}; repeat {to } across ending with 2 tr. Row 4: Turn. Ch 1, SC in each st across, changing to color A in the last st. Repeat rows 1 through 4 at least once more. Step 2: The Golden Gate Bridge connects 2 land masses together. One of the foods that San Francisco is known for is its Dungeness crab. So were going to join 2 scrumbles together to represent the 2 land masses, using a crab stitch, also known as a reverse single crochet. Pick your 2 scrumbles and with a contrasting color, join your 2 scrumbles together. Step 3: With some brightly colored thread/yarn, like a metallic or silk or both, let's make our bridge by doing some surface-crochet, using the chain stitch. Or, if you are proficient in embroidery, then choose your favorite stitch to do. I plan to do French-knots to represent the center of the roadway between my towers. Try to get a couple of rows with 2 swoops to represent the outline of the bridge towers. Try not to stress if your hand-stitching doesn't look perfect. We'll just say you're having an earthquake or an issue with the wind. I'm sure I will when I get to this step too. Most of all have fun with this and feel free to interpret these directions any way you see fit. Maybe you would just prefer a road across you waterway to represent the bridge. Whatever works for you is fine with me. It's freeform. Enjoy the process as much as the creation. ETA. Here is a site that Tora shared with me for embroidery stitches. Embroidery Stitches
s day 21 of our Freeform - March 21 2012 - Nine Months to Go
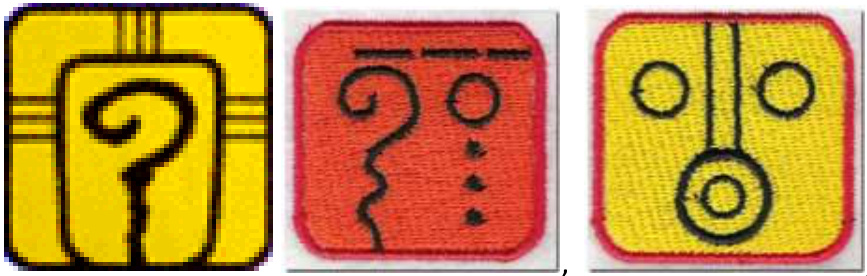
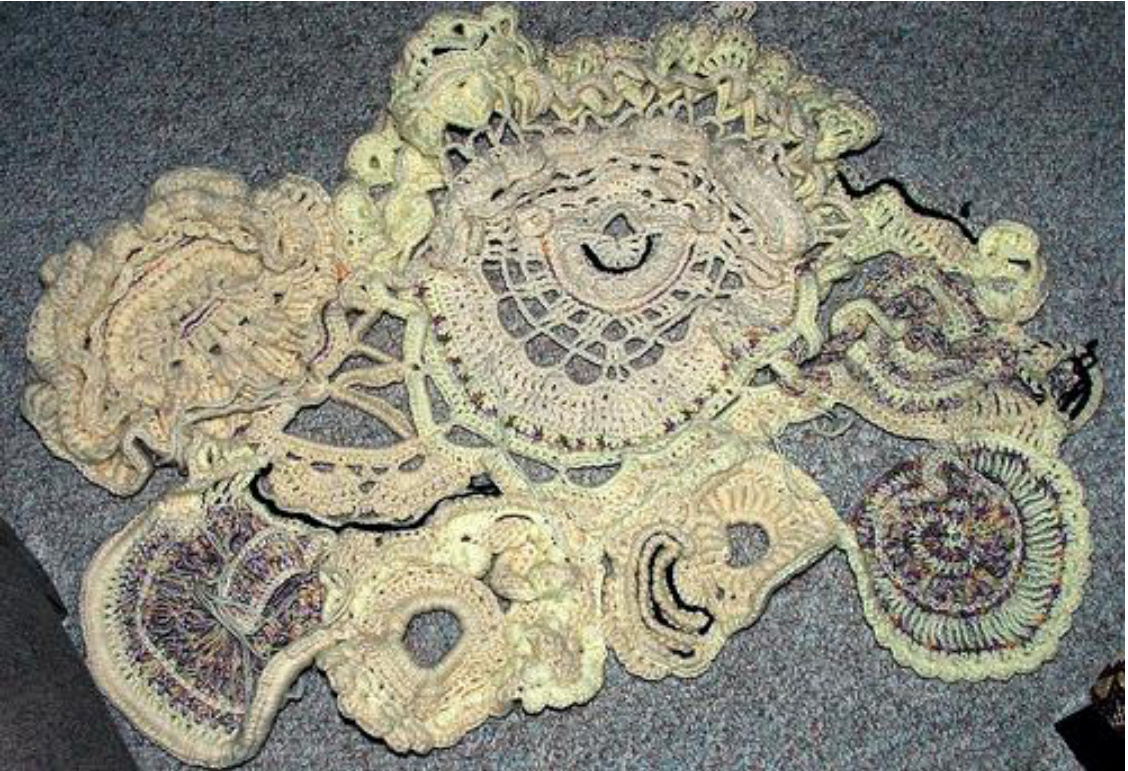
According to some gloom and doomists who have read Mayan predictions in a particular way, we have a 3/4 of a year until the end of the world... so much stash and so little time! So I've done some research and its all okay chaps.. the date was just as far as their calendar went. much better interpretation. In the course of my research though I found that the Mayans were freeformers... yep, that's what I said... check these out...

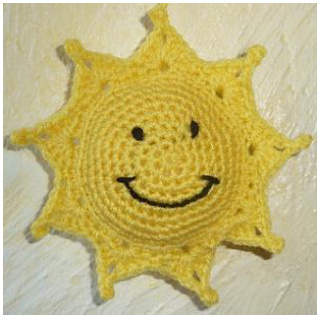
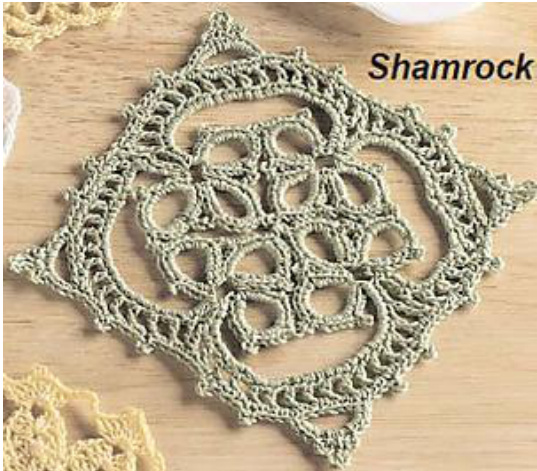
I'm posting this ingredient today because the date of the world's end is the 21st, but I want you to complete this instruction and save it until the end of your freeform and add it then ;) I'm going to tell you a few things about the Mayans that willend themselves to ingredients, it's up to you to decide what you will, and won't, be adding to your freeform out of these. 1. The Mayans revered many Gods and Goddesses, but chief among these was the Mayan sun god, Kinich Ahau, who was particularly important to these ancient people. He was the patron god of the city Itzamal, and folklore suggests that he visited the city each day at noon, when he descended from the heavens and consumed offerings that had been prepared for him. So here are some sun-type motifs for you... The central circular bit of StarburstWheel Square TheSunNecklace
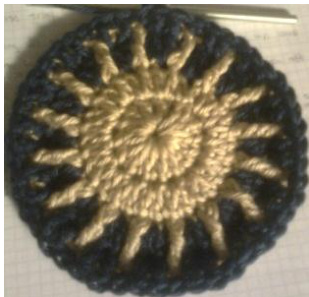
Here Comes the Sun
A Little Ray of Sunshine
2. The Maya hieroglyphic writing is arguably one of the most visually striking writing systems of the world. It is also very complex, with hundreds of unique signs or glyphs in the form of humans, animals, the supernatural, objects, and abstract designs. Many of their symbols involve circles or spirals like the ones for Warrior, Earth or Sun
a bullion spiral OR a shaped spiral using the rules for spiral increases outlined in this pos
3. The Mayans are known for creating the most amazing pyramids centuries before the Egyptians, many of these can still be found in areas like Guatemala, Belize, and Yucatan

Here are some ways of depicting pyramids in your freeform...
Concentric Squares
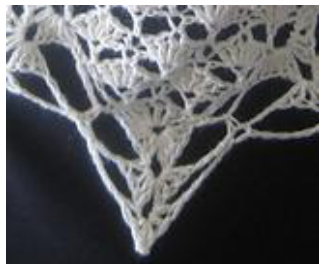
Edging from the Classic Triangle Shawl
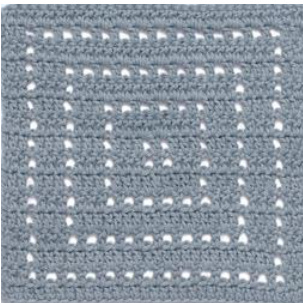
Triangle-shaped Potholder
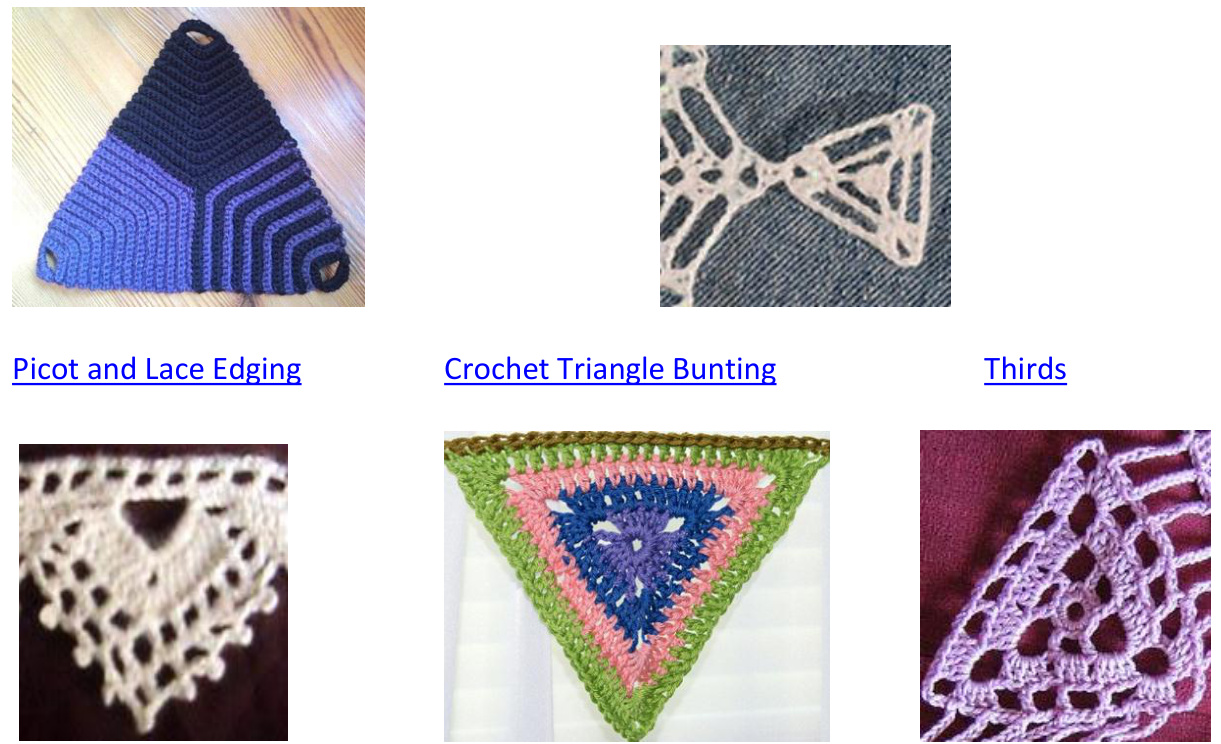
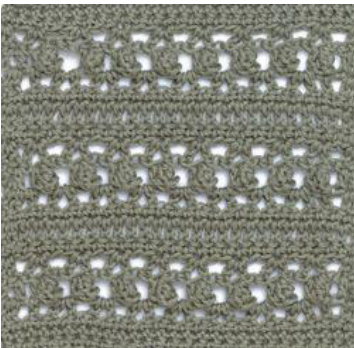
4. I showed you some of the Mayan freeform architecture at the start, this pattern reminds me of the glyphs depicted in some of them. Do as many of the row repeats as you want
Lacy Stripes
5. Or you could just go totally freeform on the Mayans and depict the chaos and destruction of the end of the world! (No, I don't ask for much ;) Ideally you should do 2 or three of the options above, or your own take on them, to create your "World's End" scrumble... have fun!
This is day 22 of our Freeform - March 22 2012 - Chain, chain, chain
From gwynna our Designer-for-a-Day. Chains tie us down in real life but in FF they can take us somewhere new. Usually chains start our crochet projects, sometimes we use them to connect pieces, but they rarely take center stage. Today we're going to use them to create blocks (or circles or triangles or...) of fabric and open up some new possibilities for our freeforming.
Step 1
Add stitches as desired for the width you'd like to achieve. Chain 20 stitches. Slip stitch into the first chain; use the back bump for a nice neat join. (This forms a loop) Chain 10, slip stitch into the back bump of the 10th chain in the previous loop/line. (Now you have what looks like a zigzag). Continue like this until you achieve the size you want. Photo tutorial can be found below. Here's my 10 stitches by 8 rows square.
Step 2
Now that you have your square or strip finished, it's time to let your imagination run wild. Using chains, and chains only, add to your starting piece and create a new piece for your FF. Here's just the beginning of my flight of fancy
I'll leave you with that so as not to influence your own "flight". I hope you enjoy playing with chains! You may do anything with chains that you please. The pattern above is solely to illustrate how chains can be so much more than a starting point and has been provided for those who might want a place from which to begin their ramblings. PS -a slip stitch is a chain that goes around something; just thought you'd like to know. If you're concerned that your chains aren't neat enough, the secret to a neat and consistent chain is tension. Finding a way to maintain an even tension is key. For me, I try to find that perfect yarn tension that makes the hook just tight enough to give me that nice little "snap" when it goes through the loop. It shouldn't be so tight you can't pull the hook through at all, or so loose that there is no tension when the hook glides through the loop. Photo Tutorial for Chain Link Square 1.Chain 20 2."Fold" and slip into beginning chain to form loop.
3.Chain 10
4.Slip into 10th chain to form third chain row.
Three rows complete.
5.Chain 10
6.Slip into 10th chain to form fourth chain row.
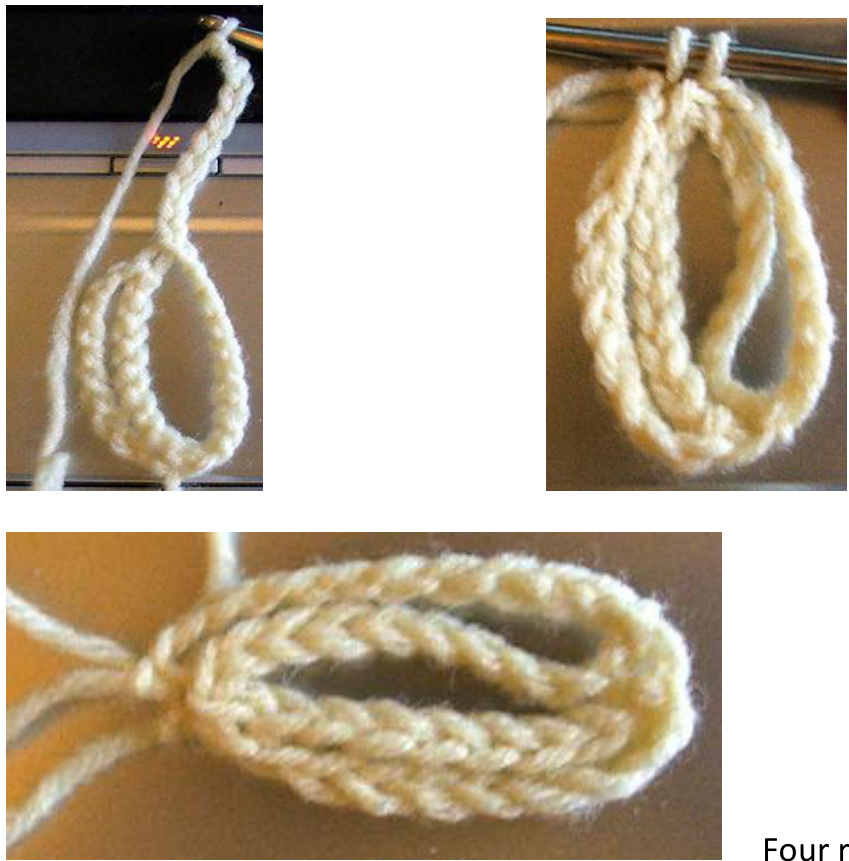
Four rows complete. Continue in the same way until number of rows needed is met.
s day 23 of our Freeform - March 23 2012 - Reach for the Star
100 years ago today Wernher Magnus Maximilian Freiherr von Braun was born. Who? I hear you ask. He is the man generally regarded as the father of the US space program. Without him there would have been no "one small step for man, one giant leap for mankind" So let's reach for the stars today and represent them in our freeform using beads :) Hook - There are a few ways of adding beads to your crochet and one of them will involve using a normal size and a fine steel hook Yarn - something sparkly to represent smaller stars and the darkest shade of the your chosen colour scheme to represent the night sky Stitch - you choose what you feel will best fir with your freeform. Amount of stitches - Again, you chose. This piece should be used as a linking piece between some of your existing scrumbles. So chose an amount of stitches/rows that will best suit this purpose.
Bead Crochet Assistance
If you are going to string your beads onto your yarn first here are some helpful hints from previous CALs (thanks to Twisted1!) 1. Before you string the beads on the yarn, use a bit of glue on the end and roll into a point. Let dry before stringing. 2. String all of the beads required for your project. 3. When you bring the bead up to the hook, just pretend it isn't there. Yarn over & pull through as usual. You did it! 4. Decide where your beads will be placed and work from the "wrong" side. If they're worked from the right side, they often face the wrong side of the work. Here is an instructional video http://www.youtube.com/watch?v=xl37LEUraEs and another! http://www.youtube.com/watch?v=AMEWxFlakbl
If you want to add beads as you go
This is the video for you, it's shown using knitting, but the principle is exactly the same :) http://www.youtube.com/watch?v= r1LEYbSu-8 It's totally up to you how lacy and open, closed and firm you make your stitches, how many beads you add, how evenly you space them, etc... let your inhibitions go and have fun with this;)
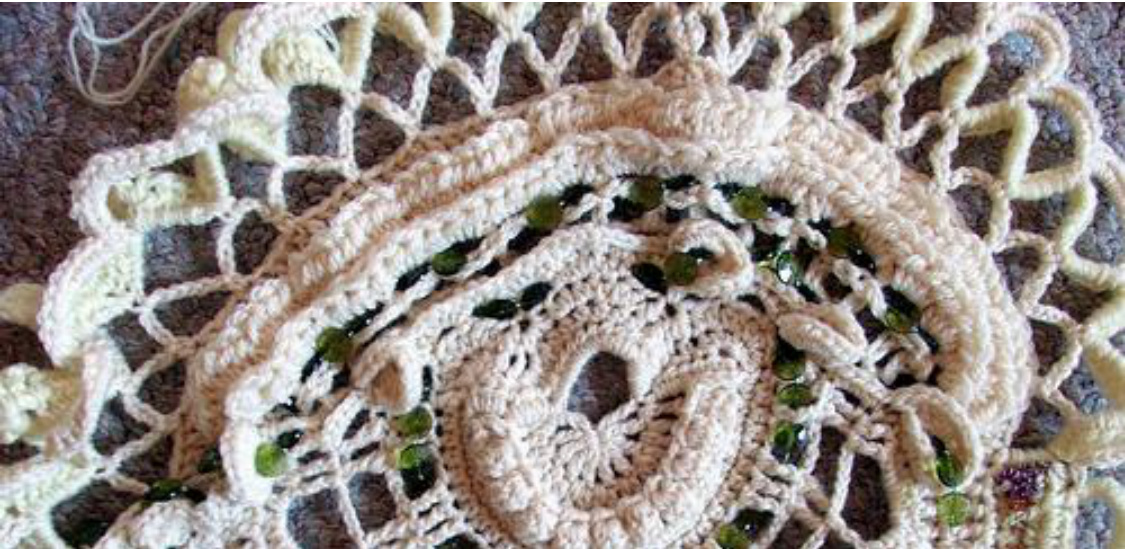
This is day 24 of our Freeform - March 24 2012 - Let's hear it for the Irish
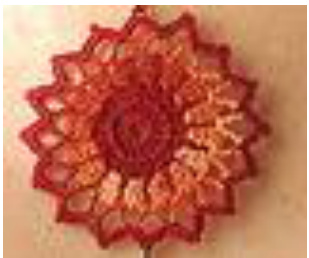
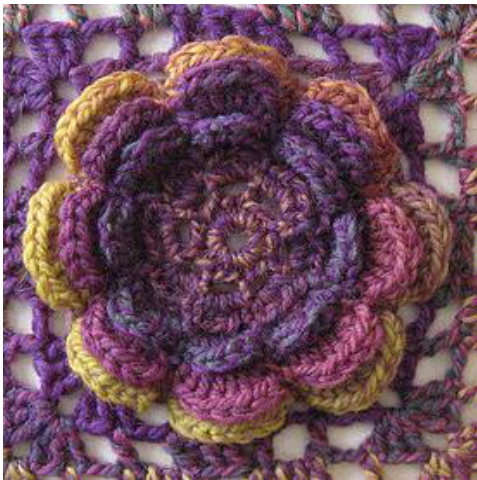
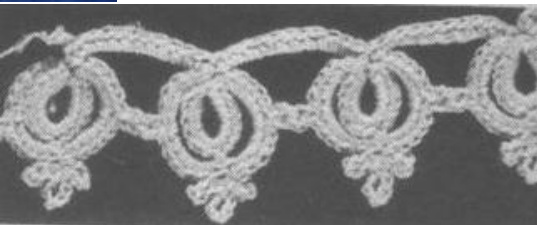
This year sees the 1ooth anniversary of the death of Bram Stoker, Irish novelist and short story writer. He is best known for his novel 'Dracula'.. and, as of today, a great excuse to try some Irish Crochet! Now don't think you have to go and get some thread, there's no reason you can't do Irish Crochet with normal yarn.. this is freeform after all, it'll just be a little bigger than normal :) So here you go, some options to choose from.. Starting with the obvious ;)
The lrish Rose
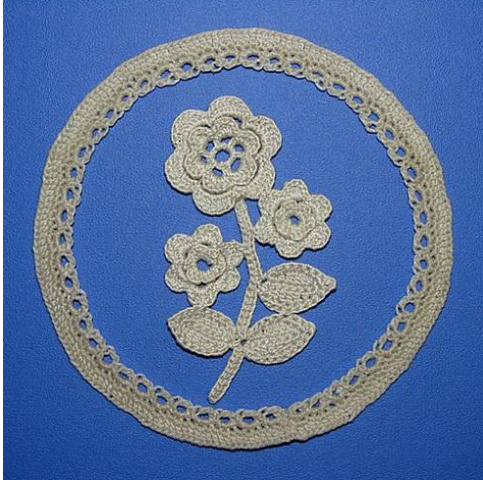
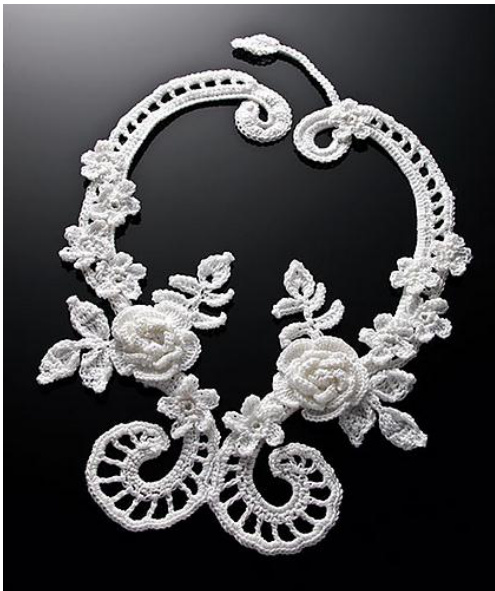
Some or all of the elements in this Floral Picture Any or all elements of Rose Rock Pick any elements from the Irish Filigree Necklace This has a marvellous tutorial on how to do the cords in Irish Crochet!!!
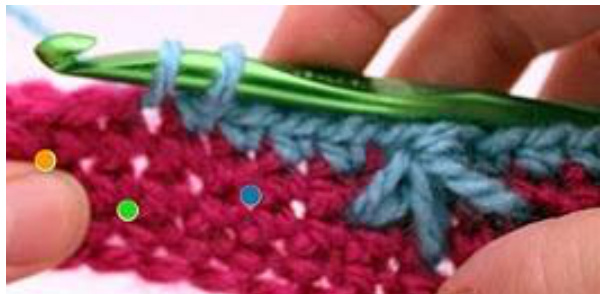
For those of you in search of more of a challenge try any of the patterns on the following pages, but I mean it when I say challenge as this is an antique pattern book ;) pages 27 - 31 or pages 38 - 40 from DMC icl 2 which can This is day 25 of our Freeform - March 25 2012 - Textures and Fillips From AkuaLezliHope our Designer-for-a-Day. What a lovely journey this has been! Now we're in the home stretch. Discovery is exciting and that excitement is both extended and fulfilled when you can share it with other aficionados and devotees. My latest epiphany has been about tufted stitches - tufting as a way to dimensional and texture, depth and topography. I found two new ones this year and, enamored of this new spice, I have sprinkled them liberally throughout my latest freeform pieces and scrumbles. For the first—-you can work this over any naked stitches, at least as tall as a dc.
Pockets
Derived from the Harmony Guides Crochet Edgings & Trims Edited by Kate Haxell, the picture in the book doesn't do it justice; only the diagram suggests its possibilities. Once I tried it, I was hooked. (pun intended) This is my version of pockets - worked over two vs. three stitches. RS facing, working around the stem of a dc or tr: {sc, hdc, three dc}, then sl st around stem of next stitch. This is worked around already existing stitches, I may treat this as working the on the row below, rs facing, or in freeform I jump in and add them. Find a place to make 5, 10, or sprinkle 15 around.
Slanted Puff
In this image the top symbols are for the pockets... I found it hard to symbol chart the slanted puffs so i made some on my piece.
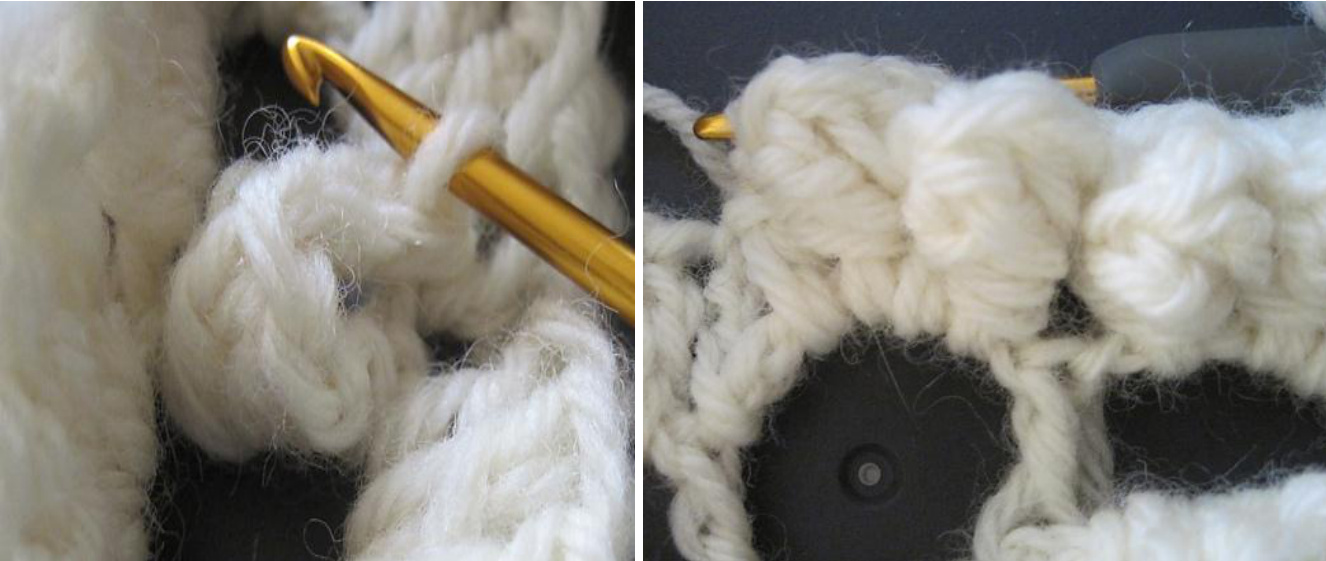
The second texture could go around an outer edge. It's from an ancient Mon Tricot knitting dictionary1030 stitches (1972). I call it the slanted puff. It's a wonderful slanted puff that lifts to upwards to the left You do two stitches at once with this - a sort of hdc and puff mixture, as follows Ch 2, hdc, {wrap around hdc 3x (yo, yo st)6 more threads on hook), sk 1 st, yo, draw up loop in next st, yo, draw thru 2 threads, yo, draw thru 6 threads, yo, draw thru last 2, ch 1. Use the bottom of this stitch as the hdc for successive stitches. Again do 5, 10 or 15 of these along an outer edge of your piece. Here are some step by step pictures
Orange Wedges
There's a third stitch I want to share, I love it for its quirkiness a quick decorative effect. Regular crochet meets Tunisian in this stitch called orange wedges, which creates little wedges/scallops/shells. From where you are (or want to be) on a piece, chain 9. Turn, and starting with the second chain from hook, working in the back/bump of the chain, pull up a loop in each chain, keeping each loop on the hook. Yo and pull through all the loops on the hook. Ch 1 to secure. Sc in next stitch or make more right there by putting a couple of chain spaces between and repeating. You may vary the number of chains and thereby the size of your wedge - my next favorite number is 12.
s day 26 of our Freeform - March 26 2012 - Enjoy Life's Simplicit
From: Gwynna our Designer-for-a-Day. As in most things, balance is key. There's a lot of texture and depth in our scrumbles and they're looking mighty good. But what about some quiet spots? Are you having a bit of trouble finding where to put that Irish Crochet flower or fan or to do some creative surface crochet? Does it seem too busy? Need a bit of calm? Let's explore the basic stitches and see what one can do with them to bring some of that calming influence to our scrumbles and to help all those bullions and pockets really stand out. Look at your scrumbles and see if there is a spot that will benefit from it having a bit moreZen. I'm going to use my Freeform as an example to show where I'd add some simpler stitches and why.
That big ruffly bit upper-left corner, the layered stitches is in need of some background stitches to help them stand up and to provide a means of attaching it to a piece of fabric without messing up my ruffles and bullions. Some SCs would be handy. Firm, but nonintrusive. On the right, see all those lacy bits with shells that are supposed to be getting pleated, so to speak, they will need some substance behind them for support. If they get a base of SC with some TCs and then I'll have a place to put orange slices making a great border in that area. If I go to the left of my ruffle, I have a gap that needs to be filled in between it and the hairpin lace circle. Not wanting to take away from either of these two pieces, a plain background would be an excellent choice. Chains would work but would compete for the onlooker's attention, so more SC or HDC are in order here. And so on... So, there you go. No new stitches, just a day to start tying it all together, filling in gaps, squaring it up, and calming things down, if needed. I hope you enjoy your moment ofZen!
This is day 27 of our Freeform - March 27 2012 - a visit to Bruges!
From Earthnut our Designer-for-a-Day. Today is the birthday of 2 famous Belgians, Joseph Abaco, Belgian violoncellist and composer, born in 1710, and Tom Goegebuer, Belgian weightlifter, born in 1975. Today we're doing some Bruges lace in their honour! Here are some motifs to inspire you: http://www.beadsky.com/brugge.php and, here are some other patterns, with more complicated motifs: http://www.ravelry.com/patterns/search#view=captioned thu... You could use a straight band or wavy band to connect existing motifs together.
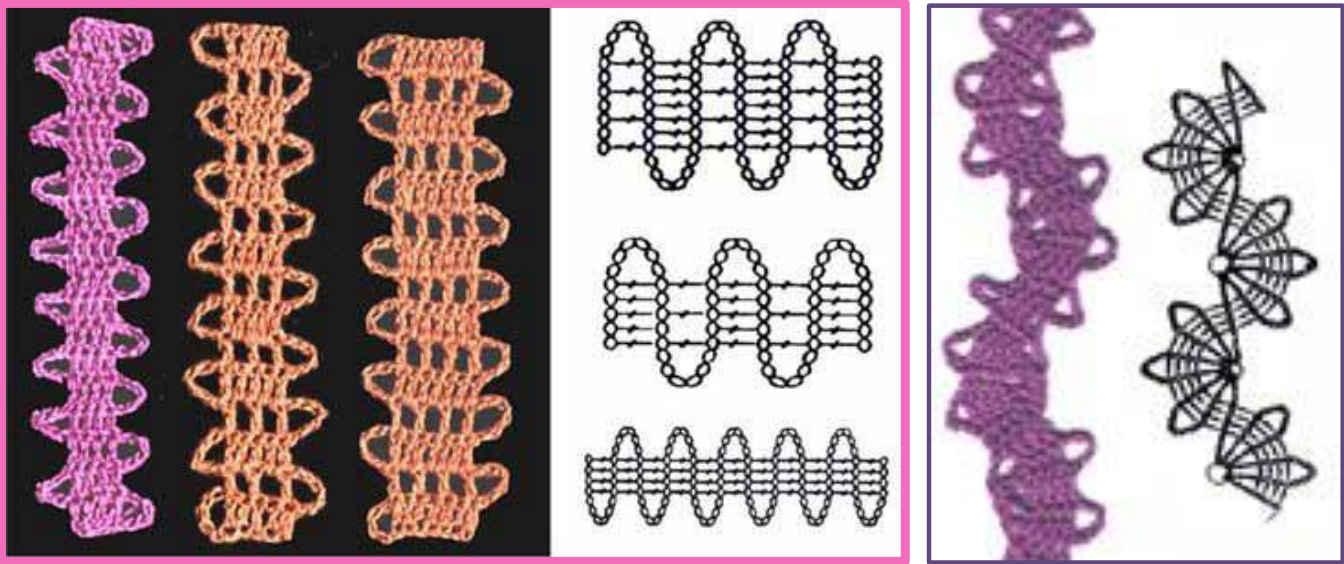
Or you could make a whole new motif! Perhaps you could use another spiral?
There's a newish group for Bruges crochet lace, anyone who's interested should join and infuse some life into the group! :)
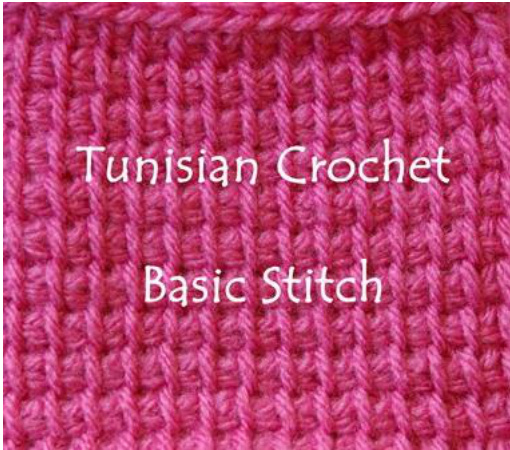
This is day 28 of our Freeform - March 28 2012 - Creation of Calm
Tunisia has a history which seems to compile nothing but unrest, from occupation and assault by other countries, to dictatorship and civil unrest. Strange then, that a craft which takes its name (though there's no evidence that it comes from Tunisia!) provides a harmonious balance between two warring factions... crochet and knitting ;) Tunisian crochet often evokes similar feelings in 'crochet die-hards' to those I mentioned for Hairpin Lace so, again, I hope to change those prejudices.. 1. Tunisian is often thought of as creating a "sturdy" fabric, almost in contrast to what we expect of crochet. The way to avoid something too staunch is to use a bigger hook than you would normally use for your chosen yarn and this will give you a much better drape. If you want something really flowing, then use an even larger hook! 2. Tunisian has no variety, and you can only do one stitch. Well hopefully the links I'm providing will dispel that rumour. 3. You can only make squares, where's the use in that? Hmmm, we'll see about that ;) So today I'd like you to have a play with Tunisian Crochet and find the stitch and shape that works with your piece. I suggest you use a simple yarn rather than something with texture to begin with, but perhaps you can have a play with texture later! The following links include wonderfully clear photo tutorials, some video tutorials, stitches, shapes, and most importantly things you need to know as 'basic rules' to make your fabric work :)
Enjoy!
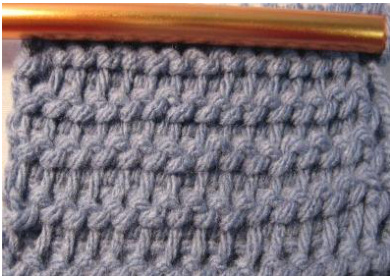
Note - although some say you need special hooks, I've tried work-arounds and can tell you that, with a little effort, you definitely don't :) Hooks with a stopper on the end - wrapping and elastic band repeatedly over the end of your hook to create a nubby bit works fine. Double ended hooks - if you are working loosely enough, I have simply taken my hook gently out and turned it around and inserted it back through althe stitches in the opposite direction (for working in the round) Interchangeable hooks - tape a large length of wire to the hook's end (working in the round). Clean the end down with acetone afterwards "Crocheting the Day Away" has 3 marvellous photo tutorials of stitches beginning with the basics (this is known as Tunisian Simple Stitch)
See Stitch Diva Studios invaluable advice on The Last Stitch of theForward Pass
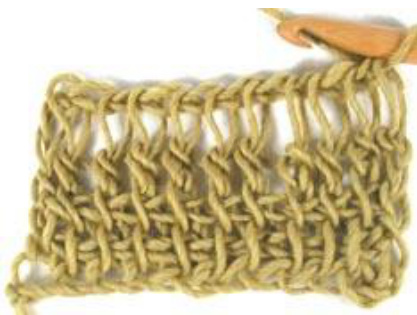
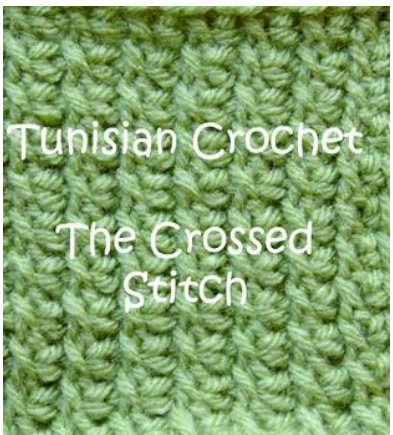
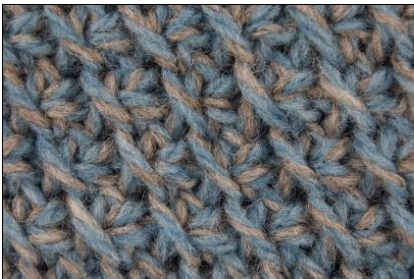
Did you know that you can also work Tunisian Double Crochet? Stitch Diva Studios show you how here. On to some more complex/interesting stitches... Tunisian Crossed Stitch from "Crocheting the Day Away"
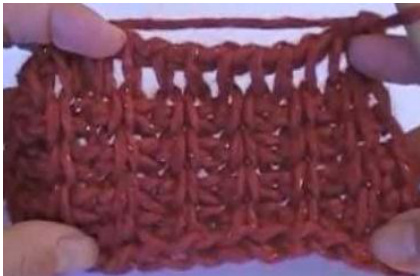
Stitch Diva Studios show you Tunisian Crochet Rib Stitch Back to "Crocheting the Day Away" for the Bias Stitch Stitch Diva Studios also show you how to do the Tunisian Purl Stitch and Tunisian Diagonal Stitch
Two ways to do Tunisian Crochet in the round Stitch Diva Studios Magic Loop System or the Double Ended Tunisian Crochet Hook method Stitch Diva Studios also tell you how to increase stitches and do "short rows to decrease" under their'shaping' section And lastly, if you want to get more of your Tunisian on, here are some more advanced patterns at ChezCrochet.com... they're still really easy once you have the basic technique under your belt. She refers to the stitches in abbreviations, although if you look at the left column, with the Basic 5 Foundations, it's easy to work out what the abbreviations refer to ;)
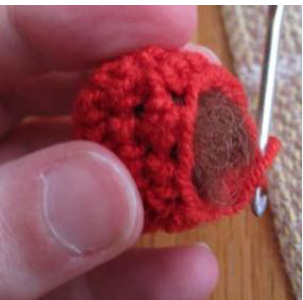
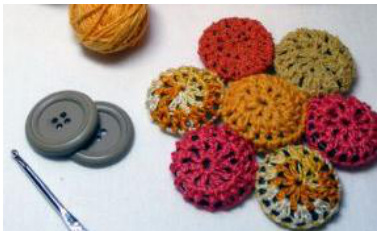
This is day 29 of our Freeform - March 29 2012 - Twinkie Bits
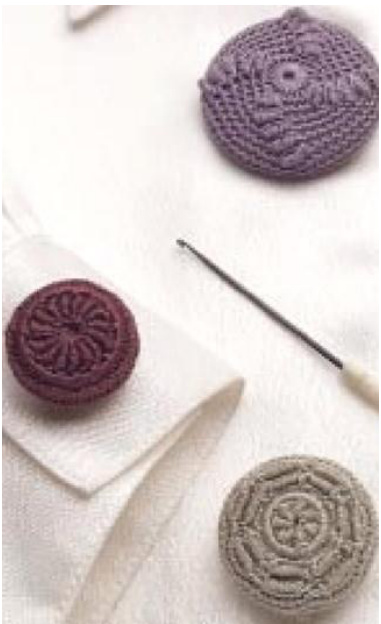
I'm going to give you a choice of things today... you can do one or all of these .. it's up to you :) 1. One of my absolute favourite things in crochet is crochet buttons because there's so much variety, it personalises a 'normal' (i.e. not freeform) crocheted item and because it can take an ugly button, that's sat in your button tin since your grandma put it there, and make it into something beautiful. I'm going to show you some tutorials and I'd like you to take this process and make something unique for your freeform Paralax knitting shows you how to make basic bobble buttons (which you can stuff with the yarn ends you've been cutting off!) and Helda's Land Handmade has another technique for this which would be quicker!
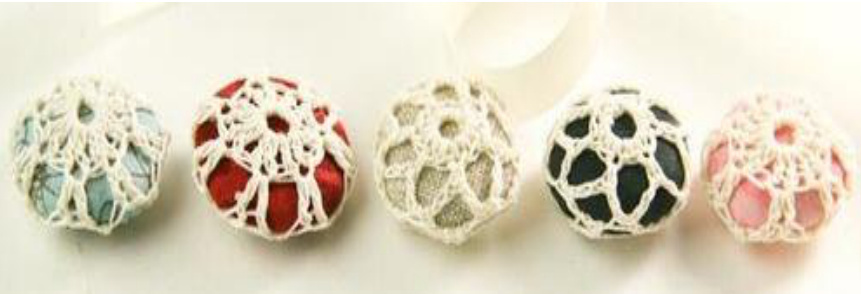
Another fairly basic technique, although this one actually covers buttons, comes from Linda Permann
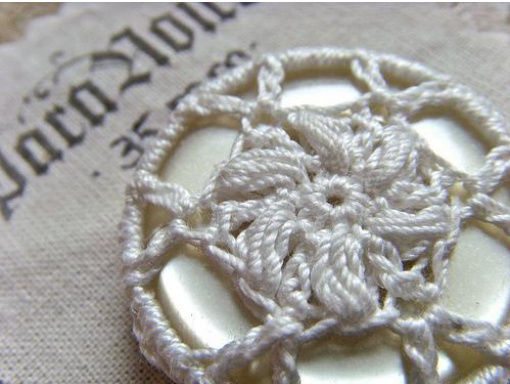
Getting a bit more adventurous with Cynthia Shaffer are these lacy little numbers
Always a joy to me, are covered buttons by Eva Eichhorn with her Starflower Pattern, Altered Starflower Pattern and her starfish button And last on the button front, means least, are some vintage buttons courtesy of freepatterns.com but by no
2 Your second option is to apply some your piece, again, here are some tutorials gain inspiration from.. edging to for you to
feel to calm your freeform down like: Purl Bee's edging for flannel (instructions apply to woollen fabric too) Easy Makes me Happy's Feather Stitch border (scroll down!)
Or the pattern from mimknit's request blanket
Or if you feel the need zhoozh, try one of Crochet Cami's Cross edging
for a bit of these: Over Stitch Open shell edging from Sandi Marshall
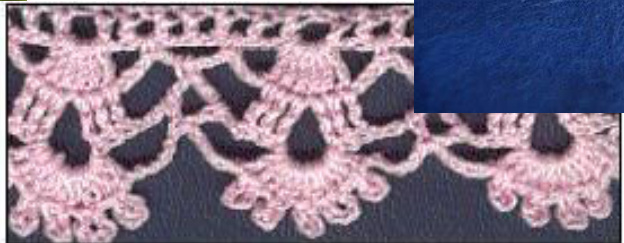
Image copyright@ 2001by SandiMarshall
About.com
Dew Drop edge from Yarn Lover's Room
Puffy Lace Edging
From Yarn Crazy Girl Patterns 3 Your final option from me is to decide who the crocheter/crochet designer is that inspires you most. Now emulate the work of this person in your freeform... I don't mean copy, I mean you should strive to equal or excel, by echoing their work in yours :)
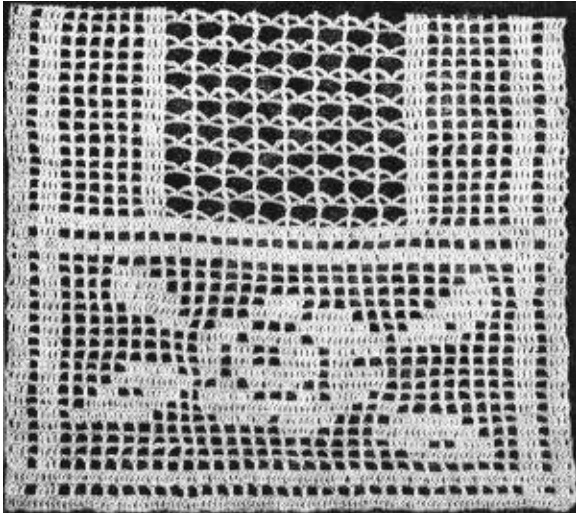
This is day 30 of our Freeform - March 30 2012 - Filet Time
From Murphey our Designer-for-a-Day. Filet crochet for our penultimate instruction. This seemingly easy technique is full of challenges if you attempt to design your own little insert or edging. Even a very small motif can take up a lot of space. Download free graph paper here if you want to tackle your own design. You may choose to locate and follow a small filet pattern to use in a spot that needs a bit of fill-in or a bit of border: there a many filet crochet ideas on Ravelry. There is no need for a symmetrical design or recognizable image. You may wish to chain, block, open block and lacet according to whim. There is no need to use thread and a small hook. Choose materials that best help you make a little completion to your free form fabulousity. This link http://www.crochetcabana.com/specialty/filet crochet.htm will help you understand how the positive and negative spaces are created. This link http://iahodnett.tripod.com/id178.html will help you calculate the required length of the beginning chain. This link offers a chance to learn lacet insertions http://crochet.about.com/library/blhowtolacet.htm. http://www.youtube.com/watch?v=LDxRllFOfDM (no sound) Example of filet crochet using typical open and filled blocks, with a lacet stitch section:
Suggested titles to look inside at Amazon.com Betty Barnden's Stitch Guide: Filet Crochet where you will find a hook, yarn and gauge guide. Look inside the book. Leisure Arts Lovely Decor: Filet Crochet where you will find graphic instructions with photos. Look inside the book.
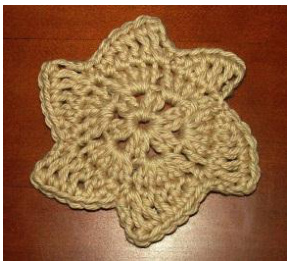
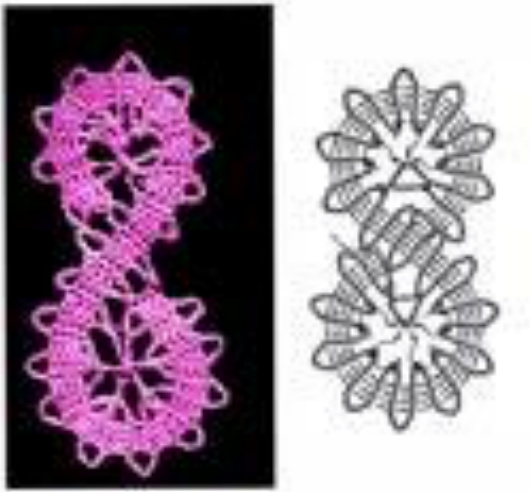
his is day 31 of our Freeform - March 31 2012 - Harmonious Triangle
From DeLeewit our Designer-for-a-Day. Today is the last day of our CAl. It's been a good ride with lots of new crochet adventures and good company. I've learned so much from this, being challenged to cross my borders of imagination! Since this the end of the journey, let me remind you, there's still the Mayan scrumble, ready and waiting. Today is the day, to attach it to your work, and if it all ends, then at least let's go outwith abang! My thought was to use the triangle, because of its symbolic meaning. The triangle symbolizes harmony and co-existence of the mind, body and spirit. According to modern belief, the triangle stressed upon the unity among three elements in all aspects of life, like the past, present and the future; land, sea and sky; mind, body, and soul, or the Eve connection shared by grandmother, mother and daughter.
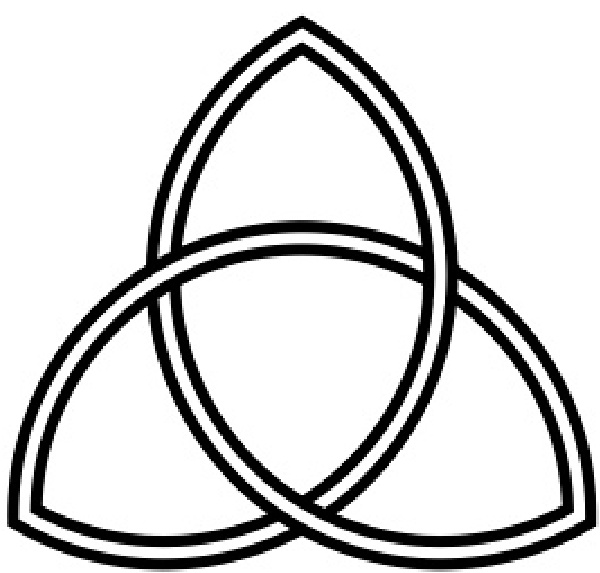
The past, present and future element is especially appropriate for the ingredients. The past is setting out with peers on this freeform journey. The present is the beautiful things everybody makes, sometimes the struggle to get it right (although there is no right or wrong in freeform) and the future is seeing each other's finished work and looking forward to next year's event. I've looked up some examples of triangles for inspiration, for instance the Celtic Triquetra, pictured left The view on triangles of an artist Radha Sahar from New Zealand, her work can be found here:
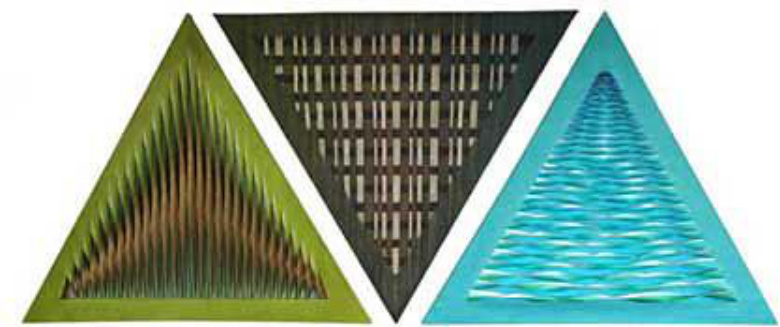
http://www.radhasahar.com/paintings1.htm The beautiful pyramid at the entrance of the Louvre in Paris.

Ingredients: your choice of yarn and hook. The stitches are your choice too, as long as the shape and/or the stitches involve triangles. There are a lot of stitches with triangle forms in them. Something like this could work. Pattern: http://www.bestfreecrochet.com/2011/06/22/173-triangles-c...
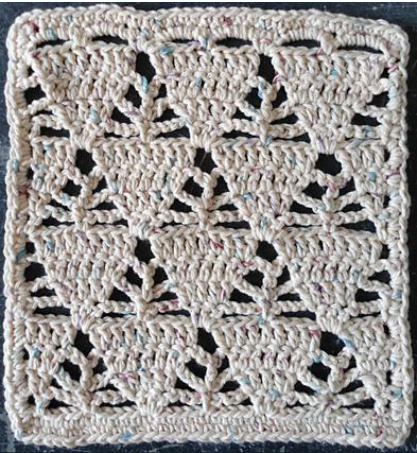
I have made a simple swatch of a triangle stitch.
Repetition of triangle 3 ch + 1. This is a Tunisian triangle stitch over 3 stitches.
This stitch requires some explanation.
It works like normal Tunisian crochet only you take 3 loops at once and then chain 1.

This shows which loops to use when you make a new round. Play with the shape, or stitches, and have FUN!


