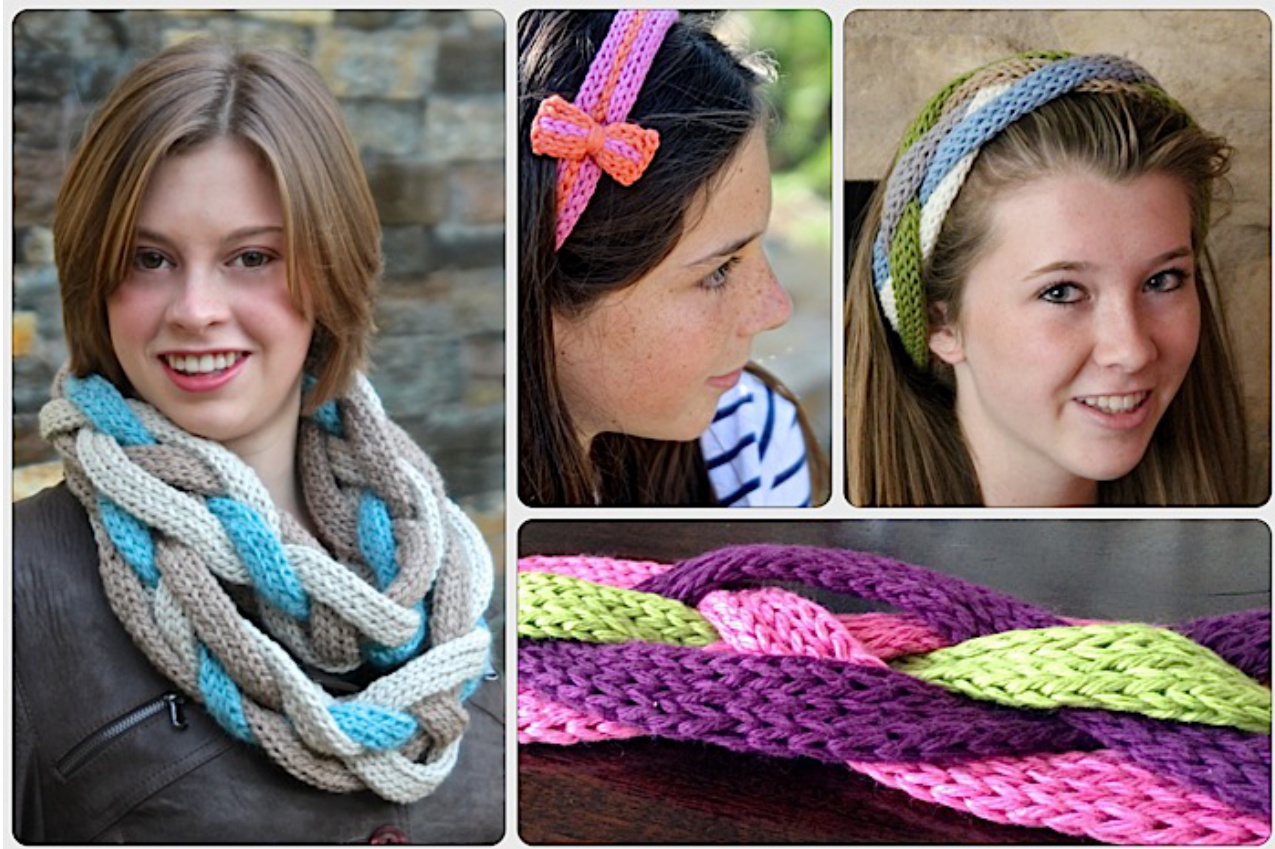
quitos Scarf
A Complete Flat i-Cord Tutorial & Fun Projects to Knit
What's Inside
Introduction to Flat i-Cords with full instructions on multiple versions, fixes, pick ups and bind offs Patterns for the lquitos Scarf, Manaus Headband and Bow Headband Pattern links to online tips, detailed Photobucket pictures & blog posts PDF pattern pages and chart files to download onto your phone or tablet Links to free Nuance tutorial downloads
Reference Sheet
Gauge
Gauge is flexible for this project. Samples: Iquitos Scarf (blue/taupe) 3.5 sts per 1" Iquitos Scarf (purple/pink) 5 sts per 1" · Manaus Headband (blue/green) 5 sts per 1" · Bow Headband (pink/orange) 4.5 sts per 1"
Size (after braiding)
> Iquitos Mobius Scarf (blue/taupe) 57" long > Iquitos Scarf (purple/pink) 72" long · Manaus Headband (blue/green) 19" long · Bow Headband (pink/orange) 18" long
Yarn/Yardage
Iquitos Mobius Scarf (blue/taupe): Cascade 128, 100% wool. Gauge of 12-15 sts per 4", 100g = 128 yds, US 10, 3 skeins, 200 grams used in total. - Other yarn ideas: Cascade Cloud or Highland Duo. lquitos Scarf (purple/pink): Cascade Pima Tencel [50% Cotton, 50% Tencel; 50g=89 yrds: 4-5 balls · Manaus Headband (blue/green): Ewe Ewe Wooly Worsted, 50g = 97 yds; 5 balls to get 5 colors; total yardage used = 50 g Bow Headband (pink/orange): Karabella Aurora 8, 100% Merino; 50g = 105 yds, approx. 25 yards total.
Notions
· Needle to knit to yarn label gauge. > Optional: Extra for 3 Needle Bind Off Tapestry Needle
| Table of Contents | Page |
| Introduction toFlat i-Cords | 3 |
| Basic | 3 |
| Wide | 3 |
| DoubleWide | 4 |
| Adding a CC Stripe | 4 |
| Bow Instructions | 4 |
| Pick Up from Edge | 4 |
| Fixing a Dropped i-Cord | 5 |
| Braid Bind Off | 9 |
| lquitos Scarf | 7 |
| ManausHeadband | 8 |
| BowHeadband | 8 |
You'll find different tips included with each tutorial and pattern so read through it all.
The Interactive Knitting Pattern
·You're Connected with links throughout the PDF file taking you to additional online information; more project details, free tutorial downloads & photos. , We blogged about it! Read about it here.


Facebook Twitter Wordpress Pinterest

Introduction to the Flat i-Cord (FiC)
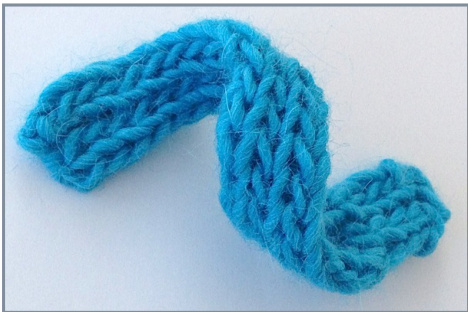
Before we get started on the projects, let's talk about the Flat i-Cord (FiC) You can knit a FiC with double point, circular or straight needles because there's no sliding the stitches to the other end! The resulting i-cord doesn't look like the traditional one. It's flat - both sides are identical. That means there's a lot you can do with it.. twist it, loop it or braid it for example.
The Basic Knit Only Flat i-Cord
This version of the Flat i-Cord is easy to knit. Half the stitches roll to the back and half to the front. It takes a few rows for the FiC to wrap fully but it will, don't worry. When weaving in the cast on tail, do it in a way that wraps the end sts toward the center. Cast On Options: You can generally cast on with the long-tail cast on. There are times when it is beneficial to start with a provisional cast on. For example, joining multiple FiCs side by side for a braid or connecting ends together to form a mobius scarf.
Knitting Instructions:
Cast on 6 stitches. Every Row: k3, sl3 wyif When you move the yarn to the front to slip the 3 sts, it's in the correct position to start the 3 knit sts on the next row. Binding Off: It isn't tricky but this will give you a cleaner result. 、 Row 1: BO 2 sts, slip 3 wyif (4 sts remaining) 、 Row 2: BO 2 sts, sl1 (the bind off from the other side), pass last stitch over. Cut tail and weave in so last chain lies flat against top of FiC. You can hide the tail down the center of the i-cord. Convenient!
The Wide Flat i-Cord
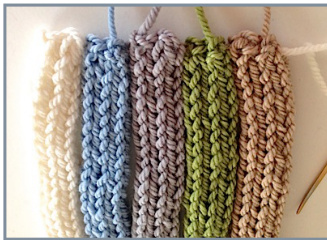
There's no need to limit yourself to just 6 stitches. A Flat i-Cord knit with 8 stitches will still close up as shown in the pink, purple and green Scarf. Cast on 8 stitches.、 Every Row: k4, sl4 wyif This will give you an even flatter, more dramatic i-cord. It's nice for lighter gauge yarns like this 5 sts per inch yarn here.

The Knit Only Flat i-Cord
Pattern: k3, sl3 wyif every row Features: Wraps front & back Benefit: Knit only, no purling knit RS: knit stitch WS: purl stitch No Stitch RS: Placeholder - No stitch made. WS: none defined slip wyif RS: Slip stitch as if to purl, with yarn in front WS: Slip stitch as if to purl, with yarn in back slip RS: Slip stitch as if to purl, holding yarn in back WS: Slip stitch as if to purl, holding yarn in front purl RS: purl stitch WS: knit stitch yo RS: Yarn Over WS: Yarn Over
p in st below
RS: Purl stitch in the row below, inserting needle from behind through the st in the row below WS: Knit into stitch below, inserting needle from front through the st in the row below p2tog RS: Purl 2 stitches together WS: Knit 2 stitches together
Introduction to the Flat i-Cord (con't)
The Double-Wide Striped Flat i-Cord
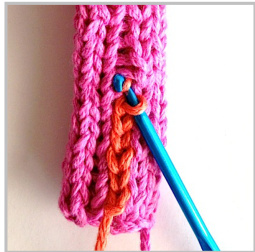
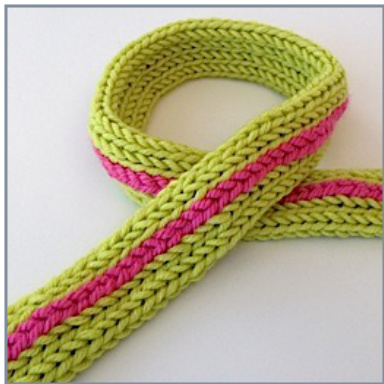
Want to go wide? The green cord to the right is 1" wide and about 1/8" high. Cast on 9 stitches. 、 Row 1: k5, sl4 wyifRow 2: k4, sl5 wyif There will be a gap along one side of the FiC. Pick up a matching or contrasting color yarn along this gap with a crochet hook in the same way you pick up dropped sts. > Place slip knot on end of crochet hook. Tighten. Pass crochet hook, bottom first, through center of FiC to the last gap hole. Loosen slip knot. Insert hook into next hole. Use hook end to find and grab yarn inside the cord. Chain up sts closing the gap.
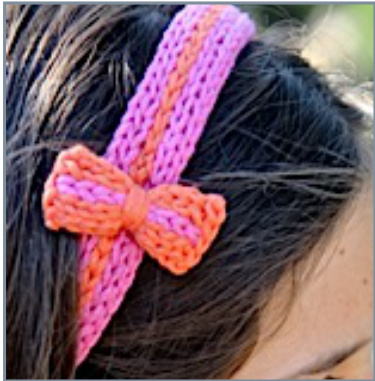
Flat i-Cord Bow
Now that you know how to add color it's easy to make a bow. Just knit a short FiC and wrap with yarn. You don't have to knit a double wide, you can use 7 sts. (Pattern for this headband on page 8.)
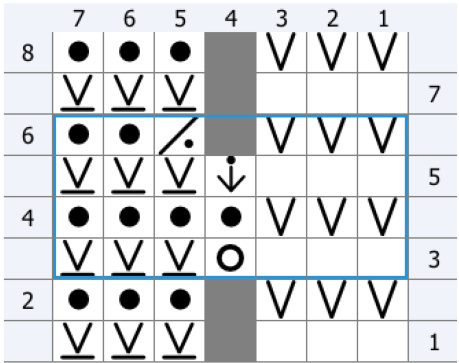
The Button Hole
Now you can add a button hole to your i-cords! Note: Rows 1-2 and 7-8 on chart are standard FiC rows. Row 3: k3, yo , sl3 wyif Row 4: k4, sl 3 wyif Row 5: k3, p1rb, sl3 wyif > Row 6: k2, k2tog, sl 3 wyif When selecting and sewing on your button, make sure it will both fit the hole and is loose enough to stretch through the thick FiC. Try a shank button or wrap thread around and around the button base to add height.
Pick Up Cast On
Sometimes you might like to add a FiC from an existing edge. Simply picking up the number of working stitches will spread the stitches too wide. The Back Rolling Flat i-Cord works best since it takes a few rows for the FiC to close. Make 1 Purl (m1P): To make a purl st pick up the strand running between the sts and purl it. > With right side facing, pick up 4 stitches. Turn. > Work the first row (WSR) as follows: p1, m1P, p2, m1P, p1 >Tug on that pick up tail to make sure it is tight. > Continue with Flat i-Cord pattern to the right.
Back Wrapping Flat i-Cord
Pattern: 1) k3, sl3 2) p3, sl3 wyif Features: Wraps back only Benefit: Yarn is already in place for slip stitches. Better for picking up an i-Cord from an edge. Flat i-Cord Projects
Fixing a Flat i-Cord
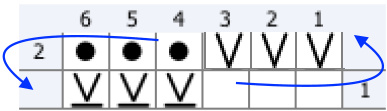
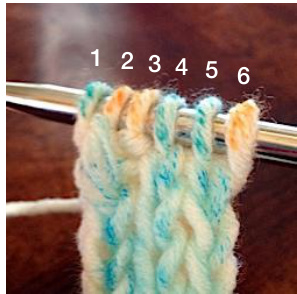
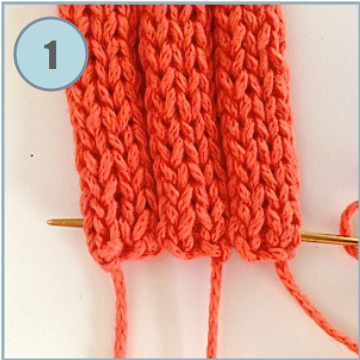
The Flat i-Cord uses only a few stitches, which means it just might slide off the end of your needles. The stitches immediately reorder themselves which may make the proper order hard to determine. Not to worry, here's how to pick up your dropped Flat i-Cord. Let's look at how the stitches sit on the needle ...


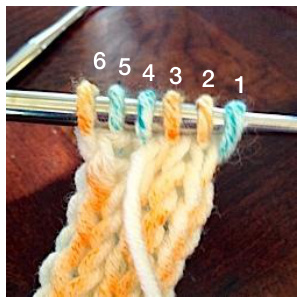
Here's how they sit on the needle. There are 3 white/green knit sts and 3 orange slipped sts.
The stitches will naturally move towards a circular shape. Slip the first 3 on the needle followed by st 4, 5 and 6. Note: It helps to have the yarn tail in the center to help identify 4th stitch. Hold the i-cord flat between your fingers so you can see the shape and pull back a row or two until you can spot it. Consider adding a Life Line to prevent future issues.
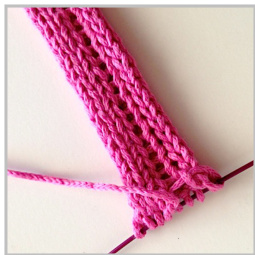
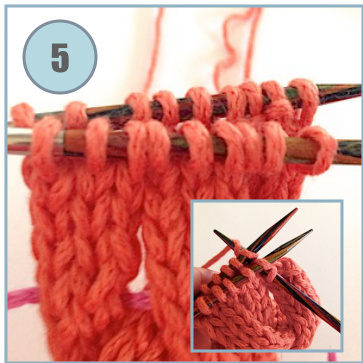
Let's Compare ..
Picking sts up for a 3-needle bind off (p6) is not the same.
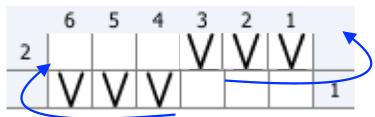
This time look at which sts show on the front (orange) and . . .
... on the back (blue).
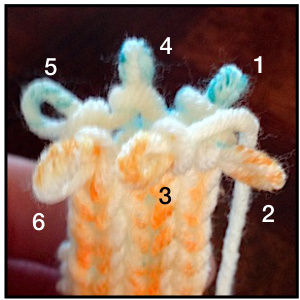
When you hold the i-Cord flat, the sts move into this order.
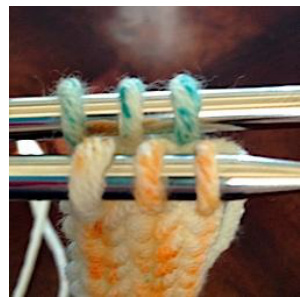
Slide front & back onto 2 needles to prepare for 3-needle bind off.
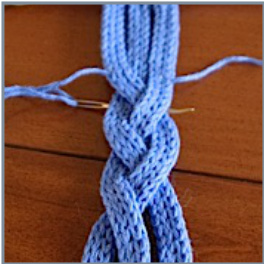
Finishing a Braided Flat i-Cord
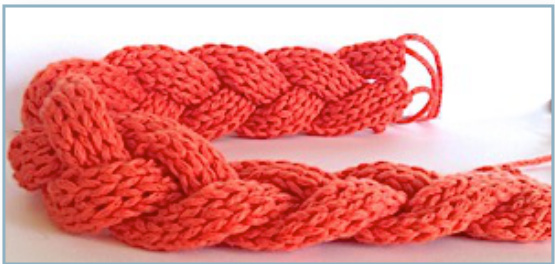
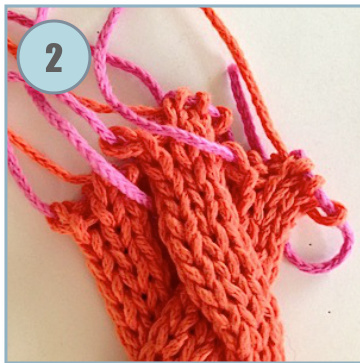
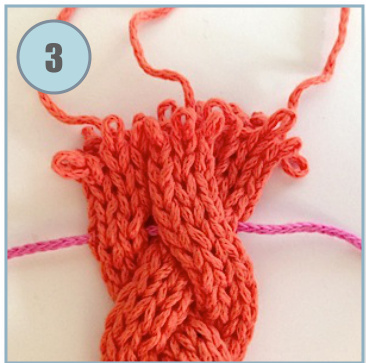
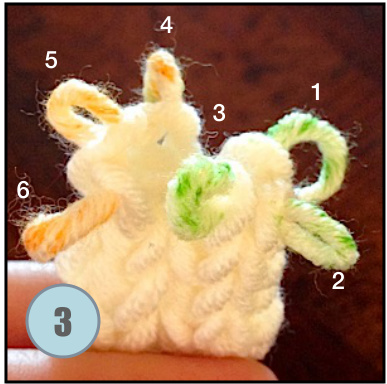
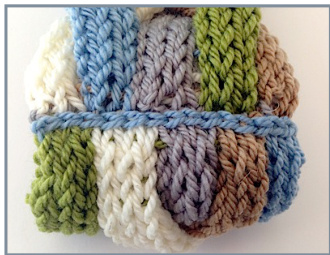
Line up cast on edges. Run existing yarn tails through the center of the i-Cord from side to side along the first 1/2" a few times so they lie next to each other without twisting. Don't pull too tightly. Braid the i-Cords snuggly. You may find the ends don't match up. No problem, just pull out the stitch holders (pink yarn scraps here). Use one to secure braid temporarily (3). Slowly and carefully pull back on the longer i-Cords until they each match the length desired. If one is too short you can alway put it back on needles to knit a few rows.
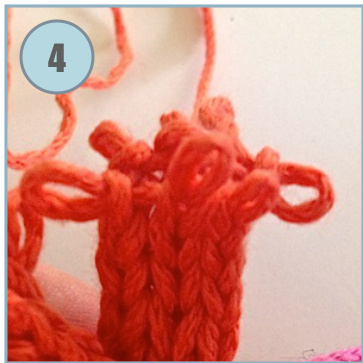

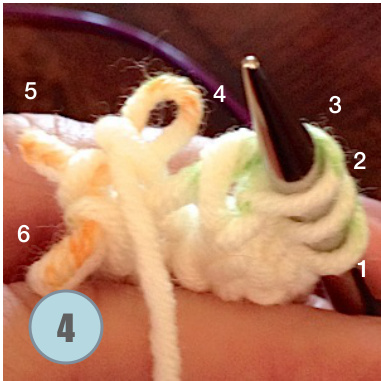
Make sure the yarn tail is on the side of each i-Cord. The 6 stitches will naturally shape themselves into three in the front and three in the back (see p 5). Carefully pick up sts on needles. The 15 front sts on 1 needle and 15 back sts on another. Knit a 3 Needle Bind Off Nicely finished Edge. Use 2 of the yarn tails to secure first 1/2" of strap so the i-Cords lie flat next to each other. Leave one longer tail to attach to top later. \* Note: If you like the cleaner edge of the 3 Needle bind off, you can start the Flat i-Cord with a 6-stitch provisional cast on and bind offin a similar manner If so, bind off to connect the beginning before braiding. Flat i-Cord Projects Knitting Nuances
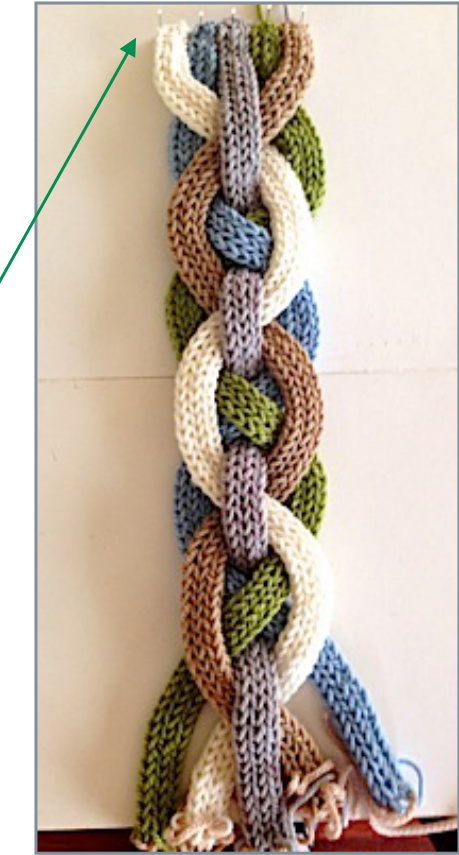
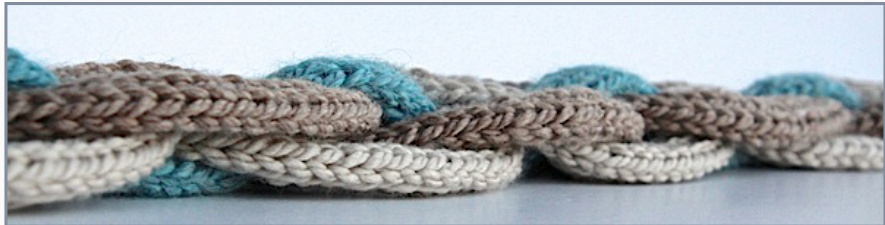
lquitos Scarf
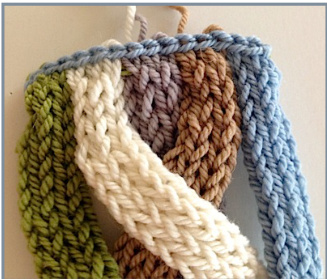
This 5-piece braid is the perfect opportunity to see how much the Flat i-Cord differs from the standard. You can either connect the ends to create an infinity or mobius scarf or leave the ends free so you can wrap it as you like. Yarn Selection: If using a bulky yarn choose one that is light weight Good options include chain yarns or alpaca blends. If you're using a lighter gauge you may want to try using 8 sts (see p3). · Sample knit with Cascade 128, 100% wool (see p2 for other ideas). > Each FiC is 64" long. When braided, scarf is 57" long before connected as mobius. Note: If you are using just 3 colors knit only until you uses half the yardage (you can use a kitchen scale). Joining: Decide on how you want to join the mobius now. The easiest way is to follow the instructions on the previous page. This will give you a nice clean join but one that shows (see next page). If you'd like to kitchener the join you'll need to start with a provisional cast on.
Flat i-Cord Pattern:
Cast on 6 sts Every row: k3, sl 3 wyif > Knit for 64" (or until you use half yarn). Center cord is a bit shorter. > Take off needle and put live sts on scrap yarn or holder. Knit 4 more!
Finishing:
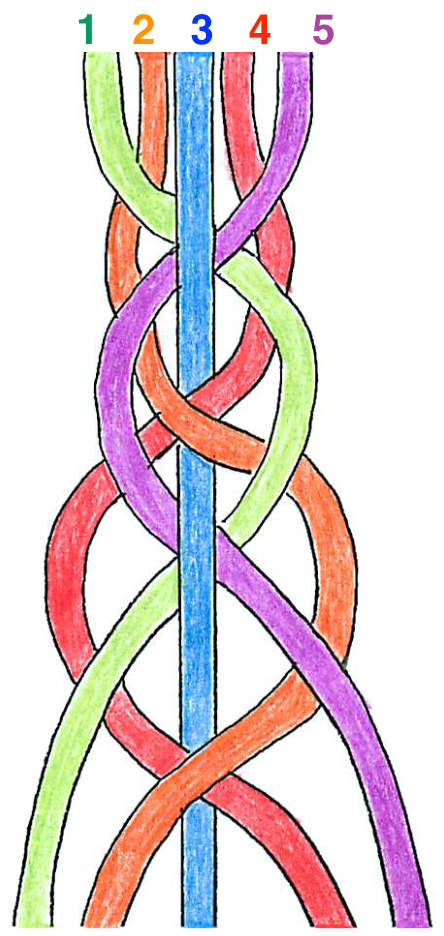
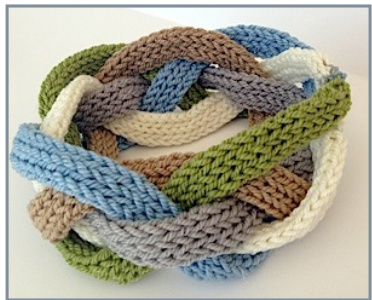
. Find a nice long flat surface to work on, a table, counter or floor. Follow instructions on prior page and the diagram to right to join, braid and bind off the scarf. Play with how tightly you want the braid to be, just don't make it so tight the i-cords bend. You can also choose to secure the braid a multiple points down the length of the scarf if you'd like braid to stay more secured. Mobius or Infinity Scarf: 、 Twist once to shape as a mobius (or not). Seam together as shown on next page. 、 Kitchener option: Place live sts from beginning on needles or scrap yarn with 15 in front and 15 in back as above. Kitchener the front and back separately. 、 Straight Scarf: When braiding, leave a few inches of the Flat i-Cord open at each end. How much is up to you. Make sure to secure end of braids. Run a scrap of yarn back and forth 3 times, then run the tails though too. Snip the tails so they don's stick out.
5 Part Braid Diagram → 3 is the center line. It passes over 1 & 5 and under 2 & 4. 1 & 5 are partners. They both always run under 3. 5 is always on top of 1. 2 & 4 are partners. They both always run on top of 3. 2 is always on top of 4.
Flat i-Cord Projects
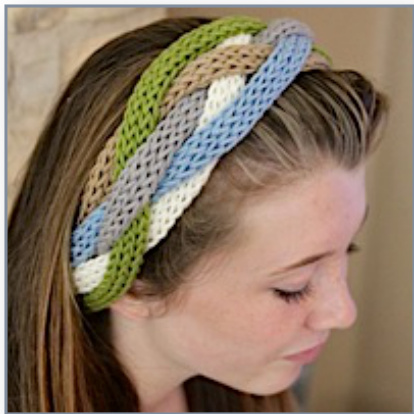
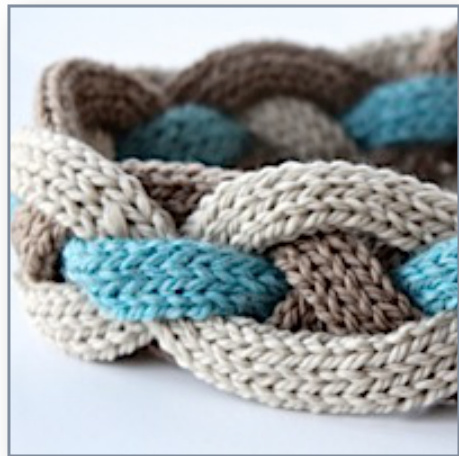
Manaus Headband
A beautifully decorative way to keep your ears warm on cool days. Yarn Selection: A merino or merino blend will work well. There is a lot of stretch in the braid. You can see it when you compare the 2 photos to the right. · Sample knit with Ewe Ewe Wooly Worsted (a nice springy merino). > Flat i-Cords length is 1 1/2" to 2" longer than finished (braided) head band. You can play with the length by braiding more or less tightly. Toddler (Girl, Women): 18 (20, 21)" before; 16 (18, 19)" after braiding. Knitting Instructions: Please read instructions for scarf on previous page. Test braid: Play with the placement of the colors. I originally had the blue as the center line but it was too strong.
Align beginning ends of Flat i-Cord. Line up cast on edges. Run existing yarn tails through the center of the FiC from side to side along the first 1/2" a few times so they lie next to each other without twisting. Don't pul too tightly. > It may help to pin them in place while braiding. I use a foam core board.
Braid using diagram on page 7. > Bind off and join ends using photo tutorial on page 6. > Sew ends together with front end just under the bind off edge so only the clean (blue) bind off edge shows..
I try to make the colors line up in the same order as the beginning, but somehow it never works out that way.
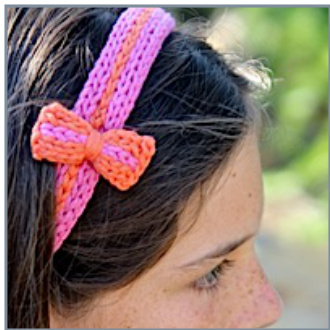
Bow Headband
Here's a great starter project. Fast, easy and fun. > See p4 for instructions on knitting a Double Wide Flat i-Cord with CC stripe. I Toddler (Girl, Women):16 (18, 19)". 1" negative ease from head size. > Knit Flat i-Cord to desired length. Sew ends together. > Knit a second FiC reversing colors just 1-1/2 to 2" long. Run tail through center to middle and wrap around to form bow. Use remaining tail to attach over seam. > Get ready to make another, they'll be in high demand! Knitting Nuances