Happymaking Designs
by Jacqui Harding
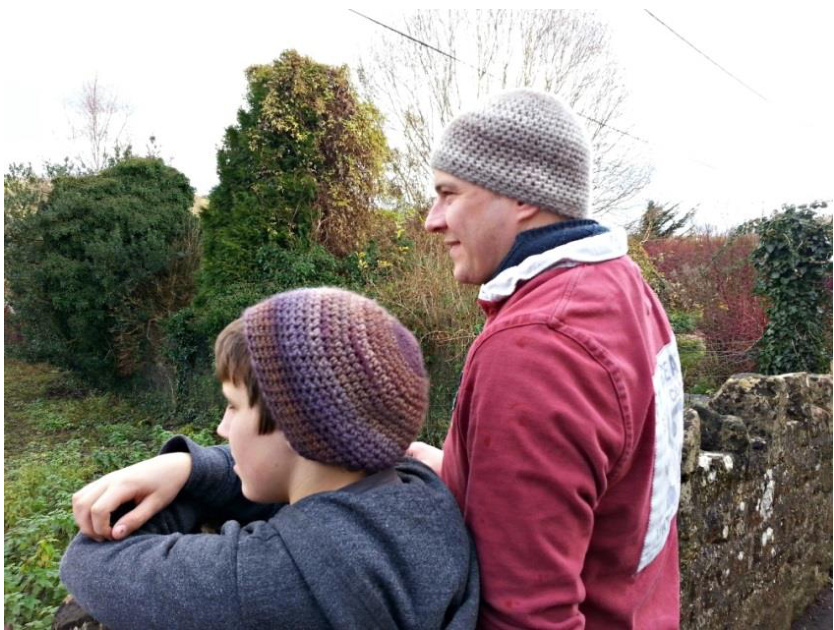
Thornbury beanie
This is about as simple as it gets. A ball of chunky wool, a crochet hook and the easiest crochet stitch. Worked from the crown to brim, make it as big or small as you need it to be - you can get an adult hat from just 50g. Once you know what you are doing, it will take around an hour. This is a great beanie that suits men, women & children - just pick your colour &off you go! 1 x 50g Rico Creative Melange chunky (90m/50g) Or 1 x 100g West Yorkshire Spinners Blue Faced Leicester roving yarn (150m/100g) \*7mm hook Short length of scrap yarn or 1 split stitch marker \*I crochet loosely. Do check as you go - if you get more than 3 sts per inch, change to an 8 or 9mm hook. \*Tension: 11sts & 13 rnds per 4" in dc. To fit; child, teen/small adult, large adult. Head circumference 17-19" (19-21", 21-23) Note - Pattern is written in UK terms. For US crocheters, substitute sc for dc. NOTES To work a double crochet (dc), insert the hook, wrap the yarn around, pull up a loop, wrap the yarn around the hook, pull through both loops on hook
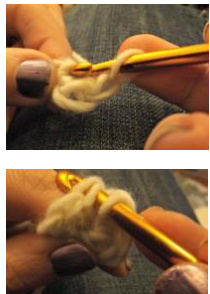
Rnd 1 - the crochet hook is inserted from front to back through the same ch every time. This forms a central circle. All other rnds - the hook is inserted from front to back under both strands of the 'v' of the stitch in the previous rnd.
Pattern;
The hat is worked in spirals, without turning the work or adding a starting chain every round. Mark the start of the round with a scrap of yarn or a stitch marker, moving it every rnd to keep track. Rnd 1: Ch2. Work 6dc into 1st ch. (6sts) Rnd 2: 2dc into each dc from previous rnd (12 sts) Rnd 3: \*2dc into dc, dc into next st; rep from \* around (18 sts) Rnd 4: \*2dc into dc, dc into next 2 sts; rep from \* around (24 sts) Abbreviations Rnd; round Rep; repeat Ch; chain Dc; double crochet St; stitch Sl st; slip stitch Rnd 6: \*2dc into dc, dc into next 4 sts; rep from \* around (36 sts) Rnd 7: \*2dc into dc, dc into next 5 sts; rep from \* around (42 sts) Rnd 8: dc into each st around
M& L sizes
Rnd 9: \*2dc into dc, dc into next 6; rep from \* around (48 sts) Rnd 10: dc into each st around
L size only
Rnd 11: \*2dc into dc, dc into next 7; rep from \* around (54 sts)
All sizes
Rep Rnd 10 until your hat measures 6"(7",8") or the recipient's preference. I used almost the complete ball of the Rico, and just over 50g of the West Yorkshire Spinners yarn. The hat looks nice left as is, but if you wanted to do a simple edging, work one more rnd of dc but work through the back loops only. At the end of the rnd, sl st to the first st. Fasten off yarn, weave in all ends. Soak and lay out to dry or block gently over a balloon. Enjoy!
Ideas for changing the style of the hat:
This should be a fairly close fitting beanie. If you want to have more slouch, make it longer. The fabric is loose enough to crumple pleasingly at the back. If you want to have a fuller shape to the hat more like a tam, add an extra one or two rounds of increases. When you are about an inch short of the length you want, reduce the extra 6 or 12 sts by working dc2tog 6 or 12 times evenly around, then continuing in dc as per the pattern. To work dc2tog, insert the hook into a st, pull up a loop, insert the hook into the next st, pull up a loop. Yo, pull through all 3 loops on hook. This is a great blank canvas for adding flowers, bows, brooches - whatever the recipient willove! All of these will use more yarn than the plain beanie. Want to follow me? You can catch me on Ravelry (www.ravelry.com) and Twitter (www.twitter.com) as Curvyjax and on my Happymaking Facebook page (www.facebook.com/happymaking)


