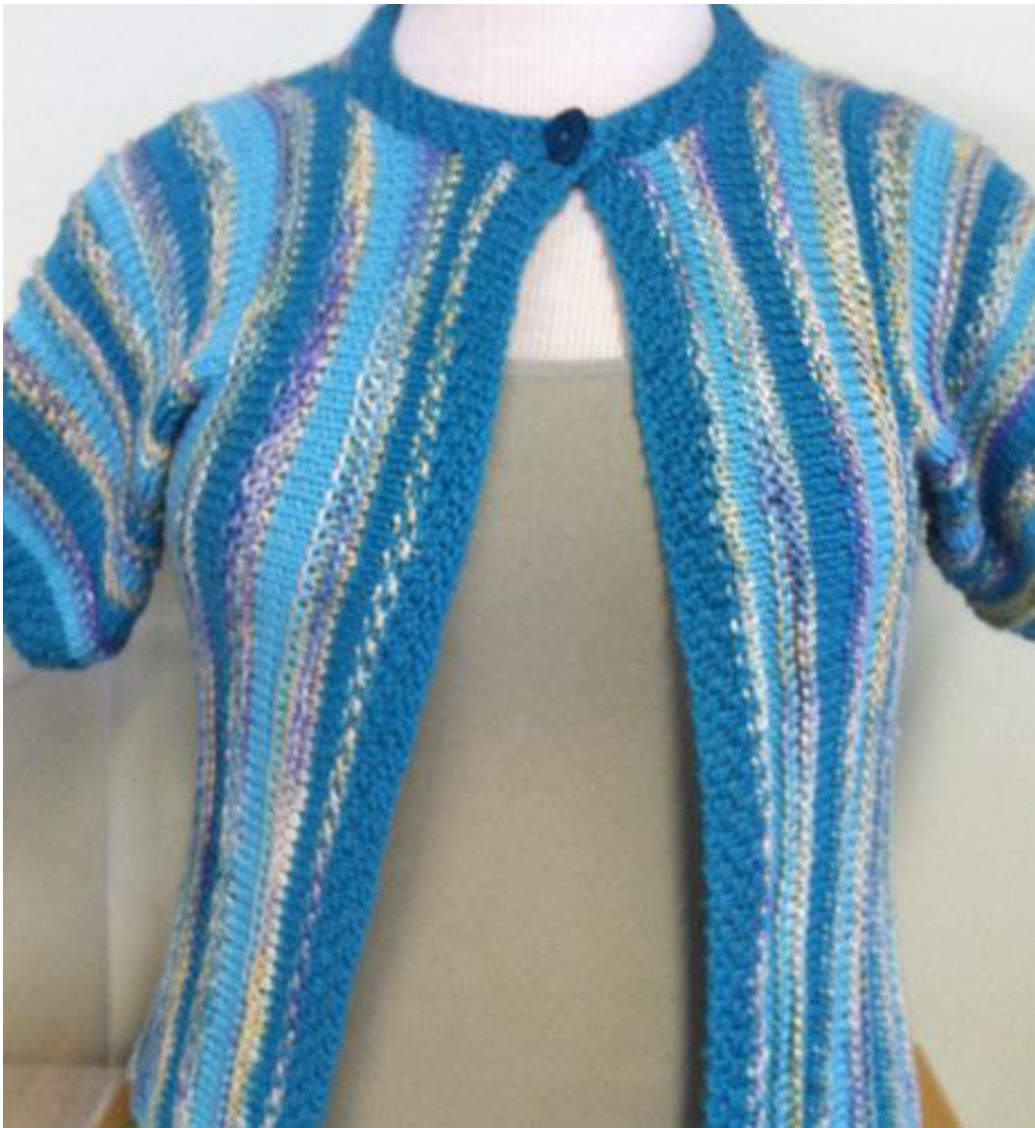
These instructions will walk you through creating a side to side cardigan in a worsted weight yarn. This easy stitch pattern sweater can be done in two or three colors. It is worked side to side with no seams.
KNITTING SKILLS TO BE USED
Page 1 of 12 Tubular cast on, Figure 8 cast-on, knitting in the round, three needle bind-off, EZ sewn cast-off.
S2SStandardFit MEASUREMENTS
Sizes to fit bust: 34 (38, 42, 46, 50) inches Knitted bust size when done: 34 (39, 44, 49, 54) inches Length from shoulder to sweater bottom: 16 % (17 3%4. 18 %, 19 3%4 20 3%) inches @ 2013 by Kathy Adams To tailor this to your personal measurements, go to Custom Fit S2S after the Standard Pattern below. MATERIALS Size US8/5mm needles 24" circular needle or size needed to obtain gauge. Size US 6/4mm 16" circular needles Tapestry needle Stitch markers 1 button %" in diameter Tape Measure Large stitch holder or waste yarn to hold stitches YARN Color A and B: Worsted weight yarns such as Pediboo Worsted Accent Yarn: Worsted weight hand dyed or variegated yarn such as Silkindian Duke, Knit collage pixie dust, Blue Ridge Silk Splash, Claudia's hand-painted bouclé, Malabrigo Rios. Yardage For Two Color version, using color A for sweater and for edging Solid Color A: 400 (400, 500, 600, 700) yards Accent Color: 330 (330, 440, 550, 660) yards To do edges of sweater in Accent color, reverse yardages. Yardage for Three color version, using color A for sweater and for edging: Solid Color B: 200 (200, 250, 300, 350) yards Solid Color A and Accent Color: 300 (300, 400, 500, 650) yards GAUGE: 17 Stitches and 26 rows - 4" in stockinette.
Abbreviations:
Beg - Beginning Dec - Decrease Even - Knit without increases or decreases Inc - Increase K -Knit K2tog - Knit two together M1 - Make one Knit stitch M1P - Make one purl stitch Meas - Measure P - Purl RS - Right Side SSK - Slip as if to knit, Slip as if to knit, Knit two slipped stitches together inserting right hand needle from right to left into the two slipped stitches. St st - Stockinette stitch (knit when on right side of garment and purl when on wrong side) WS - Wrong Side YO - Yarn Over ? 2013 by Kathy Adams Two Color Sequence: Color A: 4 rounds of stockinette stitch Accent Color: Seed stitch or garter stitch for 4 rounds. Repeat these 2 color bands throughout the sweater. Three Color Sequence: Color A: 4 rounds of stockinette stitch. Accent Color: Seed stitch or garter stitch for 4 rounds. Color B: 4 rounds of stockinette stitch. Accent Color: Seed stitch or garter stitch for 4 rounds. Repeat these 4 color bands throughout the sweater.
STANDARDPATTERN
RIGHTSLEEVERIBBING
Cast on using the modified tubular cast-on and size 6 circular needles: 60 (64, 68, 72, 67) stitches in Color A or your chosen sweater edge color. Modified Tubular Cast-on: For a K1P1 stitch pattern for seed stitch borders, this cast-on uses 2 needles rather than the traditional 1 needle and thumb. It is similar to a cable cast-on. Make a slip-loop and place on Left Needle. Cast-on a 2nd stitch by knitting into the front of the slip-knot stitch and placing the stitch on the left needle. \*Holding working yarn in front, insert the Right Needle from the back to the front between the last 2 stitches created, then wrap yarn round the needle as if to purl. Draw the yarn through to the back and place the loop on the Left Needle taking care not to twist it. Move your yarn to the back, and insert the Right Needle from front to back between the last 2 stitches. Take the yarn around the needle as if to knit. Draw the yarn through and place the loop on the Left Needle taking care not to twist it.\* Repeat from \* to \* for the required number of stitches. For a seamless cardi, knit the sleeves in the round. Place marker for start of round. Join yarn to knit in the round, being careful that there are no twists in the cast-on stitches before you join.
Double Seed Stitch Ribbing
Round 1 and 2. K1, P1 for entire round. Round 3 and 4 - P1, K1 for entire round. Repeat rounds 1-4 one time, for a total of 8 rounds of double seed stitch ribbing.
RIGHT SLEEVE BODY
Change to size 8 needles and Color B. Work on Sleeve in the round in the color sequence you chose above, doing 4 rounds in each color. Use the instructions below until you have completed 6 increase rounds (this means you have 6 color bands, NOT counting the cast on edge). Color B (and A for three color sequence) Sleeve Increase Rounds Round 1: Increase Round: K1, M1, knit entire round until one stitch before marker. M1, knit last stitch in round. Rounds 2-4 Plain rounds: Knit the round, being careful at the start of each round to twist the color(s) not in use so they are carried under your working yarn at the marker. Accent Color Rounds (Seed stitch) for Sleeve Increase Rounds Note: If using a bouclé, it is easier to do garter stitch or reverse stockinette for the Accent Color, as the bouclé will hide the seed stitch. Work your favorite increase one stitch after the start of the first round, and one stitch before the end of the first round, then work 3 rounds even in your chosen bouclé pattern. Round 1: K1, M1P, \*K1, P1\* until 1 marker is left before marker. M1, P1. Round 2: \*P1, K1\* repeat entire round. Round 3: \*K1, P1\* repeat for entire round Round 4: Same as Round 2. Continue in your chosen Color Sequence until you have increased over 6 color bands . You should have 12 more stitches on your needle than you had cast on.
Sleeve after increases:
Continue knitting in the round in your chosen color sequence until sleeve is desired length to shoulder. This is 4 12 inches for sizes 32 and 34. End with row 1 or 2 in whatever color you are On.
CASTING ON FOR THE SWEATER BODY
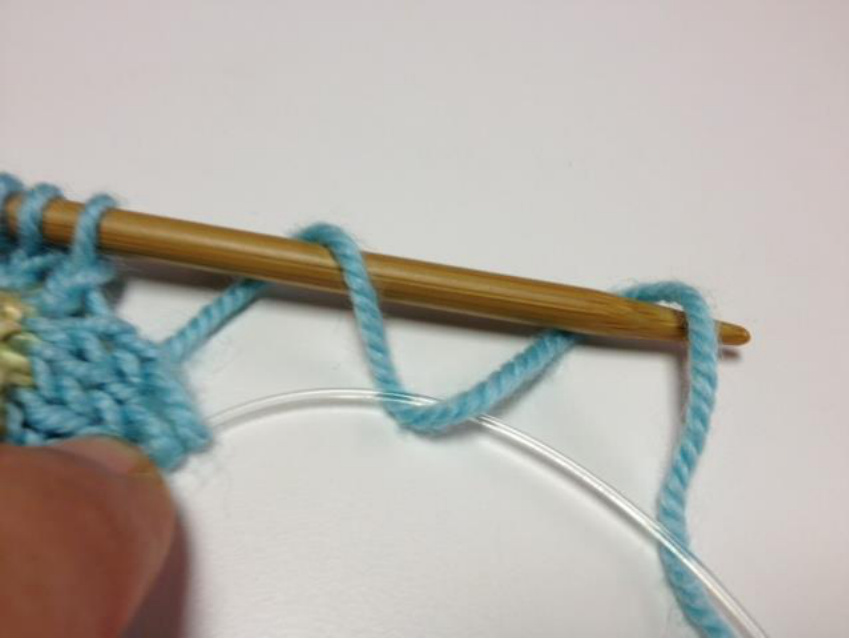
Cast on 36 (38, 40, 42, 44) stitches on each needle using figure 8 instructions as shown in this video: http://www.youtube.com/watch?v=eV23ezRr6gA The photo below also shows the yarn sequence if you don't have access to the video. The photo is purposely done very loose so you can see the path of the yarn. Note that the bottom wraps are On the cable, not on the needle tips. 1. Make sure the working yarn is on the bottom needle with the tips pointing to the right. 2. Before you start wrapping pull the bottom needle to the right so that you are wrapping on the top NEEDLE TIP but only on the CABLE for the bottom needle. This will give you a smaller wrap and a more polished look when you begin knitting. 3. Your first wrap will be on the TOP needle. Wrap tightly so you don't have a gap or hole at the underarm. To start the Figure Eight cast-on, the working yarn should be on your bottom needle, bring the yarn behind the top needle and over the front of the top needle tc Start.
At completion of cast-on, you have "live stitches" on each needle. Since your first wrap was on the top needle, end with a bottom needle wrap. Watch this video to see how to start knitting. http://www.youtube.com/watch?v=7 8YiR6JRfo. When you get to the end of the row, you are not knitting in the round anymore, watch this video which has no sound, to see how to rotate your needles at the end of the row. http://www.youtube.com/watch?v=Vj2tFelrll4
KNITTING THE SWEATER BODY TO THE NECK
You have 144 (152 160, 168, 176) stitches on the needles. You are no longer knitting in the round. You will knit up the front of the sweater and around the sleeve and down the back. You will then turn your needles and purl up the back of the sweater, around the sleeve which is now the shoulder and then purl down the front of the sweater. Continue knitting 4 rows of each color in your chosen color sequence until you have about 8 1/2 (9 %4, 11, 12 14, 13 %2) inches from beginning, ending with 2 of any given color. On the following Right side row (row 3 in your given color's color sequence), work 72 (76, 80, 86, 88) stitches and place them on a holder for the right front.
BACK OF S2S CARDI
Continue working on the back in your color sequence until the back measures 9 inches from where you put the front on a holder. Try to end with the same row 2 in the same color as you used when you put your front on hold. If this makes the sweater back too large or too small, just end with row 2 of any given color. Total sweater length from the sleeve cast-on is 17 12 (18 %), 20, 21 12, 22 %2). Cut yarns leaving enough to later weave in the end. Place stitches on a holder. (If you only have one large stitch holder, put the right front stitches on your knitting needle to free up the holder for the back stitches which are now going onto the holder).
RIGHT S2SCARDIFRON
Work the FOURTH row of the color with which you were working when you put the stitches on the holder. Make sure you are on the WS and purl this last row of your color. Note that you will be purling toward the bottom of the sweater and knitting up to the neckline. Start your new color and knit to the last two stitches, K2tog. Continue to decrease every knit row 5(5, 6, 6, 7) more times. You will now have 66 (70, 73, 77, 80) stitches on the needle. When you have completed the last decrease row, mark this row with a locking stitch marker or safety pin. @ 2013 by Kathy Adams Work evenly until the front measures about 8 (9 14, 10 12, 11 34, 13) inches from the cast-on edge, ending with row 4 of a color that is NOT your ribbing color. [Sometimes, you may need to be creative and do only 3 rows of your Accent color, or 5 rows of color A or B, to make sure you don't end with same color as your ribbing.] Using the same size 8 needle, complete 8 rows of double seed stitch and bind off.
LEFT S2S CARDI FRONT
Cast on 66 (70, 73, 77, 80) stitches using a long-tail cast on, size 8 needle and your ribbing color. Complete 8 rows in double seed stitch. Here you may need to be a little creative before proceeding if you are using three colors. Notice how many color sequences you used on the right front beginning with the first decrease row through the last color before the front ribbing. Then notice for the back stitches which color you put on the holder. You will be rejoining the front and back in a few rows. To make your color sequences come out evenly, decide which color to use after the ribbing so that you can be on the same color as the back by the time you get to the shoulder. You may need to do only three rows of a given color on the front, or perhaps go back and knit an extra 4 rows on the back to make the colors line up properly. People don't notice that there are only three rows of seed stitch in the Accent Color or that you did an extra row of another color. It gives the sweater an extremely subtle visual interest. This is a fun pattern to play with the stripes, varying color bands anywhere from 2-8rows. Once you have selected your color for the first row after the left front seed stitch ribbing, count the number of rows on the right front from your last decrease to the ribbing, and knit that same number of rows on the left front continuing your color sequence.
LEFT FRONT NECK INCREASES
This is a good time to recheck if using three colors that you are on target to end the increases with row three of the color that is on the back stitch holders. You have 12 (12, 14, 14, 16) more rows to knit before you join the back. Recheck what row adjustments you want to make and note them here: Rows of color A Rows of Accent ColorRows of color B Rows of Accent ColorCows of Color A You may need to cut your yarn if doing odd numbers of rows, and/or use a circular needle and knit from the other side instead of turning your work and cutting yarn. On a RS row, you are ending at the neck edge. Knit to last stitch, increase one stitch by knitting in the front and back of the stitch. Continue to increase on each knit row 5(5, 6, 6, 7) more times ending in row 7 of the same color that you have on the back's stitch holder. You should now have 72 (76, 80, 84, 88) stitches on the left front.
JOINING THE BODY
On a right side row, knit up the left front and then knit the stitches off of the back stitch holder. You should now have 144 (152, 160, 168, 176) stitches on your needle. Continue working in your color sequence until you have 4 (5 14, 6 12, 7 3%, 9) inches knit from the point at which you joined the left front to the back.
COMPLETINGTHEBODYANDCREATINGTHELEFTSIDESEAM
Put the two bottom edges of your sweater together with the right sides facing each other, so you are looking at the purl WS of your sweater. Complete a three needle bind-off as shown here: http://www.youtube.com/watch?v=pDrmKKxBu2E so that you have bound off 36 (38, 40, 42, 44) stitches from each needle. You may want to count out the stitches before beginning the bindoff and place a locking stitch marker where you are to stop binding off. You will have 72 (76, 80, 86, 88) remaining on your needl for the left sleeve.
LEFT SLEEVE
Place a marker at the underarm, where your bind-off ended. Join the remaining stitches and work in the round for your left sleeve as follows, always continuing in your chosen colors sequence. Work even for two rows. Begin to decrease every FOURTH row for a total of 6 decrease rows, as follows: After the marker at start of round, K1, K2tog, knit to last three stitches in round, SSK, K1. End decreases when you have 60 (64, 68, 72, 67) stitches. Work even until sleeve is same length as right sleeve without the ribbing. Switch to your chosen ribbing color, size 6 circular and complete 8 rounds of double seed stitch. Bind off using EZ's needle bind-off. http://www.youtube.com/watch?v=MfnavSY2Rug This bind-off will give you the same easy stretch that the tubular cast-on gives and will look similar.
NECK RIBBING
Using your Ribbing color and size 8 needle, with the right side facing you, start at the RIGHT FRONT. Pick up and knit about 26 (26, 27, 27, 28) stitches from the right front edge, 33 stitches from the back neck and 26 (26, 27, 27, 28) stitches from the left front edge. Work in double seed stitch for 3 rows. Buttonhole: Knitting on the right side, work 3 stitches, YO, SSK, work in seed stitch to end. Work 3 more rows. Bind off. NOTE: By binding off in a purl stitch, the bind-off will not show on the top. If you want the chain of knit like loops showing around the neck, then bind off in a knit stitch. Sew the button on left front neck band, weave in ends and you are ready to gently steam your sweater or wear as is!!
Custom fit S2S Cardi
SWATCHING
1. You can swatch or you can read the ball band. Write down the stitches per inch on ball band for (a) below if you don't swatch. If you swatch, use size 8 needles and color A, cast on about 20 stitches and do stockinette for about 4.5 inches. . Measure your stitches per inch and use for (a) below. (a) stitches per inch. (b) Your arm circumference above elbow or where you want this short sleeve to end: inches (c) Number of stitches to cast on for sleeve: (a) \*(b) = . This needs to be an even number so round up if it's not. (d) Distance from sleeve bottom to underarm inches
CUSTOM FIT RIGHT SLEEVE
Cast on the number of stiches you calculated in number 2(b) above using tubular cast on as described in Standard Pattern in your selected Rib color and size 6 circular needles. Follow instructions for the Standard Pattern right sleeve ribbing and increases. If needed after trying on the sleeve, you may make more increase rounds. If so, record how many increase rounds you made here, as you will need this number for the other sleeve. 1(e). total increase rounds for sleeve. Knit until the sleeve is desired length as noted in 1(d) 1(f). Record the number of rows that you knit evenly after your increases until you reach your shoulder: You can try it on to make sure it is a comfortable length. It should end at your shoulder bone for a good fit. End with row 1 or 2 in any color band. 2. WRITE DOWN TOTAL OF STITCHES YOU HAVE ON YOUR SLEEVE (You will need this number for the other sleeve). Stitches.
CASTING ON FOR THE CUSTOM FIT SWEATER BODY
3. To tailor the Sweater length to the hip: Once at desired sleeve length, try on sleeve and measure desired sweater length from bottom of sleeve at the underarm to point on hip for desired sweater bottom. (a). Subtract one inch (for ribbing) from desired length and write the result here inches (b) Re-measure your gauge near the stitches on the needle stitchespei inch. 4. Multiply3 (a) by 3(b) for number of stitches to cast on to EACH side of needle for sweaterbody. stitches for sweater body. 5. Cast on the number of stitches you calculated in 4, using the figure 8 cast on as shown in the photo below or the video at http://www.youtube.com/watch?v=7_8YIR6JRf0. If for example, you are to cast on 36 stitches in number 4, you will do 36 “wraps" on EACH needle in the video, ending with a wrap on the bottom cable/needle tip. The Standard Pattern also has a photo and instructions for the cast-on. At completion of cast-on, you have “live stitches" on each needle. Since your first wrap was on the top needle, end with a bottom needle wrap. Watch this video to see how to start knitting. http://www.youtube.com/watch?v=7 8YlR6JRfo. When you get to the end of the row, you are not knitting in the round anymore, watch this video which has no sound, to see how to rotate your needles at the end of the row. http://www.youtube.com/watch?v=Vj2tFelrll4 If your hips are more than 6 inches wider than your bust measurement, or you want less of an inverted V on this open cardigan, you may want to insert short rows at the side of each underarm. Please email me at nk.adams@verizon.net and I will work with you to do this extra tailoring until I've done enough to write general directions for this.
KNITTING THE CUSTOM FIT SWEATER BODY TO THE NECK
6. Shoulders
(a) Measure from where the sleeve ends at the shoulder to where you want the ribbing to start at the side of your neck. Ribbing will take up 8 rows of seed stitch. Shoulder width without ribbing: inches. Continue knitting in your color sequence until you reach this length 6(a), measuring from the shoulder at the row where you cast on the side stitches to the active needle, ending with row 2 of your current color band. 7. Total of stitches (a). On your needle, you should have stitches equal to the sum of stitches from #2 above plus (2 times the stitches in 4 above). Total (b). Divide this number by two: ..stitches Knitting on the right side, knit half of your stitches 7(b) and put on a holder to work later as the right front.
BACK OF CUSTOM FIT S2S CARDI
8. Measure your back width from the spot on your shoulder/neck where the front was put on holders across your back to the same spot on the other side of your neck. (a). inches. Continue knitting in your color sequences until the back is 8(a) inches long measuring from where the front is put on holders to the end of your current knitting. Cut yarns leaving enough to later weave in the ends. Place stitches on a holder. (If you only have one long stitch holder, put the right front stitches on your knitting needle to free up the holder for the back stitches which are now going onto the holder).
RIGHTCUSTOM FIT S2S CARDI FRONT
9.Work the FOURTH row of the color with which you were working when you put the stitches on the holder. Make sure you are on the WS and purl this last row of your color. Note that you will be purling toward the bottom of the sweater and knitting up to the neckline. . Measure from your neck edge to the center of your neck. inches Start your new color and knit to the last two stitches, K2tog. Continue to decrease every knit row 4-8 more times, using your neck width and the decreases shown in the standard pattern as a guide, and leaving at least half an inch to knit evenly to the center front. When you have completed the last decrease row, mark this row with a locking stitch marker or safety pin. (b) Write down how many decreases you've made, as you'll need it for the Left front: number of decreases made on the right front. 10. Write down the number of stitches on your needle, as you'll need it for the Left front. Stitches on needle at center front: 11. Knit evenly until the length from your first decrease row to the active needle equals what you wrote in 9(a), above, ending with row 4 of a color that is NOT your ribbing color. [Sometimes, you may need to be creative and do only 3 rows of your Accent color, or 5 rows of color A or B, to make sure you don't end with the same color as your ribbing.] Using the same size 8 needle, complete 8 rows of double seed stitch and bind off using in purl stitch on a wrong side row. . Celebrate - You are done measuring your body, and can now use the measurements you have made to complete the sweater AND you are more than half done. If your right arm is a different circumference than your left arm, you can measure the right arm and adjust using the same techniques we've already used).
LEFT CUSTOM FIT S2S CARDI FRONT
Cast on the number of stitches you wrote in number 10, above, using a long-tail cast on, size 8 needle and your edging/ribbing color. Complete 8 rows in double seed stitch. Here you may need to be a little creative before proceeding if you are using three colors. Notice how many color sequences you used on the right front beginning with the first decrease row through the last color before the front ribbing. Then notice for the back stitches which color you put on the holder. You will be rejoining the front and back in a few rows. To make your color sequences come out evenly, decide which color to use after the ribbing so that you can be on the same color as the back by the time you get to the shoulder. You may need to do only three rows of a given color on the front, or perhaps go back and knit extra rows on the back to make the colors line up properly. People don't notice that there are only three rows of seed stitch in the Accent Color or that you did an extra row of another color. It gives the sweater an extremely subtle visual interest. Once you have selected your color for the first row after the left front seed stitch ribbing, count the number of rows on the right front from your last decrease to the ribbing, and knit that same number of rows on the left front continuing your color sequence.
LEFT FRONT CUSTOM FIT NECK INCREASES
This is a good time to recheck if using three colors that you are on target to end the increases with row three of the color that is on the back stitch holders. You have two times the number you wrote in 9b more rows to knit before you join the back. Recheck what row adjustments you want to make and note them here: Rows of color A Rows of Accent ColorRows of color B Rows of Accent ColorCows of Color A You may need to cut your yarn if doing odd numbers of rows, and/or use a circular needle and knit from the other side instead of turning your work and cutting yarn. On a RS row, you are ending at the neck edge. Knit to last stitch, increase one stitch by knitting in the front and back of the stitch. Continue to increase on each knit row until you've made the number of increase that you wrote down in 9b, aiming to end with a row 2 of the same color that you have on the back's stitch holder. You should now have 7b stitches on the left front.
JOINING THE CUSTOM FIT BODY
On a right side row, knit up the left front and then knit the stitches off of the back stitch holder. You should now have (6b times 2) stitches on your needle. Continue working in your color sequence until you have completed 6(a) inches from the point at which you joined the left front to theback. COMPLETING THE CUSTOM FIT BODY AND CREATING THE LEFT SIDE SEAMPut the two bottom edges of your sweater together with the right sides facing each other, so you are looking at the purl Ws of your sweater. Complete a three needle bind-off as shown here: http://www.youtube.com/watch?v=pDrmKKxBu2E binding of the number of stitches from each needle that you recorded in number 4 above. . You may want to count out the stitches before beginning the bind-off and place a locking stitch marker where you are to stop binding off. You will have the number of stitches that you wrote in number 2 above remaining on your needle for the left sleeve.
CUSTOM FIT LEFT SLEEVE
Place a marker at the underarm, where your bind-off ended. Join the remaining stitches and work in the round for your left sleeve as follows, always continuing in your chosen colors sequence. Work even for the same number of rows that you worked in 1(f). Begin to decrease every FOURTH row for a total of decrease rows as noted in 1(e) Decrease as follows: after the marker at start of round, K1, K2tog, knit to last three stitches in round, SSK, K1. @ 2013 by Kathy Adams Work even until sleeve is same length as right sleeve without the ribbing. Switch to your chosen ribbing color, size 6 circular and complete 8 rounds of double seed stitch. Bind off using EZ's needle bind-off. http://www.youtube.com/watch?v=MfnavSY2Rug This bind-off will give you the same easy stretch that the tubular cast-on gives and will look similar.
CUSTOM FIT NECK RIBBING
Using your Ribbing color and size 8 needle, with the right side facing you, start at the RIGHT FRONT. Pick up and knit about one stitch for each bound off stitch from the right front edge, 3 of every 4 stitches from the back neck and the same number of stiches on the from the left front edge as you picked up on the right front edge. Work in double seed stitch for 3 rows. Buttonhole: Knitting on the right side, work 3 stitches, YO, SSK, work in seed stitch to end. Work 3 more rows. Bind off. NOTE: By binding off in a purl stitch, the bind-off will not show on the top. If you want the chain of knit like loops showing around the neck, then bind off in a knit stitch. Sew the button on left front neck band, weave in ends and you are ready to gently steam your sweater or wear as is!! Please send feedback, questions and photos of your finished projects to yarncacher on Ravelry


