By Rebecca Osborn
Warmth for All: Ribbed Hat and Cowl
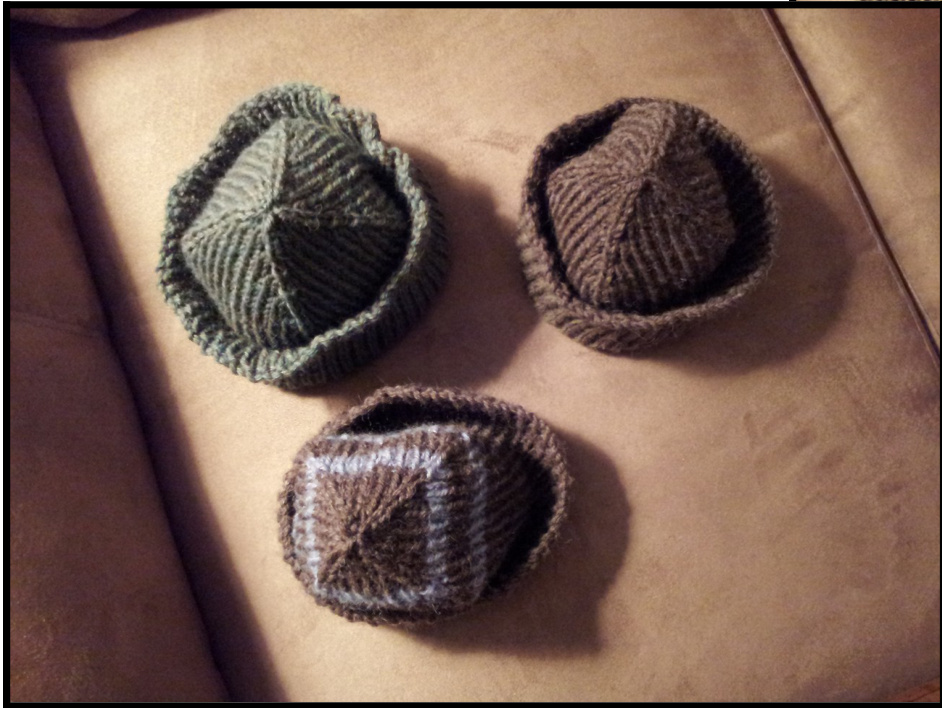
This is more of a recipe than a pattern, with a wealth of sizes and gauge options. 1X1 ribbing is a wonderful fabric, cushy and stretchy. It is forgiving in size and holds lots of air, perfect for insulating the neck or head. Wear both together, and it's like wearing a balaclava!
Materials:
Yarn of your heart's choosing, between fingering and heavy worsted. It must be able to get one of the variety of gauges specified below. You will have to guesstimate quantity, though I generally find that even for a large adult hat of generous length, I don't need more than 5 oz. of wool. I average 3.5 oz.; for children it's more like 2 oz. Needles of your heart's choosing, appropriate to your yarn. I recommend 16" circulars, with DPNs for the hat's crown.

1 regular stitch marker. For the hat only: 4 locking stitch markers. Sizes: 16(18/20/22/24)" head circumference. To fit between 6-month-old baby through large adult. When choosing a size from the chart below, go by actual head measurement. If between sizes, round down. Gauge: Between 6 and 3 stitches to the inch. To measure gauge, knit 1x1 rib on 20 or so stitches, for about 1". (You may knit back and forth to swatch even though the piece will be in the round). To measure gauge, lay the piece flat and press gently so the ribs separate naturally, but are not very stretched. Measure stitches to the inch as accurately as you can. If between measurements on the chart below, round down (i.e. if you are at 4.25 st./in., follow instructions for 4 st./in.).
Techniques, Symbols, & Abbreviations
·K - Knit P- Purl S2KP - Centered double decrease: Slip 2 stitches as if to Knit 2 together. K1; Pass slipped stitches over.
Cast On Chart
Use this chart to select a cast-on number according to your size and gauge. See "sizes" and "gauge" above for details on picking your number.
| 16" | 18" | 20" 22" | 24" | |
| 6 st./in. | 96 | 104 | 112 128 | 136 |
| 5.5 | 88 | 96 | 104 120 | 128 |
| 5 | 80 | 88 | 96 104 | 112 |
| 4.5 | 72 | 80 | 88 96 | 104 |
| 4 3.5 | 64 56 | 72 64 | 80 88 | 96 |
| 72 72 | 80 | |||
| 3 | 48 | 56 | 56 64 | 72 |
Pro Tip: You may notice that each of the numbers above is divisible by 8. That's really the only rule for the hats, so fudge accordingly. The cowls are even more lenient; you just have to cast on a number divisible by 2.
Cowl Directions
Pick a cast-on number from the chart above. Using the cable cast-on, cast on that number of stitches. Set up your needles so you are about to join in the round. (Arrange your stitches so you are careful not to twist.) The first stitch you cast on should be on your right needle, and the last stitch you cast on should be on the left needle. Slip the first stitch onto the left needle, and pull the last stitch over it onto the right needle. This means the first stitch you cast on is now the first stitch of the round. (Of course, if you find this confusing, join in the round your usual way. I find this join very pleasing, though, because there is then no jog to fix.) Place a stitch marker at the beginning of the round. K1, P1 until one of the following things happens: (a) Jesus comes back, (b) you run out of yarn, or (c) your work is 6(7/8/10/12)" in length. Or whatever length you deem best; that's just a guideline. Bind off loosely.
Hat Directions
Pick a cast on number from the chart above. Using the cable cast-on, cast on that number of stitches. Join in the round as per above for cowl. Place a stitch marker at the beginning of the round. K1, P1 for 4.5(5/5.5/6/6.5) inches. Pro Tip: Knitting for that length before starting the crown will make a normal-fitting sort of hat. If you add another 2-3" for a child or 3-4" for an adult, you can fold the brim up to add more warmth over the ears. (You can do the same thing if you want to wear the hat un-folded, but sticking out from your head in that funny hipster-ish sort of way.) 1x1 ribbing is so stretchy that if you add another inch in length, the hat may fit them again next year! Now you are going to have to do a bit of math. (Sorry.) The end goal is that you are going to take 4 locking stitch markers, and place them equidistantly around your hat (in knit stitches, please), with the beginning of the round squarely between two of them. If you don't understand that, here are some more specific directions. Take your Cast-on number and divide it by 8. Write that number here: Divide that number in half and write it here: Starting at the beginning of the round, count out the second, smaller number of stitches. Place the first locking stitch marker in the last stitch. (If it's a purl stitch, skip to the next one. We're only putting locking stitch markers in knit stitches.) Starting from the stitch you marked, count out the first, larger number of stitches, and mark that last stitch (again, knit stitches only). Do this again two more times. You should have four locking stitch markers evenly spaced around the hat, each locked into knit stitches. That was the only hard bit. If you managed that, you should be fine from here. Knit the crown repeating the following three rounds. If using at 16" circular, when necessary, switch to double points. Round 1: \*K1, P1\* until 2 stitches before marked stitch; K1, SK2P. Repeat 3 more times; K1, P1 to end. Round 2: \*K1, P1\* until 1 stitch before marked stitch; SK2P, P1. Repeat 3 more times; K1, P1 to end. Round 3: \*K1, P1\* to end. You should notice that the stitches you marked are the center stitches in a line of centered double decreases. You may wish to keep moving the locking stitch markers up the center decrease stitch; or, after a couple decrease rounds, you may find you can see the decrease line so clearly you don't need a marker. Continue until after a Round 2, you have either 8 or 16 stitches left. (It will depend on the number you cast on.) If you have 8 stitches left, break the yarn leaving a 6" tail, thread through the remaining stitches, and pull tight. If you have 16 stitches left, work one last round, Knitting 2 together all the way around. 8 stitches now remain. Break the yarn leaving a 6" tail, thread through the remaining stitches, and pull tight. Weave in ends. Blocking is not generally necessary for these pieces, but if you wish to, dampen them in your desired fashion and leave them flat to dry without stretching. A Note About the Stripes: You may desire to add fetching stripes as I did in the examples pictured. I encourage you to try your fancy. But if you are curious, here is how I did mine. Your mileage may vary based on gauge. The stripes I performed were three rows each of contrast color, with four rows of main color in between. In worsted weight yarn, this made stripes about 1/2 wide and slightly more apart. Putting them at the bottom of a hat or cowl, I started the first stripe after 5 rounds of main color. To put them at the top of a hat, I the first stripe 4 rows before starting the crown decreases. To put them in the middle of a hat, I just sort of guessed. I leave you to work that out yourself.


