Mango Badango Designs
Dream On
By MangoBadango Designs
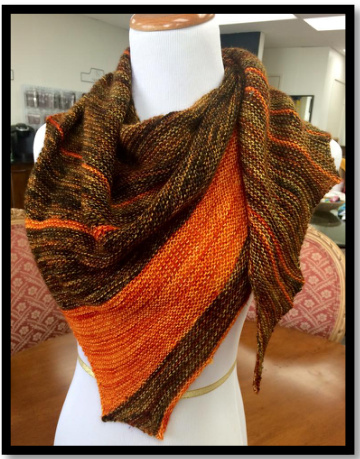
Yarn: Fingering weight yarn, sample knit in Dream in Color Jilly Main Color (MC): Ginger Ninja, 440 Yards (4 oz.) Contrasting Color (CC): Great Pumpkin, 110 yards (1 oz.) Knitting Needles: US 4 (3.5mm) 32" circulars Other Notions: Darning Needle, tape measure, stitch markers Gauge: 6 stitches to the inch, but gauge isn't important for this shawl

Stitch Instructions
M1: Insert left needle into the front of the horizontal bar between stitches. Knit through the back loop of the stitch SSK: Slip next two stitches as if to knit, insert left needle in the front of the two slipped stitches and knit two together. PM: Place Marker
Pattern Notes:
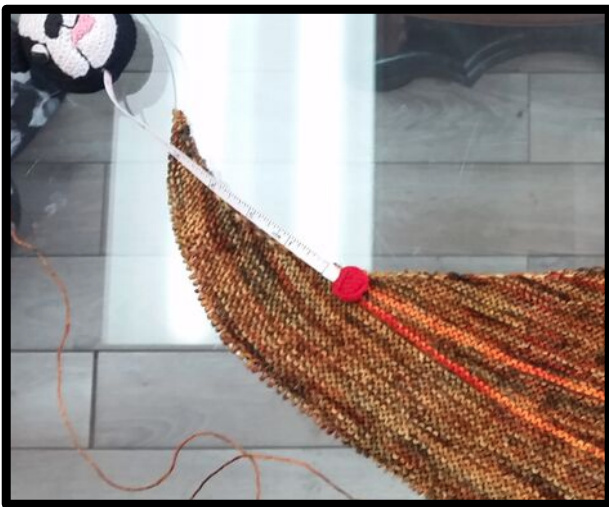
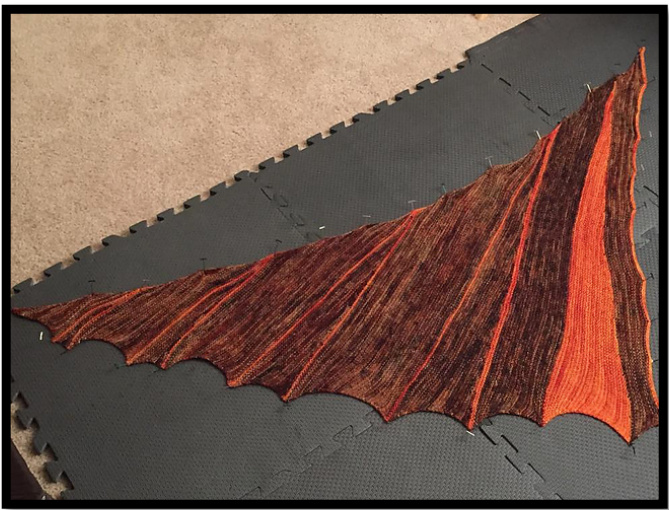
There will be a total of 4 striped wedges, the first starting at 5 inches from the beginning and the next in intervals of 6, 7, and 8 inches from the previous wedge. The pattern has instructions for each of these wedges individually. The picture to the right shows how to measure the space between wedges. The pattern calls for the use of stitch markers to mark short row turns. There are a few options to help make the turns more visible. Follow the pattern directions for placing a marker at every turn and then removing markers once the short row section is completed. Use a removable marker and continue moving the marker at each turn. Completely ignore the call for markers and make a note of the space created at each short row turn.
Dream On
Set Up
Cast on 2 stitches with MC Row 1: K1, M1, K1 Main Pattern Repeat Row 2 (WS): K1, M1, K to end Row 3 (RS): SSK, K to last stitch, M1, K1 Row 4 (WS): K1, M1, K to end Row 5 (RS): K to last stitch, M1, K1 Repeat Rows 2-5 until piece measures 5 inches along the M1 edge (top of shawl), ending with Row 4. Don't cut yarn.
Striped Wedge Pattern
Using CC knit 2 rows, cut CC yarn. Using MC Row 1 (RS): K to 6 stitches before the end of the row, PM and turn Rows 2 and 4 (WS): K to end Row 3 (RS): SSK, K to 6 stitches before marker and turn Repeat Rows 2-4 until 8 or fewer stitches remain to be knitted on the wrong side row. Jsing CC, Knit 2 rows, removing all markers on the first row. Cut CC yarn.
Main Pattern Repeat
Using MC, knit in pattern (Rows 2-5) until piece measures 6 inches from the top of the striped wedge, ending with Row 4.
Knit Striped Wedge Pattern
Using MC, knit in pattern (Rows 2-5) until piece measures Z inches from the top of the striped wedge. Ending WithRow4 Copyright @ 2015 MangoBadango Designs MangoBadangoDesigns.Etsy.com
Knit Striped Wedge Pattern
rn (Rows 2-5) until piece measures 8 inches from the top of the striped wedge Bitte beachten, "Rosina"Muster (ChartA) in VT und RT werden immer in den gleichen Jsing CC, Knit 4 rows, removing all markers on the first row. Cut CC yarn. After completing the final striped wedge, using MC, knit in pattern (Rows 2-5) until there is approximately 0.5 ounces left. End with Row 4 and cut yarn. Using CC Row 1 (RS): K to 6 stitches before the end of the row, PM and turn Rows 2 and 4 (WS): K to end Row 3 (RS): SSK, K to 6 stitches before marker and turn Repeat Rows 2-4 until 8 or fewer stitches remain to be knitted on the wrong side row. Cut CC yarn Using MC, Knit in pattern (remove all markers on first row) until yarn runs out, ending with a WS row. Using CC knit 2 rows. Bind off with an I-cord bind off.
I-Cord Bind Off
1. Cast on three stitches (I prefer a knitted cast on for this), ensuring that all stitches remain on the left needle. 2. K2, K2tog through back loop 3. Slip the three stitches from the right needle back to the left needle. 4. Repeat Steps 2 and 3 until three stitches are left. 5. K1, K2tog through back loop, slip stitches back to the left needle and K2tog through back loop. Weave in ends and block enthusiastically.
Copyright @ 2015 MangoBadango Designs MangoBadangoDesigns.Etsy.com


