Bunny Rabbit Hat
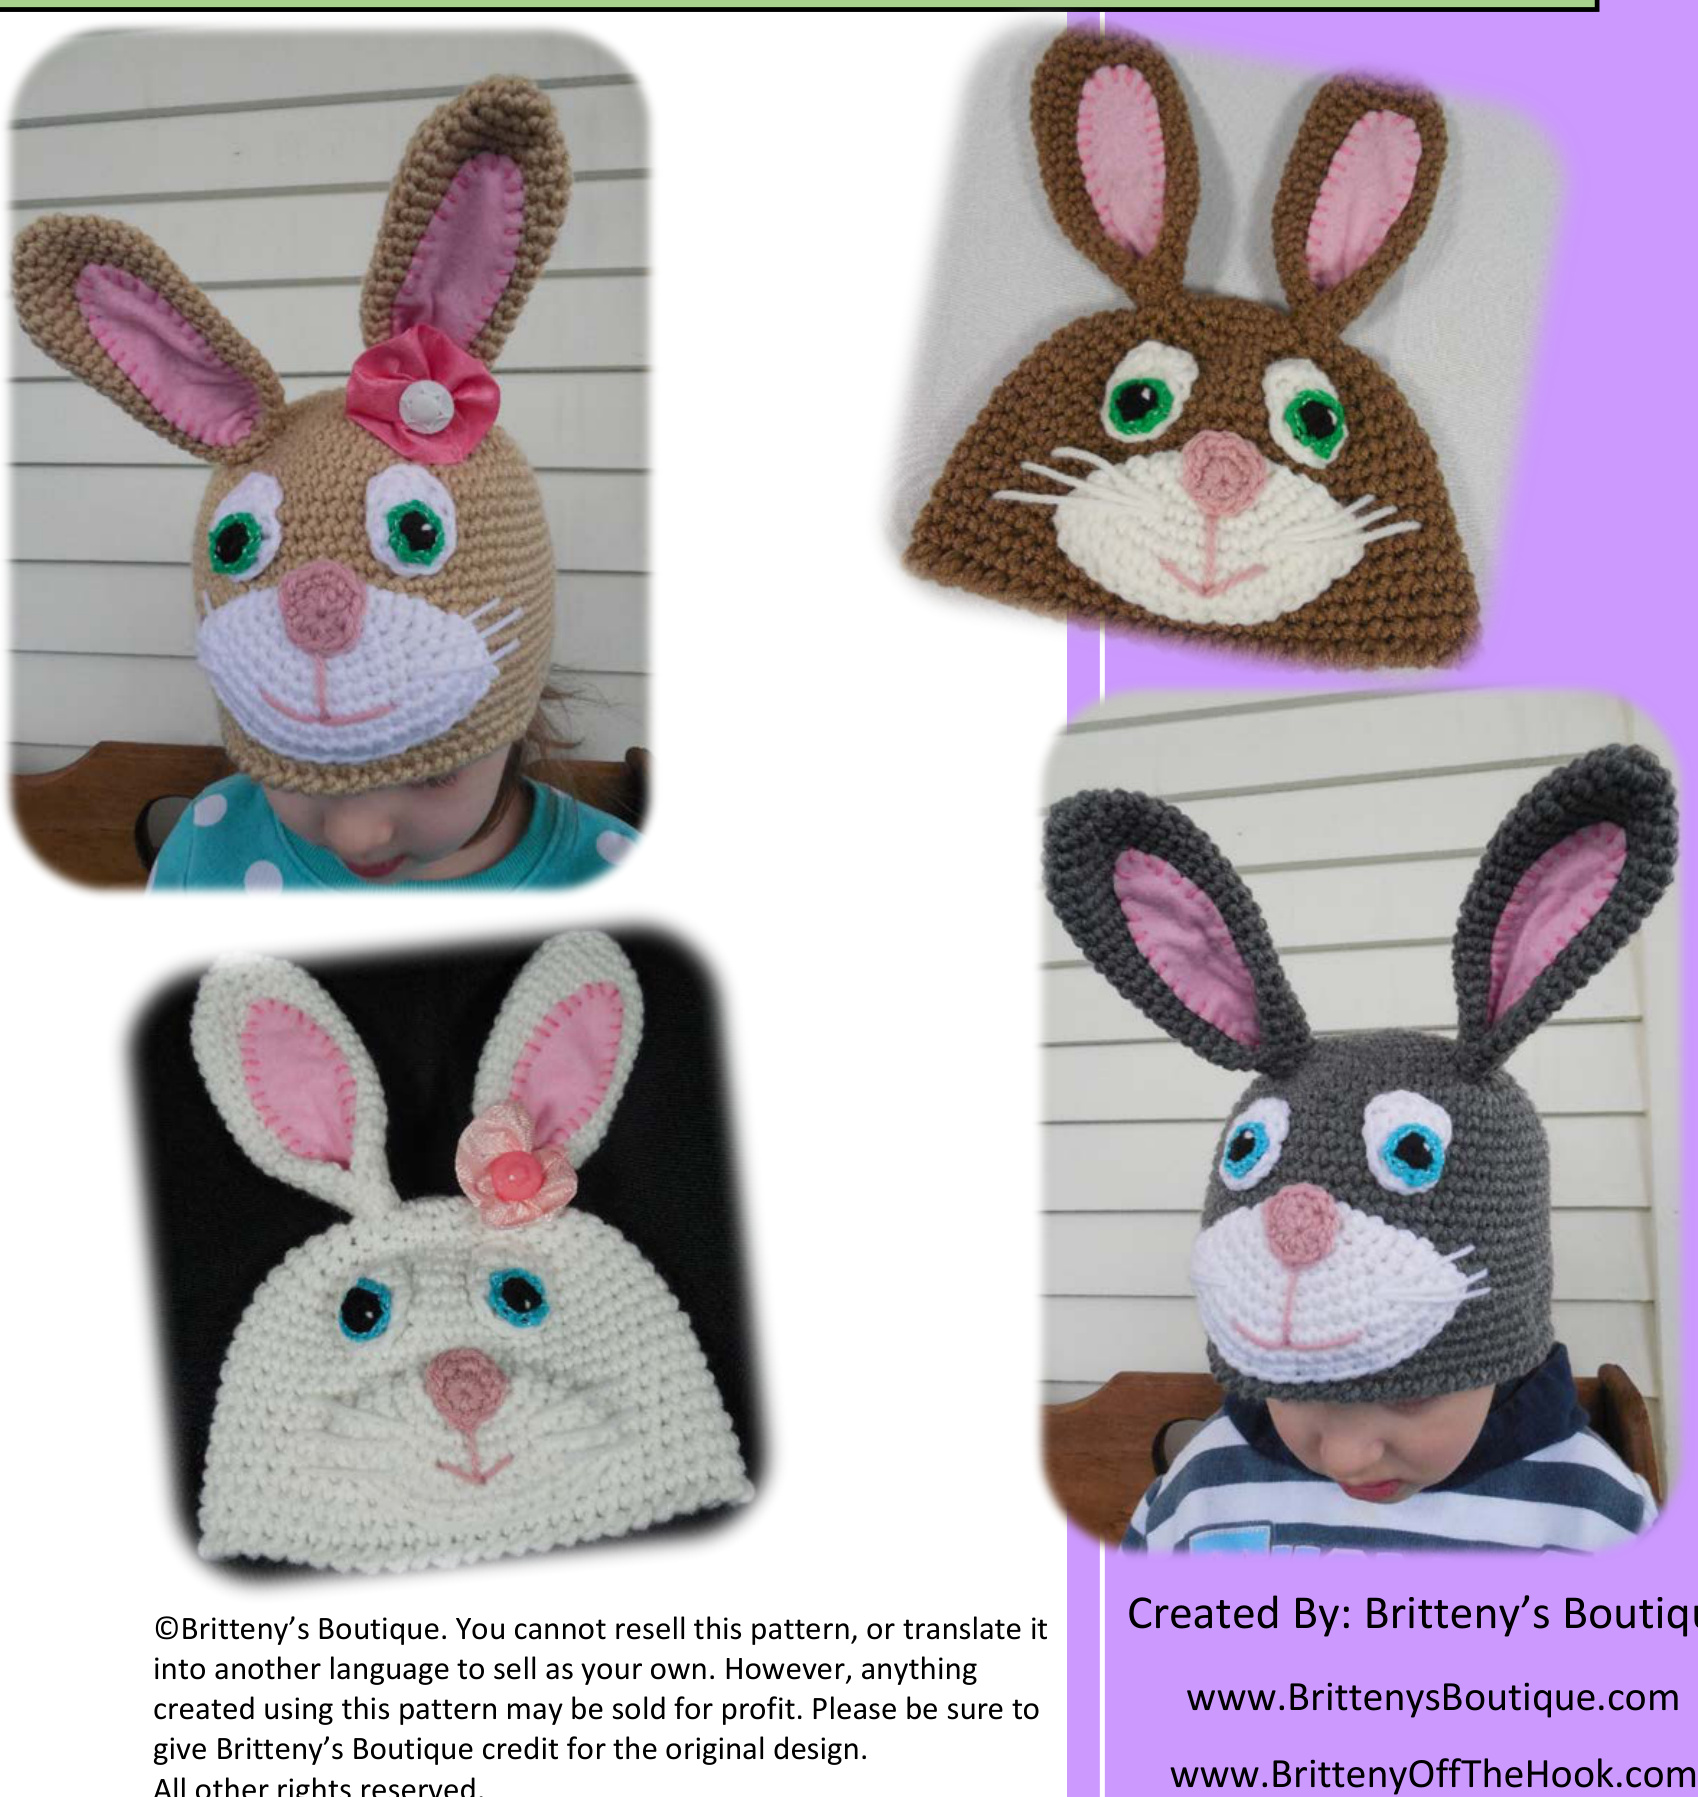
Bunny Rabbit Hat
Skill Level - Easy
Abbreviations
ch(s) - chain(s) sC - single crochet dc- double crochet hdc - half double crochet sp - space ea - each st(s) - stitch(es) sk - skip sl st - slip stitch sc2tog - single crochet 2 stiches together Rnd(s)- round(s) FO - Fasten Off
Special Stitches
Magic Circle - Many Tutorials Available Online Reverse Single Crochet (Crab Stitch) - Ch 1, working from left to right, sk first st, insert hook from front to back in next st to the right, yo, pull loop through st, yo, pull through 2 loops on hook.
Gauae for Hat..
10sc and 12 rows = 3" square; use a different size hook or yarn to obtain proper gauge
Materials
Worsted Weight Yarn (4W) (l used Loops and Threads) o Color A - Color of Hat Color B - Color of Muzzle Small amount of: Black for Pupil White for Eye &Whiskers ■ Pink for Nose Blue, Green, Brown for Eye H hook (5mm) G hook (4mm) Stitch Marker Scissors Yarn Needle 8X8 inch piece of pink felt Pink embroider floss
Finished Size
Age and Head Circumference 0-3 months - 13.5" to 15.5" 3-6 months - 15" to 17" 6-12 months - 16" to 18" 1-3 years - 17.5" to 19.5" 3-5 years - 19"to 20" 6-10 years - 20" to 21"
Notes
The hat is worked in continuous rounds, however use a stitch marker to keep track of what round you are on I work all pieces and then assemble at the end (unless otherwise noted), however you may assemble as you go
Instructions for Hat
Use H hook and Color A for all sizes Size 0-3 months Rnd 1 - Make a magic circle, ch 1 and 6 sc in magic circle (6sts) Rnd 2 - 2 sc in ea sc around (12sts) Rnd 3 - \*sc in next sc, 2sc in next sc\* repeat from \* to \* around (18 sts) Rnd 4 - \*2sc in next sc, sc in next 2 sc\* repeat from \* to \* around (24sts) Rnd 5 - \*sc in next 3 sc, 2sc in next sc\* repeat from \* to \* around (30sts) Rnd 6 - \*2sc in next sc, sc in next 4 sc\* repeat from \* to \* around (36sts) Rnd 7 - \*sc in next 5 sc, 2sc in next sc\* repeat from \* to \* around (42sts) Stop here and measure your crown, it should be approximately 3.5" to 4" Rnd 8 - \*sc in ea sc\* repeat from to \* around (42sts) Continue round 8 until hat measures 5 inches from crown to bottom On last round join with a sl st Trim - Reverse sc around (see special stitches), join - FO (42sts) Size 3-6 months Rnd 1 - Make a magic circle, ch 1 and 6 sc in magic circle (6sts) Rnd 2 - 2 sc in ea sc around (12sts) Rnd 3 - \*sc in next sc, 2sc in next sc\* repeat from \* to \* around (18 sts) Rnd 4 - \*2sc in next sc, sc in next 2 sc\* repeat from \* to \* around (24sts) Rnd 5 - \*sc in next 3 sc, 2sc in next sc\* repeat from \* to \* around (30sts) Rnd 6 - \*2sc in next sc, sc in next 4 sc\* repeat from \* to \* around (36sts) Rnd 7 - \*sc in next 5 sc, 2sc in next sc\* repeat from \* to \* around (42sts) Rnd 8 - \*2sc in next sc, sc in next 6 sc\* repeat from \* to \* around (48sts) Stop here and measure your crown, it should be approximately 4" to 4.5' Rnd 9 - \*sc in ea sc\* repeat from to \* around (48sts) Continue round 9 until hat measures 5.5 inches from crown to bottom On last round join with a sl st Trim - Reverse sc around (see special stitches), join - FO (48sts)
Size 6-12 months
Rnd 1 - Make a magic circle, ch 1 and 6 sc in magic circle (6sts) Rnd 2 - 2 sc in ea sc around (12sts) Rnd 3 - \*sc in next sc, 2sc in next sc\* repeat from \* to \* around (18 sts) Rnd 4 - \*2sc in next sc, sc in next 2 sc\* repeat from \* to \* around (24sts) Rnd 5 - \*sc in next 3 sc, 2sc in next sc\* repeat from \* to \* around (30sts) Rnd 6 - \*2sc in next sc, sc in next 4 sc\* repeat from \* to \* around (36sts) Rnd 7 - \*sc in next 5 sc, 2sc in next sc\* repeat from \* to \* around (42sts) Rnd 8 - \*2sc in next sc, sc in next 6 sc\* repeat from \* to \* around (48sts) Rnd 9 - \*sc in next 7 sc, 2sc in next sc\* repeat from \* to \* around (54sts) Stop here and measure your crown, it should be approximately 4.5" to 5' Rnd 10 - \*sc in ea sc\* repeat from to \* around (54sts) Continue round 10 until hat measures 6 inches from crown to bottom On last round join with a sl st Trim - Reverse sc around (see special stitches), join - FO (54sts)
Size 1-3 years
Rnd 1 - Make a magic circle, ch 1 and 6 sc in magic circle (6sts) Rnd 2 - 2 sc in ea sc around (12sts) Rnd 3 - \*sc in next sc, 2sc in next sc\* repeat from \* to \* around (18 sts) Rnd 4 - \*2sc in next sc, sc in next 2 sc\* repeat from \* to \* around (24sts) Rnd 5 - \*sc in next 3 sc, 2sc in next sc\* repeat from \* to \* around (30sts) Rnd 6 - \*2sc in next sc, sc in next 4 sc\* repeat from \* to \* around (36sts) Rnd 7 - \*sc in next 5 sc, 2sc in next sc\* repeat from \* to \* around (42sts) Rnd 8 - \*2sc in next sc, sc in next 6 sc\* repeat from \* to \* around (48sts) Rnd 9 - \*sc in next 7 sc, 2sc in next sc\* repeat from \* to \* around (54sts) Rnd 10 - \*2sc in next sc, sc in next 8 sc\* repeat from \* to \* around (60sts) Stop here and measure your crown, it should be approximately 5" to 5.5" Rnd 11 - \*sc in ea sc\* repeat from to \* around (60sts) Continue round 11 until hat measures 6.5 inches from crown to bottom On last round join with a sl st Trim - Reverse sc around (see special stitches), join - FO (60sts)
Size 3-5 years
Rnd 1 - Make a magic circle, ch 1 and 6 sc in magic circle (6sts) Rnd 2 - 2 sc in ea sc around (12sts) Rnd 3 - \*sc in next sc, 2sc in next sc\* repeat from \* to \* around (18 sts) Rnd 4 - \*2sc in next sc, sc in next 2 sc\* repeat from \* to \* around (24sts) sc\* reneat from \*to \* around (30sts) Rnd 6 - \*2sc in next sc, sc in next 4 sc\* repeat from \* to \* around (36sts) Rnd 7 - \*sc in next 5 sc, 2sc in next sc\* repeat from \* to \* around (42sts) Rnd 8 - \*2sc in next sc, sc in next 6 sc\* repeat from \* to \* around (48sts) Rnd 9 - \*sc in next 7 sc, 2sc in next sc\* repeat from \* to \* around (54sts) Rnd 10 - \*2sc in next sc, sc in next 8 sc\* repeat from \* to \* around (60sts) Rnd 11 - \*sc in next 9 sc, 2sc in next sc\* repeat from \* to \* around (66sts) Stop here and measure your crown, it should be approximately 5.5" to 6' Rnd 12 - \*sc in ea sc\* repeat from \* to \* around (66sts) Continue round 12 until hat measures 7 inches from crown to bottom On last round join with a sl st Trim - Reverse sc around (see special stitches), join - FO (66sts)
Size 6-10 years
Rnd 1 - Make a magic circle, ch 1 and 6 sc in magic circle (6sts) Rnd 2 - 2 sc in ea sc around (12sts) Rnd 3 - \*sc in next sc, 2sc in next sc\* repeat from \* to \* around (18 sts) Rnd 4 - \*2sc in next sc, sc in next 2 sc\* repeat from \* to \* around (24sts) Rnd 5 - \*sc in next 3 sc, 2sc in next sc\* repeat from \* to \* around (30sts) Rnd 6 - \*2sc in next sc, sc in next 4 sc\* repeat from \* to \* around (36sts) Rnd 7 - \*sc in next 5 sc, 2sc in next sc\* repeat from \* to \* around (42sts) Rnd 8 - \*2sc in next sc, sc in next 6 sc\* repeat from \* to \* around (48sts) Rnd 9 - \*sc in next 7 sc, 2sc in next sc\* repeat from \* to \* around (54sts) Rnd 10 - \*2sc in next sc, sc in next 8 sc\* repeat from \* to \* around (60sts) Rnd 11 - \*sc in next 9 sc, 2sc in next sc\* repeat from \* to \* around (66sts) Rnd 12 - \*2sc in next sc, sc in next 10 sc\* repeat from \* to \* around (72sts) Stop here and measure your crown, it should be approximately 6" to 6.5" Rnd 13 - \*sc in ea sc\* repeat from to \* around (72sts) Continue round 13 until hat measures 7.5 inches from crown to bottom On last round join with a sl st Trim - Reverse sc around (see special stitches), join - FO (72sts)
Instructions for Pieces
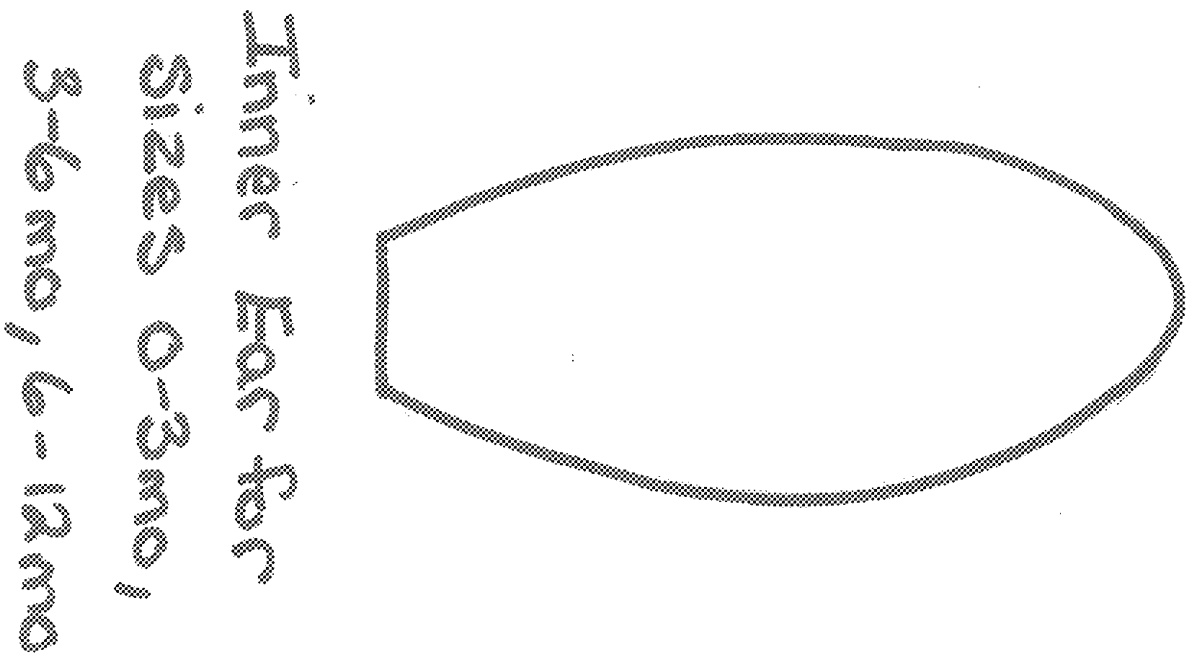
Sizes (0-3mo) (3-6mo) (6-12mo) Use G hook for all pieces
Ears (make 2)
Use Color A Rnd 1 - Make a magic circle ch 1, and 5sc in magic circle (5sts) Rnd 2 - 2sc around (10sts) Rnd 3 - sc around (10sts) Rnd 4 - \*2sc in next sc, sc in the next sc\* repeat from \*to\* around (15sts) Rnd 5 - \*sc in the next 2 sc, 2sc in the next sc\* repeat from \*to\* around (20sts) Rnds 6-20 - sc around (20sts) Rnd 21 - \*sc in the next 2 sc, sc2tog\* repeat from \*to\* around (15sts) Rnd 22 - \*sc2tog, sc in the next sc\* repeat from \*to\* around (10sts) Rnd 23 - sc around (10sts) Join with a sl st - FO leaving a Long Tail for sewing ears to hat.
Muzzle
Use Color B Rnd 1 - Make a magic circle ch 1, and 5sc in magic circle (5sts) Rnd 2 - 2sc around (10sts) Rnd 3 - \*sc in the next sc, 2sc in the next sc\* repeat from \*to\* around (15sts) Rnd 4 - \*2sc in the next sc, sc in the next 2 sc\* repeat from \*to\* around (20sts) Rnd 5 - \*sc in the next 3 sc, 2sc in the next sc\* repeat from \*to\* around (25sts) Rnd 6 - \*2sc in the next sc, sc in the next 4 sc\* repeat from \*to\* around (30sts) Rnd 7 - \*sc in the next 5 sc, 2sc in the next sc\* repeat from \*to\* around (35sts) Rnd 8 - sc around (35sts) DO NOT FO Now fold the circle in half and sc both sides together. FO leaving a long tail for sewing. TIP: It is easier if you start to fold at the stitch next to your crochet hook
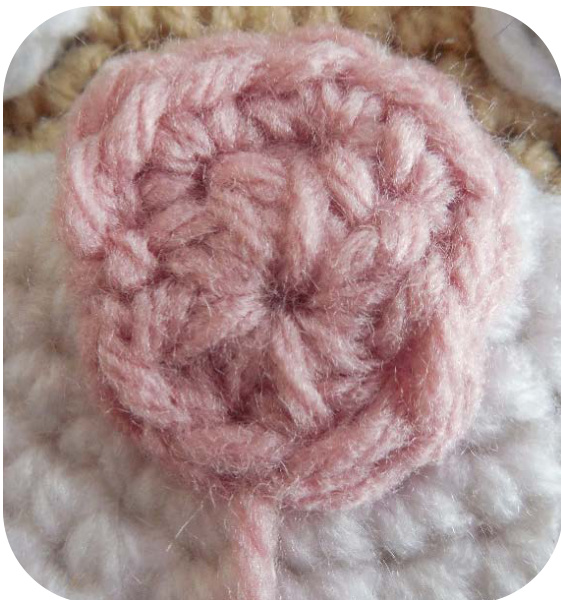
Nose/Mouth
Use Pink Rnd 1 - Make a magic circle ch 1, and 8sc in magic circle (8sts) Rnd 2 - 2sc in the next 3 sc. - Leave remaining stitches unworked. This is the top of your nose. (6sts) FO - leave a long tail for sewing nose and forming mouth.
Eyes (make 2)
Use White Rnd 1 - Make a magic circle ch 1, and 8sc in magic circle (8sts) Rnd 2 - Hdc in the next 2 sts, 2dc in the next 2 sts, hdc in the next 2 sts, 2dc in the next 2sts. Join with a sl st - FO leaving a Long Tail for sewing and twinkle in pupil. Now time to form Pupil Use Black - Rnd 1 - Make a magic circle ch 1, and 6sc in magic circle (6sts) Join with a sl st - FO With eye color join with a sl st in join of pupil Rnd 2 - 2 sl st in eat sc around (12 sts) FO - leave a long tail to attach pupil to white eye piece.
Instructions for Pieces
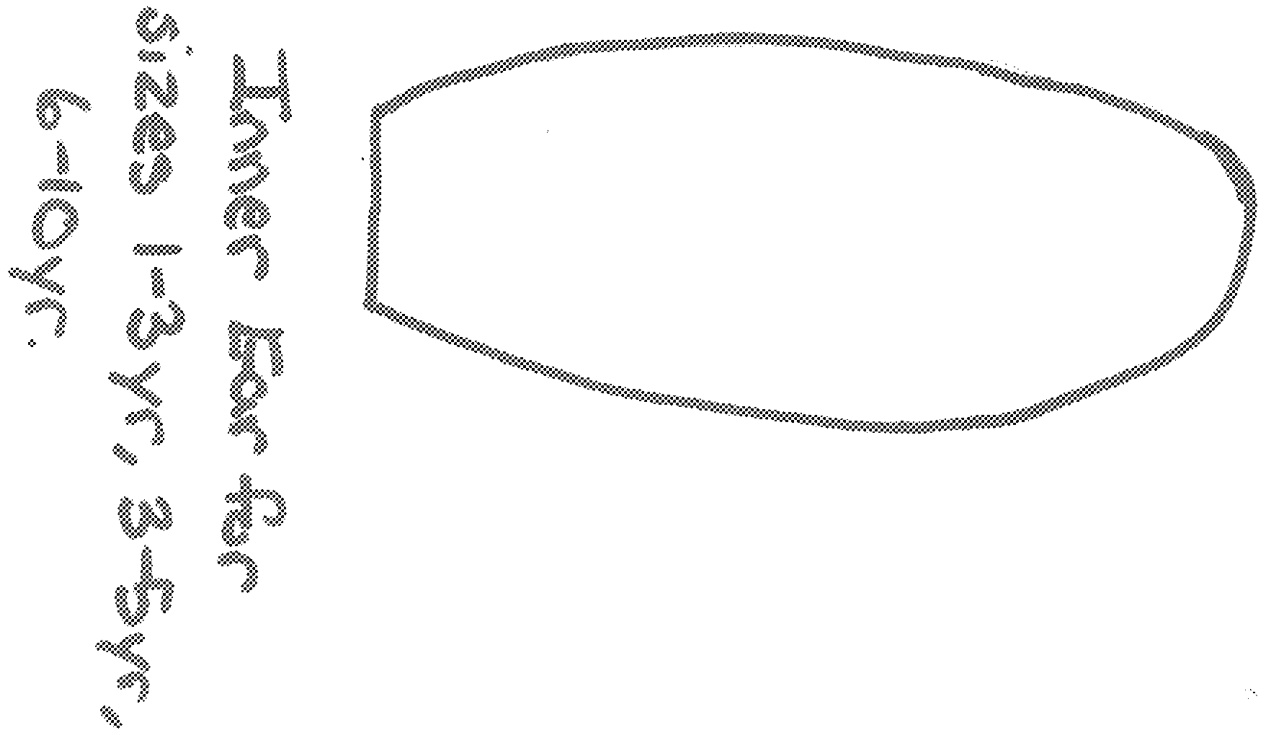
Sizes (1-3yrs) (3-5yrs) (6-10yrs) Use G hook for all pieces
Ears (make 2)
Use Color A Rnd 1 - Make a magic circle ch 1, and 5sc in magic circle (5sts) Rnd 2 - 2sc around (10sts) Rnd 3 - sc around (10sts) Rnd 4 - \*2sc in next sc, sc in the next sc\* repeat from \*to\* around (15sts) Rnd 5 - \*sc in the next 2 sc, 2sc in the next sc\* repeat from \*to\* around (20sts) Rnd 6 - \*sc in the next 9 sc, 2sc in the next sc\* repeat from \*to\* once more (22sts) Rnds 7-22 - sc around (22sts) Rnd 23 - \*sc in the next 2 sc, sc2tog\* repeat from \*to\* around (17sts) Rnd 24 - \*sc2tog, sc in the next sc\* repeat from \*to\* around (11sts) Rnd 25 - sc around (11sts) Join with a sl st - FO leaving a Long Tail for sewing ears to hat.
Muzzle
Use Color B Rnd 1 - Make a magic circle ch 1, and 5sc in magic circle (5sts) Rnd 2 - 2sc around (10sts) Rnd 3 - \*sc in the next sc, 2sc in the next sc\* repeat from \*to\* around (15sts) Rnd 4 - \*2sc in the next sc, sc in the next 2 sc\* repeat from \*to\* around (20sts) Rnd 5 - \*sc in the next 3 sc, 2sc in the next sc\* repeat from \*to\* around (25sts) Rnd 6 - \*2sc in the next sc, sc in the next 4 sc\* repeat from \*to\* around (30sts) Rnd 7 - \*sc in the next 5 sc, 2sc in the next sc\* repeat from \*to\* around (35sts) Rnd 8 - \*2sc in the next sc, sc in the next 6 sc\* repeat from \*to\* around (40sts) Rnd 9 - \*sc in the next 7 sc, 2sc in the next sc\* (45sts) Rnd 10 - sc around (45sts) DO NOT FO Now fold the circle in half and sc both sides together. FO leaving a long tail for sewing. TIP: It is easier if you start to fold at the stitch next to your crochet hook
Nose/Mouth
Use Pink Rnd 1 - Make a magic circle ch 2 (does not count as first hdc), and 8 hdc in magic circle (8sts) Rnd 2 - 2sc in the next 3 sc. - Leave remaining stitches unworked. This is the top of your nose. (6sts) FO - leave a long tail for sewing nose and forming mouth.
Eyes (make 2)
Use White Rnd 1 - Make a magic circle ch 2 (does not count as first hdc), and 8 hdc in magic circle (8sts) Rnd 2 - Hdc in the next 2 sts, 2dc in the next 2 sts, hdc in the next 2 sts, 2dc in the next 2sts. Join with a sl st - FO leaving a Long Tail for sewing and twinkle in pupil. Now time to form Pupil Use Black - Rnd 1 - Make a magic circle ch 1, and 6sc in magic circle (6sts) Join with a sl st - FO With eye color join with a sl st in join of pupil Rnd 2 - 2 sl st in eat sc around (12 sts) FO - leave a long tail to attach pupil to white eye piece.
Time for Assembly
Ears
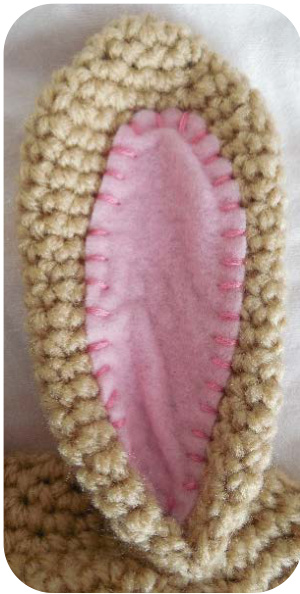
1. Trace and cut two inner ear pieces. 2. Using embroidery floss sew inner ears onto crocheted ears. 3. Fold bottom of ears (so the sides touch), and sew the bottom together and up the first three rounds (this will pinch and form the ears).
Muzzle
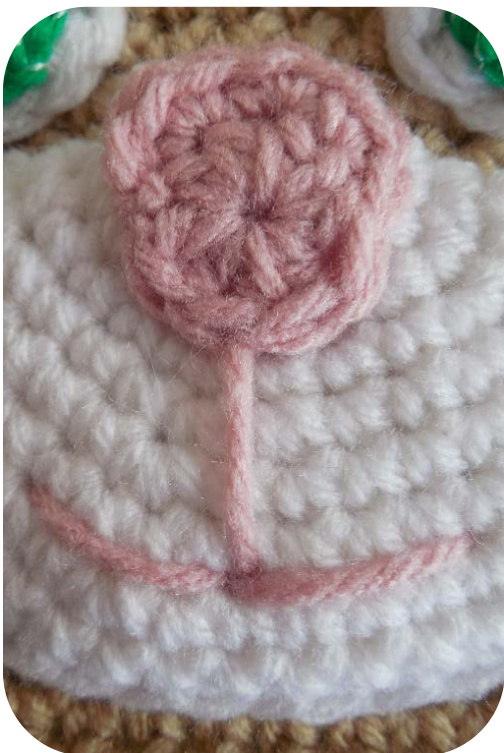
4. Sew pink nose onto muzzle piece by placing the round 2 stitches (nose top) on the center stitches of the muzzle.
5. Sew mouth under nose with pink yarn.
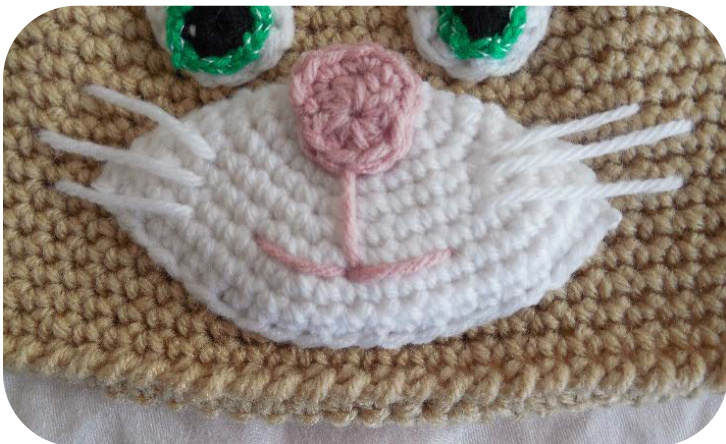
6. Pin muzzle to hat right above the reverse single crochet round on the bottom.
Eyes
7. Using eye color yarn sew pupil onto white of eye towards the bottom. 8. Using the white eyes tail, sew a twinkle in the pupil of the eye. 9. Pin eyes to hat above muzzle.

\*\~\* Feel free to adjust the muzzle and the eyes to get them in the exact place that you want them. 10.Sew muzzle onto hat. 11. With white sew whiskers onto hat from side of muzzle to head on both sides of the nose. 12.Sew eyes onto hat using the white yarn from the twinkle. 13. Place ears on top of the hat until you like the position. I like to go 4 to 5 rounds out towards the front from the center for smaller sizes, and 5 to 6 round out towards the front for the larger sizes. \*\~\* By going out towards the front
of the hat instead of off to the side, the ears will be on top of the person's head. Otherwise the ears will be off to the back.
14.Sew ears onto hat. To help them stay standing in place, be sure to sew all the way around the base of the ears. They will always have a little wiggle to them. 15. Weave in all remaining ends. \*\~\*ENJOY \*\~\*