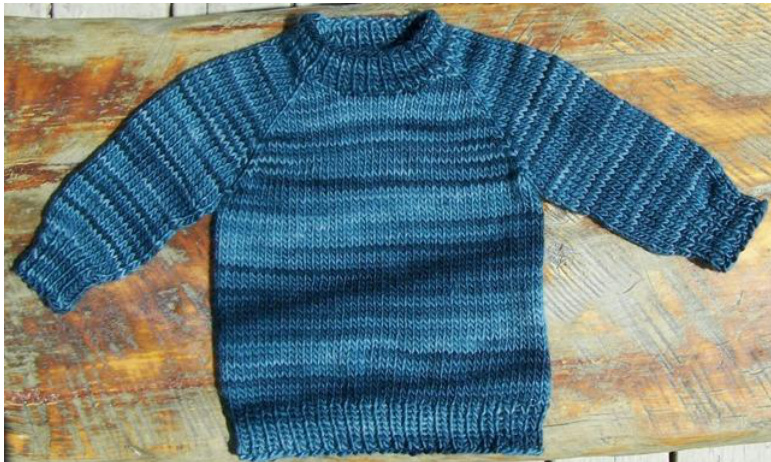
From the Top Mock Turtleneck
designed by Amy Thompson This pattern came about because I wanted to knit a raglan that was truly top down, without having to pick up stitches and add the neck afterward. Use less repeats of the neck ribbing, 4 works well, for a crew neck, or more for a longer neck. After the short row neck shaping, it is a simple raglan, dress it up however you like, cables, stripes, anything you feel inspired to do.
the3 month sizeusing the slip stitch method,knitted in Lamb's Pride Tormented Ter Sizes 3 months (6 months, 9 months) US size 8 needles, DPNs, 16” circular, and 24" circular; US size 6 DPNs for sleeve cuffs Lamb's Pride worsted, 1- 2 skeins (240-340yds) Gauge: 41/2 stitches per inch Abbreviations: K=knit; P=purl; PM=place marker; M1=increase 1; M1p-st=increase 1 purl stitch; WT=wrap & turn; PWK= knit the wrap & stitch together; PWP=purl the wrap & stitch together Helpful hints: photo tutorial at Purl Bee showing how to WT in both knit and purl rows: http://www.purlbee.com/short-row-tutorial/2008/6/18/short-rows-tutoria1.html, and a photo tutorial at Knitting Geek on the slip stitch method of short rows: http://knittinggeek.com/simple/2005/03/magic-of-short-rows.html Collar: loosely CO 56 stitches, place marker\* and join in the round, K1P1 around for 8 rows Knit around once, placing markers as follows; K10, PM, K18, PM, K10, PM, K18 \*this marker remains your start of round for the sweater throughout and marks the right back shoulder of the raglan increases; it's helpful to keep this one different from the rest as a referencepoint. Choose an increase method for the raglan seams and remain consistent; it needs to work on a purl row increase as well for these first few rows. I prefer to knit (or purl) into the stitch in the row below the stitch on each side of the marker, which I denoted as M1 or M1p-st in the instructions. Other methods work just as well. There are two ways of working the turns on the short rows on this sweater neck and shoulder, one involves slipping the last stitch after the turn and the other is a wrap & turn. I've included them as separate sets of directions to avoid confusion.
From the Top Mock Turtleneck
designed by Amy Thompson
Neck shaping, Slip Stitch method:
Row 1, right side: after starting marker K1 M1, K8, M1 K1, slip marker, K1 M1, K2, turn work Row 2, wrong side: slip the last knit stitch p-wise and pull snug, P3, slip marker, P12, slip marker, P1, M1p-st, P16, M1p-st, P1, slip marker, P1, M1p-st, P8, M1p-st, P1, slip marker, P1, M1p-st, P2, turn work Row 3, right side: slip the last purled stitch p-wise and pull snug, K3, slip marker, K12, slip marker, K20, slip marker, K1, M1, K10, M1, K1, slip marker, K1, M1, K4, turn work Row 4, wrong side: turn work, slip the last knit stitch p-wise and pull snug, P5, slip marker, P14, slip marker, P1, M1p-st, P18, M1p-st, P1, slip marker, P1, M1p-st, P10, M1p-st, P1, slip marker, P1, M1p-st, P4, turn work Row 5, right side: slip the last purled stitch p-wise and pull snug, K5, slip marker, K14, slip marker, K22, slip marker, K1, M1, K12, M1, K1, slip marker, K1, M1, K6, turn work Row 6, wrong side: turn work, slip the last knit stitch p-wise and pull snug, P7, slip marker, P16, slip marker, P1, M1p-st, P20, M1p-st, P1, slip marker, P1, M1p-st, P12, M1p-st, P1, slip marker, P1, M1p-st, P6, turn work Row 7, right side: slip the last purled stitch p-wise and pull snug, K7, slip marker, K16, slip marker, K24, slip marker, K1, M1, K14, M1, K1, slip marker, K1, M1, K across the front ( do not turn) to one stitch before left front marker, M1, K1, slip marker, K1, M1, K14, M1, K1, slip marker, K1, M1, K22, M1, K1, you are now back at your starting marker.
Neck Shaping, Wrap & Turn method:
Row 1, right side: after starting marker K1 M1, K8, M1 K1, slip marker, K1 M1, K1, WT Row 2, wrong side: P3, slip marker, P12, slip marker, P1, M1p-st, P16, M1p-st, P1, slip marker, P1, M1p-st, P8, M1p-st, P1, slip marker, P1, M1p-st, P1, WT Row 3, right side: K3, slip marker, K12, slip marker, K20, slip marker, K1, M1, K10, M1, K1, slip marker, K1, M1, K2, PWK, WT Row 4, wrong side: P5, slip marker, P14, slip marker, P1, M1p-st, P18, M1p-st, P1, slip marker, P1, M1p-st, P10, M1p-st, P1, slip marker, P1, M1p-st, P2, PWP, WT Row 5, right side: K5, slip marker, K14, slip marker, K22, slip marker, K1, M1, K12, M1, K1, slip marker, K1, M1, K4, PWK, WT Row 6, wrong side: P7, slip marker, P16, slip marker, P1, M1p-st, P20, M1p-st, P1, slip marker, P1, M1p-st, P12, M1p-st, P1, slip marker, P1, M1p-st, P4, PWP, WT Row 7, right side: K7, slip marker, K16, slip marker, K24, slip marker, K1, M1, K14, M1, K1, slip marker, K1, M1, K6, PWK, K8, PWK, Knit ( do not turn) to one stitch before next marker (left front), M1, K1, slip marker, K1, M1, K14, M1, K1, slip marker, K1, M1, K22, M1, K1, you are now back at your starting marker. Neck shaping is done. Note there may be small gaps where you turned if you used the slip stitch method, keep those slipped stitches nice and snug! Once you're done knitting the sweater, follow the path of the yarn and redistribute any looseness there may be across the row.
From the Top Mock Turtleneck
designed by Amy Thompson Row 8: Knit around Row 9: increase as you have been doing before and after each marker, beginning increases after main marker and ending before it, equaling 8 increases for the round Continue alternating knit only rounds and increase rounds until there are 40 (44, 48) stitches each between markers for the front and back; and 32 (36, 40) stitches between markers for each shoulder. End with a knit only round. Body: slip the right shoulder stitches onto a holder, keep main marker in place and remove right front marker, cast on 4 stitches and join to the right front side, knit across to left front shoulder marker, slip left shoulder stitches onto a holder, remove markers, cast on 4 stitches, join to back left side and knit across. There should be a total of 88 (96, 104) stitches around. Continue to knit around until 6" (7", 8") from underarm edge, K1P1 for 8 rounds or as it pleases you, bind Off. Sleeves: using DPNS, slip the right shoulder stitches distributed across the needles, pick up 6 stitches under the arm (more if you need more to close any gaps) reduce to a total of 36 (40, 44) stitches in next round and begin knitting around, placing a marker in the center under the arm, or simply divide the stitches on your DPNs so there's a break at the underarm center. Knit in the round for 8 rows, decrease after the first stitch and before the last stitch of the next round for 2 stitches total reduction. Continue decreasing by 2 every 6" row thereafter until at 32 stitches, knit in the round until arm length is 5 %2′ (6", 7") from underarm join, decrease by 4 stitches evenly around to 28 stitches total in the last round. \*K1P1 ribbing for 8 rows and bind off. Or knit a longer ribbed cuff that can be folded up, so that baby's hands can be covered with the cuff turned down. \*you can switch to a smaller needle size for the wrist ribbing if you like. I don't advise it for the neck or waist, at 56 stitches you want it to be able to slip over baby's head and with the bulk of diapers, sweaters with a tighter waist tend to ride up. If you do choose to use a smaller needle for the neck, use a loose method of casting on, you will need a minimum of 16" stretch, 18"-20" isbetter. Work in ends, redistribute any looseness in stitches at the neck, wash and block, find baby to keep warm.


