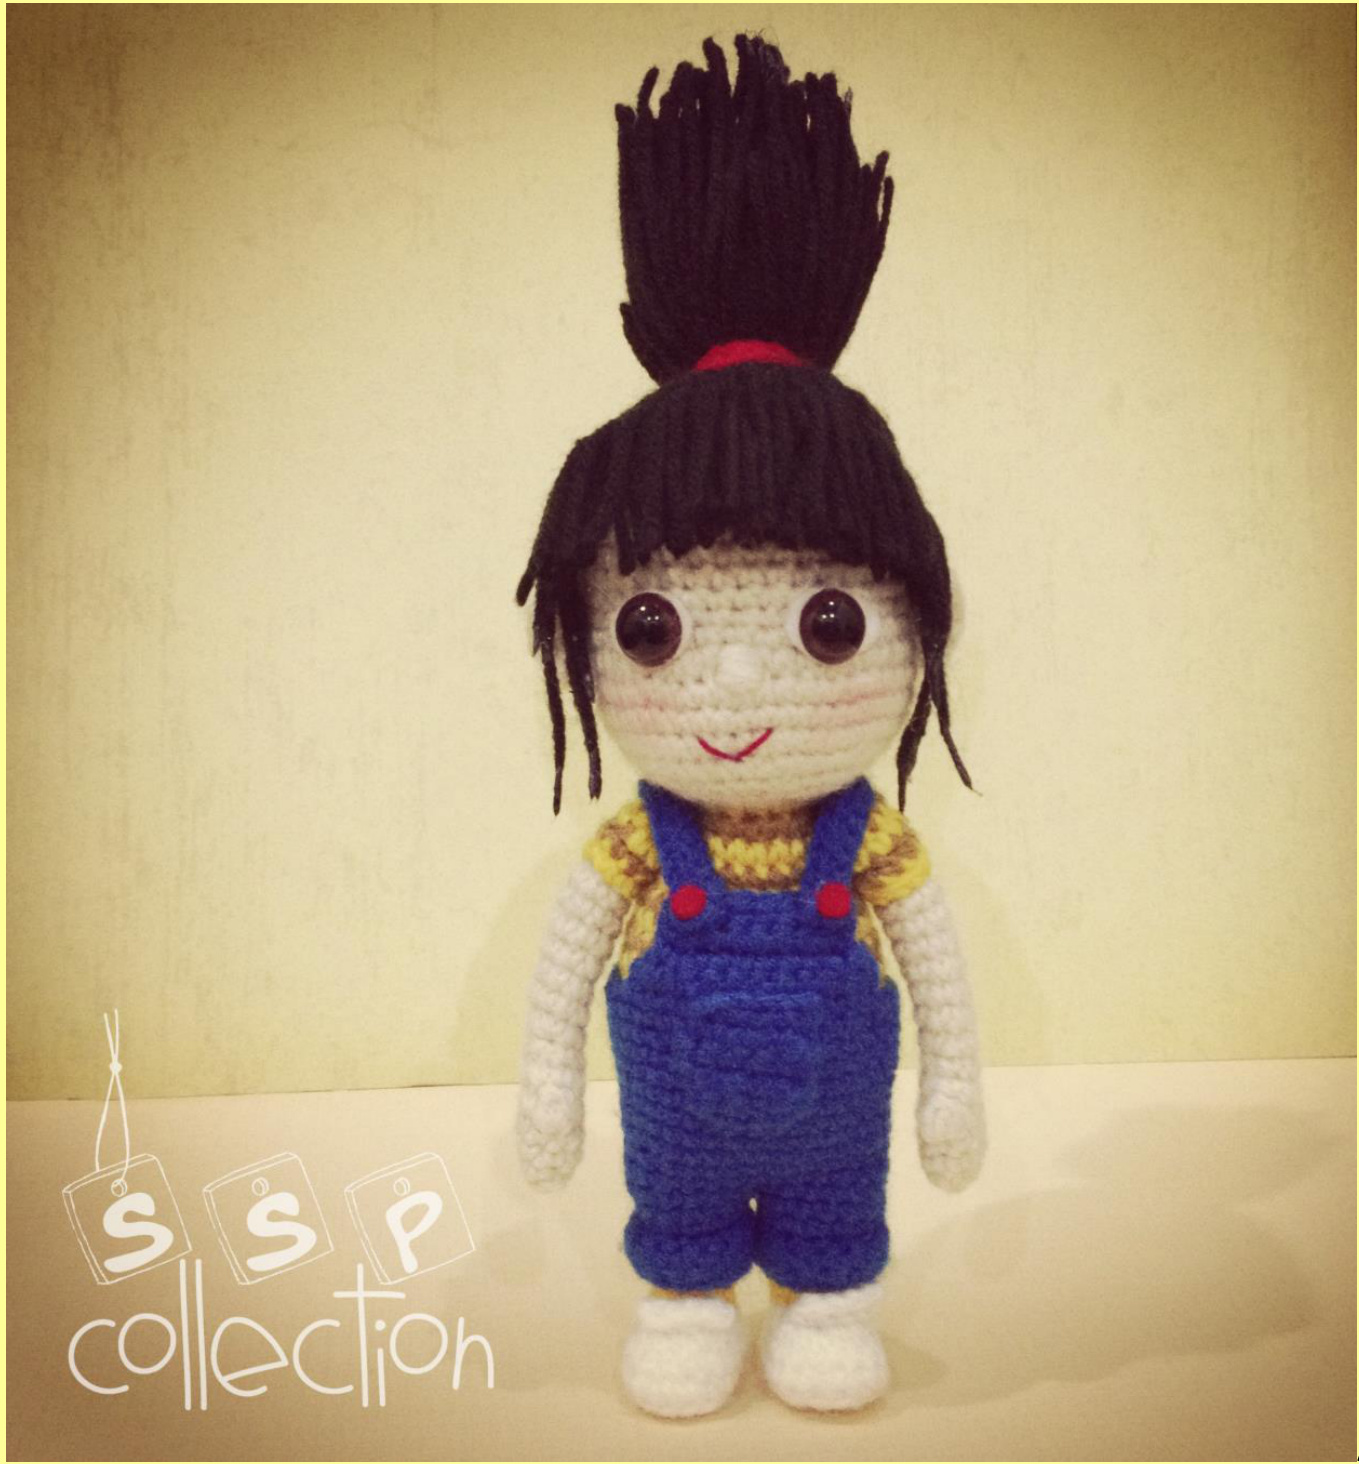
DESPICABLE ME - LITTLE AGNES
ABBREVIATION
CH Chain Stitch SC Single crochet BLO Back loop FLO Front loop INC Increase DEC Decrease Bobble 3 double crochet
MATERIALS
Yarns: skin-toned, yellow , brown, blue , black and grey 2.00 mm crochet hook for all except shoes and hands 1.5 mm crochet hook for shoes and hands Sewing needle black thread (for stitching of hair) and red thread (for embroider the smile) 1 pair of 10mm eyes Felts: White for eyes and red for buttons of overalls fiberfill Plastic Canvas to create a flat base for boots (Optional) Paint brush and pink fabric paint for the cheeks
HEAD AND BODY
With skin-toned yarn, work in continuous round. R1: SC 6 IN MAGIC RING. (6) R2: INC X 6. (12) R3: (1, INC) X 6. (18) R4: (1, INC, 1) X 6. (24) R5: (3, INC) X 6. (30) R6: (2, INC, 2) X 6. (36) R7: (5, INC) X 6. (42) R8-13: SC AROUND. (42) R14: 10, DEC, 6, DEC,2, DEC, 6, DEC, 10. (38) R15: 9, INC, 1, INC, 1, INC, 1, INC, 1, INC, 2, INC, 1, INC, 1, INC, 1, INC, 1, INC, 9. (48) R16: DEC, DEC, 15, INC, 2, INC, 2, INC, 2, INC, 15, DEC, DEC. (48) R17-19: SC AROUND. (48) R20: (2, DEC, 2)X 8. (40) R21: (3, DEC) X 8. (32) R22: (1, DEC, 1) X 8. (24) R23: (1, DEC) X 8. (16) Change to yellow, R24: SC AROUND. (16) Change to brown, R25: (1, INC) x8. (24) Work the remaining row of the body alternating between yellow and brown colour yarn to form stripes. R26-27: SC AROUND. (24) R28: (3, INC) x 6. (30) R29-30: SC AROUND. (30) R31: (4, INC) X 6. (36) R32-36: SC AROUND. (36) R37: (4, DEC) X 6. (30) R38: (3, DEC) X 6. (24) R39: (2, DEC) X 6. (18) R40: (1, DEC)X 6. (12) R41: (DEC) X 6. (6) Fasten Off.
HANDS & ARM (make 2)
With Skin-toned yarn, work in continuous rounds. R1: SC 6 IN MAGIC RING. (6) R2: 2, INC, 2, INC. (8) R3-4: SC AROUND. (8) R5: SC, bobble in next stitch (make from 3 DC), SC 6. (8) R6: SC AROUND. (8) R7: 2, DEC,2, DEC.(6) R8: 2, INC, 2, INC. (8) R9-12: SC AROUND. (8) Change to yellow, R13: Work in FLO. 1, INC, 3, INC, 2. (10) Change to brown, R14: Work in BOTH LOOPS. SC AROUND. (10) Change to yellow, R15: SC AROUND. (10) Change to brown yarn, R16: SC AROUND. (10) Change to yellow yarn, R17: SC AROUND. (10) Stuff hand and arm as you work along. Fasten off. Leave tail and pull through all loops to close the gap of last row. Sew arms to body.
BOOTS AND LEGS (make 2)
With White, work in joined rounds. CH 6. R1: SC 6 at both sides starting from 2 ch from hook. (12) R2: INC, 3, INC, INC, INC, 3, INC, INC. (18) R3: SC AROUND at BLO. (18) R4: SC AROUND at BOTH LOOPS. (18) Cut out a plastic canvas of the size of the base of the boots and place inside the boots to create a stable base for both feet. Start stuffing the feet now. R5: 5, DEC x 4, 5. (14) Change to yellow, R6: Work at BLO. 3, DEC X 4, 3. (10) R7: SC AROUND at BOTH LOOPS. (10) Change to Skin-toned yarn, R8-9: SC around at both loops. (10) Change to Blue, R10: (INC, 1) x 5. (15) R11: SC AROUND in BLO. (15) R12: Work in BOTH LOOPS, SC 14, INC. (16) Fasten off and leave tail to join to second leg.
Cuff of Overalls' legs:
With the foot faces downward, join blue yarn at the unworked loop of round 10 of the leg. R1: SC AROUND in FLO of round 10 of the leg. (15) R2: SC AROUND in BOTH LOOPS.(15) Fasten off and weave in ends.
Tongue of shoes:
Turn the leg upside down so that the foot faces upward. Join a loop of white yarn at 9th stitch of the unworked loop of row 5 of the shoe. R1: Work at FLO of Row 5 of the shoe. SC 4. CH 1. TURN. ( 4) R2: SC 4 at BOTH LOOPS. (4). Fasten off and weave in ends.
Joining the legs
Put the two legs side by side so that the shoes are pointing to the front. Join legs together by using the yarn end left from the first leg to whipstitch over 2 stitches at the top of each leg where the legs touch. Tuck yarn end inside one of the legs.
OVERALLS
With blue, join yarn at the top of the legs next to the whipstitch. Work in Joined round. R1: SC around the top of both legs, skipping the 2 whipstitches. (28) R2: 13, INC, 13, INC. (30) R3: INC x 6. (36) R4-11 : SC AROUND. (36) Fasten off and weave in ends.
Front & Back Panels
With blue, join yarn to round 11 of overalls and work in rows. R1: SC 12, CH 1, TURN. (12) R2: DEC, 8, DEC, CH 1, TURN. (10) R3: DEC, SC 6, DEC, CH 1, TURN. (8) R4-5: 15: SC ACROSS. (8) Fastenoffandweaveinends. Leave a gap of 6 stitches from the front panel and join yarn to opposite side of overalls. Repeat the above for back panel. Straps Of Overalls (make 2) With blue, CH 16. R1: SL ST 15, CH 1, turn.(15) R2: SL ST 15, CH1, turn. (15) R3: SL ST 15. (15) Fasten off and leave long tail to sew straps to back panel of overalls. Leave the other end of straps loose for sewing to front panel when attaching overalls to body later on.
Front Pocket Of Overalls
With blue, CH 6. R1-4: SC 5, CH1, turn. (5) R5: DEC, 1, DEC. (3) Fasten off and sew to front panel of overalls.
HAIR
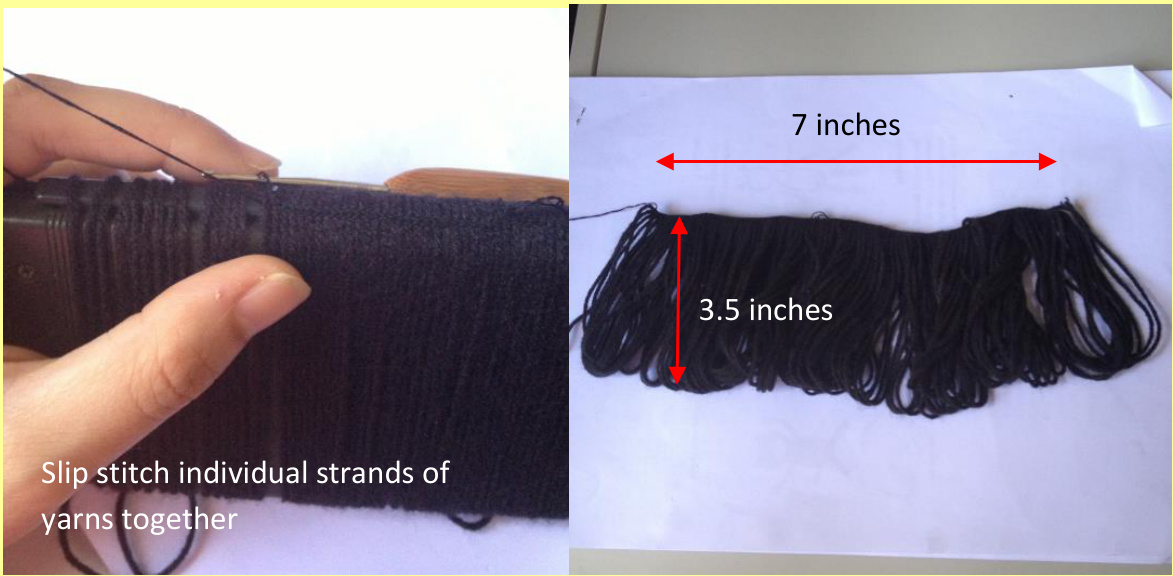
Cut out a 3.5 inches wide piece of cardboard (width of the desired hair length). Wrap black yarn around the cardboard many rounds until the length of the hair piece reaches 7 inches. Slip stitch these individual loops of yarns by using the 1.5mm hook. Make sure that the length of the hair piece should be long enough to form a nice hairline around Agnes head. Fasten off at the last loop.
Remove the ribbon of hair loops from the cardboard and pin around the Agnes's head to get your desired hairline. Using a sewing needle and black thread, stitch hair to doll's head along the hairline.
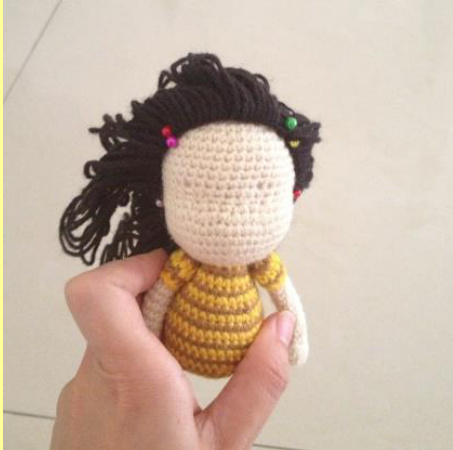
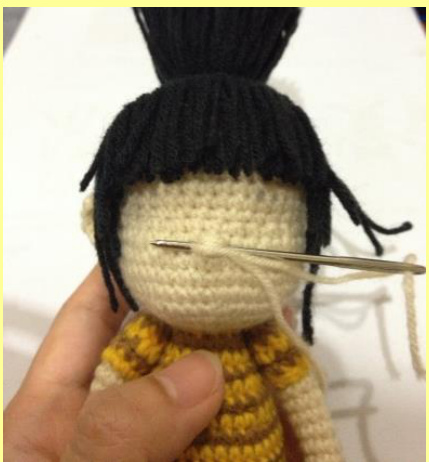
Tie the hair together into a super high ponytail at the top of the head temporary using a rubber band or scrap yarn. The length of hair should cover the bald patches on the head as you tie them up. Make another ribbon of hair of 3 inches long with a shorter hair length for Agnes's heavy bang. It is always better to be generous on the hair length as you can trim it later. Sew the hair along the front of the top hairline to form the bang. Use a pair of scissors and cut through the bottom loops of the yarns to form individual hair strands for both the bangs and the high ponytail. Leave longer strands at both sides of the face for side burns.
RED PIGTAIL
Withred,Ch16 R1: SC 15, ch 1, turn. (15) R2: SC 15. (15) Fasten off. Wrap around the ponytail and sew together when the two ends meet.
EARS
Right Ear
With Skin-toned yarn, work in continuous rounds. R1: SC 4 in magic ring. (4) R2: INC in each st. (8) R3: SC, INC, CH 1, 2 DC in next st. Fasten off and weave in ends towards the middle of the ear. Leave long tails for sewing to head.
Left Ear
Repeat the same as above but invert the wrong side to facing the front. Sew ears to sides of head just touching the hairline.
NOSE
With skin-toned yarn, sew on nose at the middle of row 16 of head by making 10 parallel stitches over 2vertical stitches.
Assembly
1. Sew the overalls to the body. 2. Put the overall's strap over the shoulder and secure it at the front panel by sewing it using same colour yarn. 3. Cut 2 small circles from the red felt and glue on the overalls' strap where it attached to the front panel. 4. Cut 2 egg-shape oval from felt and glue safety eyes on top. 5. Glue the eyes on Agnes' face between row 13 and 15 at about 4 stitches apart. 6. With sewing needle and red thread, embroider a smile on Agnes. 7. Use a dry paint brush and very small amount of pink fabric paint to add rosy cheek to the little Agnes. Have fun making this cute little Agnes! Do check out my FB page for more pictorial guide Please do not hesitate to contact me at my facebook page if you are unclear about the pattern. This is the original Something Sweet n' Precious' pattern, kindly do not claim it as your own. If you plan to sell the amigurumi made from this pattern, kindly mention Something Sweet n' Precious by placing a link to this pattern from your site. I would love to see a picture of your own finished project using my pattern. Please share it on my Facebook page (https://www.facebook.com/SomethingSweetNPrecious) or e-mail them to me (somethingssp@gmail.com) so we can share it with all ami-lover. Thank you!


