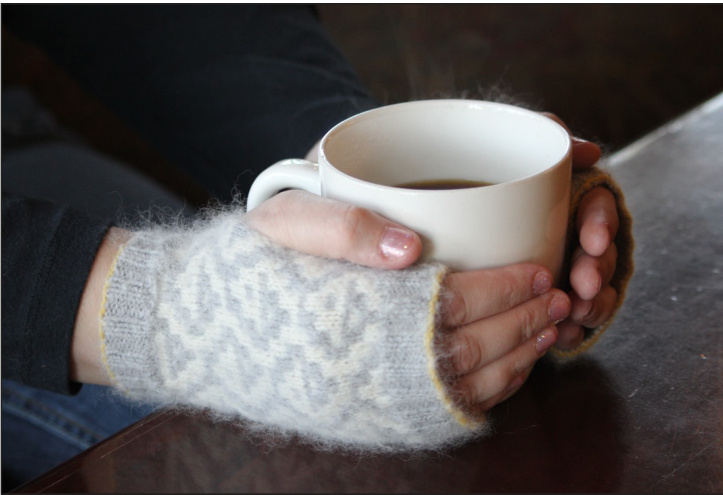
Kuelap {Fingerless Mitts }
by Bethany Hendrickson
You Will Need:
· Fingering\* weight yarn in each of three colors: 100 yards (91.4 m) in color A 90 yards (82.3 m) in color B 3 yards (2.75 m) in color C · 2.5mm (US 11/2) needles, straight or circular (knitting worked flat) yarn needle for weaving in ends, 2 safety-pin style stitch markers to aid with seaming Skill Level: Easy (basic stitches, simple shaping & finishing) Techniques: Two-color longtail cast-on\*\*, knitting, purling, slipping stitches, “make one” increase\*\*, outline stitch bind-off\*\* Gauge: 36 stitches & 48 rows = 4" (10 cm) square in colorwork pattern, after blocking Finished size: Actual measurements-71/4 (18 cm) top circumference, 61/4" (16 cm) length, 67/" (17 cm) bottom circumference, stretches to fit 6.5"-8.5" (16.5 cm-21.6 cm) circumference at top of palm / base of knuckles, see sizing note below.\*\*\* \* Some countries callthis “4ply' weight. \*\* The two-color longtail cast-on, make one increase, and outline stitch bind-off techniques are all explained in the pattern, but knowing how to work the usual longtail cast-on is essential. \*\*\* Because the stitch pattern repeat is so large (20 stitches), and the gauge so dense, if attempting to fit a hand larger than 8.5" (21.6 cm) circumference, it's best to go up a needle size or two (in mm, not US sizes) rather than trying to add stitches. The warmth and structure of the fabric will not be compromised, especially if you use a yarn containing angora, kid mohair, or some other fiber where the yarn has a nice halo as in the mitts shown.
Suggested yarns:
Toots Leblanc Fingering {60% merino wool, 40% angora} light gray (A); white (B); 250 yards / 2.5 oz (229 m / 71 g) per skein Jamieson & Smith 2ply Jumper Weigbt {100% Shetland wool} color 023 (C); 129 yards / .88 oz. (118 m / 25 g) per skein These mitts were inspired by my eternal love for all things ancient and Peruvian. The geometric nature of the stitch pattern resembles the swirling walls of the Chachapoyas fortress known as Kuelap. The angora content of the yarn is also a nod to these people of the mist because it makes the mitts feel soft and cloud-like. Handspun yarn would be great to use for these mitts——they don't require very much yarn, and the dense gauge is very forgiving of any inconsistencies in both the yarn and tension of the knitting.
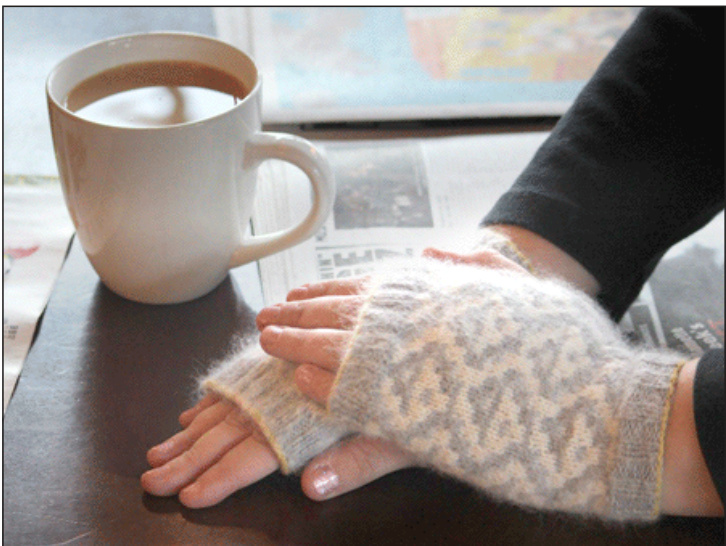
The use a type of colorwork called “mosaic knitting" It looks like stranded colorwork, but uses one color at a time and cleverly placed slipped stitches. Each mitt is knit fat making it easy to keep track of rows. The open, gusset-less thumb means no shaping in pattern, so they are simple to work. Leaving long yarn tails when casting on and binding off cuts down on bulk and the number of ends to weave in.
Chart Symbols & Abbreviations:
m1 = insert left needle into horizontal bar between stitch on left needle and stitch on right needle from back to front, insert right needle into front of this loop and purl it. One stitch increased. k = knit with color A k = knit with color B p = purl sl = slip a stitch purlwise the number of times indicated. On odd rows, slip with yarn in the back; on even rows, slip with yarn in front. The color of the grid box on the chart indicates the color of the stitch being slipped. It is important to not pull the working yarn too tightly after slipping stitches. To do this, spread out the stitches on the right needle as you work across each row.
Notes:
For brevity and clarity, only right side rows are explicitly given in the chart and written directions. On all wrong side (even number) rows, purl the stitches that were knitted on the previous row, and slip stitches that were slipped on the previous row with yarn in front. Written directions are given in a brief format to conserve space and make them less cluttered visuall. The number-letter sequence (i.e. "3A") tells you the row number and color you are to use, and the stitch repeat is given between asterisks \*like this.\* On the chart, the stitch repeat is between the bolded lines. Because wrong side directions are described above, all chart rows shown are worked right to left.
Begin Pattern:
Holding colors A & C together,tie a slip knot and place it on a knitting neede. With color C over your thumb, and color A over your forefinger, longtail cast on 54 stitches, then break color C yarn. With color A, work 8 rows of ribbing as follows: Rows 1, 3, 5, 7: p2,\*k2, p2; repeat from \* to end. (On first row, work to slip knot, pullslip knot off of needl and undo it.) Rows 2, 4, 6, 8: k2, \*p2, k2; repeat from \* to end. Row 9: increase 8 stitches evenly as follows: p6, m1; repeat from \* to last 6 stitches, end p6. {62 stitches Switch to color B, and begin working from chart or written directions below. Work 3 repeats of the 24-row colorwork pattern (72 rows total). (Multiple of 20 stitches + 2 edge stitches) 1B: k1, \*k2, sl2, k6, sl2, k8\* end k1. Row 2 and all wrong side rows: see note above. 3A: k1, \*k4, (sl2, k6) two times\* end k1.. 5B: k1, \*sl2, k4, sl2, k2\* end k1. 7A: k1, \*k2, (sl2, k4) three times\* end k1. 9B: k1, \*k4, sl2, k6, sl2, k4, sl2\* end k1. 11A: k1, \*sl2, k4, sl2, k2\* end k1. 13B: k1, \*k2, sl2, k10, sl2, k4\* end k1. 15A: k1, \*sl2, k10, sl2, k6\* end k1. 17B: k1, \*k4, sl2, k2, sl2\* end k1. 19A: k1, \*k2, sl2, k6, sl2, k4, sl2, k2\* end k1. 21B: k1, \*(sl2, k4) two times, sl2, k6\* end k1. 23A: k1, \*k4, sl2, k2, sl2\* end k1.
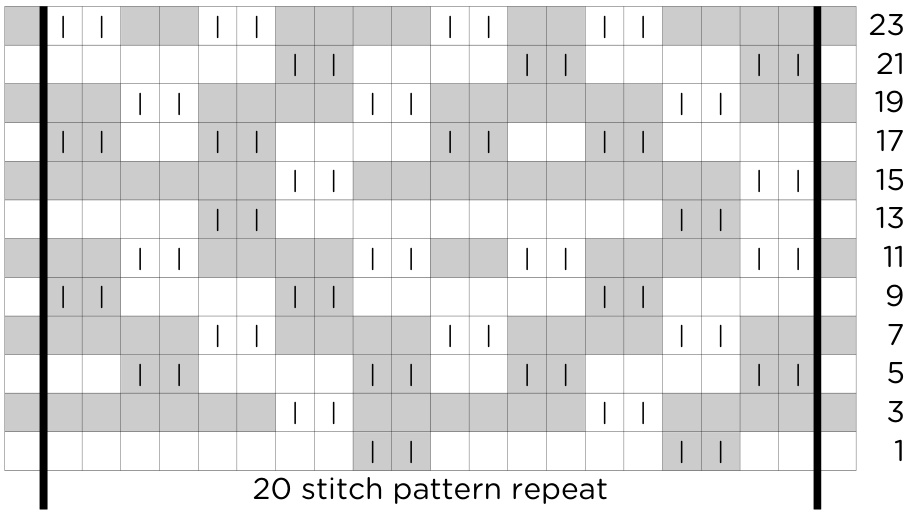
In the row counter below, color B rows are shaded a bit lighter than color A rows because color B is the lighter of the two in the pat tern. To track the pattern rows, mark the numbers below as follows: first repeat:/ secondrepeat\ third repeat: O After third repeat the numbers willook like this:

After completing 72 rows of colorwork, knit a row with color A, then work 8 rows of ribbing as follows: Row 1, 3, 5, 7: p2, \*k2, p2; repeat from \* Row 2, 4, 6, 8: k2, \*p2, k2; repeat from \*
Finishing:
Finish by working a sewn bind-off with color C as follows: Thread length of color C yarn at least 3 times as long as the width of the knitting onto a yarn needle. With right side facing, slide the knitting to the left end of the needle so that you are beginning the bind-off from the end of a right side row, and working from left to right. \*Insert needle into second stitch on needle from front to back (insert behind front leg of stitch, and come out in front of back leg of stitch on needle) then out through the first stitch from back to front (insert in front of back leg of stitch, and come out behind front leg of stitch on needle). Pop the first stitch off the right needle; repeat from \* to the last stitch. Break yarn(s) and weave in ends. (Color C yarn can be run through the first stitch of the row after seaming is completed to make the bind-off look tidier.) To block, heat a steam iron to the setting appropriate for the fibers in the yarn used. Lay mitts fat, ightly press, and puff steam through them until damp, then tug on them vertically and horizontally to adjust the tension in the Hoats from the slipped stitches. Allow to dry thoroughly beforeseaming. To seam, fold a mitt in half verticall with the wrong side out, and cast-on at bottom. Lay your thumb over the mitt and determine where you'd like it to sit on your wrist and fingers. Place stitch markers through both layers of fabric where the top and bottom of your thumb will be. Thread needle with either color A tail from cast-on, or a 12" (30 cm) length of yarn. Beginning at the bottom, whip stitch to your first stitch marker, catching only the outermost loop of each of the edge stitches. (As an experiment, I did seam one mitt with whip stitch and one with mattress stitch. The mattress stitch seam is very noticeable, and bothers whichever hand is unfortunate enough to end up with that particular mitt.) Skip the thumb by weaving the needle through the back of the knitting (make sure it doesn't peek through on the right side), then resume seaming when you get to the next marker. When finished seaming, break yarn and weave in ends. Repeat for second mitt.
Helpful Links:
Roxs tutorial (with photos) of the outline bind-off is here: http:/ /roxtalks.blogspot.com/2009/02/outline-stitch-bind-off.html Kuelap Pattern Support Flickr set: http: / /www.fickr.com/photos/akikikka/sets/72157626526419568/ For help working this pattern, visit The Busiest Bee group on ravelry: http:/www.ravelry.com/groups/the-busiest-bee Toots Leblanc yarns are available here: http: / /www.tootsleblanc.com/ Jamieson & Smith yarns are available here: http:/ /www.shetlandwoolbrokers.co.uk /
As an independent designer, feedback and critique help me to provide the best patterns posible. Please let me know if you enjoyed knitting this pattern, or have any questions or comments by emailing patterns@bethanyhendrickson.com
You can find more of my patterns and my blog at my website: http:/ /bethanyhendrickson.com/


