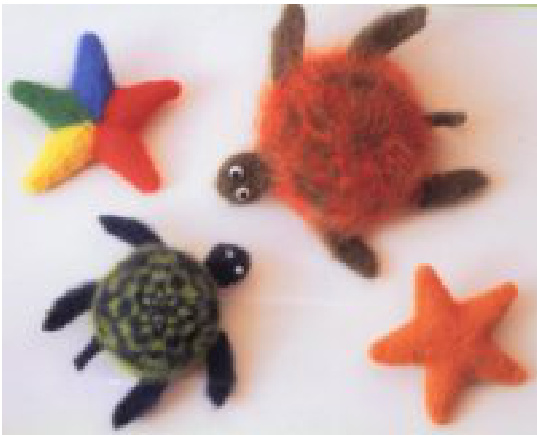
Felted fish need deep sea buddies like this felted Starfish and Sea Turtle. They work up quickly and make a great addition to felted fish mobiles. After felting, the Starfish measures 6" (sport weight yarn) and 8" (worsted weight). The Sea Turtle measures 8" (sport) and 10" (worsted). Gauge is not critical, approx 3-4 sts/inch.
Materials
Starfish - 1 skein Brown Sheep NatureSpun Sport in Sunburst Gold (Star requires 60-75 yds) Multi-Color Starfish - 1 skein each Brown Sheep NatureSpun Sport in Red Fox (A), Orange You Glad (B), Impasse Yellow (C), Elf Green (D), Blue Boy (E) Size 8 single point needles Starfish can also be made with worsted weight yarn and size 10/2 needles Sea Turtle - small - 1 skein ea Brown Sheep NatureSpun Sport in Spring Green (MC), Blueberry(CC) Size 8 double pointed needles, 16" circular large - 1 skein ea Brown Sheep Handpaints in New England Fall (MC), Lamb's Pride Worsted in Old Sage(CC) Size 10%2 double pointed needles, 16" circular 2 beads, buttons, or "google eyes" for eyes Needle for assembly, seams and eyes Stuffing k2tog tbl - knit 2 together through back loop. Insert the right needle through the back loops of the next 2 sts and Knit. m1 - make one. Pick up loop lying between st just worked and next st and knit into the back of it. 3 Needle Bind Off - \*K2 tog (1 st from front needle, 1 st from back needle)\*. Repeat \*\* once. Bind first st off over second st. Continue to k2tog, 1 front st and 1 back st, while binding off across.
Starfish
Maketwo. Cast on 8 sts loosely, leaving an 18" tail for finishing. Row 1: Knit. Row 2: Using Knitted Cast-On, cast on 2 sts. (See Techniques) Then, k to last stitch, YF, turn. (10 sts) Rows 3, 5, & 7: Slip 1 (See Techniques), k to last st, inc. Row 4: Cast on 2 sts, k to last 2 sts, YF, turn. (13 sts) Row 6: Cast on 1 st, k to last 3 sts, YF, turn. (15 sts) Row 8: Cast on 1 st, k to last 4 sts, YF, turn. (17 sts) Row 9: Slip 1, k to end. Row 10: Bind off 1 st, k to last 3 sts, YF, turn. Rows 11, 13, & 15: Slip 1, k to last 2 sts, k2tog tbl. Row 12: Bind off 1 st, k to last 2 sts, YF, turn. Row 14: Bind off 2 sts, k to last st, YF, turn. Row 16: Bind off 2 sts, knit to end. (8 sts) Repeat Rows 1-16 four more times. Bind off loosely, leaving 18" tail for finishing.
Techniques
Knitted Cast-On - Hold the work in your left hand. Insert the right needle between the last 2 sts on the left needle. Bring yarn around back and knit, pulling the new st between the last two sts and up onto the left needle. YF, turn - yarn forward, turn. Bring the yarn forward as if to purl and turn the work. Slip 1 - Slip the next st from the left needle to the right needle as if to knit. Do not work the st. inc - increase. Knit in the front and the back of the next St.
Finishing
Each starhas one tail at the center and one at the outer edge. Use center tail to sew through the “bumps" around the center of the star and close the circle. Sew together loosely at cast on and bound off edges. Join the stars together by placing one on top of the other in such a way that the tails are not in the same place and can be used to sew in either direction around the edges. Join the two stars together by sewing loosely around each arm. Leave a 3" opening at base of one arm for stuffing later. Work all tails to inside.
Multi-Color Starfish
Caston 8 sts with Color A as for Starfish above and work Rows 1-16. \*Leave 4" tail of Color A and add color B, leaving 18" tail. Work Rows 1-16.\* Repeat \*\* for colors C, D & E. Make one. Reverse color order (E, D, C, B, A) for second starfish.
Finishing
work long talls across color join on wrong side to outside edge. Sew cast on and bind off edges together loosely. Use short tails to finish center as in Starfish above. With wrong sides facing, match colors and use tails doubled to sew around each arm as for starfish above, leaving a 3" opening at the base of one arm. Work in tails. Sea Turtle/Shell Top With circular needle and MC, cast on 60 sts loosely, leaving an 18" tail for finishing. Join in the round, being careful not to twist stitches, place marker. Change to dpns when knitting becomes too tight on circular needle. Rnds 1, 3, & 5: Knit. Rnd 2: \*Ki0, m1 (See Techniques)\*, around. (66 sts) Rnd 4: \*K1, m1\*, around. (72 sts) Rnd 6: Join CC and knit around with both MC and CC. Rnd 7: Purl with MC and CC held together. Rnds 8 & 9: \*K6 in MC and k6 in CC\*, around. Rnd 10: With CC, \*k2, k2tog, k2, with MC, k2, k2tog tbl, k2\*, around. Rnds 11, 13, 15, 17 & 19: Knit, matching CC and MC around. Rnd 12: With MC,\*k2, k2tog, k1, with CC, k2, k2tog tbl, k1\*, around. Rnd 14: With CC, \*k1, k2tog, k1, with MC, k1, k2tog tbl, k1\*, around. Rnd 16: With MC, \*k2tog, k1, with CC, k2tog tbl, k1\*, around. Rnd 18: With CC, \*k2tog, with MC, k2tog tbl\*, around. Rnd 20: Break MC. With CC, k2tog around. (6 sts) Break CC and thread through remaining sts to close center. Bring tail to inside and secure. Shell Bottom With MC cast on 60 sts loosely, leaving 18' tail as above Join in round, place marker. Rnds 1, 3 & 4: Knit. Rnd 2: \*K10, m1\*, around. (66 sts) Rnd 5: Purl. Rnds 6 & 7: Knit. Rnd 8: \*K9, k2tog, k9, k2tog tbl\*, around. (60 sts) Rnds 9, 11, 13, 15, 17: Knit. Rnd 10: \*K4, k2tog, k4, k2tog tbl\* around. Rnd 12: \*K3, k2tog, k3, k2tog tbl\*, around. Rnd 14: \*K2, k2tog, k2, k2tog tbl\*, around. Rnd 16: \*K1, k2tog, k1, k2tog tbl\*, around. Rnd 18: \*K2tog, k2tog tbl\*, around. (10 sts) Rnd 19: \*K2tog\*, around. Break yarn and thread through remaining 5 sts to close center. Bring tail to inside and secure. Assembly With WS together and tails from cast on edges 3" apart, sew cast on and bound off edges together in each direction. The 3" space is the “"tail" end of the turtle and will be left open for stuffing later.
Head
With dpns pick up 12 sts on either side of seam directly opposite of open edge as follows: with dpn, pick up 6 sts from top shell side of seam, with another dpn, pick up 6 sts from bottom shell side of seam. With top of shell facing, attach CC yarn. With a third dpn, knit across first needle where yarn is attached, turn work and knit back on other needle. One round is knit by working around both needles. Don't worry about bridging the gap between the two needles - it all comes out in the wash. Knit 3 Rounds. Rnd 4: \*Inc, k4, inc\*, twice.
Rnds 5, 7 & 9: Knit.
Rnd 6: \*Inc, k6, inc\* twice. Rnd 8: \*K2, k2tog, k2, k2tog tbl, k2\*, twice. Rnd 10: \*K2tog, k1, k2tog tbl, k1, k2tog\*, twice. Rnd 11: \*K1, k3tog, k1\*, twice. Break yarn and sew through remaining sts. Tie off and work tail into head. Tail With dpn, pick up 4 sts just above cast on edge of shell top directly opposite of head. Attach CC yarn. Work 6 Rows of I-cord as follows: K all the sts, slide sts to opposite end of needle - do not turn - K all sts. Next Row: K1, k2tog, k1. Work 2 Rows I-cord on remaining 3 sts. Next Row: K3tog. Break yarn and bring through last st. Work tail into tail.
Flippers
The turtle now has a head at 12 o'clock and a tail at six o'clock. The flippers are attached at two, four, eight and 10 o'clock. With top shell facing, begin at two o'clock (about 6 sts from head). Pick up 12 sts, 6 on each side of seam with 2 dpns as above. Attach CC yarn at "tail" end of top needle and Knit 2 Rounds. Rnd 3: Inc, k10, inc. Rnd 4: Inc, k4, \*k2tog\* twice, k4, inc. Rnd 5: Inc, k12, inc. Rnds 6-8: Inc, k5, \*k2tog\* twice, k5, inc. Rnd 9: K6, \*k2tog\* twice, k6. Rnd 10: Inc, k2, \*k2tog\* four times, k2, inc. Work 3 needle bind off on remaining 12 sts. Tie off and work tails into flipper. Repeat for flipper at four o'clock. For flippers at eight and 10 o'clock, attach CC yarn at "tail" end of bottom needle (shell bottom facing) and repeat Rounds 1-10 above.
Felting
Set washer for heavy-duty cycle, low water level and hot water. Add a few drops of liquid laundry soap to the water. Place critter(s) in a lingerie bag and drop into the washer. Agitate. Check your progress after 10 minutes, then, every 5 minutes until felted as desired. Reset the cycle, if needed. Since size and fit are not a consideration, you can let the critter(s) swim through the entire cycle. There is a chance, however, that a permanent crease can develop from too much spinning. Stop the spin cycle and position the critter(s) flat against the tub to avoid this problem. Shape critter(s) and let dry. Stuff lightly. Sew seam(s) closed with matching yarn. Sew buttons, beads or "google eyes" on RS of turtle head. Eyes can also be embroidered directly on the head. Embellish with embroidery, beads, or sequins, if desired. Hang with monofilament line.


