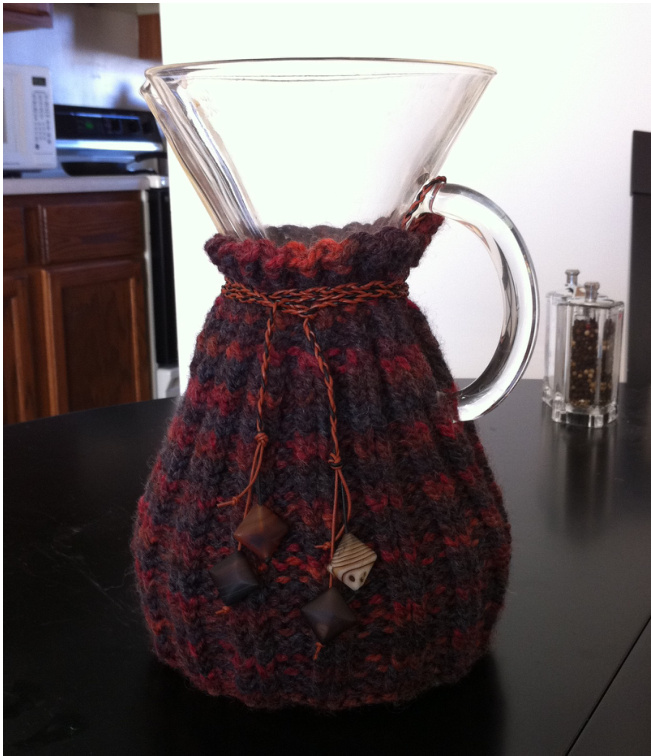
Chemex Coffee Cozy
This fits a 6 cup Chemex drip coffee pot WiTH handle. I have included mods appropriate for the no-handle version (which does simplify the pattern). This is worked in the round with no seaming!! You can secure the top with just a simple tie attached to each edge of the ribbed top, or use buttons to wrap the ties around (like those inter-office envelopes with the 2 riveted circles and the string that figure-eights around them). I like it with buttons because it adds a bit of a decorativeelement.
GAUGE:
4.5 st/in in stst or 8 stin in pattern (un-stretched, 2 knit ridges together are 1 in)
MATERIALS:
Yarn: Chunky weight washable wool blend- less than 100g Needles: US10 DPN or size to obtain gauge Tapestry needle for weaving ends Finishing: 12-24" of desired tie material (matching or contrasting yarn, ribbon, twine, leather cord), OPTIONAL: 2 buttons, assorted beads.
INSTRUCTIONS
Bottom
Place slip knot on 1 DPN (working flat for the first few rows) Row 1: K1, P1, K1 all in same stitch (3 st) Row 2: P across Row3 : Kfb across (6 st) Row 4: P across Row 5: Kfb across (12st) \*Ktbl 2, P2\* across Round 6: K across Round 7: \*Kfb, k\* repeat across (18 st) Round 8: K across Round 9: \*Kfb, k1\* repeat across (27 st) Round 10: K across Round 11: \*Kfb, k2\* repeat across (36 st) Round 12: K across Round 13: \*Kfb, k3\* repeat across (45 st) Round 14: K across Round 15: \*Kfb, k4\* repeat across (54 st) Round 16: K Round 17: \*Kfb, k5\* repeat across to last 6 st Kfb, K3, Kfb, K1 (64 st) Round 18: P across Repeat until work measures 4" from Purl row (or the height from bottom of pot to bottom of handle)
Neck (handle versionsee no-handle version at end)
\*Ktbl 2, P2\* across to last 4 st. Ktbl 2 BO 2. The rest of the cozy will be WORKED FLAT You now have a flat disk that should generally be the size of the bottom of your Chemex. [lf you have a larger (or smaller) coffee pot, continue the increase pattern knitting 1 additional st between the Kfb: (or quit increasing early). When you reach the desired circumference you dc need to end with a number of stitches divisible by 4, so tweak the st count by adding kfbs or leaving out kfbs on the last increase row as appropriate, then do your purl row to give a nice edge] (RS) \*Ktbl 2, P2\* across (WS) \*Ptbl 2, K2\* across (RS) \*Ktbl 2, P2\* across (WS) \*Ptbl 2,K2\* across (RS) CO 1 (cable-style), P st you just added, \*Ktbl 2, P2\* around in pattern (WS) CO1 (cable style), K st you just added,\* Ptbl 2, K2tog\* in pattern (RS) P1, K2togtbl, P (WS) \*K1, Ptbl\* in pattern (RS) \*P1, Ktbl\* in pattern Repeat these last 2 rows until the twisted 1x1 ribbed section measures 2" or the desired length . \*\*confirm that the neck of your cozy is loose enough to allow the wide base through...this is a very stretchy rib, so it should not be a problem, but it pays to check!\*\* BO loosely in pattern (I like Jeny's surprisingly stretchy bind off)
FINISHING:
Fancy Option:
· Sew decorative button loosely (to allow room for ties to wrap around shank) to neck edges, leaving at least 1 rib showing between edge of work and edge of button. Cut 1' length of desired tie material (braided yarn in matching or contrasting color, ribbon, leather cord, twine, etc) and secure at base of one of the buttons (leaving a length dangling adds decoration...add beads or make it a tassel!)
Simple Option:
Cut 2 8-12 in of desired tie material (braided yarn in matching or contrasting color, ribbon, leather cord, twine, etc) Secure one to each edge of the neck slit. Tie at the slit OR wrap the cords around the neck once or twice and tie off...beads at the end of the tie make this simple option more decorative! Weave in ends and block it by wetting and letting in dry on your coffee pot.
Neck NO-handle version
\*Ktbl 2, P2\* across to last 2 st. P1, sl last stitch to first DPN. This is your new end of row. TURN The rest of the cozy will be WORKED FLAT (WS) K1, \*Ptbl 2, K2\* across in pattern (RS) P1,\*Ktbl 2, P2\* across in pattern (WS) K1 \*Ptbl 2, K2\* across in pattern (RS) P1 \*Ktbl 2, P2\* across in pattern (WS) K1 \*Ptbl 2, K2\* across in pattern (RS) P1 \*Ktbl 2, P2\* across in pattern (WS) K1 \*Ptbl 2, K2tog\* in pattern (RS) P1, \*K2togtbl, P1 (WS) \*K, Ptbl\* in pattern (RS) \*P, Ktbl\* in pattern BO Bind off co Cast on KKnit PPurl Ktbl Knit through back loop Ptbl Purl through back loop K2tog Knit 2 together K2togtbl Knit 2 together through back loop St Stitch RS Right side WS Wrong side


