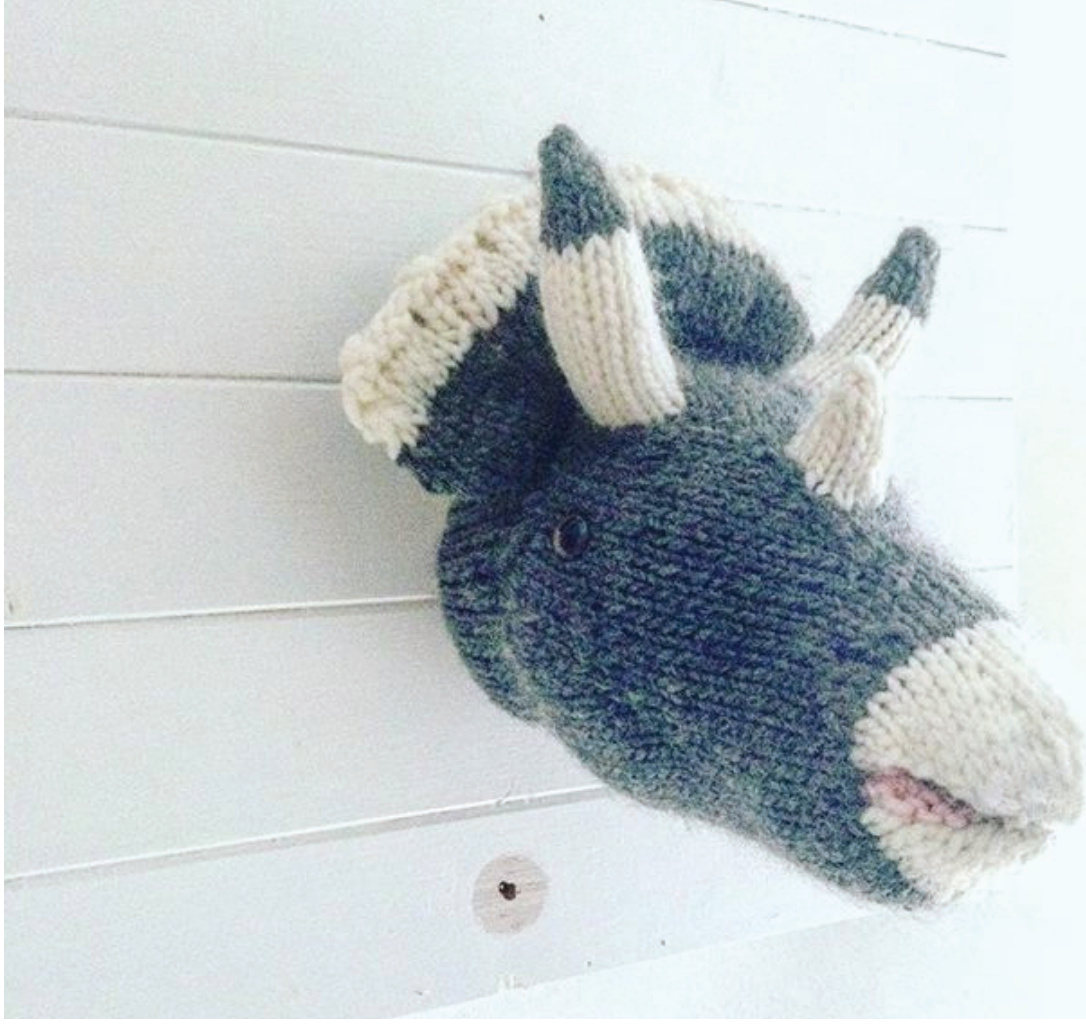
triceratops trophy page I
YARN 1 ball each chunky yarn in main colour and nose colour plus a small amount for the inside of the mouth SHOWN AS Drops Eskimo Dark Grey (MC), Off White (yarn C) and Baby Pink NEEDLES Pair 7mm (US 10.75) x 40cm (16in) circulars plus 4 x 7mm (US 10.75) long double pointed needles (dpns) TENSION 12 stitches and 15 rows counted over a 10cm (4in) square as stocking stitch - although the tension is not totally necessary, just a guide NOTIONS toy flling, yarn needle, 18mm toy/ bear eyes Special instructions and abbreviations are found at the end of the patterns.
triceratops trophy
Muzzle
With MC, CO 36 sts onto 3 dpns (12 sts on each) and work the following rounds: 1-2) K all sts, placing a marker to determine the beginning and ending of each round. (Keep this marker in position at the beginning of each round for each round because I refer to it a lot during the pattern 3) inc) K16, kfb, k2, kfb, k16. 38sts 4) K38. 5) inc) K17, kfb, k2, kfb, k17. 40sts 6) K40.
+riceratops trophy page 2
7) inc) K18, kfb, k2, kfb, k18. 42sts Create a gap for the nose horn... 8) K21, turn - with purl side facing, p21 to marker, then p21 sts beyond marker, turn. 9) inc) K1, kfb, k19 to marker, then k19 sts beyond marker, kfb, k1, turn. 10) P22 to marker, then p22 sts beyond marker, turn. 11) inc) K1, kfb, k20 to marker, then k19 sts beyond marker, kfb, k1, turn. 46sts 12) P23 to marker - you will now continue to knit in the round to shape the head as follows: 13) inc) Knit side (RS) facing, K21, kfb, k1, then, knitting across the 'nose horn gap',k1, kfb, k21 to beginning of the round. 48sts 14) K all sts. Switch to the circular needles, dividing the sts evenly. Shape the top of the head and the cheeks 15) inc) K21, kfb, k4, kfb, k21. 50sts Cheeks 16) inc) K9, m1, k12, kfb, k6, kfb, k12, m1, k9. 54sts 17) inc) K22, kfb, k8, kfb, k22. 56sts 18) inc) K10, m1, k12, kfb, k10, kfb, k12, m1, k10. 60sts Mark eye positions 19) K17, place stitch marker on the last stitch to determine left eye positioning, k27 place stitch marker on the last stitch to determine
triceratops trophy page 3
left right positioning, k to beginning of round. Create 2 spaces for the upper horns... 20) inc) K11, m1, k13 turn - with purl side facing, p25 to row marker, then p24 sts beyond marker, turn. 21) inc) K12, m1, k11 to row marker, then k12, m1, k12 sts beyond marker, turn. 22) P26 to marker, then p25 sts beyond marker, turn. 23) K13, m1, k to marker. Break yarn. Returning to the 12 sts that lie in the middle of the head between the space for upper horn, work as follows to even up the row count: Slip all 12 sts onto a dpn. RS facing rejoin the yarn and work 4 rows st st, break yarn and leave these stitches whilst you rejoin the yarn to the beginning of the round. 24) Work one round by knitting all 64sts - keeping a tight tension as you knit across the horn spaces.
Chin/ neck/ back of head shaping
25) dec) K1, skpo, k7, k2 tog, k13, skpo, k10, k2 tog, k13, skpo, k7, k2 tog, k1. 58sts 26) K all sts. 27) dec) K1, skpo, k6, k2 tog, k12, skpo, k8, k2 tog, k12, skpo, k6, k2 tog, k1. 52sts
triceratops trophy page 4
28) dec) [K1, skpo, k2, k2 tog] twice, k24, [skpo, k2, k2 tog, k1] twice. 44sts 29) dec) K1, skpo, k5, k2 tog, k7, skpo, k6, k2 tog, k7, skpo, k5, k2 tog, k1.38sts You will now separate from the back of head/ neck stitches to create the head plate that rises up from the neck. 30) K9. Leave allthe stitches on the wires of the circulars whilst you pick up stitches for the head plate as follows:
Head Plate
1)Using a fresh ball of yarn and the dpns (or straight needles of simila1 size) \*pick up and knit a stitch in each of the next 20 horizontal bars (these are the same horizontal bars that would pick up to M1 (make a stitch) that lie between the stitches on the circular wires\* \*RS facing insert your dpn in through the front and under a horizontal bar, as the needle tip emerges on the other side of the bar wrap the yarn around the back of the needle (as if to knit) and knit it. 2) inc) Keeping the tension fairly loose for this row (see △ at neck shaping) - Pfkb, p18, pkfb - all across these newly made 20 sts. 22sts 3) inc) [K2, kfb] all across to last st, k1. 29sts 4)P.
triceratops trophy page 5
5) inc) [K3, kfb] all across to last st, k1. 36sts 6) P. 7) inc) [K4, kfb] all across to last st, k1. 43sts 8) P. 9) inc) [K5, kfb] all across to last st, k1. 50sts 10) P. 11) dec) K1, skpo, k1, p1, [k4, p1] rep to last 2 sts, k2 tog. 48sts 12) [P4, k1] all across - ends with p3. Break yarn MC. Change to yarn C 13) dec) K1, skpo, p1, [k4, p1] rep to last 2 sts, k2 tog. 46sts 14) P3, k1, [p4, k1] all across - ends with p2. 15) dec) K1, skpo, [k4, p1] rep to last 2 sts, k2 tog. 44sts 16) P2, k1, [p4, k1] all across - ends with p1.
Picot edge
17) inc) [K3, yo, k2 tog] all across to last 4 sts, k3, yo, k1. 45sts 18) K - this is the edge where you will fold over to reveal the picot edging at the top of the plate. 19) (RS) P1, k1, [p4, k1] all across - ends with p3. 20) inc) K3, p1, [k4, p1] rep to last st, kfb. 46sts 21) (RS) P2, k1, [p4, k1] all across - ends with p3. 22) K3, p1, [k4, p1] all across. Break yarn C. Change to yarn MC 23) (RS) inc) P1, pkfb, [k1, p4] rep to last st, pkfb. 48sts 24) P1, k3, [p1, k4] all across - ends with k2.
triceratops trophy page 6
25) P2, k1, [p4, k1] all across - ends with p3. 26) inc) K1, kfb, k to last st, kfb. 50sts 27) P. 28) dec) [K5, k2 tog] all across to last st, k1. 43sts 29) P. 30) dec) [K4, k2 tog] all across to last st, k1. 36sts 31) P. 32) dec) [K3, k2 tog] all across to last st, k1. 29sts 33) P. 34) dec) [K2, k2 tog] all across to last st, k1. 22sts 35) P2 tog, p to last 2 sts, p2 tog. 20sts 36) K2 tog, cast off next 17 sts, slip stitch on right needle onto left needle, k2 tog. Fasten off.
Horns
1)\*Beginning with the nose horn using the dpns and yarn C with RS facing starting at the back right of the gap (nose is facing you) pick up and knit 12 sts around the perimeter of the nose horn gap', divide the sts over 3 dpns and work 1 round - you should be working clockwise from the back right of the horn (4sts) toward the nose then across the back left (4sts) and then across the back (4sts).\*\* 2) dec) K3, k2 tog, k4, k2 tog, k1. 10sts 4) dec) K2, k2 tog, k3, k2 tog, k1. 8sts 5) K. 6) dec) K1, k2 tog, k2, k2 tog, k1. 6sts 7) dec) [K2 tog, k1] twice. 4sts 8) dec) K2 tog twice, then pass the first st over the second. Fasten off. Thread the end into the inside of the horn. For the other two horns (working both horns similarly): Work as nose horn from \* to \*\*. Place marker. 2) K12 all around. Rep last round 5 times. 8) dec) K3, k2 tog, k4, k2 tog, k1. 10sts 9) K. Rep last round 4 times. Break yarn C. Change to yarn MC 14) K. 15) dec) K2, k2 tog, k3, k2 tog, k1. 8sts 16) K. 17) Rep last rnd once. 18) dec) K1, k2 tog, k2, k2 tog, k1. 6sts 19) dec) [K2 tog, k1] twice. 4sts Break yarn, thread end through sts and pull up to close hole. Thread the ends into the inside of the horn.
triceratops trophy page 8
triceratops trophy page 9
Stitches are now picked up in the original cast on sts to shape the beak shaped mouth. Using MC yarn, and beginning just to the right of the first CO st, pick up and knit 1 st for every CO st. There should be 36 sts total - 12 on each dpn. 1) K all sts 2) dec) [K2, k2 tog] 3 times, k2, skpo, k4, k2 tog, k2, [k2 tog, k2] 3 times. 28sts. Break yarn MC. Change to yarn C 3) K all sts. Divide top of mouth from bottom 4) K21, turn. 5) (WS) P14 sts for top of the mouth - the remaining 14 sts can be held on a single dpn or spare yarn for now. 6) Skpo, k3, kfb, k2, kfb, k3, k2 tog. 7) P. Rep last 2 rows once. 10) dec) Skpo, k3, kfb, k2, kfb, k3, k2 tog. 11) dec) P1, p2 tog, p2, p2 tog twice, p2, p2 tog, p1. 10sts 12) dec) Skpo, k2, k2 tog, k2, k2 tog. 7sts Break yarn, thread end through all 7sts and pull up to gather . Secure the end.
Mouth
Bottom mouth RS facing rejoin yarn C to the remaining 14 sts for the bottom of the mouth 5) Skpo, k to last 2 sts, k2 tog. 12sts 6) P. Rep last 2 rows once more. 10sts 9) K2 tog all across. 5sts Cast off p-wise.
Inside of the mouth
With the nose facing you, join the pink yarn by picking up and knitting a stitch at right hand side at the junction between the top and bottom of the mouth (where the jaw hinges)\*\*\*. Continue to pick up and knit 13 more sts working around the front and then back along to the junction on the other side of the mouth. Cont. to work reverse stocking stitch as follows: 2) (WS) dec) Skpo, k across to last 2 sts, k2tog. 12sts 3) P. 4) dec) Skpo, k across to last 2 sts, k2tog. 10sts 5) P. 6) dec) Skpo, k across to last 2 sts, k2tog. 8sts 7) dec) P2 tog, p1, p2tog. 6sts 8) dec) Skpo, k across to last 2 sts, k2tog. 4sts 9) dec) P 2 tog twice. 2sts
triceratops trophy page 10
Leave the 2 remaining sts on a needle for the moment. Break yarn.
Upper mouth
With the nose facing you, join the pink yarn by picking up and knitting a to the right of the lower mouth - same place a where you picked up the first stitch(\*\*\*). Continue to pick up and knit 5 more sts across, then knit the 2 sts that are one the needles, then pick up and knit 6 more sts across to the other side. 14sts 2) K. 3) P. 4) dec) K2 tog, k4, skpo, k4, k2 tog. 11sts. 5) P. 6) dec) K2 tog, k to last 2 sts, k2 tog. 9sts. 7) P. Rep last 2 rows once. 7sts 10) dec) K2 tog, k1, skpo, k2 tog. 4sts 11) dec) P1, p2 tog, p1. 3sts 12) dec) K3 sts tog. Fasten off. Join upper inner mouth to inside of the outer upper mouth by sewing a few discrete stitches - also work it in/ mould it with your fingers to create that inside of the mouth concave shape.
triceratops trophy page I1
Neck shaping
Return to the 38sts that are held on the circular needles. 1)K all around - △ knitting behind the plate may be a little tricky if the tension when adding the plate was too tight however this will ease in subsequent rounds. 2)Then knit 29sts - back to the original marker. 3) inc) K1, kfb, k34, kfb, k1. 40sts 4) K. 5) inc) K1, kfb, k36, kfb, k1. 42sts 6) K. 7) inc) K1, kfb, k to last 2 sts, kfb, k1. 44sts 8) K. Decrease for the very back of the trophy - change to yarn C (this section willie against the wall so use up your other yarn!) 9) (dec) [K9, k2 tog] 4 times. 40sts 10) (dec) [K8, k2 tog] 4 times. 36sts 11) (dec) [K7, k2 tog] 4 times. 32sts 12) (dec) [K6, k2 tog] 4 times. 28sts 13) (dec) [K5, k2 tog] 4 times. 24sts
To make up
Stuff the trophy really well - \*\*add card or lollipop sticks to the insides of the horns if you like (really depends on how firm your yarn is... as a note - I didn't, I just used stuffing).
triceratops trophy page 12
Sew the back of the plate. 14) (dec) [K4, k2 tog] 4 times. 20sts 15) (dec) [K3, k2 tog] 4 times. 16sts 16) (dec) [K2, k2 tog] 4 times. 12sts 17) (dec) [K1, k2 tog] 4 times. 8sts Break yarn, use end to thread through rem sts, pull up tight and secure the end. Sew the back of the plate - if needs be (see above re. horns\*\*) add stiff interfacing or card cut to size by drawing around the shape to create a template and then sandwiching it in-between the knitting
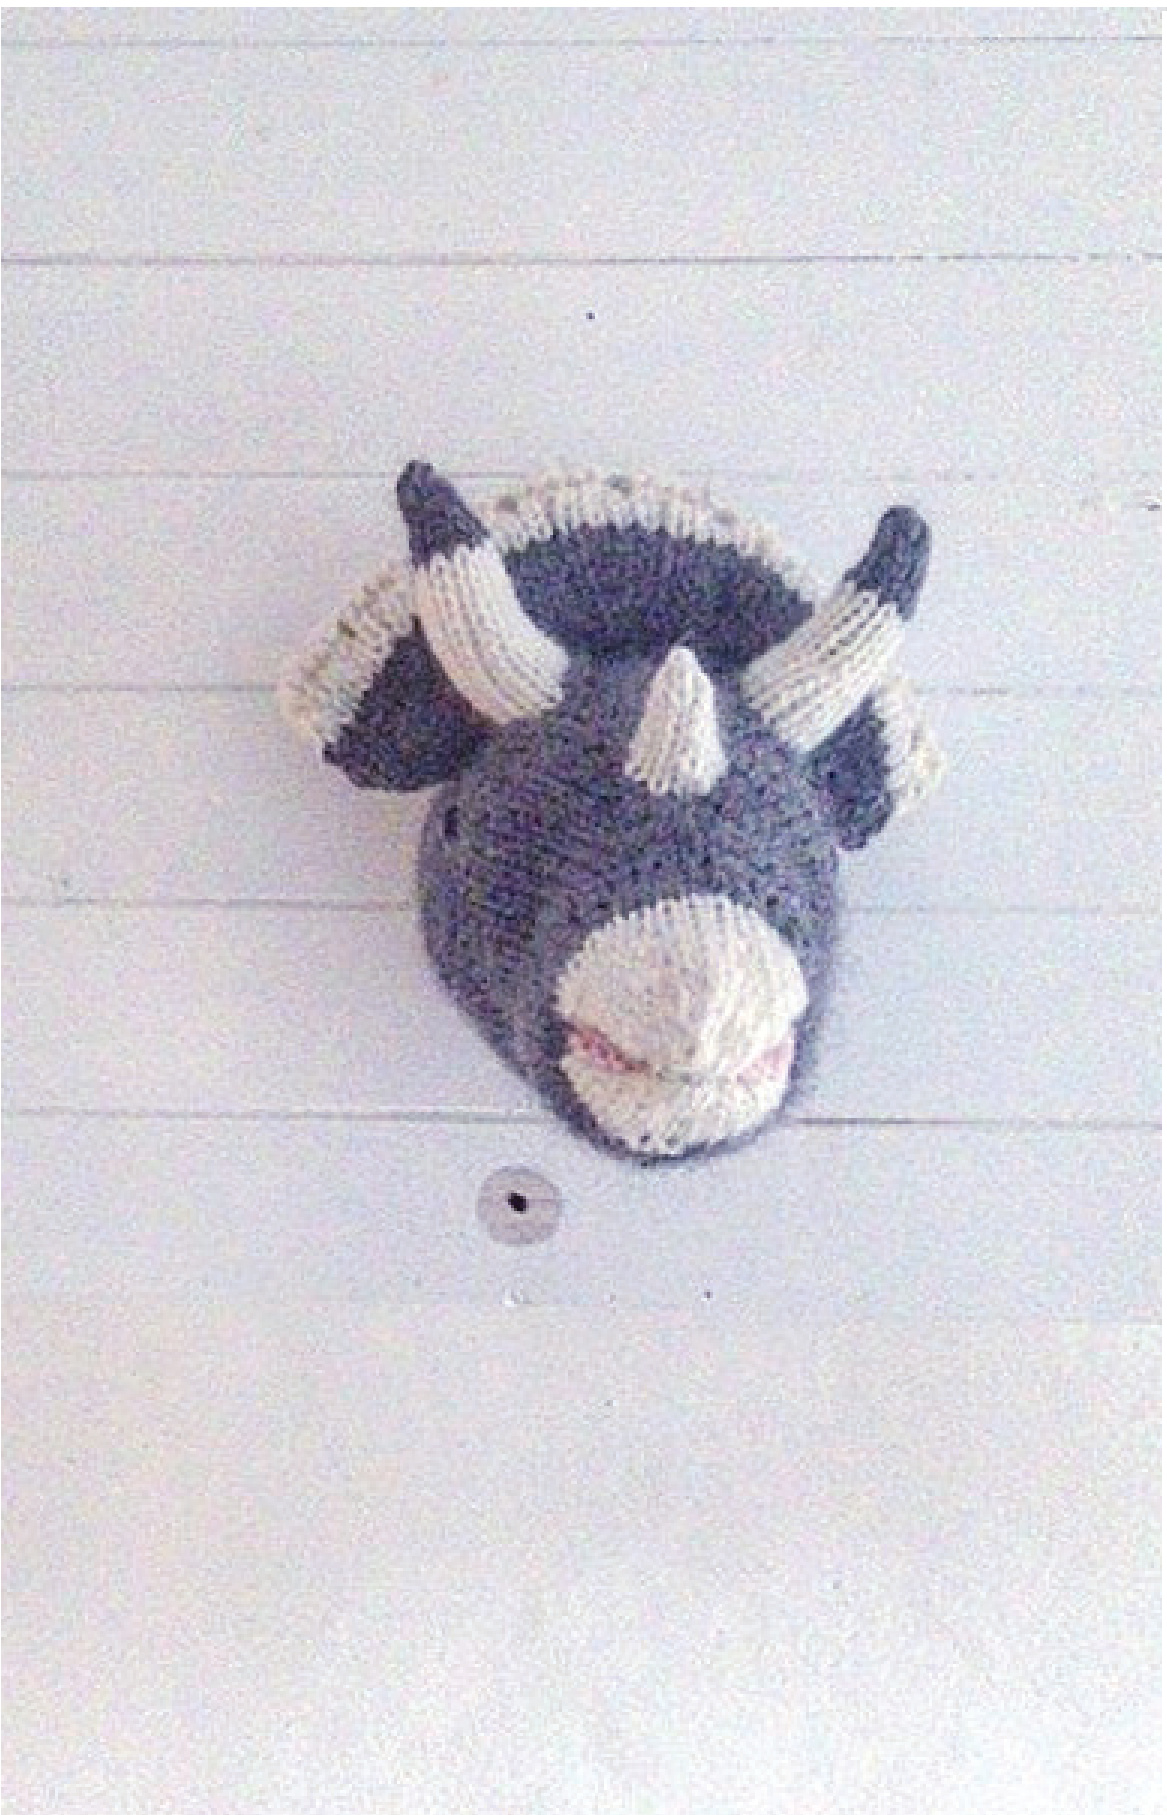
triceratops trophy page 13 Image sbows tbe top of the bead with its two larger borns and nose born
Pattern knowledge
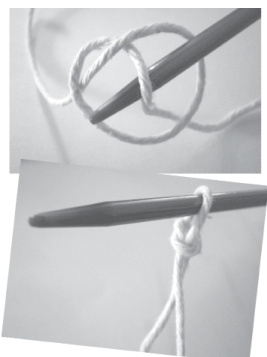
cm centimetre/s CO cast on cont continue dec decrease gm gram/ mes in inch/es inc increase k knit/ knitting kfb knit into front, then back LH/ RS left hand/ left side m1 make a stitch (see definitions) mm millimetre P purl patt pattern pfkb purl into front, knit into back pup&k pick up and knit (see definitions) rep repeat rem remaining RH/RS right hand/ right side skpo slip next stitch, knit the next stitch pass slipped stitch over the knitted stitch (see definitions) sl slip st/sts stitch/es WS wrong side WT - wrap and turn (see definitions) Definitions The following definitions are brief explanations of the special techniques and some of the basic techniques that may have been used within these patterns. Some definitions are explained within the patterns themselves, especially if they occur regularly and are uncommon, some are illustrated where it is easier to show a diagram than it is to put into words. Plus for extra tuition, sometimes with stepby-step video footage, the Internet provides wonderful tutorials on all these and other special or basic techniques . Slip knot this is generally how to begin knitting or crochet and usually becomes the first stitch; it is the beginning of the cast on method adopted for these patterns and it is also how to begin a crochet chain. To make a slip knot work the yarn, with your fingers, into a half knot but don't pull the knot closed - this will leave you with a loop. Slip the point of the knitting needle, or crochet hook for crochet projects, under the loop then pull the working yarn, this is attached to the yarn ball, gently until the knot lies, not too tightly, onto the needle or hook.
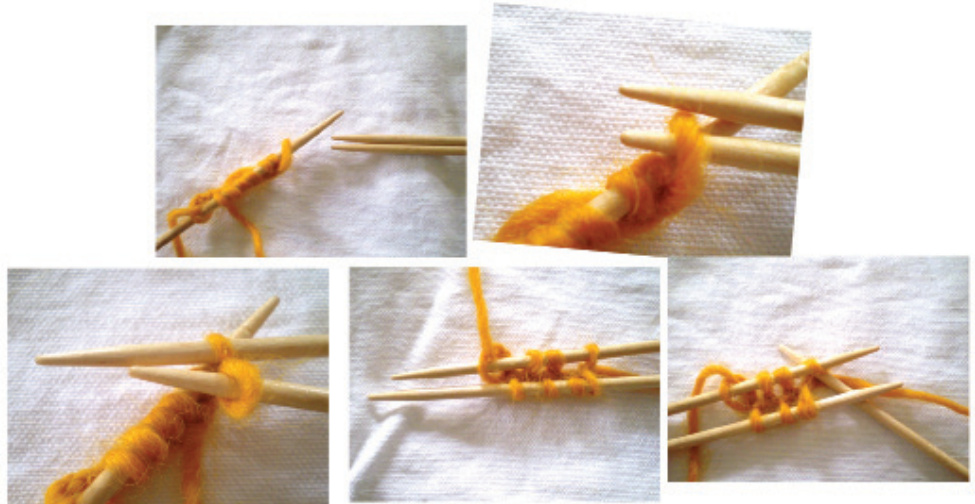
Slip knot Simple toe cast on is a really useful cast on method when you want to knit a 3D pattern in its entirety - that means no sewing up or seaming as this cast on method begins by knitting two sides (be it front and back for eg.) at the same time! You work the entire pattern over two needles with a third needle to knit with and the pattern is generally written referring to first the needle then the second needle. I've written these instructions within the pattern for your ease, however here they are again with diagrams 1. Hold needle with cast on stitches in left hand. 2. Hold 2 empty dpns parallel in right hand. 3. Slip 1st cast on st p-wise onto the dpn closest to you and off the needle in the left hand, then slip the next cast on st onto the dpn farthest away and off the RH needle. Repeat step 3 until all stitches are divided evenly onto the 2 parallel dpns. Slide sts to the other ends of the dpns (see last 2 pics) working yarn at back, begin knitting.
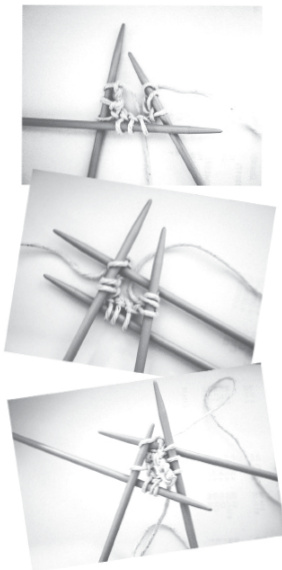
Knitting in the round (rnd) is a process of working seamless knitting, that is not having to sew a seam to join front to back for example. It is working knitting around and around without having a beginning or an end - the start of the piece is however marked by a stitch marker of knotted loop of spare yarn. And it is worked, in the case of these patterns, with four double pointed needles (dpns). To join for working in the round’ begin with two of the double pointed needles and cast on stitches in the normal way then spread the stitches as evenly as numbers will allow dividing them over three of the needles. Arrange the stitches so that the loops are lined up on the top of each dpn, the working section/ cast on edge of the knitting lying beneath the needles and the working yarn to your right, ready to begin to knit - the three rows of cast on stitches are not to be twisted in a spiral around the needls as you link the last cast On stitch with the first cast on stitch by, using your fourth needle, knitting into it. Placing a marker before you knit the first stitch to link/ join the “round’ determines the beginning of the round. Subsequent rounds are worked from the first stitch after the marker up to the last stitch before the marker. This marker you slip onto the right-hand needle before beginning another round. At the end of each rnd you should have the same number of stitches on each needle that you started with. With the first couple of rounds check to see that the stitches are not twisting/ spiralling around the needles, after that you can be reassured that this will not happen. Note: when you are working in the round you never see the Wrong side of the fabric so to make stocking stitch, all rounds are worked all knit (no purling), garter stitc is one round knit, next round purl.
Brackets when you come across these brackets [] in a pattern enclosing an instruction/ number and followed by a number, work the instruction within the bracket the number of times stated. For example: [K5, k2 tog] 5 times means knit 5 sts then knit 2 stitches together - do these two instructions five times. Knit one of the two most basic stitches in knitting. There are other methods - this is the one I adopt: Hold the full needle (the needle with all the stitches on) in your left hand and the empty needle in you right. Insert the tip of the needle in your right hand into the first stitch from left to right, front to back. Wrap the working yarn around the back needle (right-hand needle) counter clockwise. Draw the loop through the stitch at the front of the work - this is the new stitch. Now slide the old stitch from the left needle. Purl the second of the two basic stitches. This is the reverse of a “knitted’ stitch and loops like a horizontal bar. To work a purl stitch, insert the needle from right to left in front of the work with the yarn at the front. Wrap the yarn around the right-hand needle in front of the work counter clockwise as you did for knit'. Draw the loop through the stitch, slide the old stitch off the needle. French knot working this embroidery stitch embellishes the knitting or sewing with texture and fine detail, a French knot is also useful for creating the pupil and highlight for the doll's eye. Thread up a sewing needle with cotton thread or light-weight yarn. With the thread secured at the back of the work, bring the threaded needle through from the back of the work to the front where you want the knot to be. Wrap the yarn around the needle clockwise, three times. Holding the loops in a tight bundle with your thumb and forefinger, pull the needle through the coils by inserting the needle back into the fabric near the base of the knot, not in the same place. Secure the thread at the back of the work. M1 an increase stitch, used primarily a within a row. Knit to where the increase is to occur, in a pattern this will read as k5, m1 - for example, so knit 5 sts, slip the righthand needle front to back, under the horizontal bar that lies before the next stitch, slip left-hand needle through, from front to back, the picked up bar and allow the stitch to remain on the left-hand needle then, with the right-hand needle, knit into the back of the newly made loop to complete the new stitch. Carry on knitting along the row or round unless otherwise stated. P2 tog purl 2 sts together. As purling - insert the needle from right to left in front of the work this time into the next two stitches with the yarn at the front. Wrap the yarn around the right-hand needle in front of the work counter clockwise as you did for ‘purl draw the loop through the two stitches, then slide the remaining stitch off the needle. One stitch decreased. Skpo slip stitch, knit a stitch then pass the slipped stitch over - a simple decrease sometimes used with K2 tog to give an even and balanced decrease at the ends or within a row. Simply work up to where the decrease is to be, for example: K5, skpo, k3 - knit 5 sts, slip the next stitch by inserting the right needle into the stitch as if to knit and moving it over to the right needle without winding the working yarn around it, knit the next stitch (a), then with the left needle, pick up the slipped stitch from the right needle and pass it over the knitted stitch (a) and off the needle to lose' a stitch. One stitch decreased. WT - wrap and turn Bring yarn to front of work between needles, slip next st to righthand needle, bring yarn around this st to back of work, slip st back to left-hand needle, turn work to begin working back in the other direction.


