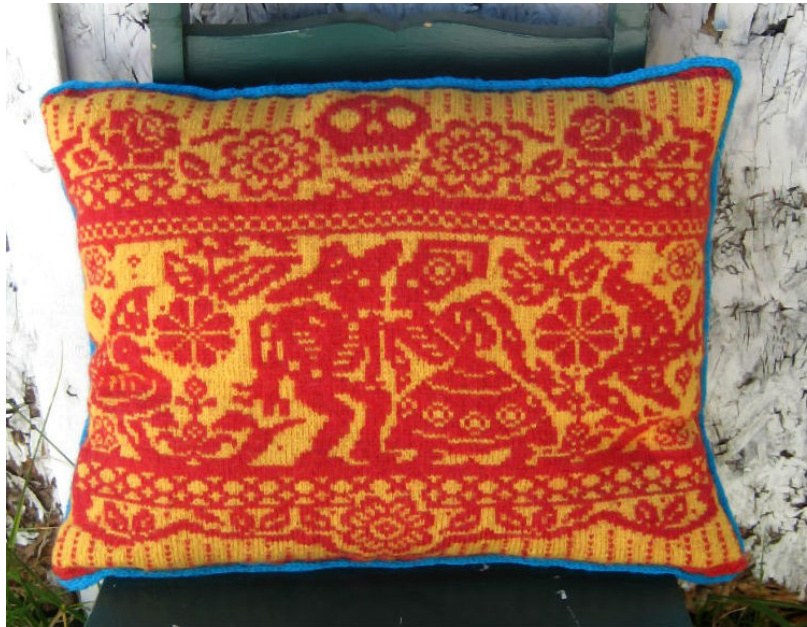
Papel Picado
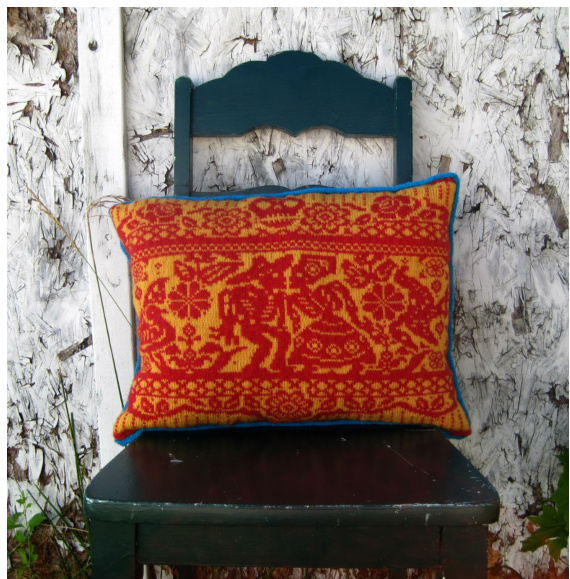
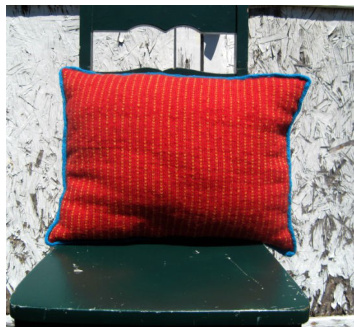
Inspired by the traditional cut paper designs of the Mexican papel picado used to decorate for El Dia de los Muertos, this pillow is a simple tube, knit in the round on a circular needle and seamed on the top and bottom. Tools: one 32 inch size 2 (2.75mm) circular needle, set of 4 size 2 (2.75mm) double pointed needles (all needle sizes are US sizes), optional stitch markers (2), needle to weave in ends. Fiberfill or some other stuffing. Materials: 4 balls of Knit Picks Palette, or other fingering weight yarn, plus 1 partial ball of fingering weight yarn. I used: two balls of Raspberry Heather(color A),two balls of Semolina, (color B), and one partial ball of Whirlpool (Color C). Each ball is 230 yards and 50 g. Gauge: 34 st and 40 rows = 4 inches in Knit Picks Palette. Finished Measurements: 18 x 14.5 inches. Pattern technique: Wrapping: In traditional fair isle knitting, one only carries the unused yarn color behind the knitted work for a few stitches. There are parts of this pattern that require you to carry the unused color behind the knitted work for longer stretches. This can create long “floats" of unused yarn behind your work. Long floats, when incorrectly handled, can screw up your tension causing the fabric to buckle, and can get caught on things. We will avoid having dangling floats by using a wrapping method. When to use the wrapping method: whenever a float is going to be more than about 4-6 stitches long. (this is more often than I would suggest for other items, because this is a hat. but do what feels comfortable to you.) When done carefully, there is no show-through of the unused color. This technique works best if you stagger the wraps so that they don't occur in the same Spot. How to create the wrap: put your right-hand needle into the next stitch as if to knit. Wrap the unused color once over the used color, then knit the stitch color as normal. Tug the unused "wrapped" yarn gently up toward the top and right-hand side of the work. What direction do I wrap the yarn? The wrap works best if you bring the yarn over the top of the used color. However, if you wrap only in one direction, the yarn can become tangled- so sometimes bring the yarn up from underneath. Note: There are some long carries in the chart, but remember that those are all on the inside of your pillow- which will be sewn shut- so if you simply keep a consistent gauge, however you carry your floats, you'll be in great shape.
Abbreviations:
CO cast on DPNS double pointed needles Kknit PM place mark St Stitch PM place marker
Directions for Pillow:
Using circular needle and color A, CO 145 stitches, PM, CO 145 stitches, PM. Join, being careful not to twist. Knit Foundation Row: K two rows. Break color A, Join color B. Using color B, k across front of pillow. Rejoin color A, break color B, knit across back of pillow.
Knit Pillow Body:
Using A and B together, begin working chart 1 on the front of the pillow, and chart 3 on the back. Note that chart 3 has 2 sections- work A and B together once, then repeat part B across the back of the pillow. When you have finished working chart 1 on the front of the pillow, begin working chart 2. The charts are presented horizontally for the sake of size- to knit the pillow, orient the charts right side up, and work them that way. After you have finished both chart 1 and chart 2 on the front of the pillow, work across the back of the pillow so that you are ready to begin a new round. Break color A, Join color B. Using color B, k across front of pillow. Rejoin color A, break color B, knit across back of pillow (just as you did at the beginning). Break color B. K one round with color A. Work bind off row. Weave in any ends. Make I-cord: using DPNS, CO 3 stitches. K an I-cord long enough to go around the perimeter of the pillow ( about 49 inches). Note: To make I-cord: Knit, do not turn. Slide the sts back to the beginning of the DPN and (without turning, ever!) k the row again. Continue working like this until you have the desired length. To finish, break the yarn a few inches from the end of your knitting, k3 together and pul the end through your knitting. Finishing: Using color A, neatly whipstitch the bottom closed. Stuff the pillow to your taste, then whipstitch the top closed, also using color A (you will find that you want to adjust the stuffing as you finish sewing the pillow).
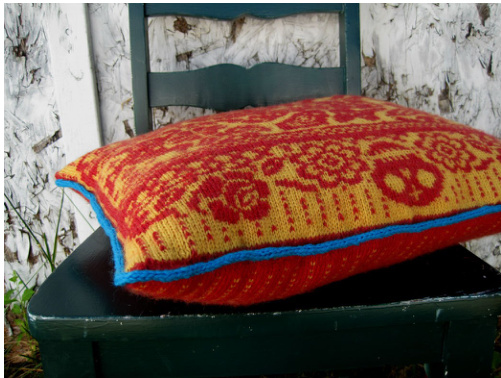
To attach I-cord: Start in the center bottom of the pillow. Using the same color that you used to make the I-cord, attach the I-cord in the following way: lay the I-cord so that it is lined up with the “seam" line demarcating the front and back of the pillow. Using the same yarn as the I-cord, whipstitch through one stitch on the I-cord, an one loop of the first stitch of the back of the pillow. Work around the edge of the pillow in this way, sewing the ends of the I-cord together at the end. Weave in any ends.
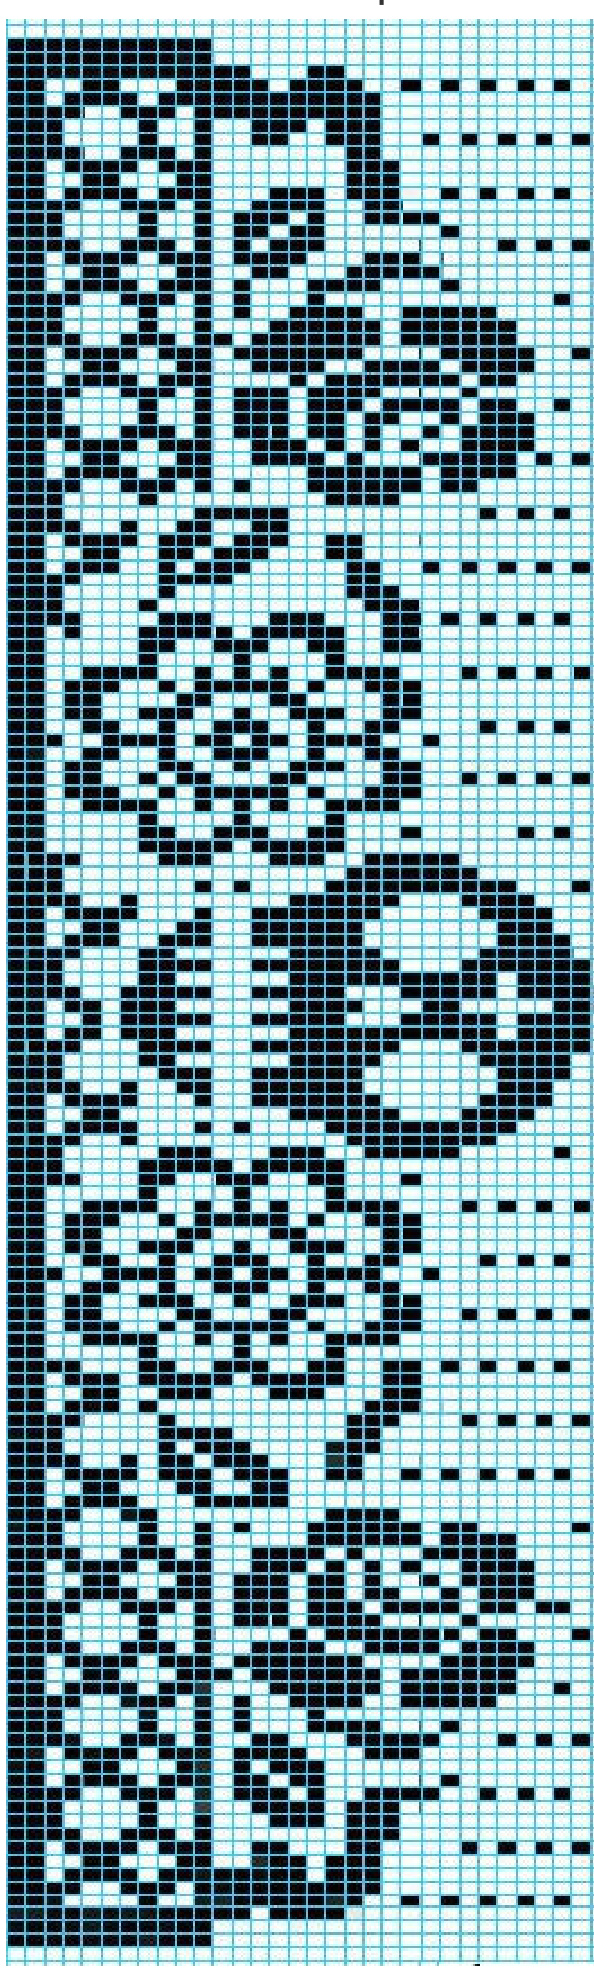
Charts
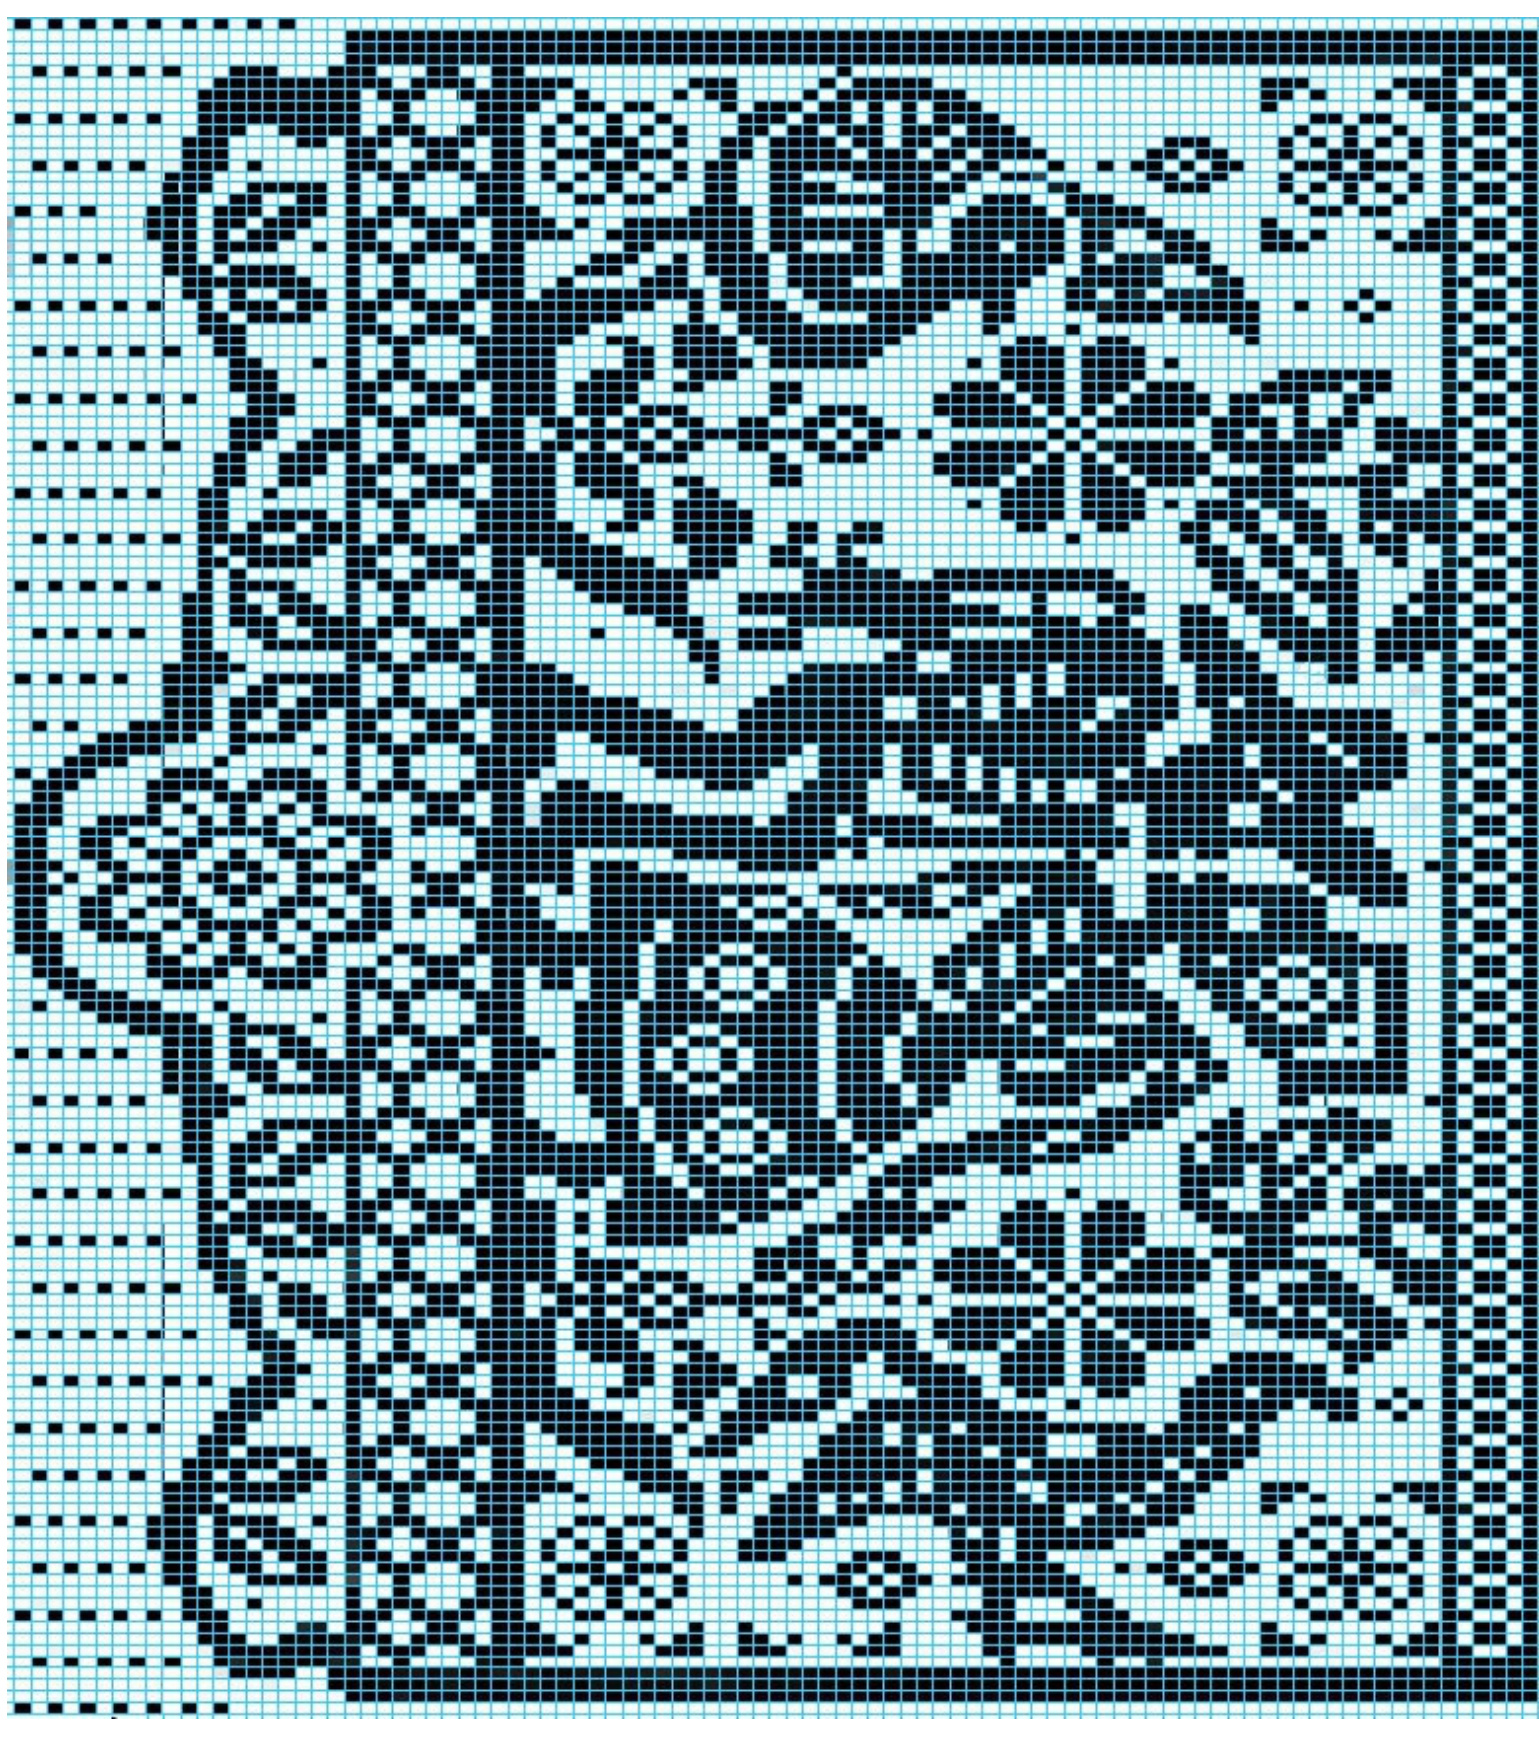
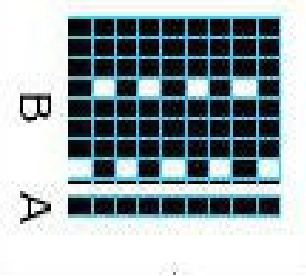
Chart 2- front top