CORINNE'S KNITS
The Shawl Collection
Ederra Shawlette Twirly Wrap
Sunkissed
Agate Capelet
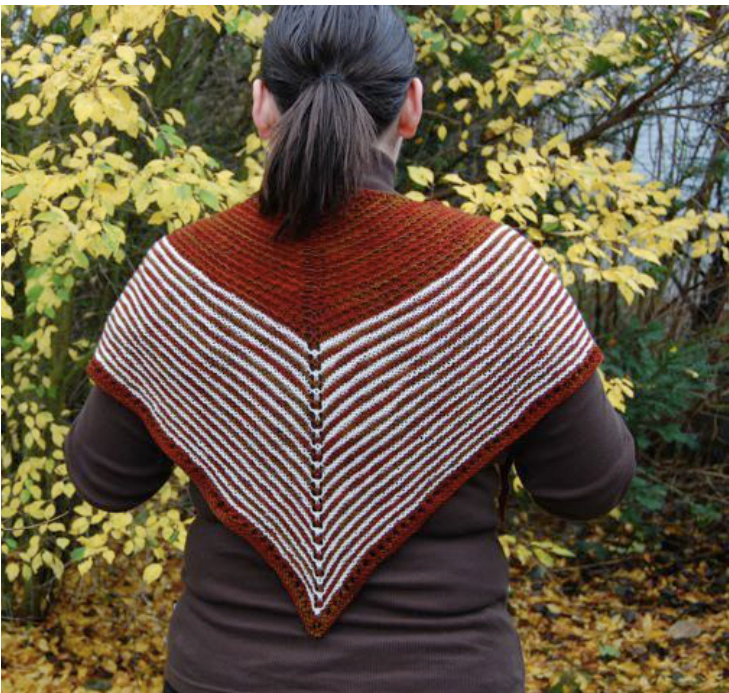
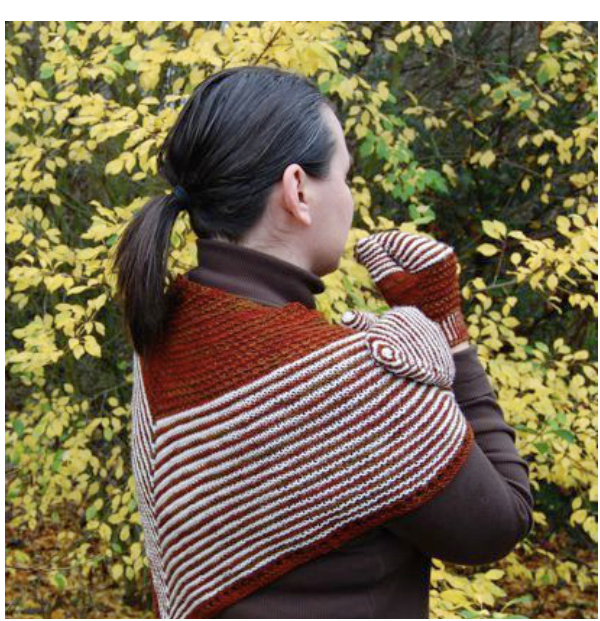
Ederra Shawlette
Description
Ederra is a two-coloured shawlette featuring a lot of texture. It works best with two colours that have a strong contrast. Difficuty Easy
Yarn
Colour A: 260m/285yards Colour B: 146m/160yards of sock yarn Shown in Wollmeise, colourway Spice Market (A) and Sandnes Garn Lanett, colourway Cream(B)
Notions
Needles
4.0mm/US6 circular needle or size needles needed to obtain gauge Accessories 1 darning needle 1 stitch marker Necessary Skills YO, K2tog, Kfb, P2tog Gauge 20 sts x 46 rows / 10 cm - 4" in garter stitch
Sizes
One size fits all 136cm wide x 56cm tall (blocked) 53 1%" wide x 2.2." tall
About The Designer
Corinne's passion for yarn started around age 8 when she started to knit. Today, she especially loves to design with sock yarn. Although French, she lives in Germany with her English partner and their two boys, where she can fully put her second passion, languages, to the test. Her patterns can be found on Ravelry on the Corinne's Knits designer page or on her blog: corinnesknits.wordpress.com. For pattern support, email: corinnesknits@googlemail.com.
Notes
Ederra can easily be made into a full length shawl if you wish. Just increase the length of the starting section and the stripy section accordingly (keeping the same proportions). But, remember that the given yardage is for the pattern as written. The list of abbreviations is available on page 13.
Stitch Pattern
There are three sections in the pattern, each in a different stitch. The first is knit in granite relief stitch, the second in stripy garter stitch and the last in ridged eyelet stitch.
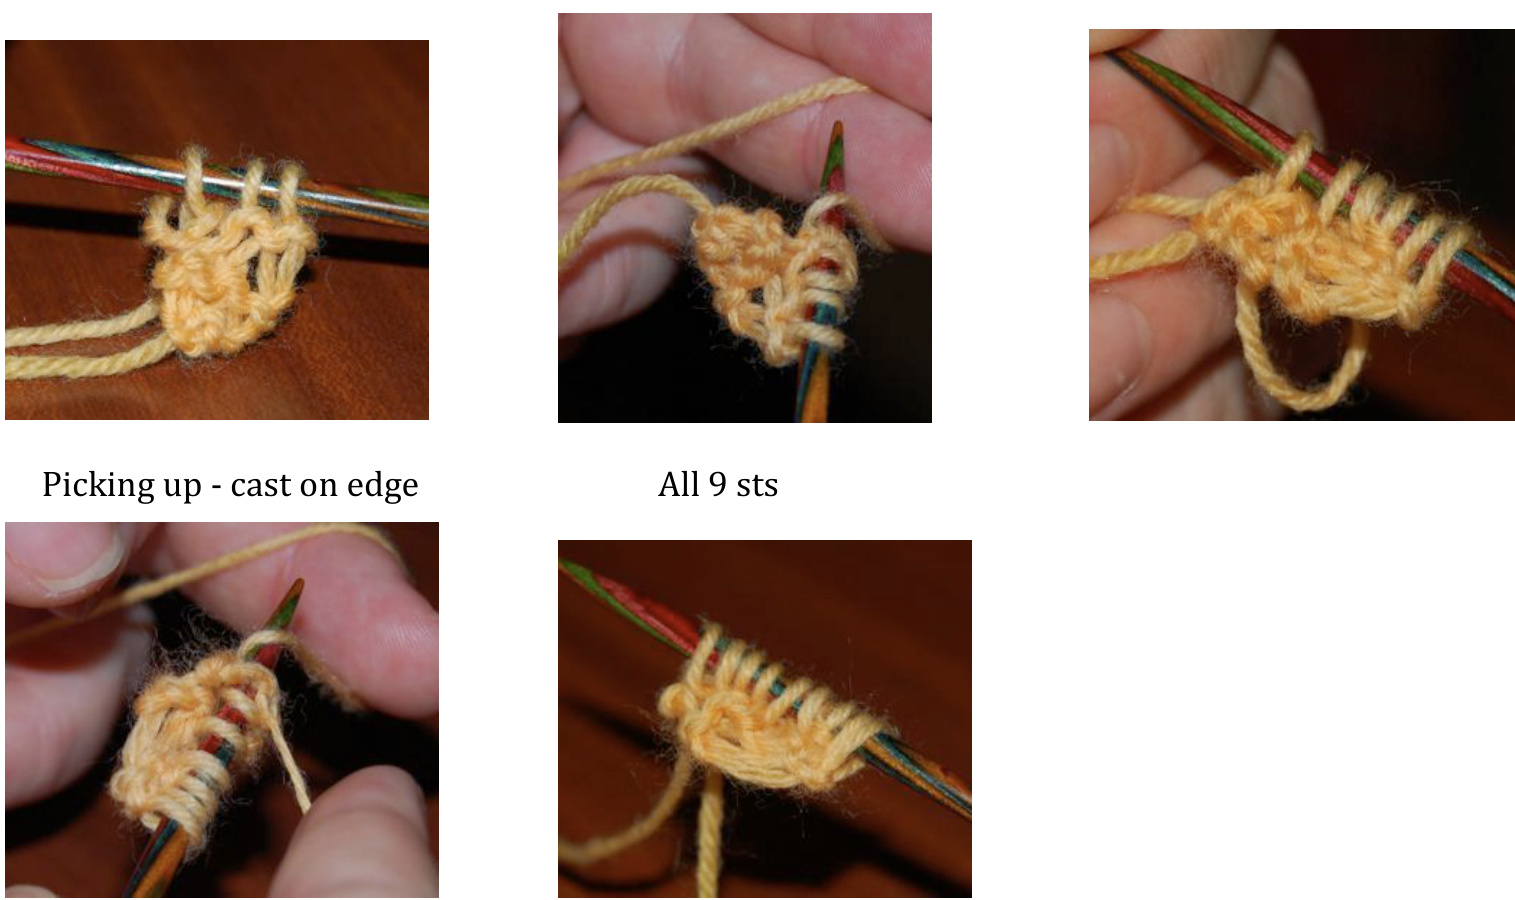
Set up / Garter tab cast on
With colour A, cast on 3 sts and K 6 rows. PU 3 sts from the long edge of the garter st and an additional 3 sts from the cast on edge. You should have a total of 9 sts. K1 row
6 rows K
Picking up - long edge 1st 6 sts
Granite Relief Stitch Section
Row 1 (RS): K3, YO, Kfb, YO, PM, K1, YO, Kfb, YO, K3 Row 2: K3, \*K2tog\* to 1 st before M, K1, SM, \*K2tog\* to last 3 sts, K3 Row 3: K3, YO, \*Kfb\* to M, YO, SM, K1, YO, \*Kfb\* to last 3 sts, YO, K3 Row 4: K3, P to 1 st before M, K1, SM, P to last 3 sts, K3 Row 5: K3, YO, K to M, YO, SM, K1, YO, K to last 3 sts, YO, K3 Row 6: K3, \*K2tog\* to 1 st before M, K1, SM, \*K2tog\* to last 3 sts, K3 Row 7: K3, YO, \*Kfb\* to M, YO, SM, K1, YO, \*Kfb\* to last 3 sts, YO, K3 Row 8: K3, P to 1 st before M, K1, SM, P to last 3 sts, K3 Repeat rows 5-8 another 12 times
Note on colour changing:
When changing colours in the stripy section, I just drop one colour and take the other one, as there are only two rows, nothing more is necessary.
Stripy Section
Row 1: Switch to colour B, K3, YO, K to M, YO, SM, K1, YO, K to last 3 sts, YO, K3 Row 2: K to M, SM, K to end of row Row 3 Switch to colour A, K3, YO, K to M, YO, SM, K1, YO, K to last 3 sts, YO, K3 Row 4: K to M, SM, K to end of row Repeat rows 1-4 another 18 times. Note that this section ends with colour A, the same colour as in the edging.
Edging
The edging is done in colour A Row 1: K3, YO, K to M, YO, SM, K1, YO, K to last 3 sts, YO, K3 Row 2: K3, \*YO, P2tog\* to 1 st before M, K1, SM, \*YO, P2tog\* to last 3 sts, K3 Row 3: K3, YO, K to M, YO, SM, K1, YO, K to last 3 sts, YO, K3 Row 4: K to M, SM, K to end of row Row 5: K3, YO, K to M, YO, SM, K1, YO, K to last 3 sts, YO, K3 Row 6: K to M, SM, K to end of row Cast off. If you are a tight knitter you might want to use a bigger size needle to cast off.
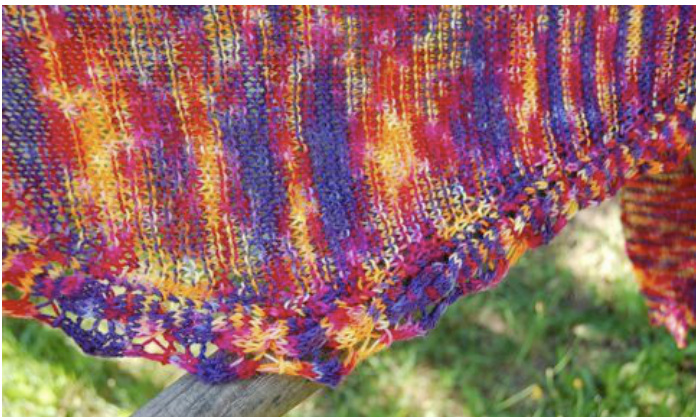
Twirly Wrap
Description
A simple shawlette, knit sideways. I designed it to use only one skein of sock yarn. It is long and pretty short. Difficulty Easy
Yarn
1 skein of sock yarn, approximately 408m/446yards Alternatively, you can weight the yarn you have available and start decreasing once you've used 50%.
Notions
Needles
4mm straight needles (or circular needle) or size needles needed to obtain gauge 1 cable needle Accessories 1 stitch marker Necessary Skills Kfb, easy cable Gauge 24 sts x 40 rows / 10 cm - 4" in garter stitch Size One size fits all 160cm/63" wide x 35cm/14" tall
Notes
This is an easy knit; the cable border is a simple 6 stitches cable perfect for cable beginners. The abbreviations used in the pattern can be found on page 7.
Stitch Pattern
The shawlette is knit sideways. The body is in garter stitch, the border composed of a simple cable. The border pattern is described in the written instructions and also charted (see page 7).
Directions
Cast on 12 sts and K 1 row. (WS)
Increases
Row 1: K1, PM, sl1 pw, K2tog, YO, K6, YO, K2 Rows 2/4/6/8/10/12: sl1 pw, P to last st before M, K1, Sl M, K to end of row Row 3: K to M, SI M, sl1 pw, K2tog, YO, K6, YO, K1, YO, K2tog Row 5: K to 1 st before M, Kfb, Sl M, sl1 pw, K2tog, YO, sl3 sts to cable needle, hold it in front, K3, K3 sts from cable needle, \*YO, K1\* twice, K2tog Row 7: K to M, Sl M, sl1 pw, K2tog, YO, K6, YO, K1, \*K2tog\* twice Row 9: K to 1 st before M, Kfb, Sl M, sl1 pw, K2tog, YO, K6, YO, \*K2tog\* twice Row 11: K to M, Sl M, sl1 pw, K2tog, YO, sl3 sts to cable needle, hold it in front, K3, K3 sts from cable needle, YO, sl1 pw, K2tog, PSS0 These 12 rows will be repeated until half the shawlette is knit. On subsequent repeats, substitute row 1 and replace it by:
Row 1: K to 1 st before M, Kfb, Sl M, sl1 pw, K2tog, YO, K6, YO, K2
Continue this way until you have knit at total of 17 pattern repeats or until you have used half of your available yarn (don't forget to weight it before starting to know exactly when to start decreasing). Then, knit rows 1-8.
Decreases
Resume knitting in pattern starting at row 9 below, then make sure to use the rows from the decrease section when you start your next repeat at row 1. Row 1: K to 2 sts before M, K2tog, Sl M, sl1 pw, K2tog, YO, K6, YO, K2 Rows 2/4/6/8/10/12: sl1 pw, P to last st before M, K1, Sl M, K to end of row Row 3: K to M, Sl M, sl1 pw, K2tog, YO, K6, YO, K1, YO, K2tog Row 5: K to 2 sts before M, K2tog, Sl M, sl1 pw, K2tog, YO, sl3 sts to cable needle, hold it in front, K3, K3 sts from cable needle, \*Y0, K1\* twice, K2tog Row 7: K to M, Sl M, sl1 pw, K2tog, YO, K6, YO, K1, \*K2tog\* twice Row 9: K to 2 sts before M, K2tog, Sl M, sl1 pw, K2tog, YO, K6, YO, \*K2tog\* twice Row 11: Kto M, Sl M, sl1 pw, K2tog, YO, sl3 sts to cable needle, hold it in front, K3, K3 sts from cable needle, YO, sl1 pw, K2tog, PSS0 Continue until you have 12 sts left and cast off. Block shawlette.
Chart
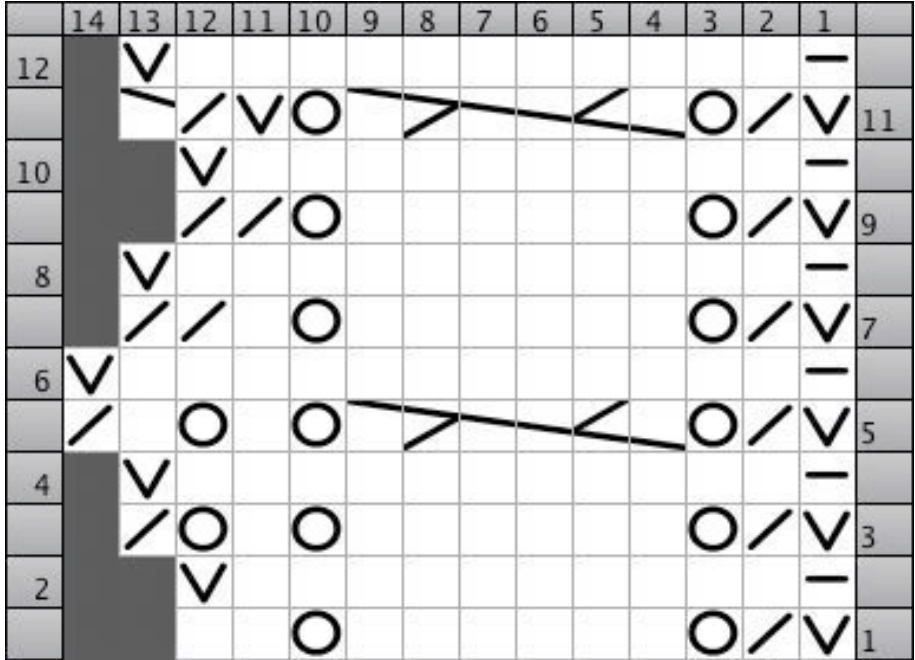
| Key: | |||
| Cable6Left PassSlippedStOver Slip S | |||
| c61 (RS)3sttofront,k3,k3fromcableneedle | (WS)3sttofront,k3,k3fromcableneedle | psso (RS)PassSlippedStitchOverlastKnitStitch (WS)PassSlippedStitchOverlastKnitStitch | |
| Knit k (RS)Knit | |||
| (WS)Purl | Knit2Together k2tog | ||
| Purl D (RS)Purl (WS)Knit | (RS)Knit2stitchestogether (WS)slip,slip,purlslippedststogether | (RS)Slip (WS)Slip NoStitch X (RS)NoStitch (WS)NoStitch YarnOver yo (RS)YarnOver (WS)YarnOver | |
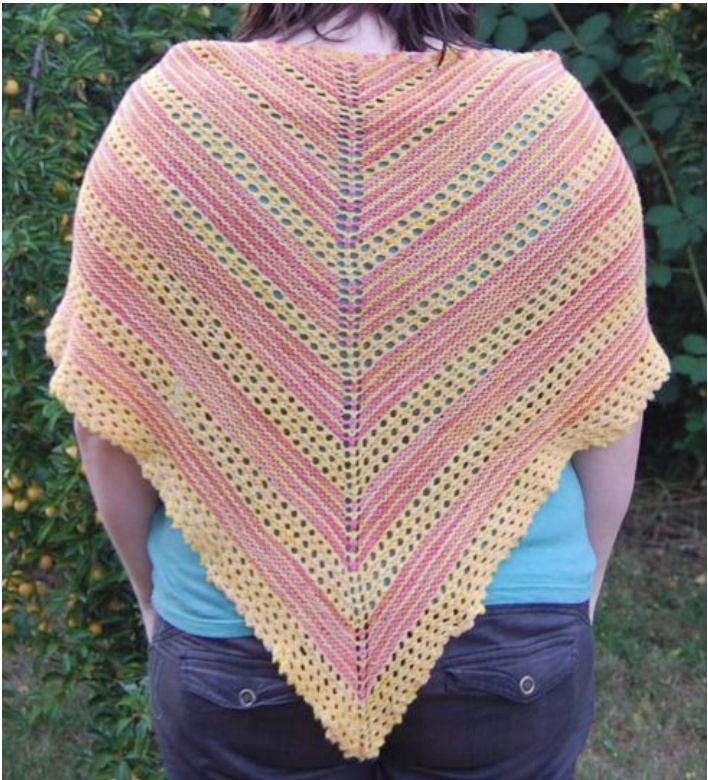
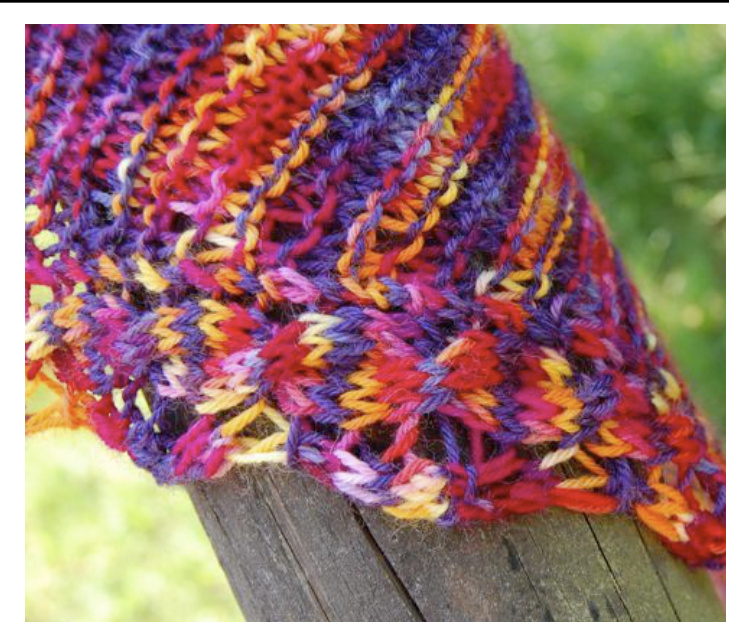
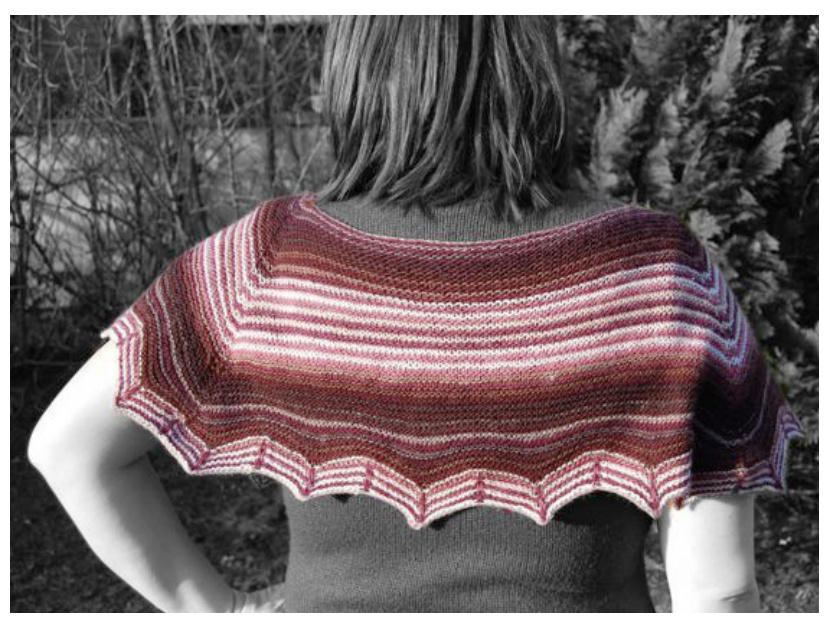
Sunkissed
Description
Sunkissed is a bright and happy garter stitch shawl knit in two colours with lace sections that grow bigger as the shawl grows and a simple picot edging Difficulty Easy
Yarn
Colour A: 410m/448yards Colour B: 185m/202yards of sock yarn Shown in Knit Picks Stroll Tonal, colour ways Golden Glow (A) and Queen Anne (B)
Notions
Needles
4.0mm/US6 circular needle or size needles needed to obtain gauge Accessories 1 darning needle 1 stitch marker Necessary Skills YO, K2tog Gauge 20 sts x 40 rows / 10 cm - 4" in garter stitch Sizes One size fits all 167cm wide x 70cm tall 66" wide x 28" tall
Notes
This is a simple design knit in garter stitch with a very simple lace pattern, ideal for new knitters. You can easily make it smaller or lager by doing more or less lace sections but remember that the given yardage is for the pattern as written here.
Stitch Pattern
The shawl is knit in two-colour garter stitch, the lace sections are made using YO and K2tog. It is finished with a simple picot edging.
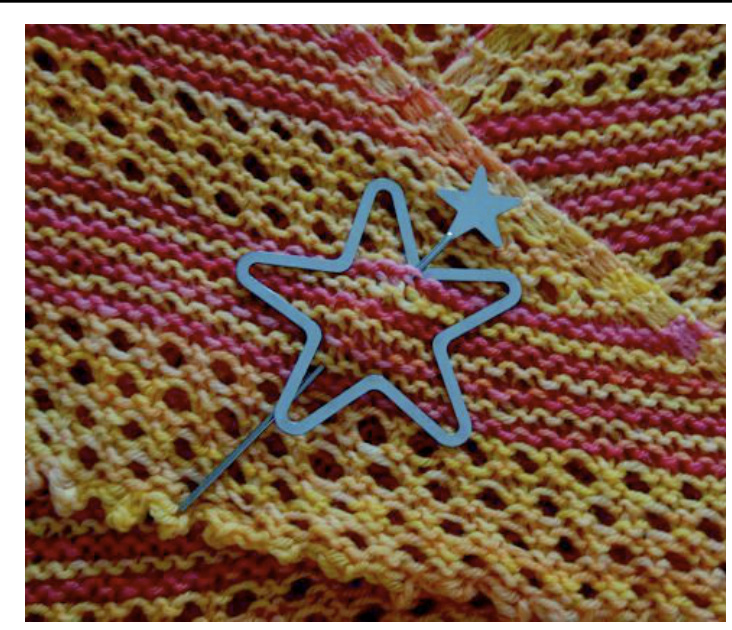
Set up / Garter tab cast on (See photo tutorial on page 3)
With colour A, cast on 3 sts and K 6 rows. PU 3 sts from the long edge of the garter st and an additional 3 sts from the cast on edge. You should have a total of 9 sts.. K1row
Note on colour changing:
When changing colours in the stripy section, I just drop one colour and take the other one, as there are only two rows, nothing more is necessary. When knitting the lace sections, I make colour B "follow" up every other row (beginning of RS). 1 interlock the colours together by simply "hooking" colour B around colour A before knitting the first stitch of the row.
Stripy section
Row 1 (RS): Switch to colour B - K3, YO, K1, YO, K1, YO, PM, K1, YO, K3 Row 2: K to end, slipping M as you encounter it Row 3: Switch to colour A - K3, YO, Kto 1 st before M, YO, K1, YO, SM, K to last 3 sts, YO, K3 Row 4: K to end, slipping M as you encounter it Row 5: Switch to colour B - K3, YO, K to 1 st before M, YO, K1, YO, SM, K to last 3 sts, YO, K3 Row 6: K to end, slipping M as you encounter it Rows 7-14: Repeat rows 3-6 another two times.
Lace repeat
Row 15: Switch to colour A - K3, YO, K to 1 st before M, YO, K1, YO, SM, K to last 3 sts, YO, K3 Row 16: K to end, slipping M as you encounter it Row 17: K3, YO, \*K2tog, YO\* repeat to 2 sts before M, K1, YO, K1, YO, SM, \*K2tog, YO\* to last 4 sts, K1, YO, K3 Row 18: K to end, slipping M as you encounter it

Repeat rows 1-18 another time, replacing the original row 1 with this one: Row 1: Switch to colour B - K3, YO, K to 1 st before M, YO, K1, YO, SM, K to last 3 sts, YO, K3 From this point, always use this new row 1! The pattern continues in the same manner, alternating stripy sections and lace sections. Up to this point, you have knit 1 stripy section, 1 lace repeat, 1 stripy section, 1 lace repeat. The 2 next lace sections will be made of 2 lace repeats, the following 2 of 3 lace repeats and the last one before the edging of 4 lace repeats. So, the pattern goes: 1 Stripy section - 1 Lace section of 1 repeat 1 Stripy section - 1 Lace section of 1 repeat 1 Stripy section - 1 Lace section of 2 repeats 1 Stripy section - 1 Lace section of 2 repeats 1 Stripy section - 1 Lace section of 3 repeats 1 Stripy section - 1 Lace section of 3 repeats 1 Stripy section - 1 Lace section of 4 repeats Edging
Edging
The edging is done in colour A \*Cast on 2 sts using cable cast on1. Then bind off 4 sts using the standard method2. Slip the single st on the right hand needle back onto the left hand needle.\* Rep to end of row.
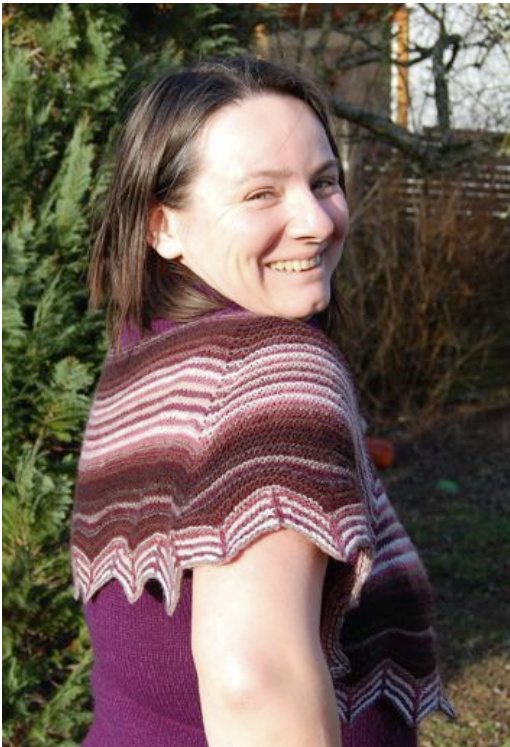
Agate Capelet
Description
This capelet is made out of two different colourways of sock yarn. I designed it specifically with the Zauberball in mind, but any sock yarn with long colour repeats will have the same effect. Of course, you can also use two plain colours. It is named after the stone agate. A geologist pointed out to me that it looked like an agate, so Agate it had to be. Difficulty Easy
Yarn
Size S/M: 245m/265yards of colour A & 220m/240yards of colour B Size L/XL: 260m/290yards of colour A & 245m/270yards of colour B of 4 ply sock yarn Shown in Schoppel-Wolle Zauberball, colourways Brombeeren & Schokocreme
Notions
Needles
4mm (US 6) circular needle, Darning needle or size needles needed to obtain gauge Accessories 4 stitch markers 1 button, approximate diameter 3cm/1.2" Necessary Skills Kfb, M1, slipped sts Gauge 18 sts x 32 rows / 10 cm - 4" in garter stitch (blocked). 22 sts unblocked
Sizes
Woman S/M - Width about 110cm, Height about27cm Woman L/XL - Width about 128cm, Height about 31cm
Notes
For the M1, here is a good tutorial: http://fibernacci.blogspot.com/2008/12/m1-tutorial.html. I recommend using the second method.
Stitch Pattern
The body of the capelet is knit in garter st, every row is K. The last st of every row is slipped for a better finish on the border. The edging stitch is described in the directions and charted (on page 13).
Body
Cast on 92(120) sts with colour A Row 1: K to last st, Sl st pw Change to colour B Row 2 (RS): K18(23), Kfb, PM, K1, Kfb, K4(8), Kfb, PM, K1, Kfb, K36(46), Kfb, PM, K1, Kfb, K4(8), Kfb, PM, K1, Kfb, K17(22), Sl st pW Row 3 (WS): Kto last st, sl st pw. SI M along the way Change to colour A Row 4 (RS): \*K to 1 st before M, Kfb, SM, K1, Kfb\* repeat until last st, Sl st pw Row 5 (WS): K to last st, Sl st pw. Sl M along the way Repeat rows 4 & 5 another 35(37) times, alternating colours every two rows, i.e. switching colour before repeating row 4. You should have 388(432) sts total; 56(63) - 81(89) - 113(127) - 81(89) - 57(64) sts in each section

At the same time, at 1.5cm/0.6" from the cast on edge, on a RS row: K5, cast off 3 sts, continue as row 4. On the next row, K to the cast off sts, cast on 3 sts, K to last st,SI stpw When you have 388[432) sts, repeat row 4, adding an extra st by doing an M1 somewhere in the middle of the work. You should then have 397(441) sts Next row: K to last st, Sl st pw. Remove M along the way Edging (chart on page 3) Row 1: K1, SSK, K8, M1, K1, M1 \*K8, SSK, K1, K2tog, K8, M1, K1, M1\* repeat to last 11 sts, K8, K2tog, K1 Row 2 & 4: K11 \*Sl 1 st pw wyif, K10\* repeat to last st, K1 Row 3: K1, SSK, K8, M1, Sl 1 pw wyib M1 \*K8, SSK, Sl 1 st pw wyib, K2tog, K8, M1, Sl1 pw wyib, M1\* repeat to last 11 sts, K8, K2tog, K1 Repeat rows 1-4 another 2 times. Cast off row: repeat row 1, working the increases and decreases as written. Cast off loosely! (if you are a tight knitter, it might be useful to use bigger needles to cast off) Break yarn. With darning needle, weave yarn through last st, pull and weave in. Block capelet.
Edging Chart
| 454443424140393837363534333231302928272625242322212019181716151413121110987 | 一 | 一 | A一一 | 65 | 43 | 2 | |||||||||||||||||||||||||||||||
| 4 | 一一一一一一 | 一 | |||||||||||||||||||||||||||||||||||
| M | AI M | M | A M | 3 | |||||||||||||||||||||||||||||||||
| 2 | 一一一一一一 | 一 | + | 一 | 一一一一一 | 一一一一一一一 | 一 + | 一 M | 一一一一一 | ||||||||||||||||||||||||||||
| M | M | M | 1 |
Greyed area is repeated
| Abbreviations | ||
| Circ - Circumference | Kfbf - Knit in the front, back & | Sl - Slip |
| unstretched | front of the stitch (inc 2 sts) | Sl M - Slip marker/s |
| Dec - Decrease | M - Marker/s | SSK - Slip, Slip, Knit |
| DPN(s) Double pointed | M1 - Make 1 | st(s) - Stitch(es) |
| needle(s) | P - Purl | st st - Stocking Stitch |
| Inc - Increase | P2tog - Purl two stitches | (Stockinette) |
| K - Knit | together | tbl - through back loop of st |
| K2tog - Knit two stitches | PM - Place marker | WS - Wrong side |
| together | pw - purl wise | wiyb - with yarn in back |
| Kfb - Knit in the front and | PU - Pick up | wiyf - with yarn in front |
| back of the stitch (inc. 1 st) | ||
| Rd - Round RS - Right side | YO -Yarn over | |


