Unicorn Taxidermy
Gauge: Not important, just be sure to use a needle that makes a very tight gauge for your yarn. I used a worsted weight and US 4 (3.5 mm) needle to obtain this.
Materials
Unicorn
Any worsted weight yarn. At least 50% wool is recommended. Sample shown uses 100% wool with acrylic as accents. I used white for my main color and light brown for the horn, acrylic in pink, green, blue, purple, orange, and yellow were used for the mane and Fair Isle chart. You can use whatever colors you want. Circular needle: US 4 (3.5 mm) or whatever needle size you need to get a very tight gauge. Tapestry needleforweaving in ends 3 stitch markers 1 is for marking the beginning of a round and two are for marking the beginning of the Fair Isle chart (optional). Embellishments: nose, eyes, and mouth. I chose to needle felt mine (if you chose to do so you will need wool and a felting needle). You may embroider them, use buttons or whatever you prefer.
Plaque
I made mine from paper mache. Instructions are included. You may choose to use wood or other item for the background but if you are choosing paper mache, the materials you will need are: Protected surface (a table covered in newspaper or disposable plastic table cloth) Newspaper cut into strips (2" x4" strips work well, but don't get crazy measuring, I usually just rip them as I go) Cardboard (I used a Bisquick box) Flour Water Something to stirwith (I used a fork) Bucket (I used an old ice cream bucket) Rack for drying (if you don't have a cooling wire rack you can always just put your wet plaque in a laundry basket untilit dries) Ribbon for hanging up your plaque Stapler Paints Paint brushes Sealant (optional-you can use modge podge or a glossy spray)
PaHtern Notes
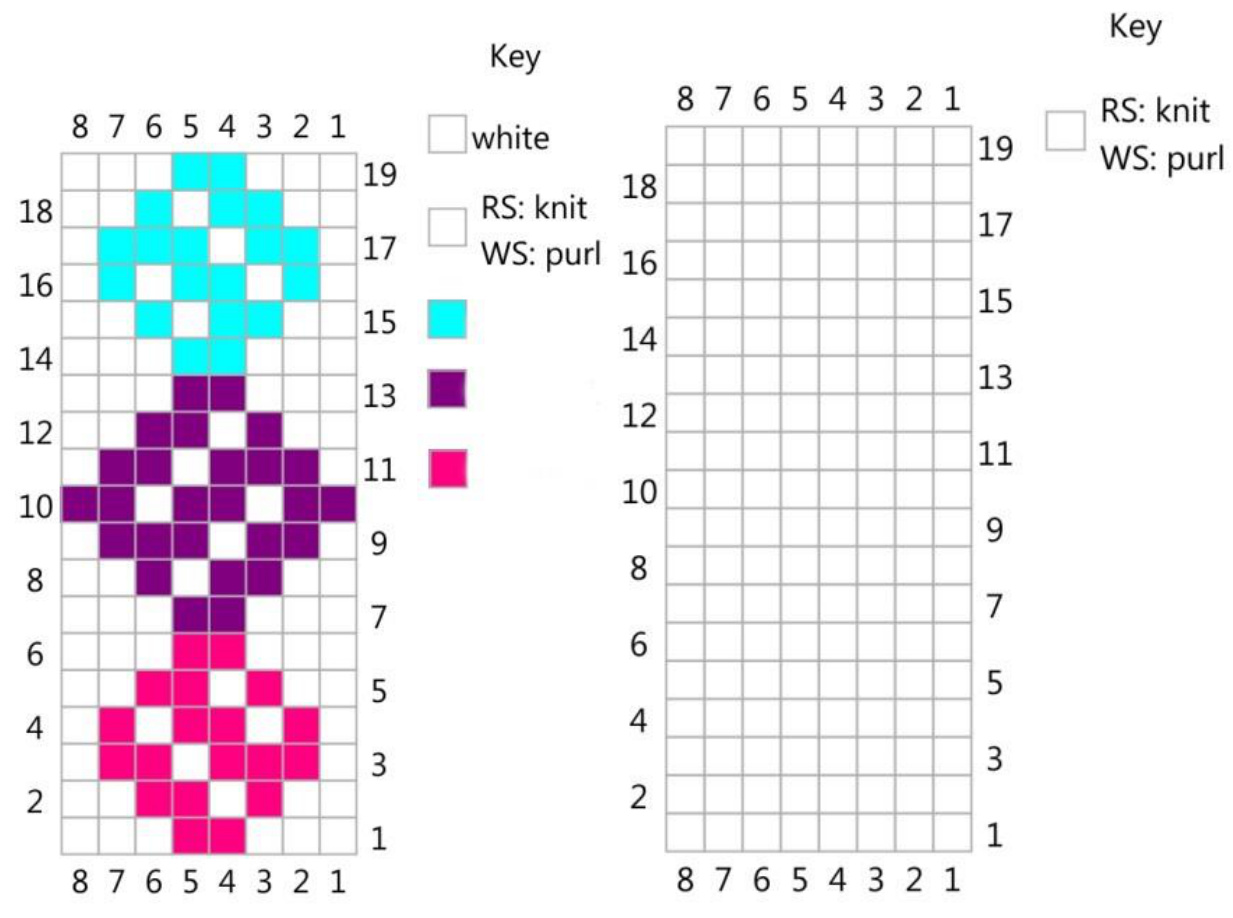
Rows that are in bold are short rows, you will not be finishing the entirety of that row or you will be starting in the middle of a row. The short rows are written as if using German Short Rows (with the use of the double stitch). You can, however, use wrap and turn if you prefer, just wrap and turn at the end of a row and instead of a ds, you will knit or purl. The placing of stitch markers is optional; I found it useful when working the Fair Isle chart. In the neck and head, you will work flat for a short time to work the Fair Isle chart. You will find that you will still need to use the magic loop technique until you complete a few rows because the work curves around. This is normal. It is much easier to work Fair Isle flat than even trying it in the round, so that is why this method is chosen. When stuffing, always stuff on the lighter side, many people make the mistake of over stuffing and then you get weird lumps, the stockinette starts to stretch and you can see stuffing through the little holes and it just looks‘weird.' There are a LoT of photos at the end of this pattern for visual reference. Take care, when printing, if you do not want to waste a ton of ink you may want to leave the last few pages off. I have included a blank Fair Isle chart for you in case you want to really customize your unicorn. Just remember to not have more than 4-5 squares of any one color. of your head by using bigger needles and double strands, or a lighter weight yarn and smaller needles.
Stitches and cAbbreviations
DS-double stitch: This is a stitch that you do at the beginning of every short row. This means, that the row that was prior to a row that begins with a ds was not worked all the way to the end or beginning. The reason you work the first stitch in this manner is so that you do not have a hole in your work that you would get from knitting the first stitch after turning in the middle of a row. To work the stitch: Bring yarn to front, insert right needle into next stitch on left needle, keeping right needle in the stitch, bring yarn to the back, pulling on the stitch gently (not too tight but not too loose), remove left needle from the stitch, keeping gentle tension on the yarn. You will see that the two legs of the stitch are upwards making it look like two stitches even though it is only one. This will be worked as one stitch when you come to it again. If you are worried you will not remember which stitch it is, feel free to mark the stitch with a stitch marker. For video instruction: http://youtu.be/XbNkM-H8pk4
Neck and Head:
With main color: Cast on 60, divide stitches evenly (30 per side) and join for working in the round placing a stitch marker to mark the beginning of round. 1. K 2. Decrease round: ssk, kto two stitches before the end, k2tog (58) 3. K 4. Decrease round: ssk, k to two stitches before the end, k2tog (56) 5. K 6. Decrease round: ssk, k to two stitches before the end, k2tog (54) 7. K 8. Decrease round: ssk, k to two stitches before the end, k2tog (52) 9. K 10. Decrease round: ssk, kto two stitches before the end, k2tog (50) 11. K 12. Decrease round: ssk, kto two stitches before the end, k2tog (48) 13. K 14. Decrease round: ssk, kto two stitches before the end, k2tog (46) 15.K 16. Decrease round: ssk, kto two stitches before the end, k2tog (44) 17.K 18. Decrease round: ssk, kto two stitches before the end, k2tog (42) 19.K 20. Decrease round: ssk, k to two stitches before the end, k2tog (40) 21. K30 22. Ds, p19 23. Ds, k18 24. Ds,p17 25. Ds, k16 26. Ds, p15 27. Ds, kto end of round 28. K 29. K1, kfb, k36, kfb, k1 (42) 30. WORKING FLAT (so you will be turning after ev row) until noted otherwise: P 31. K1, kfb, k15, PM, work row 1 of chart, PM, k15 kfb, k1 (44) 32. P18, work row 2 of chart, p18 33. K18, work row 3 of chart,k18 34. LEFT CHEEK SHAPING: p12 35. Ds,k11 36. P11 37. Ds,k10 38. P10 39. Ds,k7, k2tog (43) 40. P2tog, p15, work row 4 of chart, p18(42) 41. RIGHT CHEECK SHAPING: k12 42. Ds, p11 43.K11 44. Ds, p10 45. K10 46. Ds, p7, p2tog (41) 47. K2tog, k15, work row 5 of chart, k16 (40) 48. P16, work row 6 of chart, p16 49. K1, ssk, k13, work row 7 of chart, k13, k2tog, k1 (38) 50. P2tog, k13, work row 8 of chart, k13, p2tog (36) 51. K14, work row 9 of chart, k14 52. P2tog, p12, work row 10 of chart p12, p2tog (34) 53. K13, work row 11 of chart, k13 54. P2tog, p11, work row12of chart, pl1, p2tog (32) 55. K1, ssk, k9, work row 13 of chart, k9, k2tog, k1 (30) 56. P2tog, p9, work row 14 of chart, p9, p2tog, (28) 57. K10, work row 15 of chart, k10 58. P2tog, p8, work row 16 of chart, p8, p2tog, (26) 59. K9, work row 17 of chart, k9 60. P9, work row 18 of chart, p9 61. K1, kfb, k7, work row 19 of chart, k7, kfb, k1 (28) 62. Join again for working in the round (you can remove stitch markers now) and split your stitches between two needles (14 per side). K 63. K1, kfb, k24, kfb, k1 (30) 64. K 65. Ssk, k7, ssk, k8, k2tog, k7, k2tog (26) 66. Ssk, k5, ssk, k8, k2tog, k5, k2tog (22) 67. K 68. Ssk, k3,ssk, k8, k2tog, k3, k2tog (18) 69. K 70. Ssk, k1, ssk, k8, k2tog, k1, k2tog (14) 71. K2tog around cut the yarn and pull through all 7 loops and then secure tightly. You may want to pullit through the loops a few times to be sure it doesn't loosen up at all. Sew the portion of the head that was worked flat closed (I just whip stitched the edges together).
Horn
With yellow: cast on 24 and join for working in the round (12 stitches per side) and place a stitch marker to mark the beginning of round. 1. K 2. K3, p1, k11, p1, k8 3. K4, p1, k11, p1, k7 4. K5, p2tog, k10, p2tog, k5 (22) 5. K6, p1, k10, p1, k4 6. K7, p1, k10, p1, k3 7. K8, p1, k10, p1, k2 8. K9, p2tog, k9, p2tog (20) 9. P1, k9, p1, k9 10. K1, p1, k9, p1, k8 11. K2, p1, k9, p1, k7 12. K3, p2tog, k8, p2tog, k5 (18) 13. K4, p1, k8, p1, k4 14. K5, p1, k8, p1, k3 15. K6, p1, k8, p1, k2 16. K7, p2tog, k7, p2tog (16) 17. P1, k7, p1, k7 18. K1, p1, k7, p1, k6 19. K2, p1, k7, p1, k5 20. K3, p2tog, k6, p2tog, k3 (14) 21. K4, p1, k6, p1, k2 22. K5, p1, k6, p1, k1 23. K6, p1, k6, p1 24. P2tog,k5,p2tog,k5 (12) 25. K1, p1, k5, p1, k4 26. K2, p1, k5, p1, k3 27. K3, p1, k5, p1, k2 28. K4, p2tog,.K4, p2tog (10) 29. P1, k4, p1, k4 30. K1, p1, k4, p1, k3 31. K2, p1, k4, p1, k2 32. K3, p2tog, k3, p2tog (8) 33. P1, k3, p1, k3 34. K1, p1, k3, p1, k2 35. K2, p1, k3, p1, k1 36. K3, p1, k3, p1 37. P2tog, k2,p2tog,k2 (6) 38. K1, p1, k2, p1, k1 39. K2, p1, k2, p1 40. P1, k2, p1,k2 41. K1, p2tog, k1, p2tog (4) break yarn and pull through loops on needle and secure. Set aside
Ears
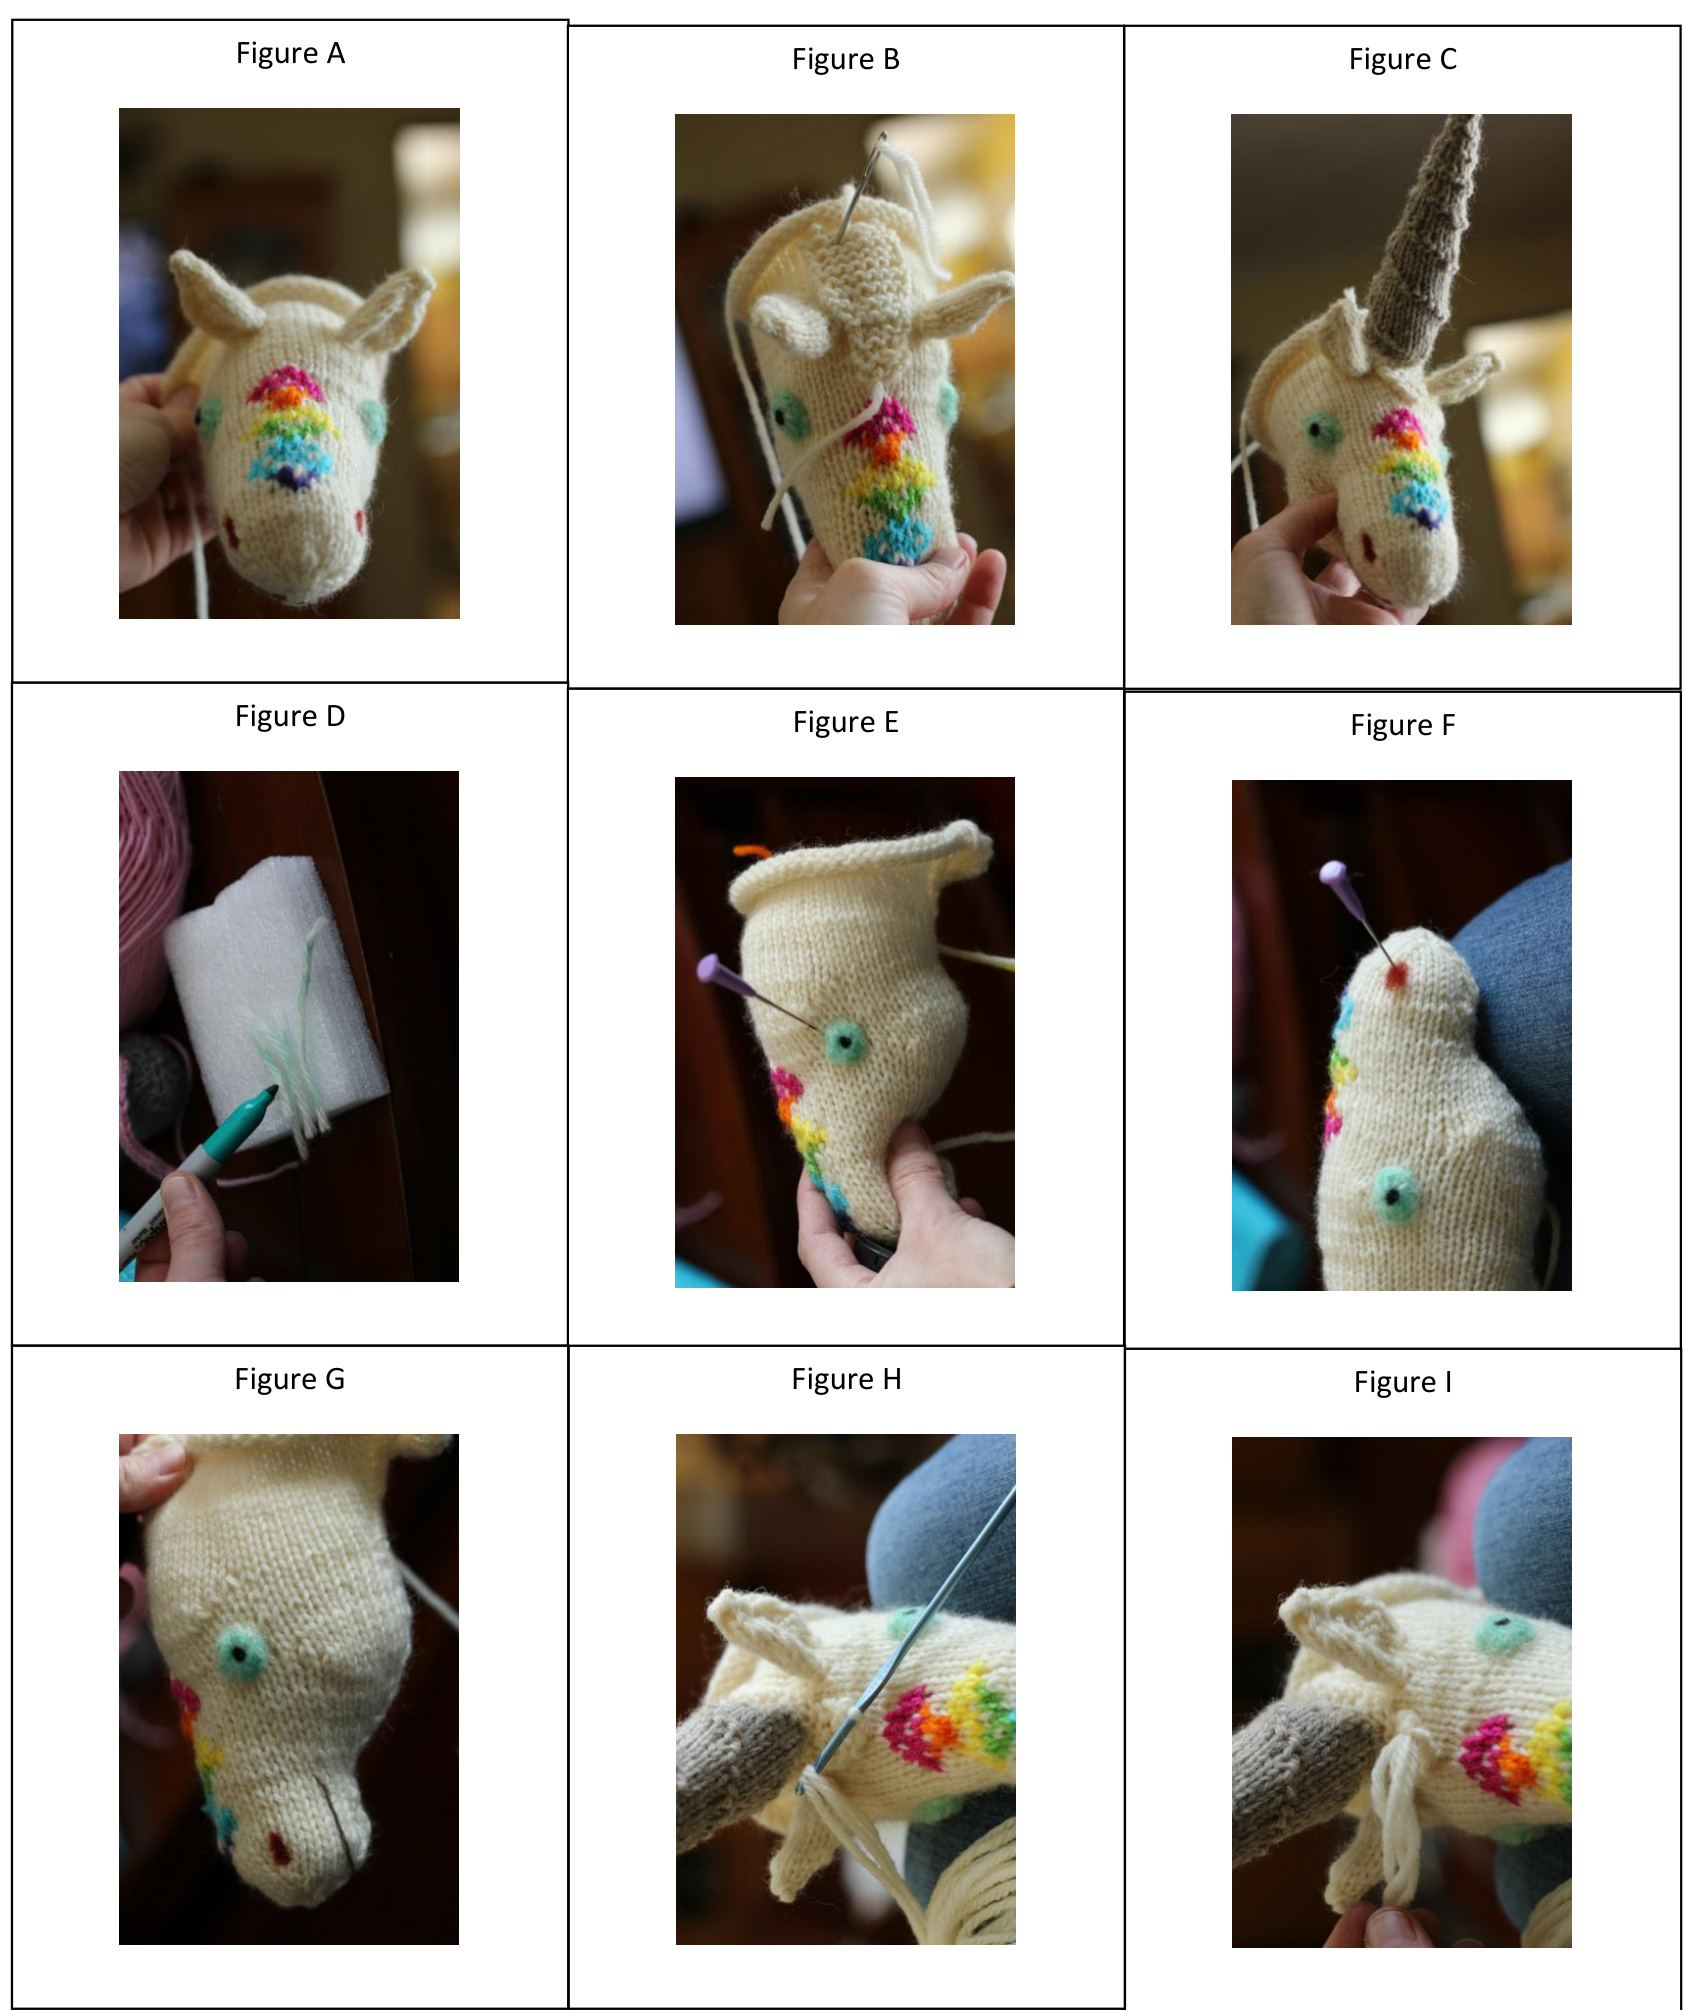
With MC, CO 14 and divide to 7 stitches per needle, join for working in the round, placing SM to mark beginning of round 1. K 2. K 3. Kfb, k6, kfb, k6 (16) 4. K2, p4, k10 5. Repeat round 4 6. Ssk, p4,k2tog,k8 (14) 7. K1, p4, k9 8. K1, (p2tog) x2, k9 (12) 9. K1, p2, k9, (readjust on needles if needed) 10. Ssk, k2tog, k8 (10) 11. K2tog, around (5) break yarn and pull through loops. Sew ears onto head. (See Figure A for placement). Mane (worked ingarte stch) With color for mane, (sample shown used white) cO 4 1.-6.K 7. KFB, k2, kfb (6) 8.-10. K 11. kfb, k4, kfb (8) 12 .-22.K BO, leaving a long tail for sewing. Sew mane onto head between ears (see Figure B for placement).
Finishing
Stuff horn and sew horn onto mane. (See Figure C for placement). Sew eyes onto head (I found that stuffing the head at this time was helpful to find out just where I wanted those eyes). I chose to needle felt some eyes. I just used my white wool and used a sharpie to color it a little and then shaped them into eyes. I also used some black for the pupil. For the nostrils I used red and the mouth I used one long strand of brown and shaped it into a mouth all with my felting needle. You may use the same method or embroider them on as you see fit. (see figures D-G). Using a crochet hook and yarn cut into about 10" lengths, tie some strands onto the purl ridges of you mane section. You may then unravel the yarn if you desire to make it look more ‘wild.' (see figures H-l).
Plaque
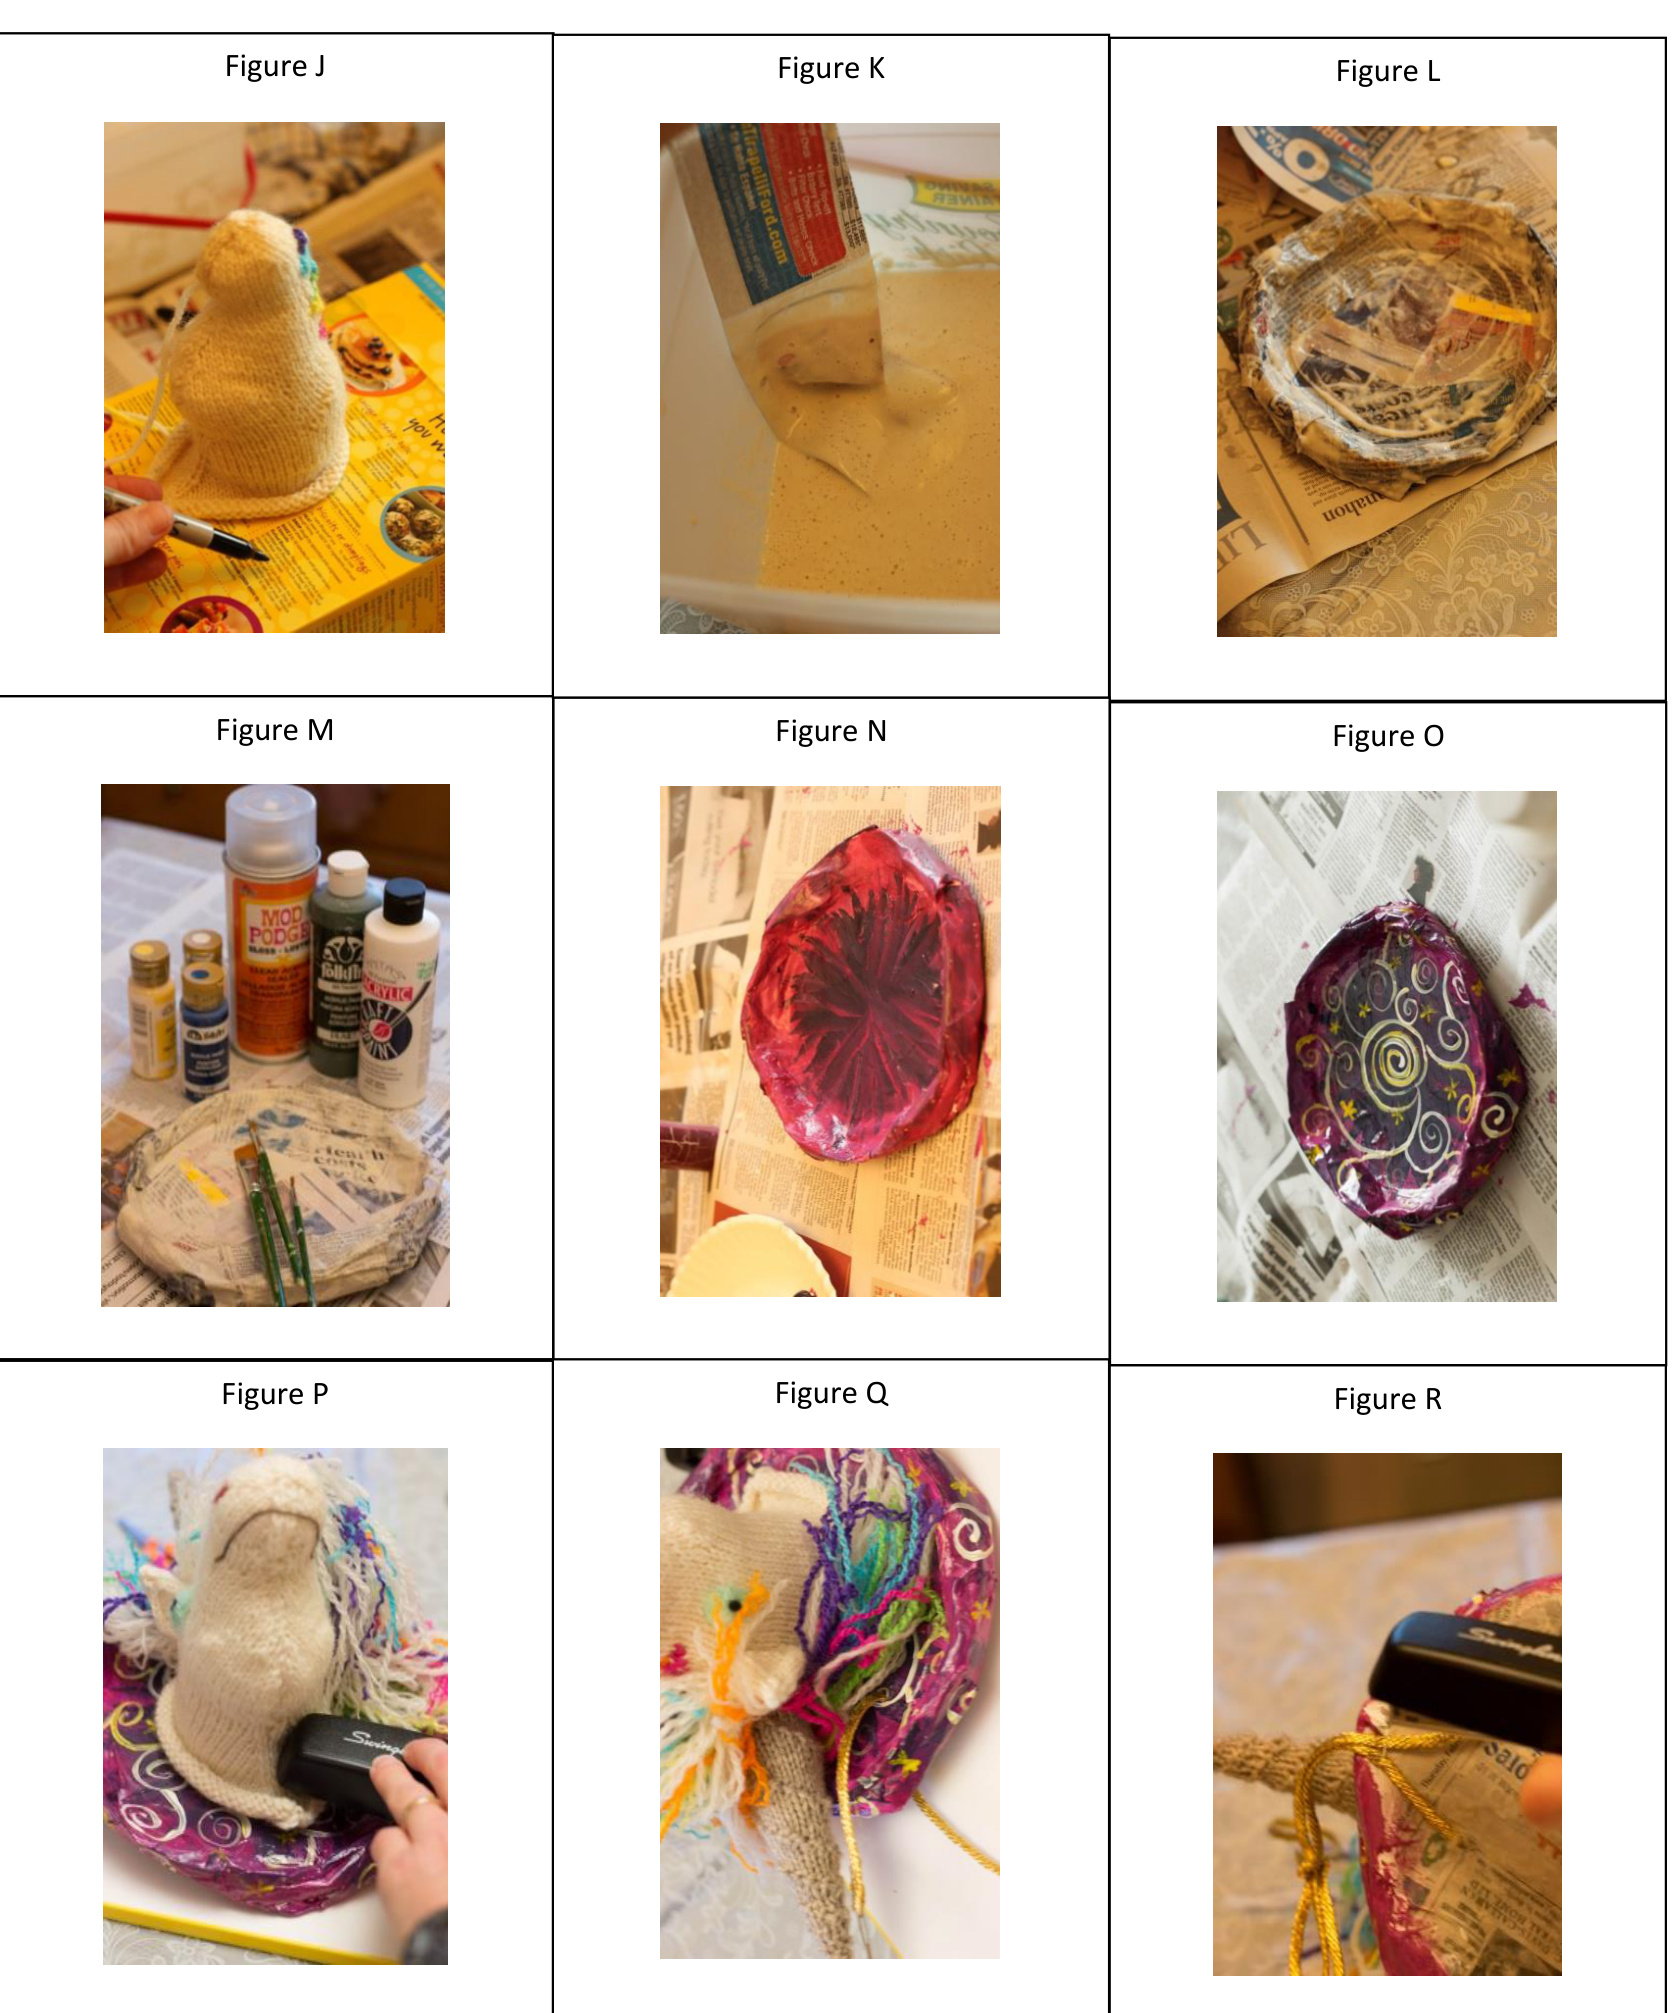
If you have never done paper mache before, I hope you find it as fun as I do. I always make a pinata for my children's birthdays, and it is always a huge event-usually taking a whole month to finish. This will be a simple little project that hopefully will take you a LOT less time! You will need to prepare an area-I like to use plastic table cloth that comes in rolls at party stores. I always have it on hand, it's water proof and it is nice and cheap and you can just throw it away along with allthe garbage that is usually on top of it when you are done. You could also just line the area in newspaper. You willalso need: Newspaper cut into strips (2" x 4" strips work well, but don't get crazy measuring, I usually just rip them as I go) Cardboard (l used a Bisquick box) Flour Water Something to stir with (l used a fork) Bucket (I used an old ice cream bucket) Rack for drying (if you don't have a cooling wire rack you can always just put your wet plaque in a laundry basket until it dries) Cut your cardboard to be about the size that you want your plaque. I wanted mine a few inches on each side bigger than my unicorn (see figure J). Mix the flour and water-the amounts used do not have to be precise. I usually start with one cup water and one cup flour, but add more water until I like the consistency which should be like runny pancake batter. Start dipping your newspaper strips into the mixture and put them onto your cardboard plaque (see Figure K), smoothing them out as you go. I used a little bit of newspaper rolled up lightly and made a nice little ridge around the outside (see figure L). Set your plaque on your drying rack and let it dry. It may take a day or two. You can cheat and put a fan on it, it really does help speed the process up a bit. After it is dry you can repeat the above steps and add more strips of paper to fix up any areas you do not like or you can just move on to painting. Ilike to use Folk Art acrylic paints and then either modge podge for a clear coat or I'll use a glossy spray coat to give it a nice finished look (see Figure M-o). After the plaque is dry it is time to put your unicorn onto your plaque. Stuff your unicorn if you haven't already done so and begin stapling the unicorn to the plaque,just inside the part where the neck rolls so when it is stapled, the stockinette rolls over the staple (see Figure P). I used a needle and ribbon to put a tie on the plaque for hanging. I also stapled the ribbon to the back of the plaque to hold them right in the center so it hangs straight (see Figures Q-R).
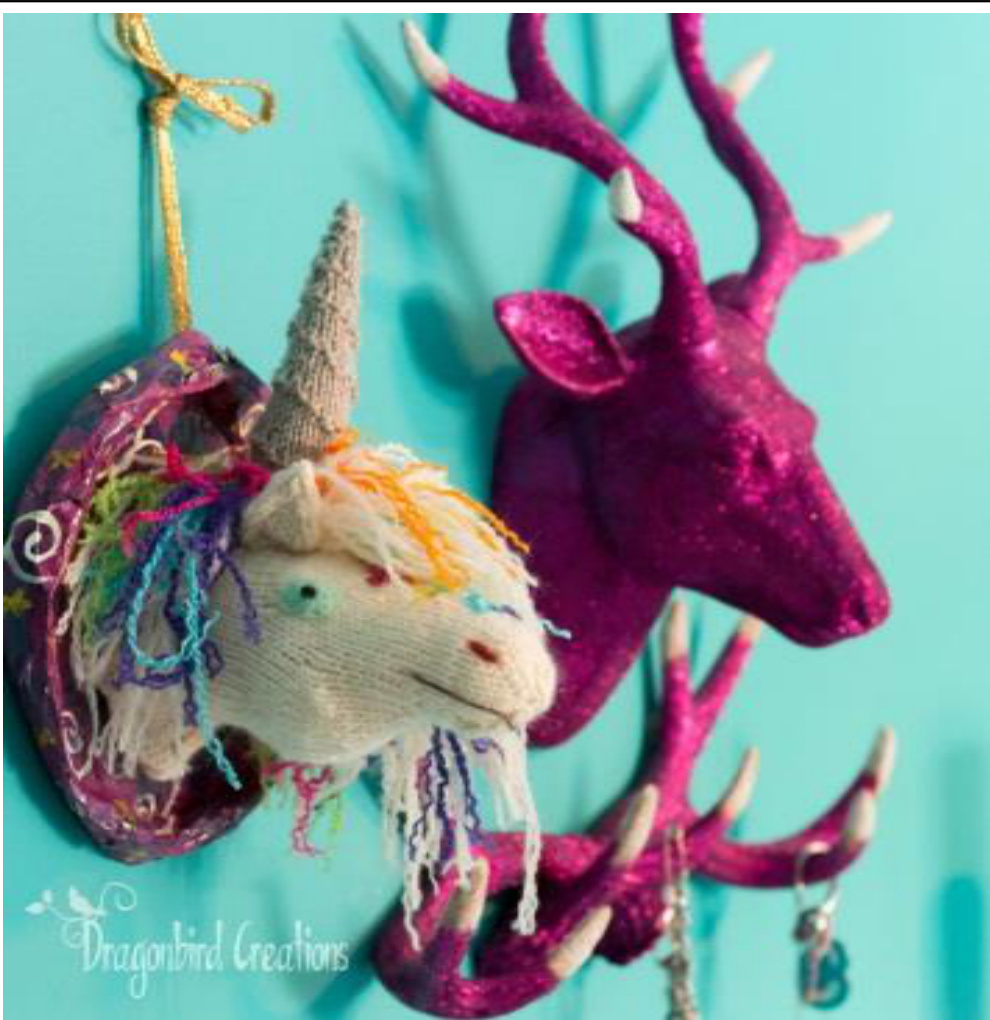
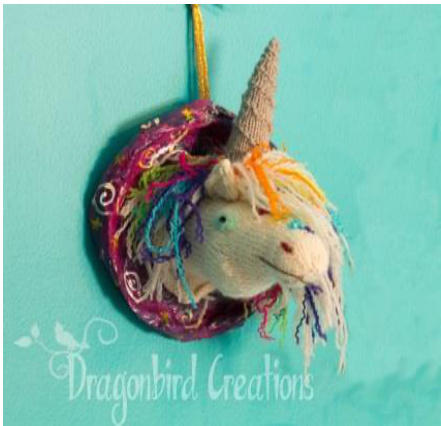
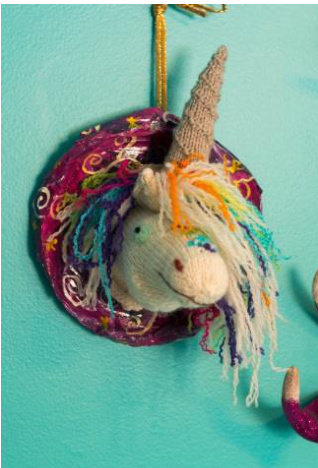
Here is the finished unicorn with my daughter's fun glitter deer head. We had a lot of fun glitterizing that deer-the tips of the antlers are glow-in-the-dark! The unicorn was the perfect addition to her girlie/creepy head themed room!