
Ziggy!
EASY
Text and images by Lolly's Crafty Crochet & Laura Tegg, all rights reserved. No pattern may be reproduced or distributed — mechanically, electronically, or by any other means, including photocopying, without written permission. Finished products created with this pattern may be used for commercial sale. Design credit should be given to Lolly's Crafty Crochet when finished products are listed.
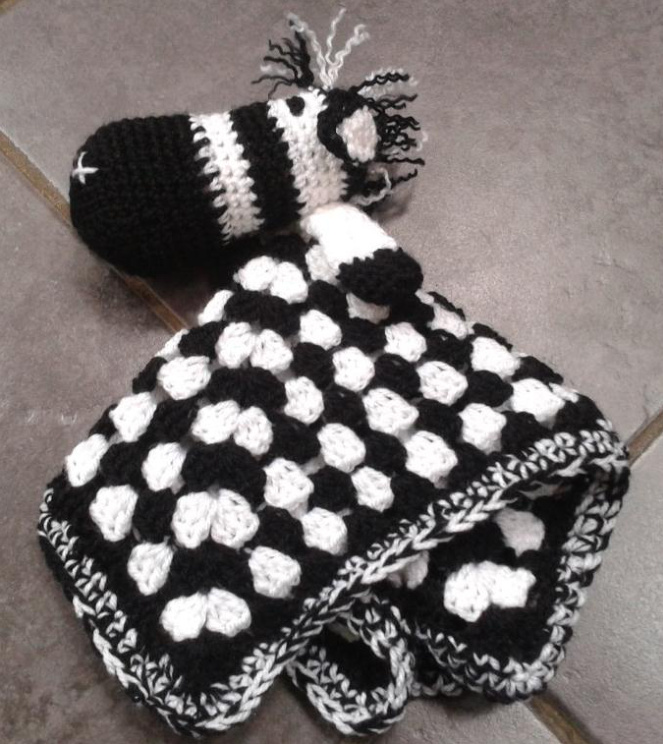
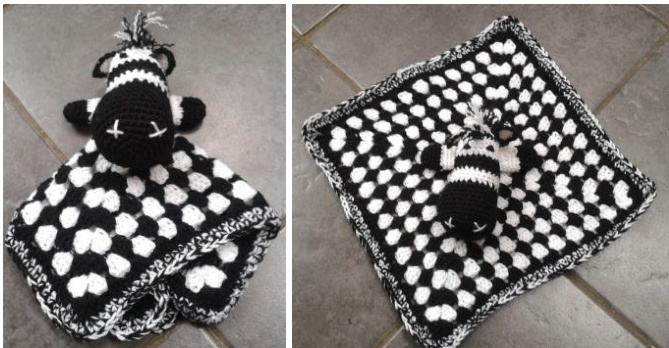
Say hello to Ziggy, the Zebra Lovey! Ziggy enjoys spending his days on the Savannah and his nights snuggled up to someonespecial! This lovey crochets up quickly and is small enough to fit into a travel bag. Ziggy is the perfect gift for any special littleone!
What you will need:
Yarn: 3/Light/Worsted/8ply yarn - 50gwhite 50g black Hook: G7 (4.5mm) Gauge: Not critical for this project - try to keep sts as tight as you can when working the head so that the stuffing does not show through Note: Different hook sizes and yarn weights can be used to achieve a lighter or heavier finished item. Terminology: US Other items needed: Stuffing for head Stitch markers Darning needle
abbreviations:
Beginning (beg) Chain (ch) Double Crochet (dc) Half Double Crochet (hdc) Loop (lp) Nxt (nxt) Repeat (rep) Single Crochet (sc) Space (sp) Skip (skp) Stitch (st) Slip Stitch (sl st) Yarn Over (yo)
Special Stitches
Sc2tog (sc dec): (lnsert hook into nxt st and draw up a Ip) twice, yo and draw through all 3 Ips on hook - 1 sc decreased
Jattern Start:
Granny Sguare Blanket
Useful Granny Square Tutorial link from The Crochet Crowd: http://www.youtube.com/watch?v=BFn yfJEWCd8 Using white yarn, ch4 and sl st to the beginning ch to form ring. Round 1: Ch3 (counts as a dc from now on), work 2dc into the ring, \*ch2, 3dc into the ring\*, rep from \* twice more, ch2 and sl st to the top of the ch3 that started the round, fasten off the white yarn. Change colour to black yarn, alternate the colour of your rounds from now on throughout rest of blanket instructions. Round 2: Attach black yarn where you fastened off. Ch3, work 2dc into the same sp, \*ch1, work 3dc, ch2, 3dc into nxt ch2 corner sp. Rep from \* all the way around. Your final sts should be 3dc, ch2 and then sl st to the top of the ch3 that started the round. Round 3: Attach new colour of yarn in any corner ch2 sp, ch3, work 2dc, ch2, 3dc into same sp, ch1, \*3dc, ch1 across into each ch1 sp to nxt corner, work 3dc, ch2, 3dc into nxt ch2 corner sp. Rep from \* all the way around. Sl st last ch1 to the top of the ch3 that started the round. Fasten off for colour change.. Rounds 4-12: Rep round 3 nine times. Each round will cause the square to increase in size.
Border
Without fastening off the previous yarn colour, attach the other colour you are using to the same st, so you are working this final round in both colours. Round 1: With both colours held together and on your hook, ch1 (does not count as a st), sc into same st, sc in nxt 2 sts, work 2sc into ch2 corner sp, \*sc in nxt 3 sts, skp ch1, repeat from \* across to next corner, work 2sc into ch2 corner space, continue to repeat from \* all the way around working 2sc into corner sps joining the last sc to first sc with a sl st (152sc) Round 2: Still keeping both yarns together, ch1, sc into same st, work sc into each st on the sides and 2sc into the two sc's in each corner (160sc) Fasten off.
Head
Ziggy's head is crocheted in continuous spirals, without joining the rounds from the nose up to the top of the head. You will need a stitch marker to keep track of where the beginning of each round starts; move the marker up to the first stitch of the nxt round after finishing the previous one. Foundation Round 1: With black yarn, ch2, work 6sc in furthest ch from the hook (6sc) Round 2: Work 2sc in each st around (12sc) Round 3: \* Work sc in nxt st, 2sc in nxt st, rep from \* around (18sc) Round 4: \* Work sc in nxt 2 sts, 2sc in nxt st, rep from \* around (24sc) Round 5: \* Work sc in nxt 3 sts, 2sc in nxt st, rep from \* around (30sc) Round 6: \* Work sc in nxt 4 sts, 2sc in nxt st, rep from \* around (36sc) Rounds 7-9: Sc in each st around (36sc) Round 10: \* Work sc in nxt 4 sts, sc2tog, rep from \* around (30sc) Rounds 11-13: Sc in each st around (30sc) Round 14: \* Work sc in nxt 3 sts, sc2tog, rep from \* around (24sc) Change to white yarn. Useful video for how to change colour from Planet June: http://www.youtube.com/watch?v=f8vt kK-3Do Rounds 15-17: Sc in each st around (24sc) Change to black yarn. Rounds 18-20: Sc in each st around (24sc) Change to white yarn. Rounds 21-24: Sc in each st around (24sc) - eyes will be placed here - see under the heading features Change to black yarn. Round 25: Sc in each st around (24sc) Round 26: \* Work sc in nxt 2 sts, sc2tog, rep from \* around (18sc) Stuff head. Round 27: \* Work sc in nxt st, sc2tog, rep from \* around (12sc) Round 28: Sc2tog around (6sc) Fasten off, leaving a long tail and use this to weave through the final stitches to close, hide any loose ends.
Features
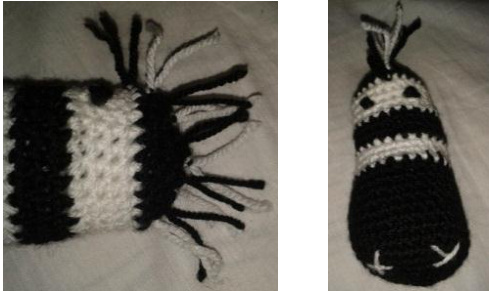
Sew Ziggy's eyes three stitches apart between rows 21 and 24 (as mentioned above). Sew two x's with white yarn onto the end of Ziggy's nose to form his nostrils.
Mane
Warning: The mane strands are very fine once pulled apart, therefore we would not recommend that this lovey be given to babies, due to choking hazard. Mane can always be skipped. Cut 5, 6cm lengths of both the white yarn and the black yarn (10 lengths in total, 5 in white, 5 in black) Start in the centre of the head at the top of the white band where you have placed the eyes. Then with a length of black yarn work the lengths as per the following video by Art of Crochet by Teresa, alternating between black and white in a line to the back of the head: http://www.youtube.com/watch?v=iAg gGMxIJ40 Pull each piece of yarn apart to secure and create a fuller mane.
Ears - make 2
Round 1: Using white yarn, ch2 and work 6sc into the furthest ch from the hook, joining last sc to first with a sl st (6sc) Row 2: Ch1, sc in same st, sc in nxt st, hdc in nxt st, sc in nxt 2 sts, turn (5sts) Row 3: Ch1, sc in same st, sc in nxt st, dc in nxt st, sc in nxt 2 sts, turn (5sts) Change to black yarn. Round 4: Ch1, sc in same st, sc in nxt 4 sts, rotate work 90 degrees clockwise, and work, sc in same st to work around the corner, work sc evenly around the ear, I used 6sc but if you feel that you need more or less, please do so! (12sc in total) Fasten off - you will end the ear at the top point. Then using a length of black yarn and a darning needle attach ear to one side of the mane onto the back of the head.
Legs - make 2
Round 1: Using black yarn, ch2 and work 6sc into the furthest ch from the hook, joining last sc to first with a sl st (6sc) Round 2: Ch1 (does not count as a st) 2sc into same st, then work 2sc in each st around, joining last st to first with a sl st (12sC) Rounds 3 - 5: Ch1 (does not count as a st) sc into same st, then sc into each st around, joining last st to first with a sl st (12sc) Fasten off and change yarn colour to white. Rounds 6 - 8: Ch1 (does not count as a st) sc into same st, then sc into each st around, joining last st to first with a sl st (12sc) Round 9: Ch1 (does not count as a st), \*sc2tog, sc in nxt 2 sts, repeat from \* around, joining last st to first with a sl st (9sc) Rounds 10 - 13: Ch1 (does not count as a st) sc into same st, then sc into each st around, joining last st to first with a sl st (9sc) Fasten off with a long tail to allow attachment to body.
Finishing
Using a length of white yarn and a darning needle, sew head to centre of the blanket (utilising the hole in the centre). Make sure to sew the underside of the white band which has the eyes in it to the white centre of the blanket, this will ensure that your sts will not be seen. Using the length of yarn left on each leg, fold them in half and sew the top closed without stuffing. Then using the rest of the length of yarn sew each one separately to the very centre of the blanket right where the head is attached (essentially you are sewing this to the 'neck' as it were). I hope you enjoy making your Ziggy the Zebra Lovey! All my for sale patterns are fully tested by members of my pattern testing group on Ravelry but if you do find that you need any clarification of any part of the pattern or find any errors, please don't hesitate to let me know: Ravelry: LollysCC Facebook: Lolly's Crafty Crochet Twitter: @LollysCC Website: www.lollyscraftycrochet.co.uk


