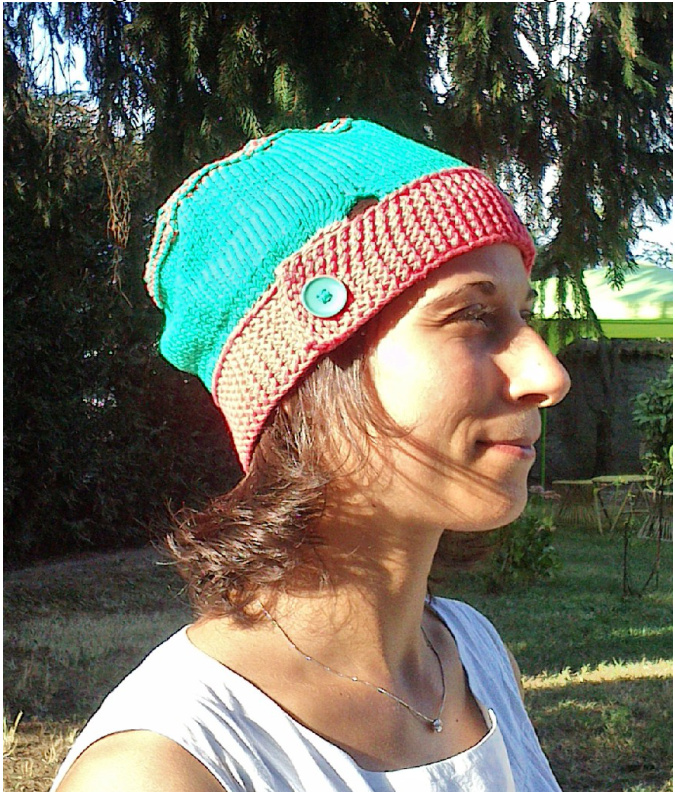
Vintage Cloche in Mali by AliceTwain

vintage-styled cloche for a girl (or a woman with a small head and a taste for bold colors) in a warm cotton, perfect to keep out those nasty fall breezes. Katia Mali is a pure cotton Lwith a very compact texture. Knitted at a relatively high gauge it yields a compact, warm texture that will keep your head warm. The bold coloring of the yearn reminded me of the late XIX and early XX century fascination of the newly invented chemical dyies that allowed to create much brighter, rather extreme coloring in the clothing and, therefore, to create this vintage-styledhat. The hat uses almost fully the yarn. Work the gauge swatch with CC from one end of the hank and start knitting from the opposite end. If needed complete the hat undoing the swatch. Thanks to my friend Sonia Arw for modeling the hat
Materials
· One good sized button in the same color as the MC of the hat · Scissors and tapestry needles ·A crochet hook (optional). · Sewing thread and needle (optional) Gauge: 20 sts and 27 rows = 4" (10 cm) in st st. Katia Mali, 10o% combed cotton,1 3/4 0z (50 grams) = 71 yds (65 m), 2 balls in different colors (pick your favorite from the rather bright color card), designate one as MC (body of the hat) and one as CC (band and stripes on the crown) · Size_7 (4,5 mm) 16" (40 cm long) circular needle (or use the size that gives you gauge) · A set of 4 dpns in the same size (As an alternative you may want to knit the whole hat on a longer circular needle working with the magic loop method) One ring stitch marker Size: Preteen/woman S: max hat circumference 2o" 1/2 (52 cm), hat length 8" 1/4 (21 cm), hat band 18" (46 cm); the width of the hat can be somewhat regulated when sewing onthebutton. Note: m1 = make 1 by casting on one stitch with the backward loop method.
Instructions
Band C.o. 10 sts with CC. Work in g st as follows: · sl 1st st pwise, k to end. Always repeat this row until it is 82 ridges long. B.o. and cut yarn. The slipped purlwise stitch at the start of the row will give it a nice chainette-like edge.
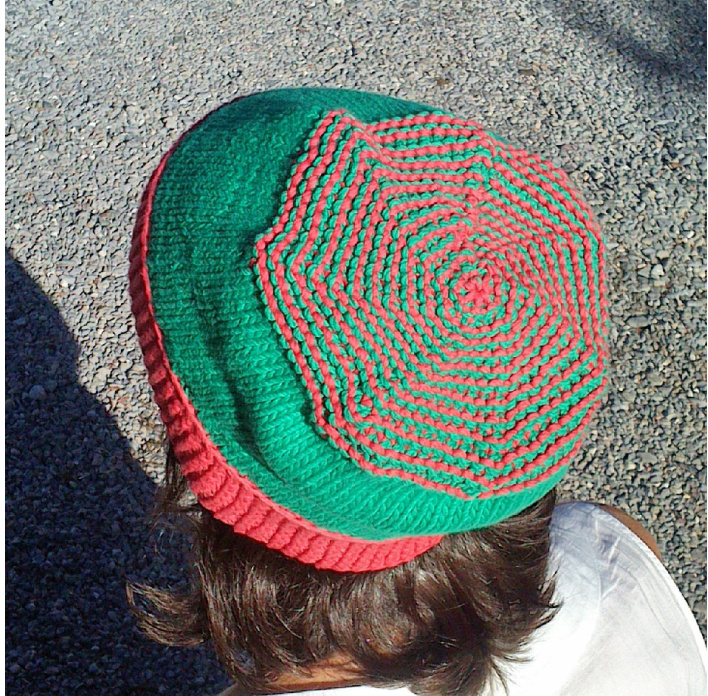
Body of the hat Pick up and knit from the edge of the band to create the body of the hat. Use MC. Pick up the stitches from the central strand of yarn going through the chainette edge. You may want to use a crochet hook to make things easier. Starting at the right end of the strip and working on the RS (whichever you decide is the RS): p.u. 3 sts, \* m1, p.u. 3 sts \*, repeat from \* to \* until you have 95 sts on the needle. Work in st st in rows for 3 rows (p 1 row, k 1 row, p 1 row). Change to working in the round: k 1 row to 1 st before end, insert stitch marker, join in the round and knit the last st on the needle with the first st on the next round (k2 tog; 94 sts). of the hat is 3" 1/2 inches (6 cm) long (20 rounds + 3 rows worked back and forth). On the last row, decrease 3 sts evenly around to setup for working the crown (91 sts). Crown Join CC. Rd 1 (dec): with CC, \* k 11, k2 tog \* around (84 sts). Rd 2 and all even rds: with MC, p around. Rd 3 (dec): with CC, \* k 10, k2 tog \* around (77 sts). Rd 5 (dec): with CC, \* k 9, k2 tog \* around (70 sts). Rd 7 (dec): with CC, \* k 8, k2 tog \* around (63 sts). Continue working as established until you have 7 sts only on the needle on a knit round (CC). Remove marker, cut yarn, slip the tail through all sts, and pull tight to close the gap at the top.
Finishing
Wash the hat in warm water with a drop of a mild detergent, dry out of the direct sun. Weave tails on the wrong side of the hat. Divide a strand of the MC yarn in its three strands and use one to sew on the button (if you prefer use some sewing thread) sewing it across both layers of the had where it's overlapped. Regulate the place you will be sewing the button in to fit the head of the recipient.
Copyright Alice Twain 2013, all rights reserved.
Alice Twain has written the knitting manual Ai ferri corti. She lives in Milan, earning her food by editing books and teaching knitting. She's one of he creators of the main independent Italian knitting website, Maglia-Uncinetto.it. Her own blog is Ferricorti.wordpress.com. Contact her at alicetwain@gmail.com.


