Lollipop
Lollipop
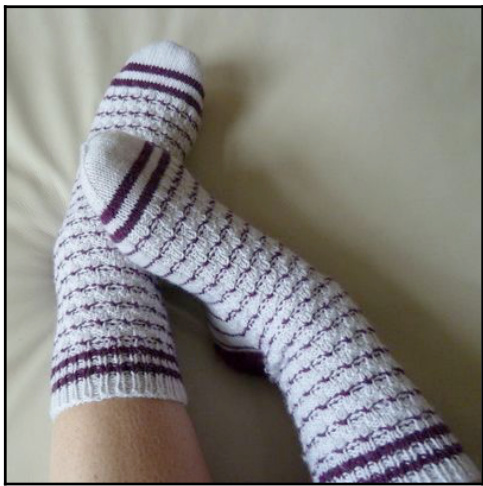
Sock Pattern
for Him and / or Her Copyright @ Februar 2013 by ela m. All rights reserved. This publication contains material protected under International and Federal Copyright Laws and Treaties. Any unauthorized reprint or use of this material is prohibited. No part of this pattern may be reproduced, distributed or transmitted in any form or by any means electronic or mechanical, including photocopying, recording, other electronic or mechanical methods, or by any information storage and retrieval system without express written permission from the author, except in the case of brief quotations embodied in critical reviews and certain other noncommercial uses permitted by copyright law. The scanning, uploading, and / or distribution of this document via the internet or via any other means without the permission of the author is illegal and is punishable by law. Please purchase only authorized editions and do not participate in or encourage electronic piracy of copyrightable materials.
Material:
You'll either need a circular needle (80 cm / 32 inches - magic loop) or a set of double pointed needles (5 needles) size 2.0 mm (US 0) - 2.5 mm (US 1 1/2) (depending on yarn weight and desired size of the finished socks). You'll also need approx. 100 g (3.53 oz) sock yarn in fingering (up to shoe size EU 42 / US 11.5 / UK 9.5 - bigger sizes might need more yarn). If in doubt please consider manufacturer's recommendations. And of course scissors and a darning needle to weave in ends.
Sizes:
The pattern is written for the following sizes: 56 stitches (size S) 64 stitches (size M) 72 stitches (size L) 80 stitches (size XL) Details for sizes M, L and XL are in brackets (64 / 72 / 80).
Introduction:
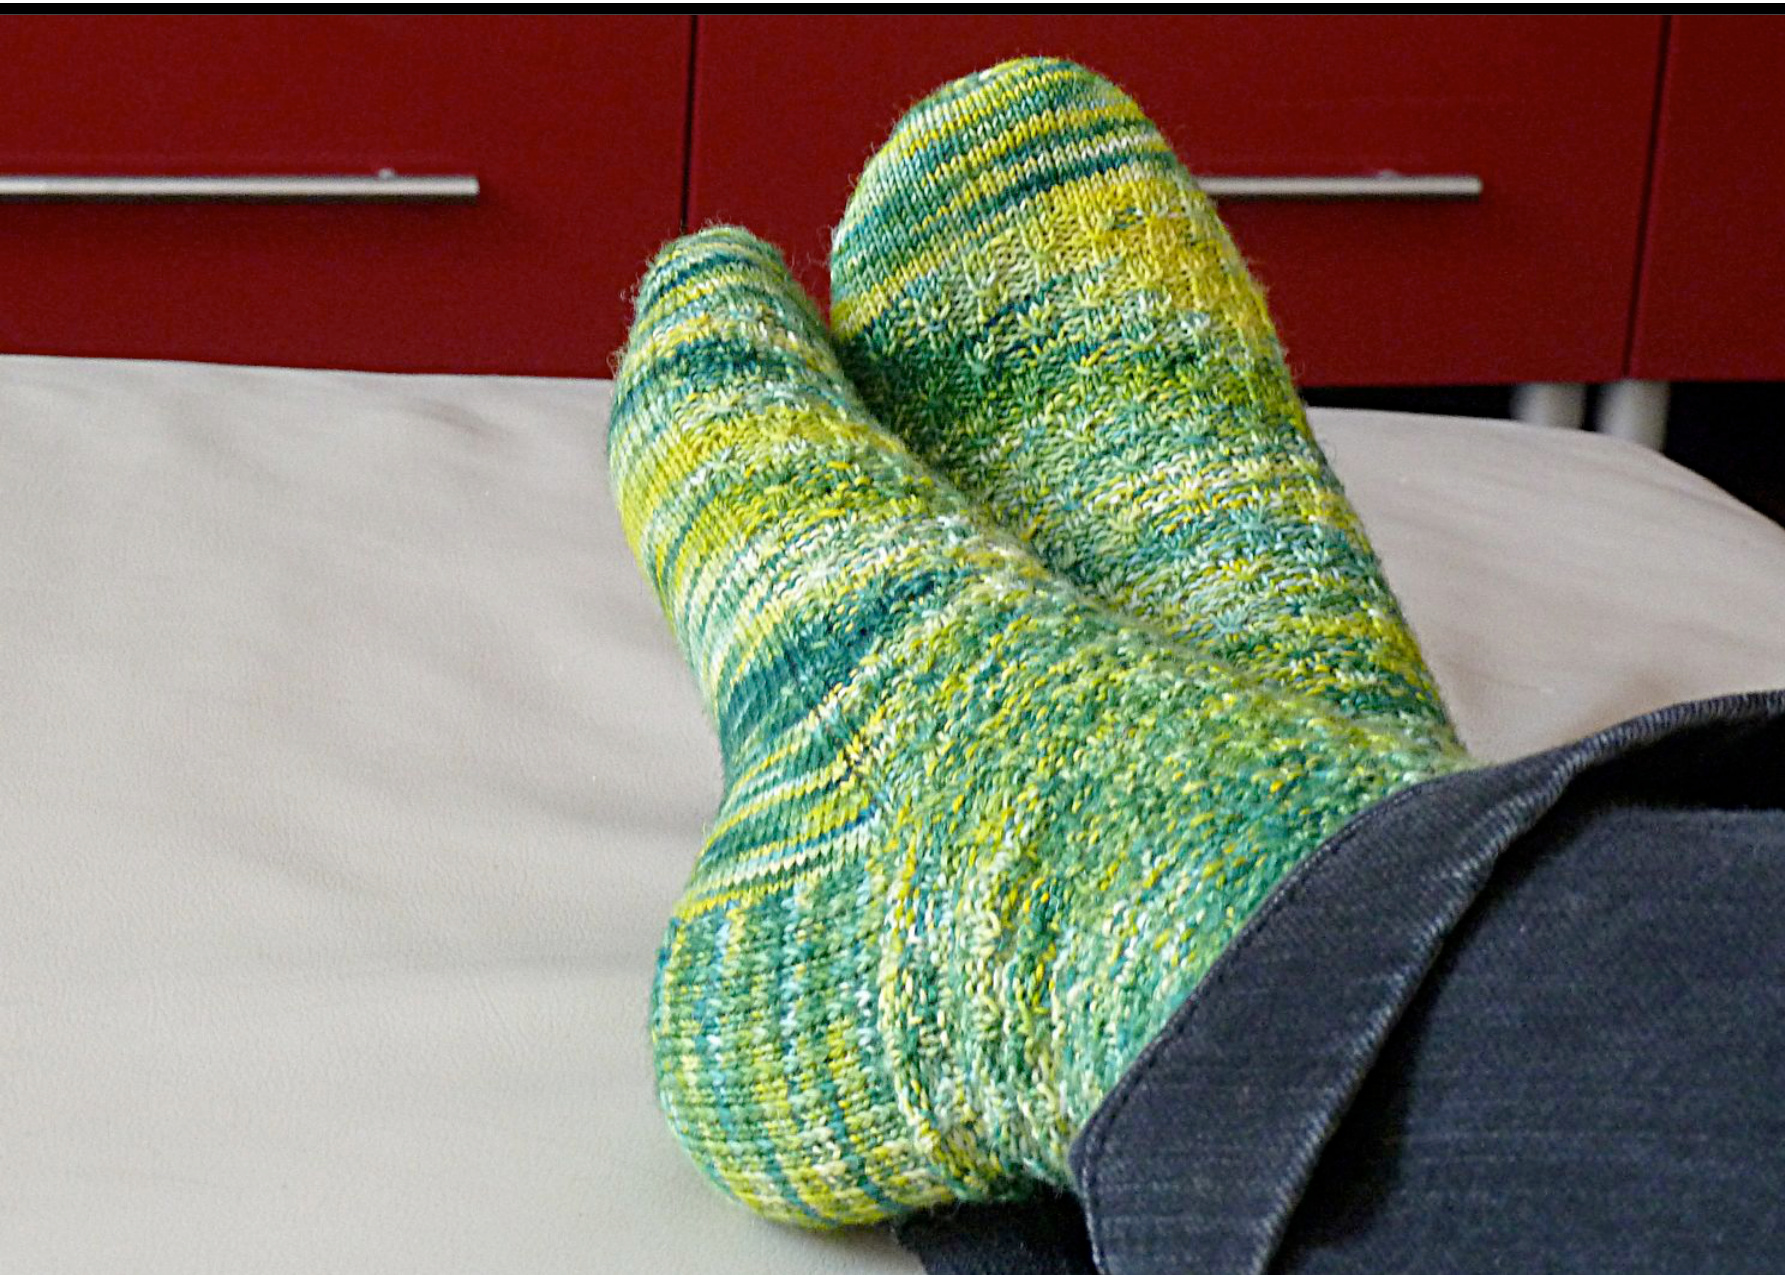
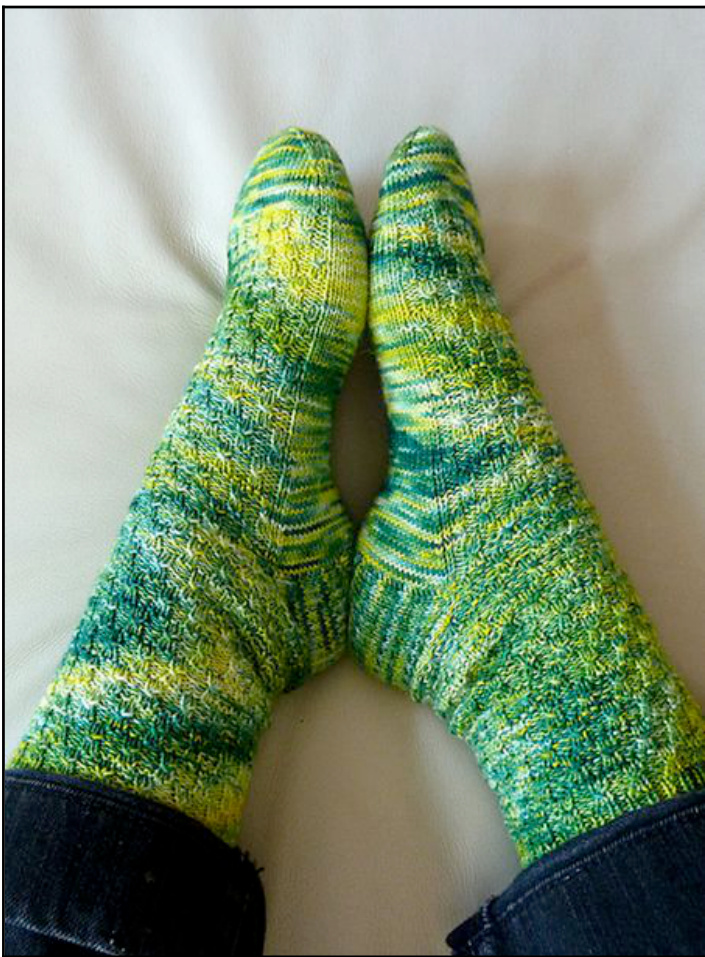
This pattern has been written for a special ball of yarn in selfstripping, bright lollipop colours. But of course you can also knit these socks in any solid colour or with hand dyed yarn (see picture left side). The pattern can be adjusted furthermore and varieed (s. Appendix p. 6).
Techniques needed:
You should have a beginner's knowledge of sock knitting, e.g. casting on, working in the round, knit and purl, selvedge stitches, picking-up stitches along the side of a heel flap and to knit them through back-loop, as well as knitting two stitches together and knitting two stitches together through back loop. You'll also have to know how to make a yarn over and how to make (increase) a stitch knitwise.
Time required and difficulty:
Knitting time is so very individual, but for a pair of socks I need 20-25 hours knitting time at an average (just to give you a clue). Difficulty is in between easy and intermediate, meaning for seasoned sock knitters this sock is more on the easypeasy side, but even if you're new to sock knitting you should manage.
Gauge:
I myself knit socks very (really very) tightly, e.g. knitting fingering sock yarn with a yardage of 210 m / 50 g (230 yards / 1.76 ounces) I usually use needles 2.0 mm (size 0). Therefore my gauge (knit stitch, knitted in the round) is: 20 stitches × 28 rounds = 5 x 5 cm (2 x 2 inches) This gauge doesn't always match the recommandations of the manufacturers and this is the reason why I usually don't give details to gauge in my patterns. If in doubt which size to knit, please use the sock guides of the manufacturers and brands on the Internet.
Cast-On:
CO 56 (64 / 72 / 80) sts. Divide evenly between needles and join to begin working in the round. Mark beginning of round. The pattern uses the following layout: Set of double pointed needles: n 1+2: back/ calf and sole n 3+4: front / shin and instep Circular needle: n 1: back / calf and sole n 2: front / shin and instep
1. Cuff
Work 14 (16 / 18 / 20) r in the following pattern: \* k1, p1 \* repeat sts in between \* through the round.
3. Leg:
From now on you'll work in the main pattern: Repeat chart (r 1-14) to the desired length of your leg.
| 一 | 14 | |||
| 一 | 一 | 13 | ||
| 12 | ||||
| X | 11 | |||
| 10 | ||||
| 9 | ||||
| 8 | ||||
| 一 | 7 | |||
| 一 | 6 | |||
| 一 | 5 | |||
| 一 | X | 4 | ||
| 一 | 3 | |||
| 一 | 2 | |||
| 一 | 一 | 1 | ||
| 4 | 3 | 2 | 1 | |
k s1p, k1, yo, slip slipped stitch over knitted stitch and the yarn over
Abbreviations:
co: cast-on n: needle / needles r: row(s) / round(s) st/sts: stitch / stitches sst: selvedge stitch k: knit (k2 - knit 2 stitches) p: purl (p2 - purl 2 stitches) s1k: slip 1 stitch knitwise s1p: slip 1 stitch purlwise tbl: knit through back loop tog: together (k2tog - knit 2 sts together, p2tog - purl 2 sts together) ssk: slip the next 2 sts, one at a time knitwise, insert left needle into the fronts of these two sts and knit them tog (like tbl) yo: yarn over m1k: make 1 stitch knitwise (pick up strand in between 2 sts with left n from front, knit through back loop)
My notes:
yarn: needles: sts = stitches r = rounds sts x r=5x5cm/ 2 x 2 inches
4. Heel flap
The heel flap will be knitted reinforced (working half of your stitches). If you use a set of double pointed needles, you work the stitches of n1+2, if you use a circular needle, you work the stitches of n1: 1st r (right side): m1k \* k1, s1k \*, k1, sst (= 29 / 33 / 37 / 41 sts), turn Repeat sts in between \* up to the last 2 sts 2nd r (wrong side): sst, purl all sts up to last st, sst 3rd r (right side): sst \* k1, s1k \*, k1, sst Repeat sts in between \* up to the last 2 sts 4th r (wrong side): sst, purl all sts up to last st, sst Repeat rows 3-4 until desired length of your heel flap.
Tip:
There are numerous ways to knit an edge or selvedge stitch. You can use whatever stitch you feel comfortable with. My favourite stitch for the edge of heel flaps is: At the end of the needle: slip the last stitch with yarn in front purlwise (turn) At the beginning of the needle: knit through backloop
My notes:
The proverbial ,rule of thumb" is to knit as many rows as is your stitch count (e.g. 32 sts for the heel flap -> 32 rows). Because of the slipped sts the rows knitted are a little bit shorter than rows knitted in knit stitch, so you need more rows to get the same height for the heel flap: Size S / 56 sts: 30 r Size M / 64 sts: 36 r Size L / 72 sts: 40 r Size XL / 80 sts 46 r
Please keep in mind ...
... the last row of the heel flap is always a wrong side row and here you decrease the one st you increased at the beginning of the heel flap. When you work your last row purl together the 2 sts inthe middle of your needle and are agian back to half of the sts - 28 (32 / 36 / 40) sts.
5. Heel turn
My notes: sst, k 14 (16 / 18 / 20) sts, ssk, k1, turn s1p, p3, p2tog, p1, turn s1k, k4, ssk, k1, turn s1p, p5, p2tog, p1, turn s1k, k6 re, ssk, k1, turn s1p, p7, p2tog, p1, turn Work as established until all sts are worked. There should be now 16 (18 / 20 / 22) sts on your needle.
6. Gusset and gusset decreases
From now on you again start knitting in the round and beginning of round from now on is in the middle of the heel / sole sts. All sts top of the foot (instep sts) are furthermore worked in pattern and sole and gusset stitches will be worked in knit stitch. Pick up 15 (18 / 20 / 23) sts left and right out of the selvedge stitches of the heel flap plus an additional stitch out of the corners. Work one round and knit the picked up sts through back loop. While working this round, please mark new beginning of round which will now be: douple pointed needles:at the beginning of n1 circular needles: in the middle of the stitches of n1 Gusset decreases: From beginning of round knit up to the last 3 sts of sole / gusset sts, k2tog, k1. Work instep sts in pattern. Then on the other side of the sock: k1, ssk, k to end of round.
k1r
Repeat these two rounds until you are again back to your original stitch count of 56 (64 / 72 / 80) sts.
7. Foot
Knit the foot until you reached the desired lenght up to your toes. All stitches on top of the foot are still worked in pattern and all sole stitches in knit stitch.
8. Toe
The toe will be worked over 19 (23 / 25 / 27) rounds and the decreases are worked as described in the following paragraph:
Set of double pointed needles:
n 1+3: knit up to last 3 sts, k2tog, k1 knit one round n 2+4: k1, ssk, knit to end of needle
Circular needle:
n 1: From beginning of round, knit up to last 3 sts, k2tog, k1, n2: k1, ssk, knit up to last 3 sts, k2tog, k1 n1: k1, ssk, knit to end of round.
Size S:
1 r decreases, 2 r k repeat 1 time 1 r decreases, 2 r k repeat 2 times From now on: decrease every row. Size M / L / XL: 1 r decreases, 2 r k repeat 2 times 1 r decreases, 2 r k repeat 2 times From now on: decrease every row. Work decreases until there are 8 sts left (all sizes).
9. Finishing :-)
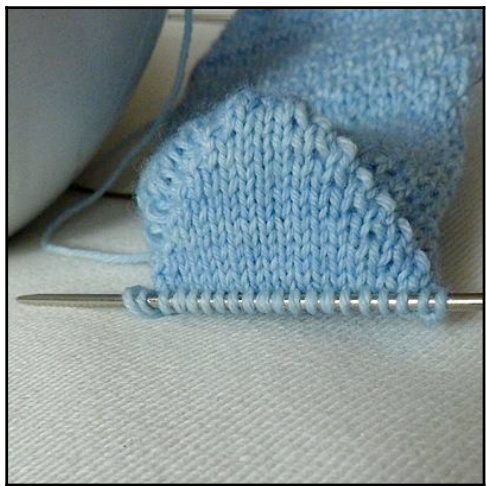
Cut yarn, thread through remaining 8 stitches, turn sock on left side, thread in all ends.
Tip:
There is an easy trick on how to know how long you have to knit the foot and when to stop. You measure your row gauge (sole sts) and calulate the remaining rounds. Just measure how many rows you knitted for 5 cm / 2 inches (q.v. gauge). The toe will be knitted: Size S: 19 r Size M: 23 r Size L: 25 r Size XL: 27 r
Example 1 (cm)
2.5 mm needle size (US 1 12) / 64 M: 5 cm / 2 inches = 20 r => 1 r = 5/20 = 0.25 cm (0.1 inches) => 23 r x 0.25 = 5.75 cm (2.26 inches) So you start your toe: footlenght -5.75 cm (-2.26 inches).
Example 2 (inches)
2.0 mm needle size (Us 00) / 72 M: 2inches = 28 r => 1 r = 2/28 = 0.07 inches (0.18 cm) => 25 r x 0.07 = 1.75 inches (4.5 cm) So you start your toe: footlenght -1.75 inches (4.5 cm).
My notes:
Appendix - sizing chart
| Size | stitch count |
| XS | 48 sts |
| XS-S | 52 sts |
| S | 56 sts |
| S-M | 60 sts |
| M | 64 sts |
| M-L | 68 sts |
| L | 72 sts |
| L-XL | 76 sts |
| XL | 80 sts |
| XL-XXL | 84 sts |
| XXL | 88 sts |
Adjustments in size:
If you don't find the right size for your yarn / foot in this pattern, then of course can make further adjustments. After all you can knit these socks in all sizes as long as your stitch count is divisible by 4, e.g. XS / 48 sts - work cuff 12 rounds total and heel flap 25 sts with 26 r XXL / 88 sts - work cuff 22 rounds total and heel flap with 45 sts / 48 r And also all in-between sizes are of course possible. Heel and toe are adjustable as well, so if you have already a preferred heel and toe construction, then you can use them within this pattern without any difficulty.
2-coloured Lollipops:
If you do have some leftovers of sock yarn you would like to use, then this is possible as well. For example you can knit 2-3 rows in the cuff f in contast colour or change colours every two rows (main colour / contrast colour). Likewise you can consider to knit the heel and toe in contrast colour or - as shown in the sample above - the heel is knitted in contrast colour and in the toe section there are also worked 2 x 3 rows in contrast colour. When using contrast colour in the pattern, you knit as follows: r 3 and r 10 are worked in contrast colour while all other rows are knitted in main colour. Have fun playing! :-)
Feedback - comments - questions
If you want to give me feedback (which is always greatly appreciated), if you want to leave me a comment, or if you have any questions, please contact me: ravelry: m0onb3am e-mail: ela@ela-m.net


