
erb Garden Stole
By Linda Choo
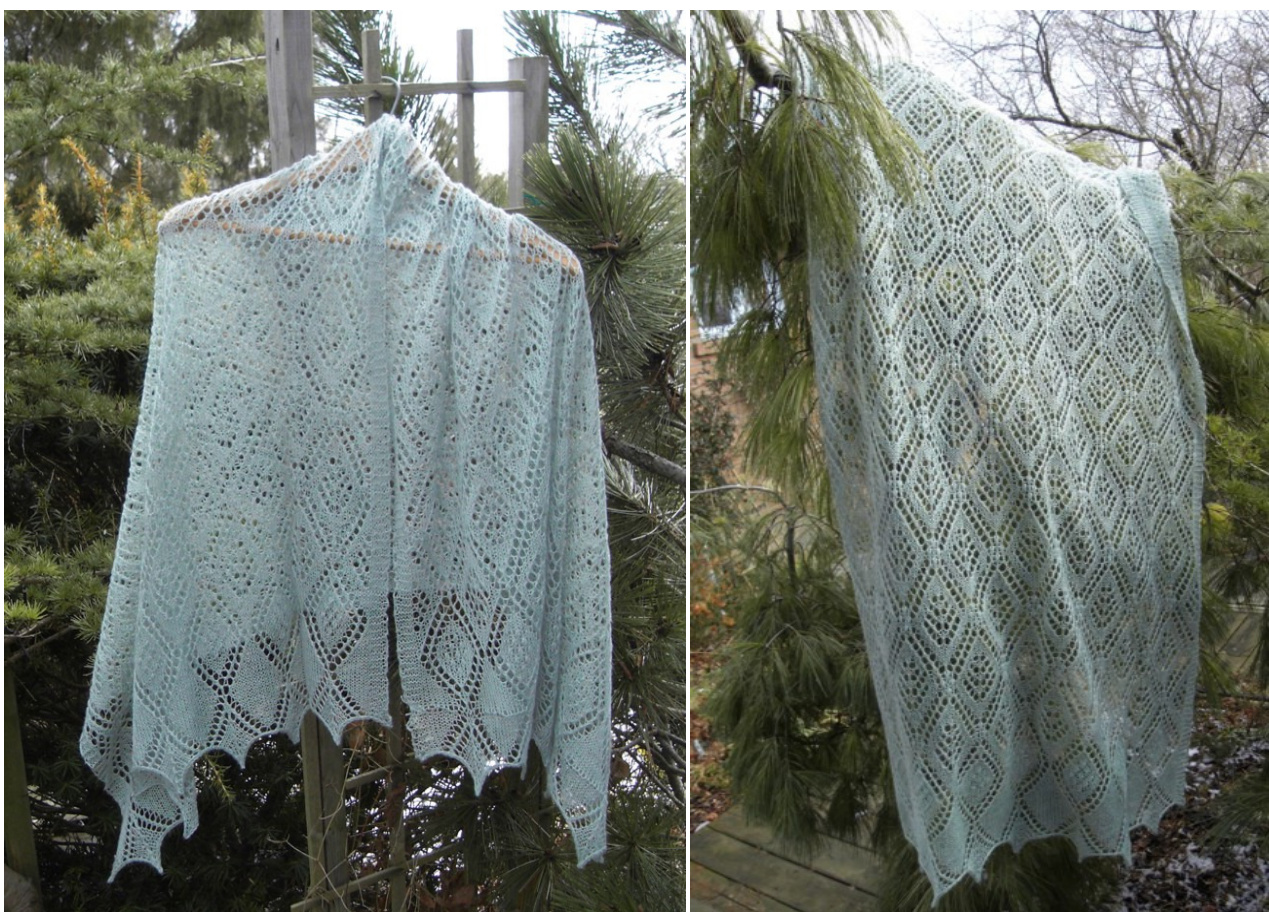
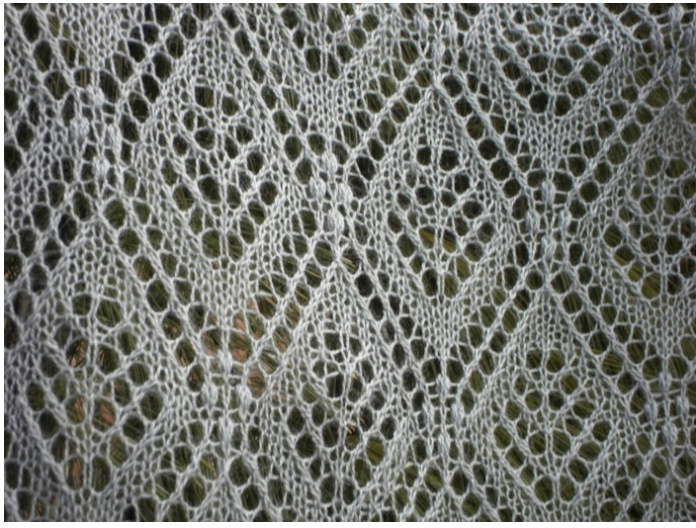
Difficulty: intermediate - design is rectangular in shape with a constant stitch count. Only charts are provided. There are some nupps in the design. Beads can be substituted, if desired. The centre motif is based on Kuusega kuubikukiri pattern from Haapsalu Sall The central pattern reminds me of herbs growing in the garden, or indoors in a planter for winter use in cooking - rosemary, sage, thyme, basil, all make those special dishes even more special and aromatic. Construction: The construction is a typical rectangular stole knit from one side to the other. The shawl is worked with a garter stitch border the beginning border is knit with the shawl in one piece. The ending border is knit separately and then grafted to the remainder of the stole. Gauge: Gauge is not important since this is nota fitted garment. The lace willopen up after blocking Needles: Needle size will vary with the yarn choice. It is recommended that a sample or swatch is knitted to determine a suitable needle size. The sample was knitted with 3.5mm circular needle with laceweight yarn. Yarn: Laceweight is recommended, although fingering weight would also work in this design. Size: This will depend on the yarn and size knitted. Sample: The sample was done with Alpaca with a Twist Fino and used almost all of 1 skein (800m) of the yarn for the size shown. Additional or fewer repeats can be done for a different finished size. The sample is $35^{\prime\prime}$ by $70^{\prime\prime}$ after blocking. Stitches Used: K2tog -this is a right leaning decrease, by knitting the 2 stitches together Slip-knit-psso (pass slipped stitch over) (alternately ssk can also be used)- this is the corresponding left leaning decrease. Whether you chose to use SKP or SSK, consistency in the type of decrease is important in lace knitting for the overall appearance. Slip-k2tog-psso (pass slipped stitch over) or $S k2p-$ is a double decrease with the first stitch positioned on top of the decrease. Again consistency in the type of decrease is important to the appearance of the motif. Yo - yarn over the needle, to make an eyelet N- Nupp. This can be done with 5 or7 stitches, depending on your yarn. Fora 5 stitch nupp, you would k1,yo,k1,yo,k1 all in the same stitch. On the corresponding purl row you would purl 5 together.
Instructions:
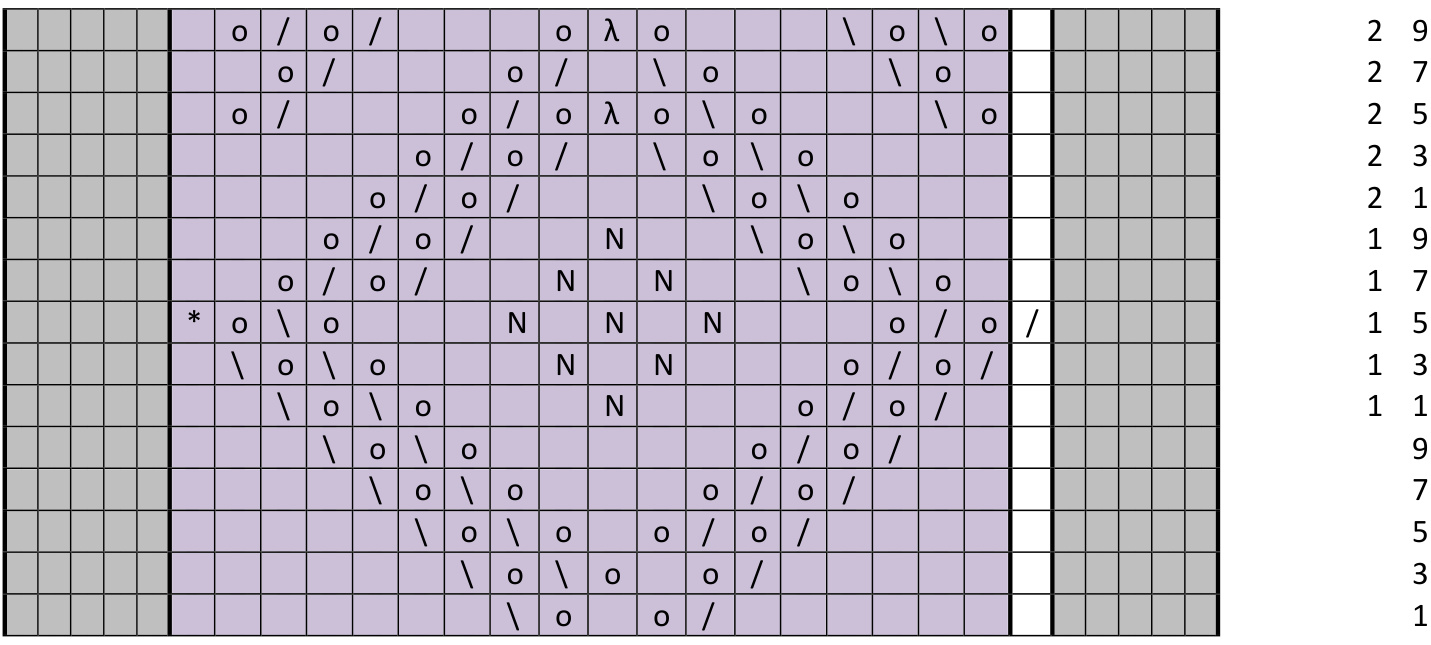
Cast on 137 stitches loosely, with the yarn held doubled. Cut one strand of the yarn, leaving an end to be woven in later. Knit 1 row (wrong side). Turn. Work Chart 1 (lower edging), working the repeated area a total of 7 times. Work the chart once. Note that only the right side rows are charted. All purl side rows are worked as: K5, purl 127, K5. The grey shaded areas show the 5 stitch garter stitch border (on each side). The pink shaded are shows the repeated area which is worked a total of 7 times. The white area is only worked once. Chart 2 is the lower border. The repeated area is worked a total of 7 times. This chart is worked once. Chart 3 is the Body chart. Again the repeated area is worked a total of 7 times. This chart is repeated until you obtain the desired stole length (allowing for the ending border and edging). A tutorial on nupps is found in the appendix. You can make them any number of stitches from 5 to 9, depending on your preference and your yarn selection. Chart 4 is the upper border chart and is worked once. When row 30 is complete, place stitches on a spare needle or cable and set aside for the grafting to be done later. Lower Edging: With yarn held double, cast on 137stitches loosely. Cut one strand of the yarn, leaving an end to be woven in later. Knit 1 row (wrong side). Turn. Work chart 1, ending with row 14. With right sidestogether, graftheuper edging and the stole togetherusing the Kitchener stitch, or your favourite grafting method. Block your lace, weave in the ends and enjoy! Chart 2 - Lower Border
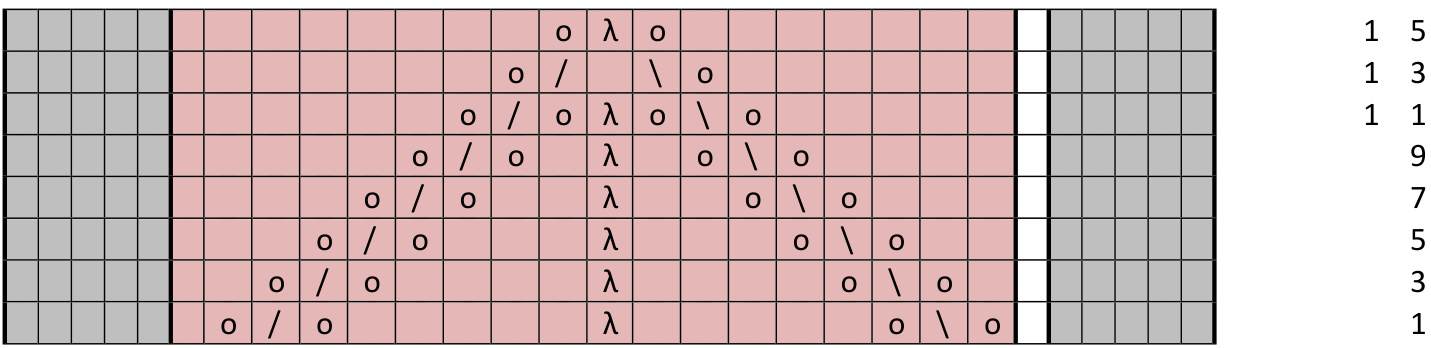
Legend:
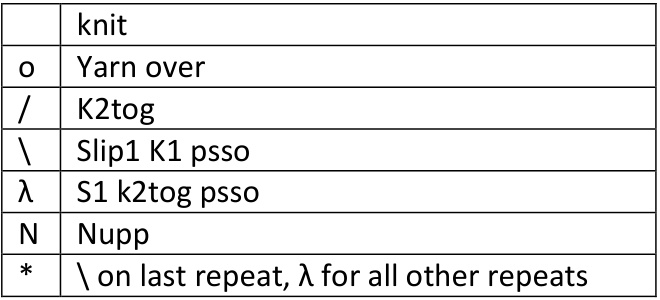
Chart 3 - Body
Legend:

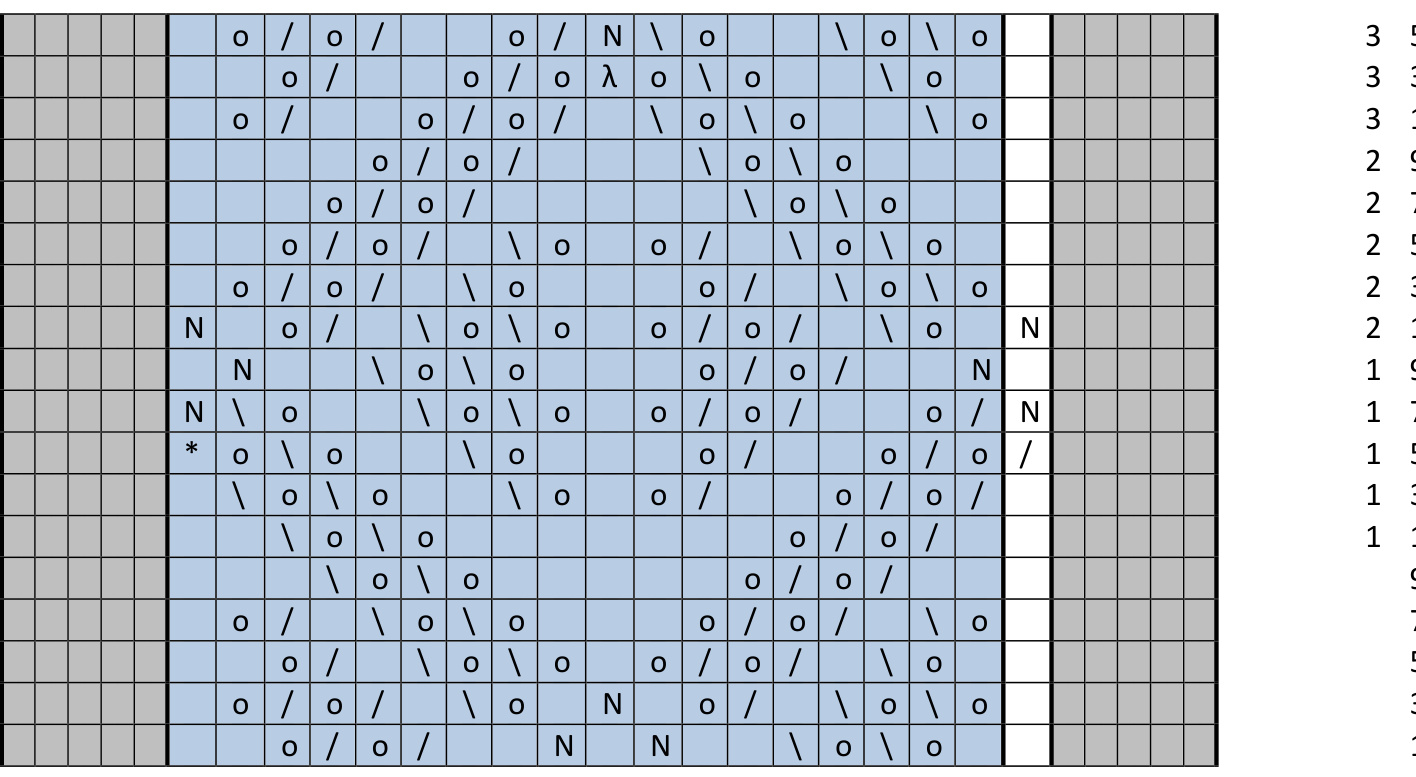
Chart 4 - Upper Border
Legend:

Nupp Tutorial
This is a short summary of nupps and how to do them. When you gettothestith, pullupaloop, verylong and lose loop. If you thinkit istooloose, it probably isn't loose enough.
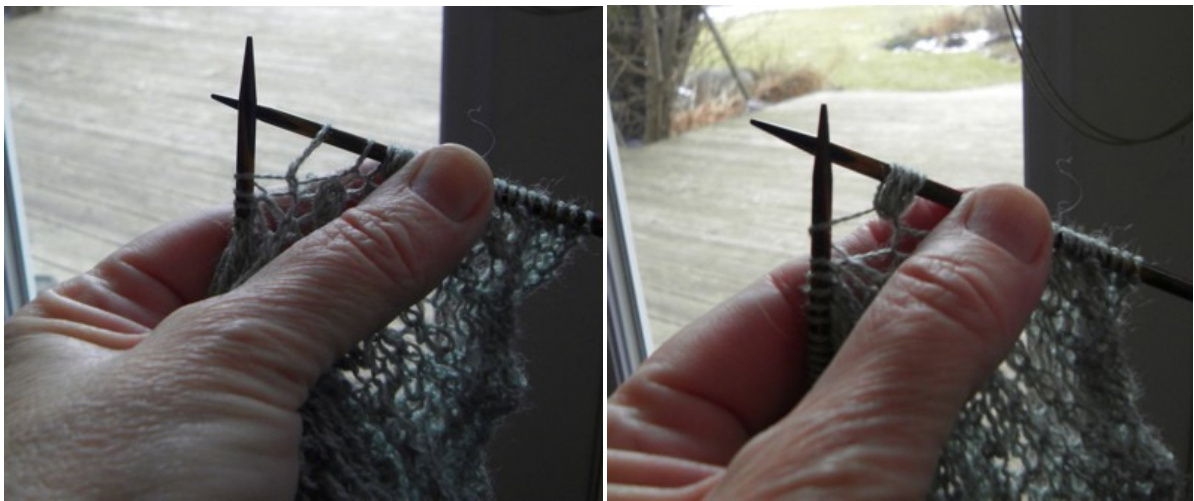
Then do a yo, K1, yo, K1 in the same loop you did the first loop. Keep them LOOSE. When you get to the next row and are about to purl them together, pull down on the group of loops, and count them to make sure that you get them all and don't accidentally work in a neighbouring loop or stitch. Then insert your needle carefully and purl all loops together.
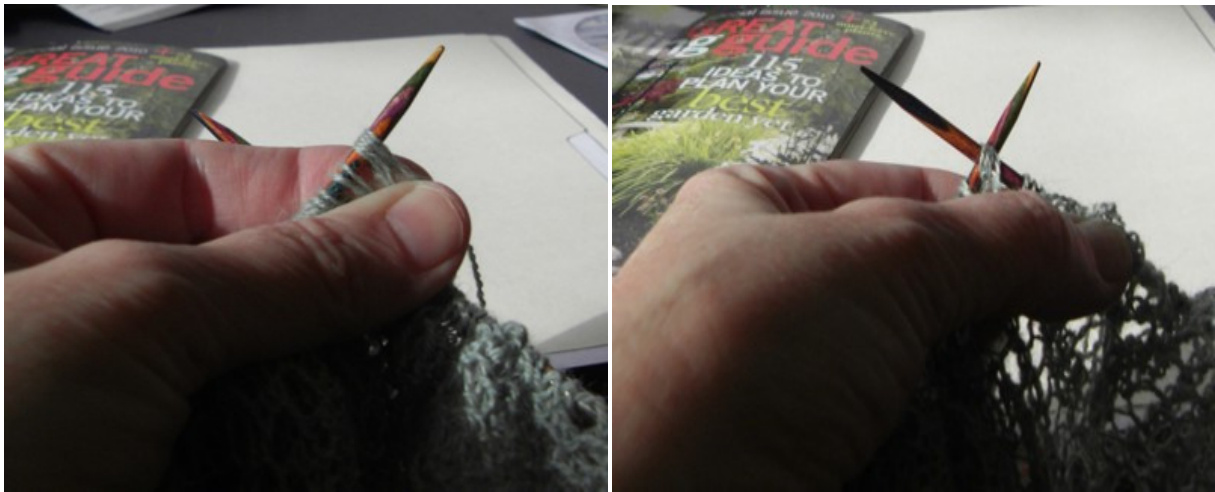
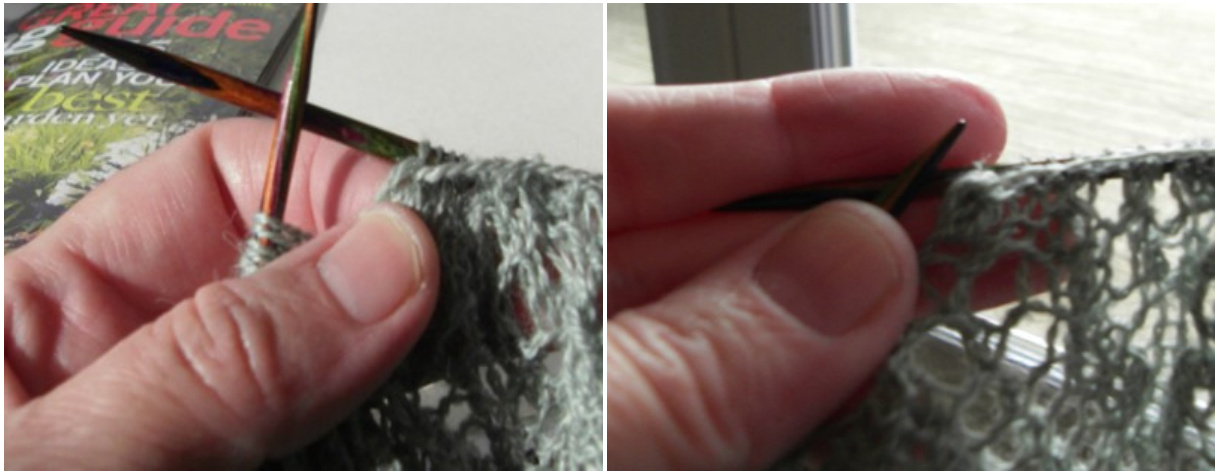
As you release the purled nupp, pull down on the stitches so that it catches at the top of the loops. This keeps them very neat and eliminates a rogue loop from springing out. Then sit back, pat yourself on the back, and admire your nupp.


