Fopmzla %ee lp Soeks For ell Sizes bg Jise K8g
MATERIALS
Any sock yarn you choose. 1 set dpns or circulars, size to obtain gauge Examples use size 1.5 ( $\underline{{\mathsf{2.5}}}\,\mathrm{mm})$ for Bootie, Child, and Female Sock. Tapestry needle GAUGE The pattern is adapted for utilization of your own gauge. Examples use 8 sts/12 rows $={\bf1^{"}}$ in stockinette.
PATTERN NOTES
CO using your favorite toe-up technique. If you do not have experience with toe-up socks, I recommend referring to, “Socks From The Toe Up," by Wendy D. Johnson. BO using Russian Bind Off, also described in, “Socks From The Toe Up.' Kf&b: Knit front and back, increasing one. Pf&b: Purl front and back, increasing one. W&t: wrap and turn. M1: I prefer to use kf&b, but a lifted increase can be used if desired. K tbl: Knit through the back loop Page 1 Copyright Lisa Kay, 2009. ll rights reserved.
Pattern stitches:
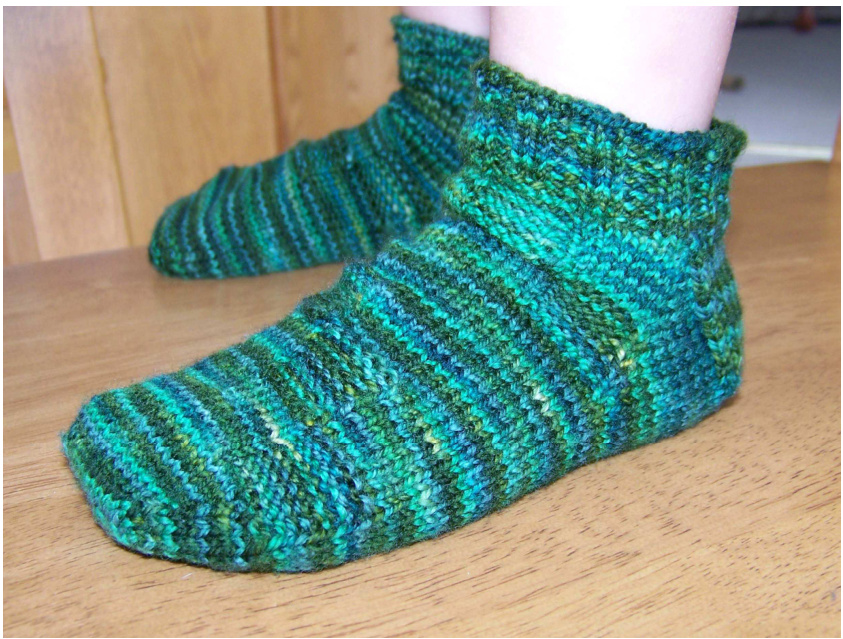
For the instep and calf of the sock, stockinette is a certainly an option. While stockinette may seem “easiest," I find using a stitch variation with at least a simple pattern makes it easier to count and control the number of rows, especially when it comes to copying for the second sock. If you knit two socks at once, this is less of an issue. In the child's sock example, a simple square block of purl stitches is inserted for six stitches and nine rows, then moved left in the round six sts, and so on. After four blocks, it is easy to tell that 36 rows have been knitted, with no counting.
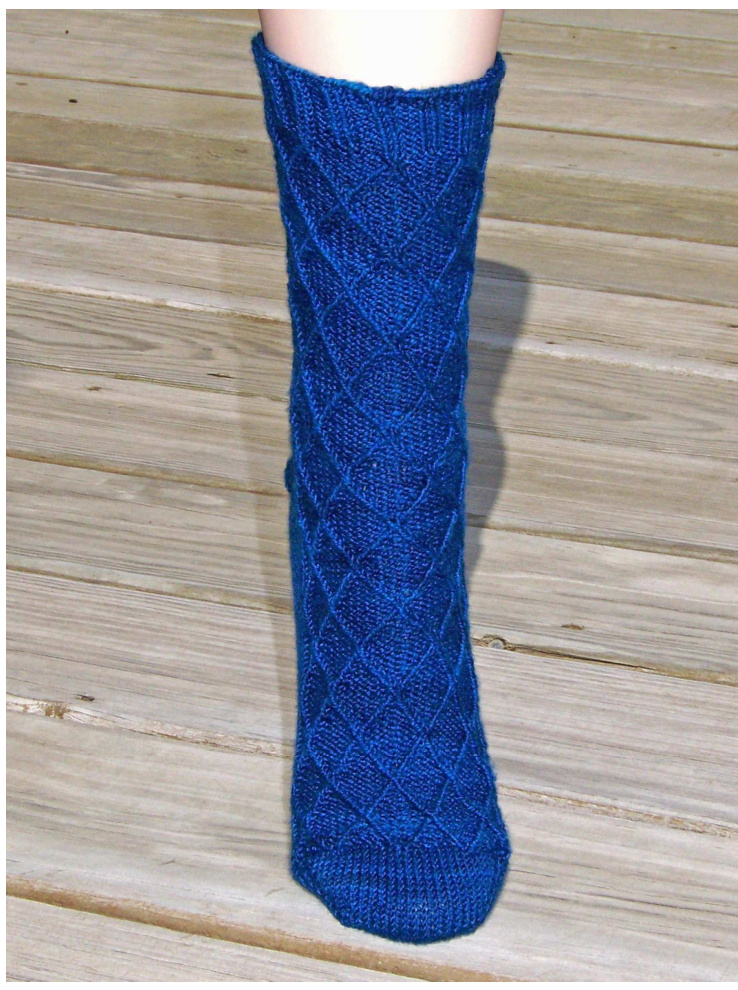
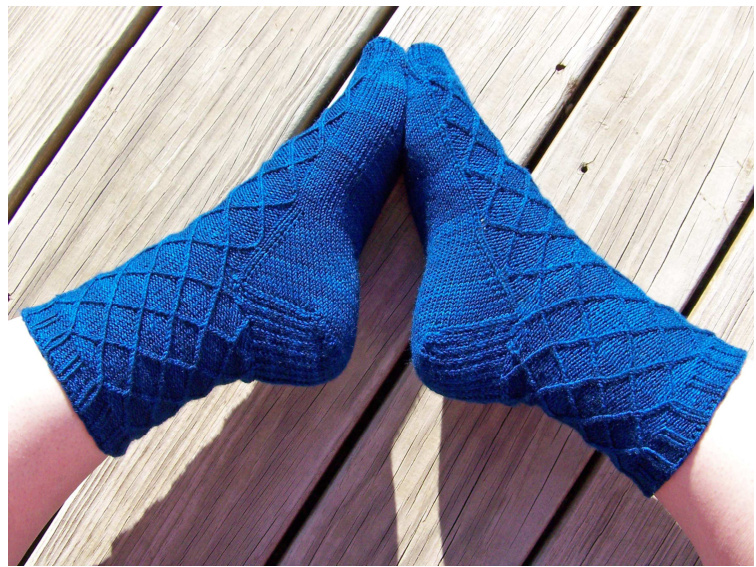
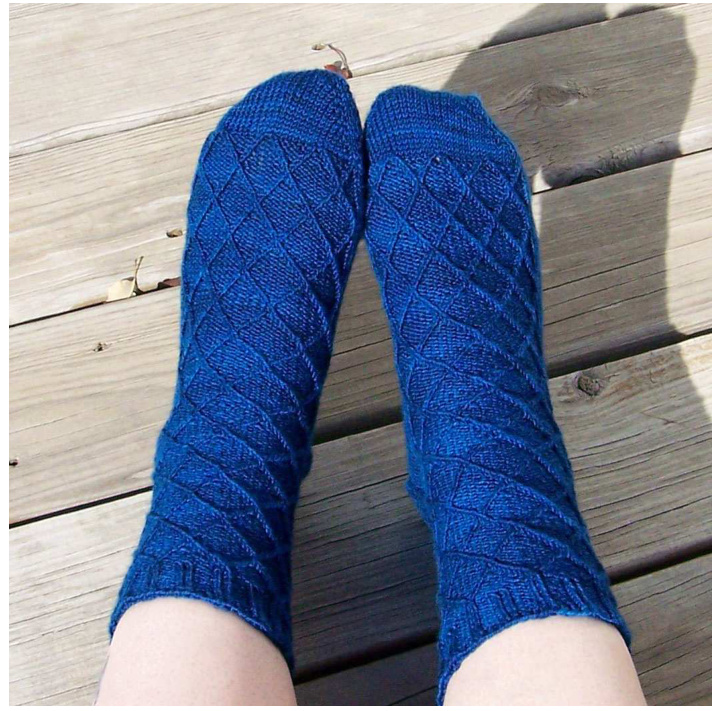
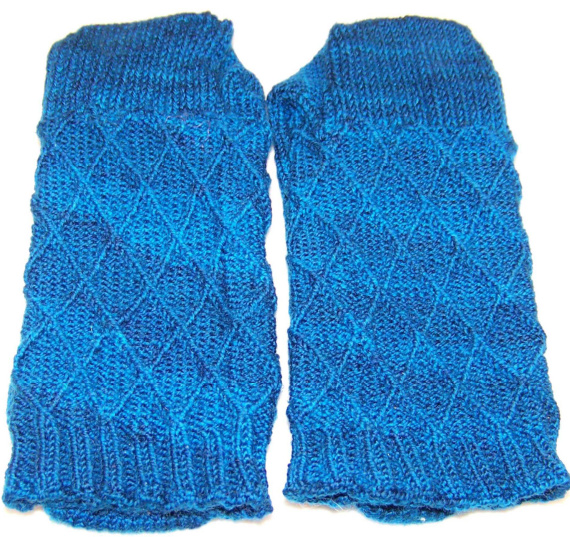
There are many stitch dictionaries and sock books that give a host of stitch patterns intended or adaptable for socks. My first several pairs of socks were knitted using patterns from, “Sensational Knitted Socks," by Charlene Schurch. Jeannie Cartmel's blog has a straight-forward tutorial on adding or subtracting stitch counts from patterns, since it may be important to have a ten-stitch repeat vs. an eight-stitch repeat, depending on your gauge and foot size. Basically, given a certain stitch pattern, pick a number of repeats that is divisible by two and feasible for the size of sock and gauge that you achieve. For example, if you have an $8^{\circ}$ foot, and an 8 sts/inch gauge (slightly stretched), you need about 64 sts per round. Picking an eight-stitch pattern gives 8 repeats around the calf (four repeats on the instep and 32 sts on the sole). If your gauge makes a 64- stitch sock just a bit too loose for you, and you find that you cannot adjust gauge slightly down because either it produces a fabric too tight and rigid to please you, or because you find smaller needles simply too fiddly, then dropping the number of repeats to six (the next even number) is entirely too small. Then, a good choice is to work to a ten-stitch repeat and make a 60-stitch round (six repeats). If adding plain knit or purl stitches is an option without disrupting the way you want the pattern to look, you can use the eight-stitch pattern with six repeats and two extra stitches between each repeat, for a total of 6o stitches, also. However, some charts, such as the lattice, do not lend themselves to inserting plain stitches between pattern repeats, so the chart must be modified if a different number of stitch repeats is needed. CookieA's book, "Sock Innovation," has a very useful tutorial section on how to design or adapt stitch patterns for working in the round, as well as options for centering or off-setting stitch patterns for the instep/sole division at the heel. For the Lattice sock shown in the example, a Lattice Cable pattern, inspired by Jared Flood's "Koolhaas" hat, was used. There are 8-st and 10-st variations on the Lattice Chart given below. The 32-st woman's sock given for the “Female” sock example in the formula tables in this pattern used the 8-st Lattice Chart, with four repeats on the instep, 8 repeats around the calf. For the Lattice Chart, where the top two rows are skewed to the right, one st is moved from the left needle to the right needle at the beginning of the round (row 15 in the 8-st Lattice Chart, or row 19 in the 10-st Lattice Chart) in order to place the cabled stitches next to each other for cabling. After the last row, the st at the beginning of the round moves back to the left needle. When using circular needles, this st movement only applies on the calf. When using four dpns, the st in the middle of the Page 2 Copyright Lisa Kay, 200. Allrights reserved. insole (between dpns) has to switch needles on the next to the last row (and must move back, then, on the first row). Similarly, with dpns, the first stitch on all four needles switches back and forth between needles on the next to the last row and the first row of each chart repeat. On the insole, the lattice pattern on the edges simply continues ak tbl at the edges (first st of the insole and last st of the insole) for rows 15-16 of the 8-st Lattice Chart and rows 19 -20 of the 10-st Lattice Chart. The cables at the “edge" of the insole are not needed.
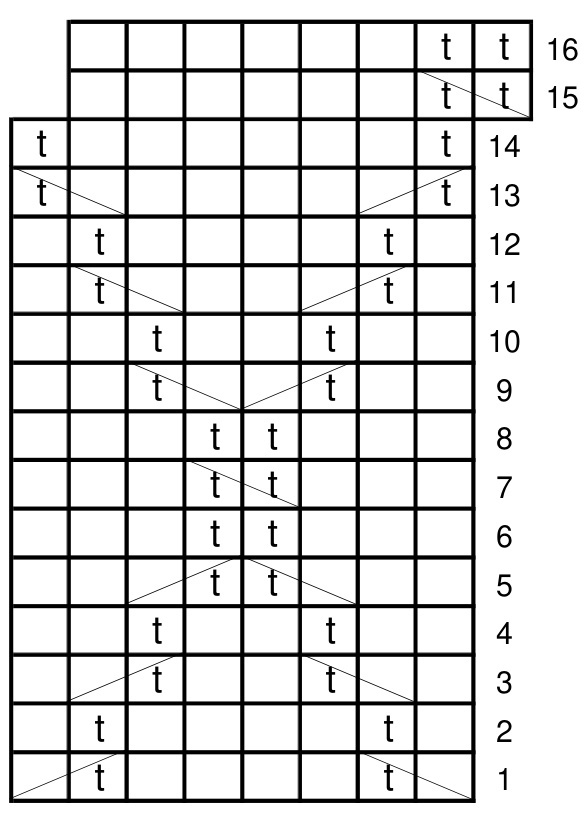
8-st Lattice Chart
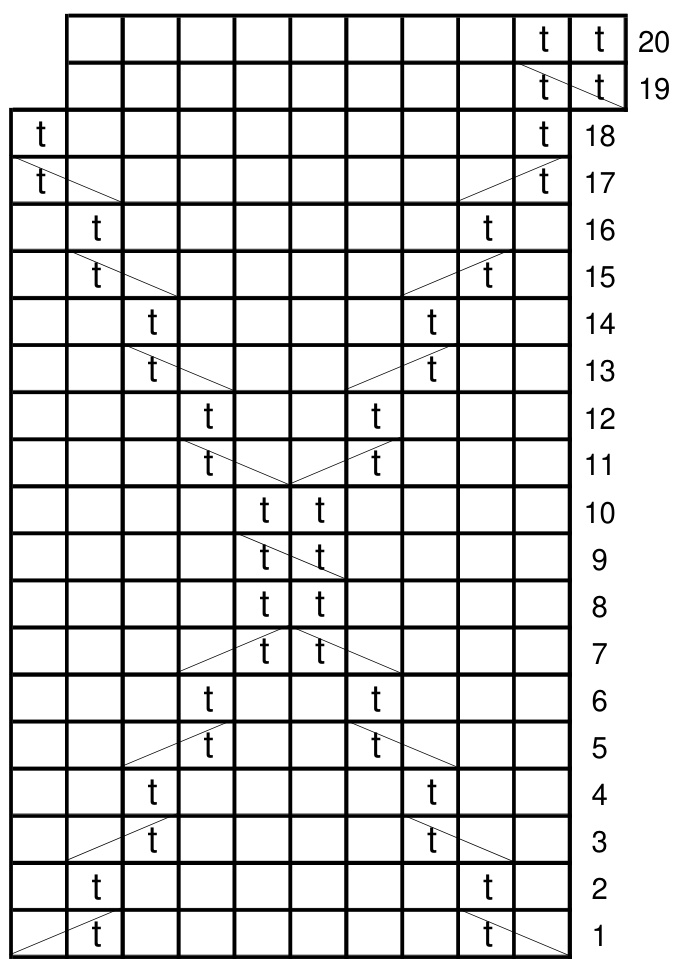
10-st Lattice Chart Place first st on cable needle. Hold back. K tbl st on left needle. P st on cable needle. Place first st on cable needle. Hold front. P st on left needle. K tbl st on cable needle. Place first st on cable needle. Hold front. K tbl st on left needle. K tbl st on cable needle.
Lattice Chart Legend
Even though the cable instructions imply use of a cable needle, work is much speedier when “cabling without a cable needle." Instructions for cabling without a cable needle can be found in many resources, including Melissa Leapman's,"Continuous Cables," Wendy Johnson's website Wendy Knits, and Interweave Knits Magazine's Fall 2oo9 issue (also given on Interweave's Knitting Daily website).
DIRECTIONS
Use your foot measurement (widest part of the ball of your foot), gauge, and pattern repeat, as. discussed above, to determine how many sts to CO. The total number of stitches in the sock, divided by two, is “N," which is the number that will be used for the various formulas throughout the pattern.
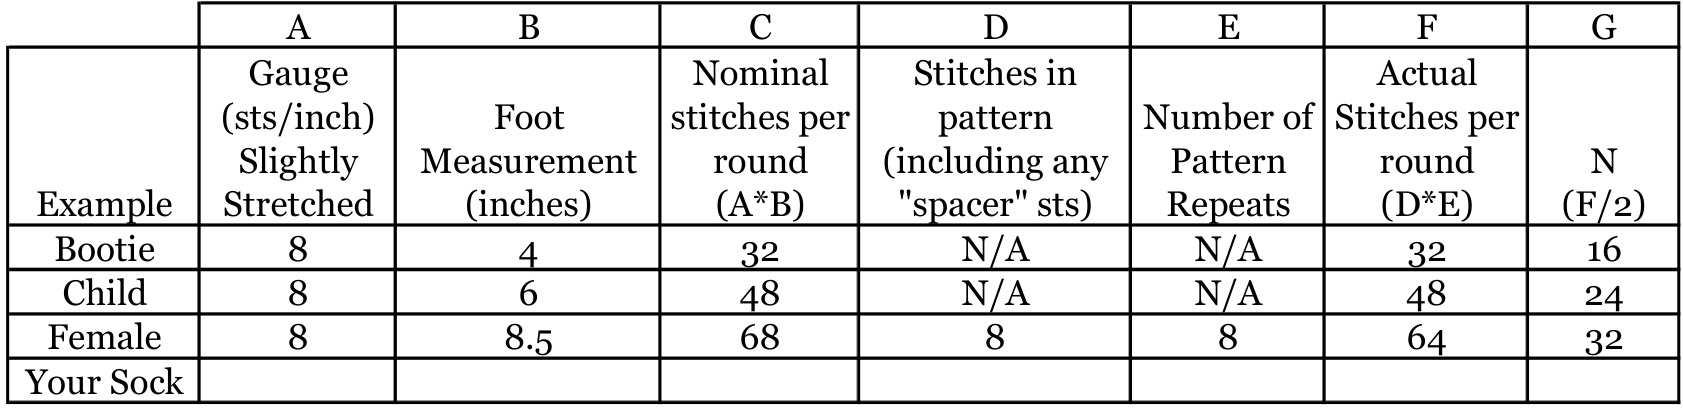
Table 1: Calculating N
Toe CO N total sts, $\mathrm{N}/2$ on each of two needles, using your favorite toe-up circular cast on. (Adjust $\mathrm{N}/2$ to an odd or even number, depending on whether N is odd or even, since increases will occur in pairs.) For example, if N is 33, CO either 15 or 17 sts on each of two needles. Separate stitches onto either four dpns or two circulars, as you prefer to knit socks. The first half of the sts will be considered the instep, and the second half the sole.
Round 1: K1, m1, knit to last two sts on instep, m1, k1. K1, m1, knit to last two sts on sole, m1, k1. Round 2: K all sts. Repeat last 2 rounds until $\mathbf{2}^{*}\mathbf{N}$ sts are on the needles. A rounder toe can be produced by CO of $\mathrm{N}/2$ sts $(\mathrm{N}/4$ on each needle), increasing every round for $\mathrm{N}/4$ rounds, then increasing every other round until $\mathbf{2}^{*}\mathbf{N}$ sts total sts are on the needles. (If $\mathrm{N}/4$ is not a whole number, just pick the nearest one.)
Work the instep in desired pattern and the sole in plain k, until the desired gusset start point is reached, as calculated in the following section.
Calculating the gusset start point:
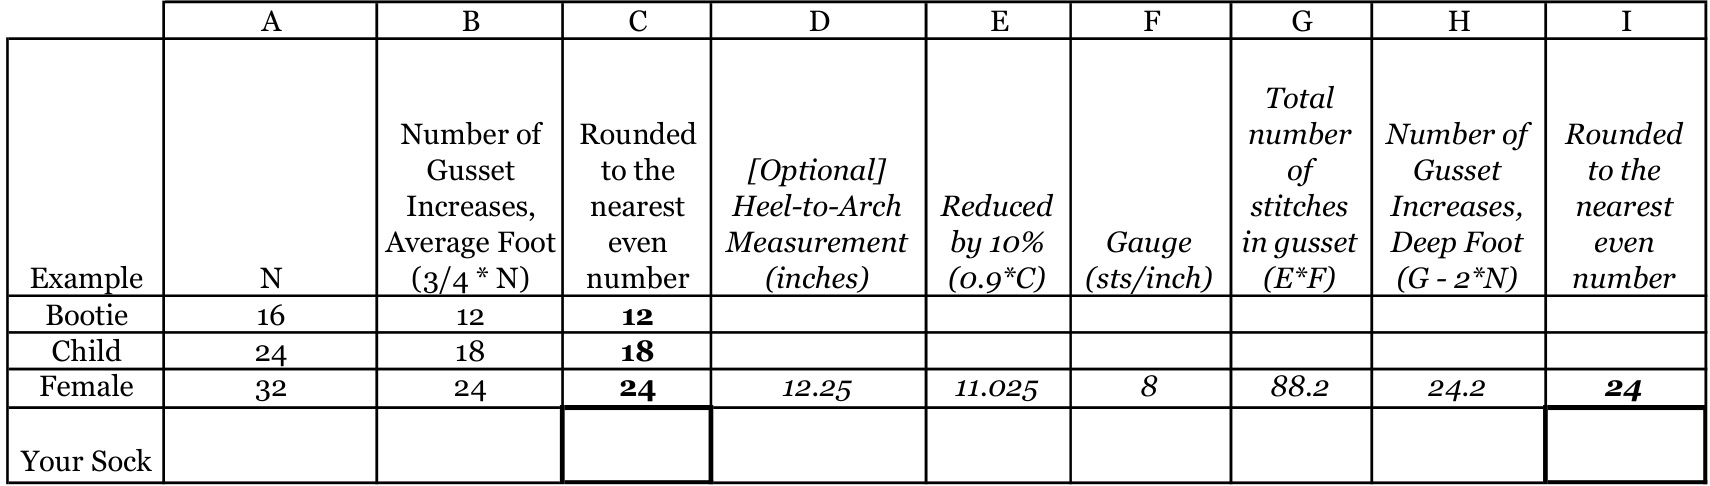
The point to start the gusset is calculated by knowing the foot length, the number of rows in the gusset (which is equal to the number of sts increased in the gusset, since it is two increases per row, every other row), and the number of short rows in the heel turn. The number of rows in the gusset can be generalized as typically 3/4 N. If $\%$ N is an odd or fractional number, of course, it should be rounded to the nearest even number.
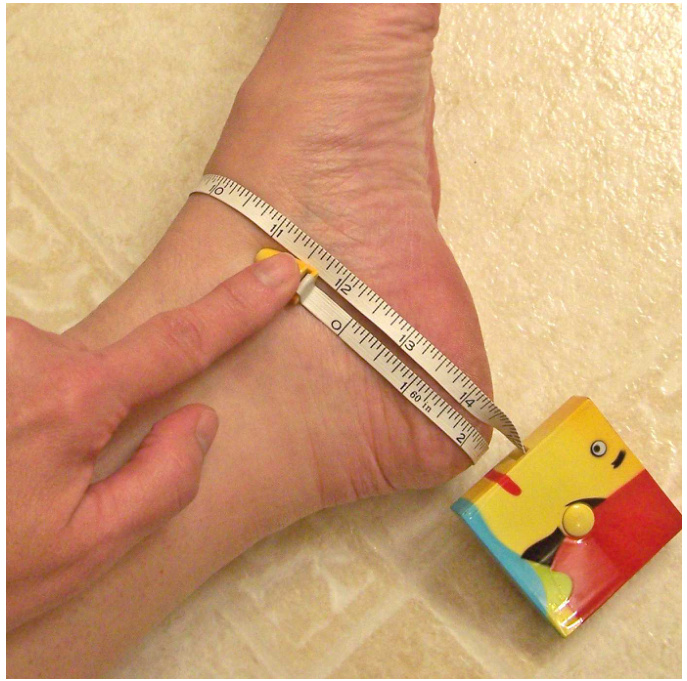
If you have an extra wide or deep arch, you can increase the gusset size. To calculate the sts to use for the gusset, measure around your foot where the heel-to-arch measurement is the largest. Reduce your measurement by $10\%$ . The explanation for $10\%$ is simply that the sock should be stretched a certain amount at that point to keep it from bagging, and also, this is number that works for an “average" foot. You can check, if you want, but it is not necessary to do this step if you have an “average" shaped foot. Your measurement represents how big around the sock needs to be at the maximum number of stitches in the gusset. Take the measurement and divide by gauge, of course, to get a total number of stitches around your foot at the arch. Subtract $\mathbf{2}^{*}\mathbf{N}$ to get the number of gusset increases. Table 2: Calculating the Number of Gusset Increases
To calculate the number of short rows in the heel turn, see the following table. If you are on the border between two foot lengths, feel free to choose your preferred value. I tend to go up a value if it is on the border. The Child's Sock example is $6^{\,\circ}$ in length, at 8 sts/inch, and 6 short rows were used.
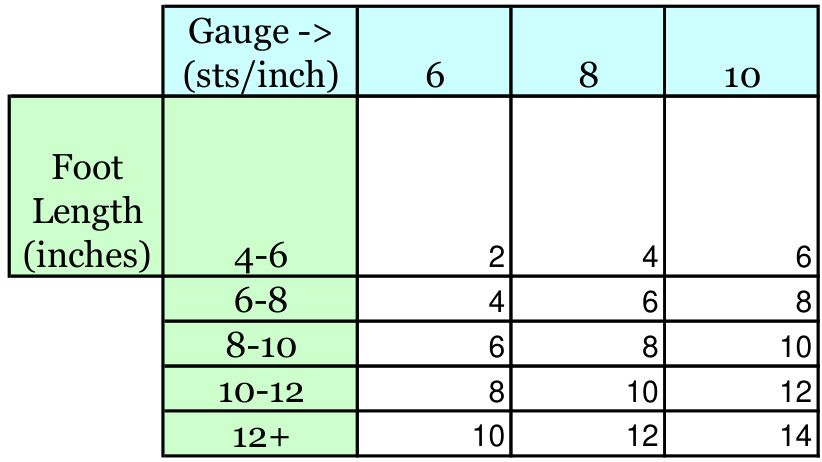
Table 3: Number of Short Rows (NSR) in the Heel Turn
Finally, put it alltogether toget the number of rows in the gusset and theheel tun, giving thelnth to start the gusset before the foot length.
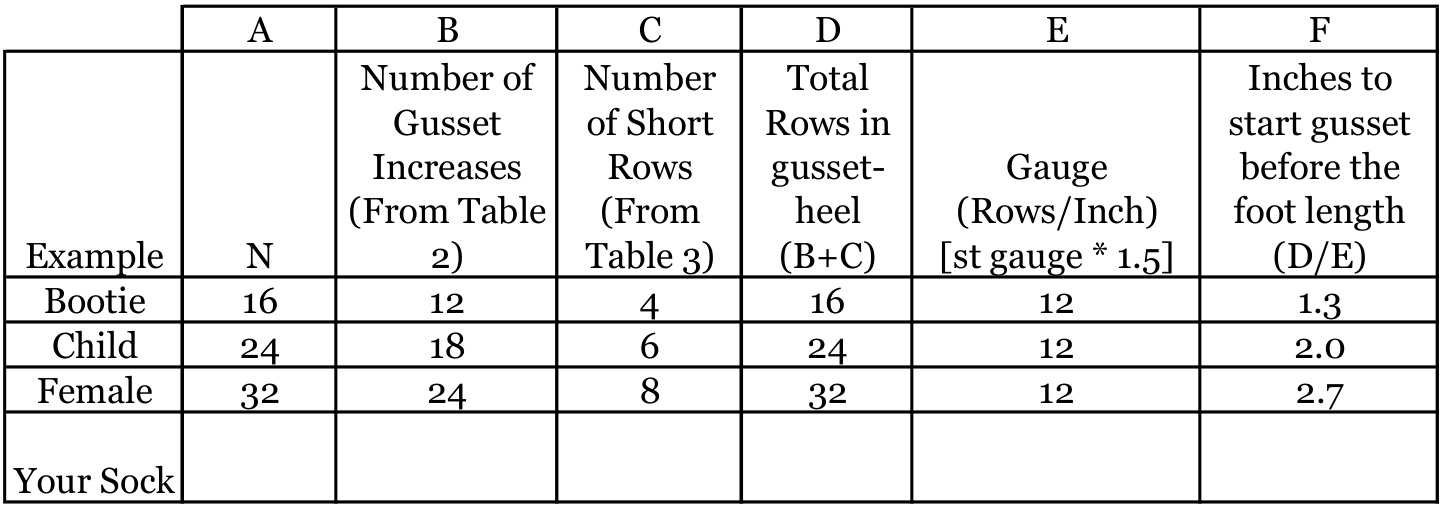
Table 4: Length Before Foot Length to Start Gusset
Pattern placement is one other consideration in determining where to start working the gusset. When you complete the heel, the calf will continue in pattern. To start a pattern repeat directly after the heel, it will need to match up with the pattern on the instep. Therefore, the rows in the gusset should end at a pattern repeat. If you have an eight-row pattern repeat, for example, a 32 row gusset will end on a pattern repeat only if you start the gusset when the instep is on the pattern row one. If you had a ten-row pattern, the 32-row gusset should be started on a row 9 of the pattern (two rows shy of a pattern repeat). Another option is to ignore pattern placement for the gusset and simply work plain stockinette on the back of the calf after the heel, until the front of the calf is at a pattern repeat. If it does not detract from the pattern, the pattern can be picked up wherever it happens to fall on the back of the sock after the heel. Alternatively, the whole back of the calf may be worked in stockinette. When moving the gusset start to make the heel end at a pattern repeat, the results of Table 4 may be tweaked up or down, of course. If your sock is somewhat snug, tweaking up is advised. For the female sock example, the chart was worked three times (48 rows) prior to starting the gusset. The gusset, with 24 rows, has 1.5 repeats of the chart. After the heel, then, the front and back of the sock are both ready to start the pattern on row 1.
Gusset
Continuing in any established pattern for the instep, work the sole as follows: Round 1: Work instep in pattern. K1, m1, knit to last two sts of sole, m1, k1. Round 2: Work instep pattern. K all heel sts for one round. Repeat until the desired number of gusset increases are completed, as given in Table 2. EXCEPT: ... for even N, inc one in the center of the last row, and ... fortheverylast Round 2, work only the instep and donot work the sole stitches, but go directly to the TURN HEEL instruction. To make a heel in contrasting yarn, switch yarns now.
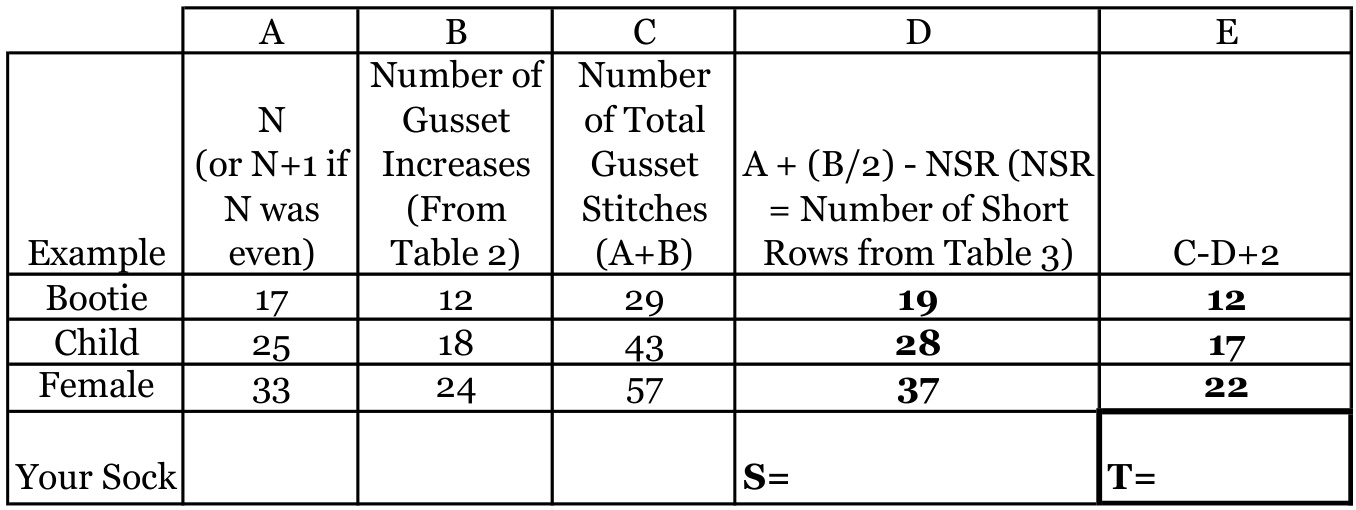
Turn Heel
On the sole sts for Round 2 after the last gusset increase, begin toturn the heel as follows: Row 1: K S sts, kf&b, k1, w&t. (S is given in Table 5.) Table 5: Calculating S and T, the Number of Sts to K and P in the first two short rows
Row 2: P T sts, pf&b, p1, w&t. T is calculated in Table 5. Continue as follows, until thenumber of short rows, givenyTable is comleted.Notthat for inch booties/socks in6sts/inch gauge, short rows are already complete Only work the following rows until NSR is complete. Row 3: K T-2 sts, kf&b, k1, w&t. T-2 $=$ (if required) Row 4: P T-4 sts, pf&b, p1, w&t. $\mathrm{T}{-}4=$ (if required) Row 5: K T-6 sts, kf&b, k1, w&t. T-6 $=$ (if required) Row 6: P T-8 sts, pf&b, p1, w&t. T-8 $=$ (if required) Row 7: K T-10 sts, kf&b, k1, w&t. T-10 $=$ (if required) Row 8: P T-12 sts, pf&b, p1, w&t. T-12 $=$ (if required) After the last purled short row, turn and begin the heel flap. Heel flap begins without knitting another round. There are no “instep” stitches at any time while working the heel (convenient for contrasting heels).
Heel Flap
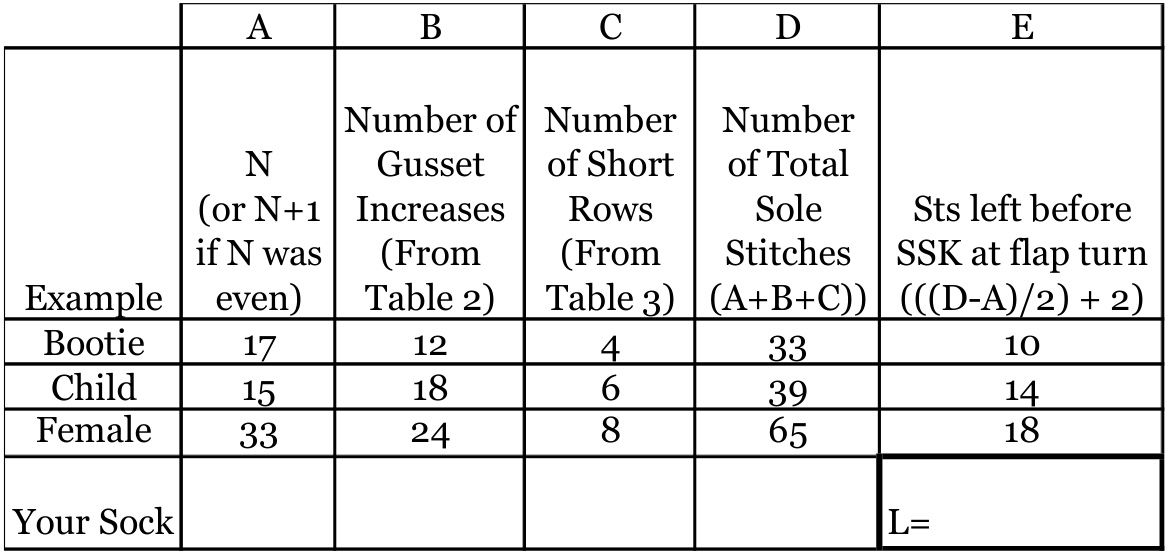
Row 1: (starts mid-row, after the last p short row turn): K to the last L sts, ssk, turn. L is calculated according to Table 6.
Row 2: Sl1, p until L sts remain in the heel, p2tog, turn. Row 3: [Sl1, k1] to 1 before the gap, ssk, turn. Repeat Rows 2 and 3 until allthe gusset sts are used, N sts left in the flap. (If N was even, $\mathbf{N}{+}\mathbf{1}$ now remain. Decrease 1 in the middle of the heel on the next row.) If a contrasting color was used for the heel, change back to the main color, now.
Calf
After the heel flap, it is a good idea to pick up a stitch or two across each corner of the gusset/instep join, to help eliminate holes. The extra stitches at each corner should then be decreased on the following round(s), though that instruction is not given below. Details on how to pick up the extra stitches to close the holes are given in Charlene Schurch's, "Sensational Knitted Socks."
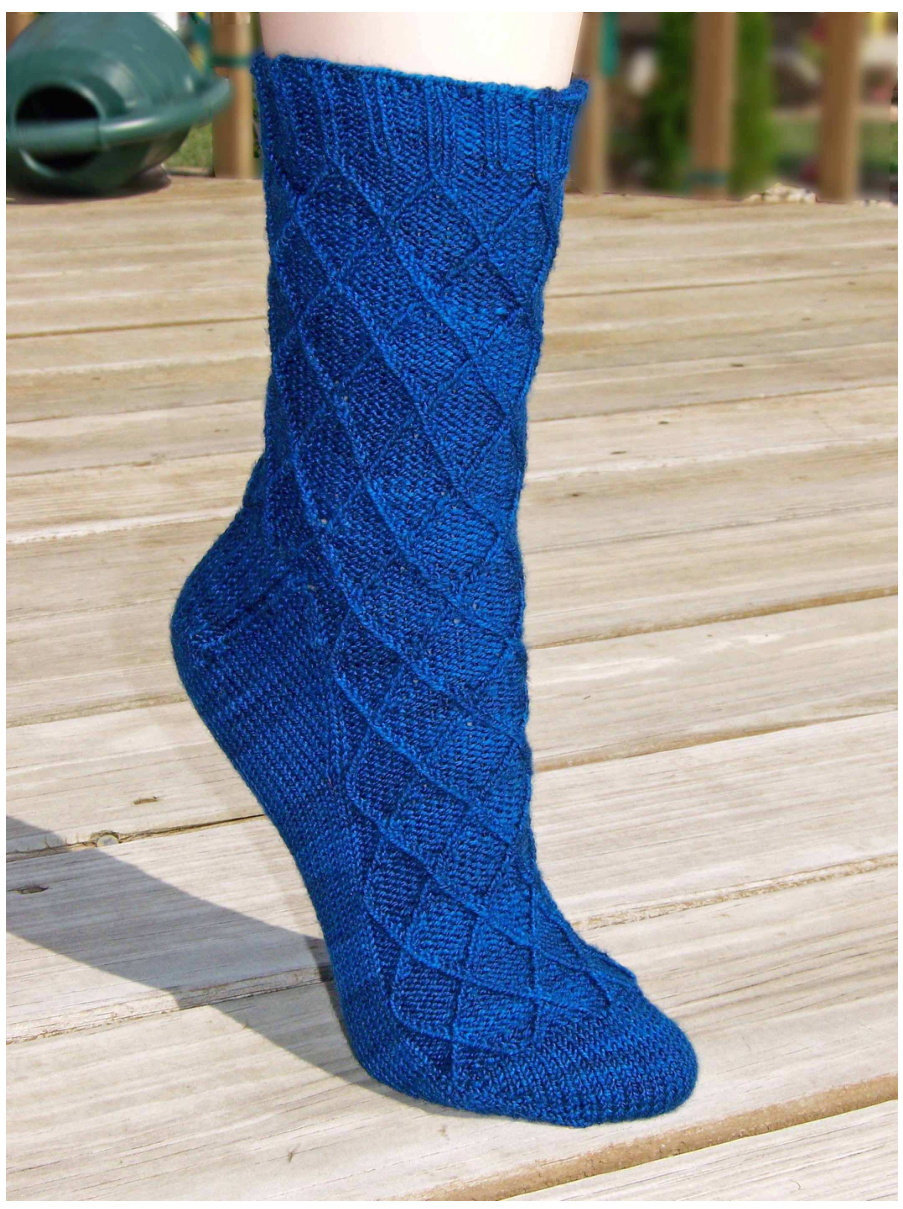
Begin working the back half of the calf in pattern, matching up pattern rows with the instep pattern. Continue for desired height. Working the same number of chart repeats in the calf as were worked on the instep (prior to the gusset increases), or slightly more, makes a balanced sock. Another way to check is to fold the sock at the heel and see if the calf matches the foot (minus the height of ribbing desired). The example lattice sock shown has three and a half pattern repeats in the calf, and three in the foot before the gusset, with 10 rows of ribbing.
Ribbing
The ribbing should complement the pattern design. If a pattern has some purls and some knits, it may work out to match the p's and k's of ribbing to the pattern, either k1/p1, or k2/p2, or some other combination. Sometimes it makes sense to even do an irregular repeat, such as $\mathrm{k}3/\mathrm{p}2$ , in order to match up with the calf pattern. For the lattice pattern, $\mathrm{k}2/\mathrm{p}2$ rib was used, with k's all tbl and placed to match the lattice crossing, with another pair of k's in the middle of the lattice diamond. Begin the ribbing after the last row of the chart Options for ribbing, picot edge, and binding off, are available in many knitting books. I like the Russian Bind Off described in Wendy D. Johnson's \*Socks From The Toe Up."

REFERENCES Cartmel, Jeannie, “Sewing, Knitting, and Beyond,” blog, “How to Modify Stitch Patterns for Your Socks,”2007. Cookie, A, "Sock Innovation,” Interweave, 2009. Flood, Jared, “Koolhaas Hat," Interweave Knits Holiday Issue, 2007. Interweave Knits,“Cabling Without a Cable Needle,” Interweave Knits Magazine, Fall 2009. Johnson, Wendy D., "Socks From The Toe Up," Potter Craft, 2009. Johnson, Wendy D., "Wendy Knits" blog, “Cables Without A Cable Needle. Leapman, Melissa, “Continuous Cables," Potter Craft, 2008. Schurch, Charlene, “Sensational Knitted Socks," Martingale & Company, 2005.
ABOUT THE DESIGNER

Lisa Kay is an engineer, a wife, and a mother of one. Her \*Posey” pattern was published in the 20o7 Spring Knitty. Lisa also enjoys spinning her own yarn. She spins on a Ladybug. Lately, she's been doing several socks for the Ravelry KAL for Wendy D. Johnson's book, “Socks From The Toe Up." Her blog can be found here. http://www.lisakayknits.blogspot.com/


