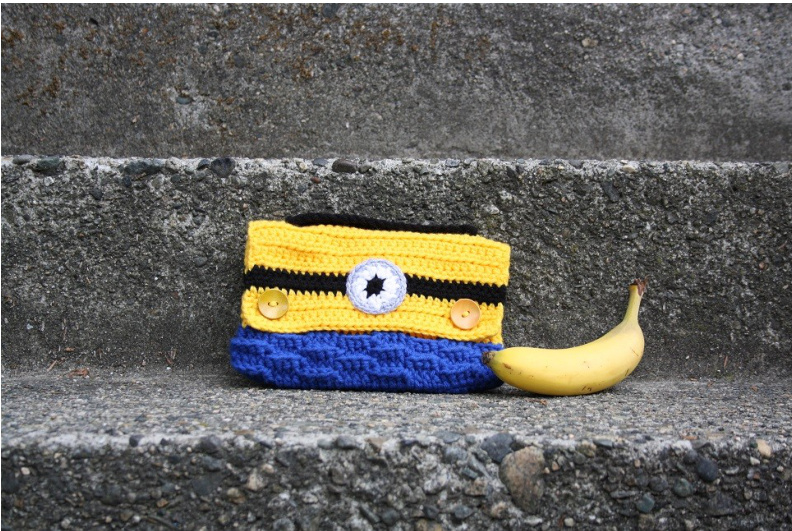
Minion Snack Bag
Materials needed:
Worsted weight yarn - i.e. Red Heart Super Saver blue (or black) for coveralls (CA) yellow (or purple) for Minion (CB) black for band on goggles and iris (CC) white for eye (CD) grey for goggle lens (CE) 5 mm (US size H) hook 2 - 2" yellow or purple buttons Yarn needle Scissors
Gauge:
8 hdc/htr sts x 8 hdc/htr rows= 2" x 2"
Stitches used:
ch-chain sl st - slip stitch sc/dc - US single crochet/UK double crochet hdc/htr - US half double crochet/UK half treble crochet dc/tr - US double crochet/UK treble crochet fpdc/fptr - US front post double crochet/UK front post treble crochet bpdc/bptr - US back post double crochet/UK back post treble crochet \*Separate instructions for both US and UK terminology\*
Notes:
Ch2 does count as a stitch. Ch1 does not count as a stitch.
in front of a st indicates to add # into the same st. i.e. 2dc means to add 2 dc into 1 st Do not turn work unless directed to do so.
There are 2 standard Minion colourations: yellow Minion with blue coveralls, or purple Minion with black coveralls. However, you can make your Minion in any colours you choose.
Special stitch instructions:
fpdc/fptr - Yarn over and insert hook from front to back, around the post, of the next stitch. Yarn over and pull up a loop. Yarn over and pull through 2 loops on hook, yarn over and pull through last 2 loops. bpdc/bptr - Yarn over and insert hook from back to front, around the post, of the next stitch. Yarn over and pull up a loop. Yarn over and pull through 2 loops on hook, yarn over and pull through last 2 loops. hdc2tog/htr2tog - Yarn over, insert hook into next st, yarn over and pull up a loop. Yarn over, insert hook into next st, yarn over and pull up a loop. Yarn over and pull through all loops on hook.
Instructions using Us terminology:
Snack Bag
Ch 33. Round 1: CA - dc in 3rd ch from hook and in each ch to end of row. Rotate work so you are now working on the other side of the starting ch. 2dc in 1st st, dc in each remaining st until end of row. Join with sl st to top of ch2. (64 sts) Round 2: CA- ch1, \*fpdc into next 4 sts, bpdc into next 4 sts\*. Repeat from \* to \* until end of round. Join with sl st to ch1. (64 sts) Round 3: CA- ch1, \*bpdc into next 4 sts, fpdc into next 4 sts\*. Repeat from \* to \* until end of round. Join with sl st to ch1. (64 sts) Round 4: CA - Repeat round 2. (64 sts) Round 5: CA - Repeat round 3. Fasten off and change to colour CB. (64 sts Round 6: CB - Join with sl st to ch1 of previous round. ch1, hdc in next st and in each st until end of round. Join with sl st to ch1. Turn. (64 sts) Round 7-9: CB - Repeat round 6. Fasten off and change to colour CC. (64 sts) nd 10: CC - Join with sl st to ch1 of previous round. Repeat round 6. (64 sts) ound 11: CC - Repeat round 6. Fasten off and change to colour CB. (64 sts) Round 12: CB - Join with sl st to ch1 of previous round. Repeat round 6. (64 sts) Round 13: CB - Repeat round 6. (64 sts)
Flap
From this point on, you will now be working in rows, not rounds. Do not finish off after snack bag section; continue working as one piece. Row 1: CB - ch1, hdc in next 32 sts. Turn. (32 sts) Row 2-8: CB - Repeat row 1. Fasten off and change to colour CC. (32 sts) Row 9: CC - Join with sl st to ch1 from previous row. Repeat row 1. (32 sts) Row 10: CC - Repeat row 1. Fasten off and change to colour CB. (32 sts) Row 11: CB - Join with sl st to ch1 from previous row. Repeat row 1. (32 sts) Row 12: CB - ch1, hdc in first 3 sts, ch2, skip next 2 sts, hdc in next 22 sts, ch2, skip next 2 sts, hdc in last 3 sts. Turn. (28 hdc and 4 ch sts) n first 3 sts, 2 hdc into ch2 space, hdc in next 22 sts, 2hdc into ch2 space, hc in last 3 sts. Turn. (32 sts) Row 14: CB - ch1, hdc in first st, hdc2tog, hdc in next 26 sts, hdc2tog, hdc in last st. (30 sts) Finish off and weave in ends. Sew buttons to line up with the button holes made in the flap. Eye(s) Make 1 or 2 eyes depending on the Minion of your choice. Ch 2. Round 1: CC - 6dc in 1st ch. Join with sl st to top of 1st dc. Finish off and weave in ends. Change to colour CD. (6 sts) Round 2: CD - Join with sl st to 1st dc from previous round. ch2, dc in same st. 2dc in each st until end of round. Join with sl st to top of ch2. Finish of and weave in ends. Change to colour CE. (12 sts) Round 3: CE - Join with sl st to 1st dc from previous round. ch1, 2sc in same st. sc in next st. \*2sc, 1 sc\*. Repeat from \* to \* until end of round. Join with sl st to top of first sc. Finish off, but leave a long strand for sewing. (18 sts) For a 1-eyed Minion, sew the eye along the black band in the centre of the flap. For a 2-eyed Minion, space the eyes evenly along the black band of the flap.
Handle
ur choice and hold 2 strands together. Leave a long tail at beginning for sewir Ch 21. Row 1: sc in 2nd ch from hook and in each ch to end of row. Turn. (20 sts) Row 2: Ch1, sc in each st across. (20 sts) Finish off and leave a long tail for sewing. Sew handle at the very top of the snack bag where the flap meets the bag. Finish off and weave in ends. Enjoy!
Instructions using UK terminology:
Snack Bag
Ch 33. Round 1: CA - tr in 3rd ch from hook and in each ch to end of row. Rotate work so you are now working on the other side of the starting ch. 2tr in 1st st, tr in each remaining st until end of row. Join with sl st to top of ch2. (64 sts) Round 2: CA- ch1, \*fptr into next 4 sts, bptr into next 4 sts\*. Repeat from \* to \* until end of round. Join with sl st to ch1. (64 sts) Round 3: CA- ch1, \*bptr into next 4 sts, fptr into next 4 sts\*. Repeat from \* to \* until end of round. Join with sl st to ch1. (64 sts) Round 4: CA - Repeat round 2. (64 sts) Round 5: CA - Repeat round 3. Fasten off and change to colour CB. (64 sts Round 6: CB - Join with sl st to ch1 of previous round. ch1, htr in next st and in each st until end of round. Join with sl st to ch1. Turn. (64 sts) Round 7-9: CB - Repeat round 6. Fasten off and change to colour CC. (64 sts) nd 10: CC - Join with sl st to ch1 of previous round. Repeat round 6. (64 sts) Round 11: CC - Repeat round 6. Fasten off and change to colour CB. (64 sts) Round 12: CB - Join with sl st to ch1 of previous round. Repeat round 6. (64 sts) Round 13: CB - Repeat round 6. (64 sts)
Flap
From this point on, you will now be working in rows, not rounds. Do not finish off after snack bag section; continue working as one piece. Row 1: CB - ch1, htr in next 32 sts. Turn. (32 sts) Row 2-8: CB - Repeat row 1. Fasten off and change to colour CC. (32 sts) Row 9: CC - Join with sl st to ch1 from previous row. Repeat row 1. (32 sts) Row 10: CC - Repeat row 1. Fasten off and change to colour CB. (32 sts) Row 11: CB - Join with sl st to ch1 from previous row. Repeat row 1. (32 sts) Row 12: CB - ch1, htr in first 3 sts, ch2, skip next 2 sts, htr in next 22 sts, ch2, skip next 2 sts, htr in last 3 sts. Turn. (28 hdc/htr and 4 ch sts) · in first 3 sts, 2htr into ch2 space, htr in next 22 sts, 2htr into ch2 space, htr ii last 3 sts. Turn. (32 sts) Row 14: CB - ch1, htr in first st, htr2tog, htr in next 26 sts, htr2tog, htr in last st. (32 sts) Finish off and weave in ends. Sew buttons to line up with the button holes made in the flap. Eye(s) Make 1 or 2 eyes depending on the Minion of your choice. Ch 2. Round 1: CC - 6tr in 1st ch. Join with sl st to top of 1st tr. Finish off and weave in ends. Change to colour CD. (6 sts) Round 2: CD - Join with sl st to 1st tr from previous round. ch2, tr in same st. 2tr in each st until end of round. Join with sl st to top of ch2. Finish of and weave in ends. Change to colour CE. (12 sts) Round 3: CE - Join with sl st to 1st tr from previous round. ch1, 2dc in same st. dc in next st. \*2dc, 1 dc\*. Repeat from \* to \* until end of round. Join with sl st to top of first dc. Finish off, but leave a long strand for sewing. (18 sts) For a 1-eyed Minion, sew the eye along the black band in the centre of the flap. For a 2-eyed Minion, space the eyes evenly along the black band of the flap.
Handle
choice and hold 2 strands together. Leave a long tail at beginning for sewing. Ch 21. Row 1: dc in 2nd ch from hook and in each ch to end of row. Turn. (20 sts) Row 2: Ch1, dc in each st across. (20 sts) Finish off and leave a long tail for sewing. Sew handle at the very top of the snack bag where the flap meets the bag. Finish off and weave in ends. Enjoy! September 2015 Jennifer Bregg of Jennesis Designs Pattern and photographs are protected by copyright. Pattern may not be reproduced, sold or published without permission by owner. Please link to this pattern rather than copy and paste. If selling your finished items, please use your own photographs.


