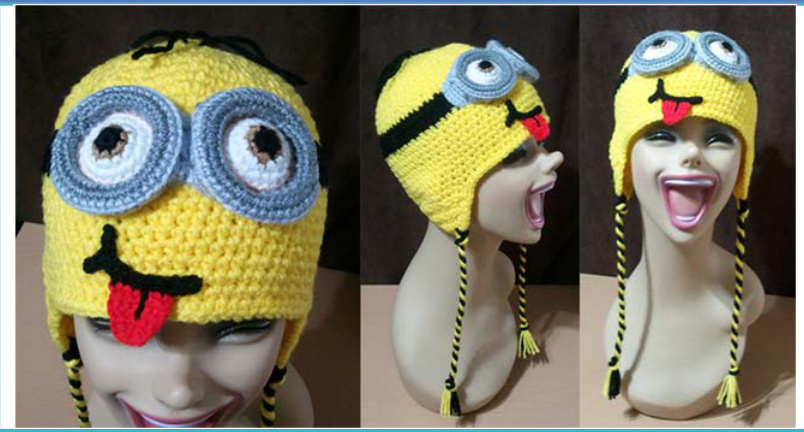
Minion Beanie
| Author/Creator:Lori-Anne Ketola, 2013. License:CreativeCommons | ||||
| *The Minion is property of llumination Entertainment. No copyright infringement is intended, merely an appreciation of the character design. This pattern is free and intended for gifts and entertainment only; please does not reproduce this pattern, or sell the finished product for profit. Sharing is fine, but please do not remove me as the designer. Thank you. | ||||
| Description: | Beanie based on the minion character from Despicable Me. | Finished size: Teen/Adult | ||
| Skill Level: | Easy/Beginner Hooks: | Yarn: Bernat Super-Saver( or other worsted weight yarn): Bright Yellow (approx. 100g) | ||
| Materials Needed: | 3.75mm 2.75mm Scissors Tapestry Needle Stitch Markers | Heather Grey Light Grey White Black (approx.. 50g) Red Brown | ||
| stitches are worked in same stitch | ||||
| Abbreviations mr st | Light Peach | |||
| magic ring | ) | |||
| ch chain | ** repeat step written between stars | |||
| stitch | [] total stitches in Row/Rnd | |||
| sl st slip stitch | ls | loop stitch | ||
| together | ||||
| tog single crochet | ||||
| SC | ||||
| hdc half double crochet Rnd | ||||
| round f/o Credits | ||||
| fasten off Credit to Paula from Owl Luv Crochet for how to make the ties, and the earflap counts. | ||||
| Beanie | Rnd | Instructions: Using Bright Yellow yarn | Notes |
| Rnd 1 Rnd 2 | In Magic Ring hdc 8 in ring. Do not join. [8] | *Continue working in thefirst hdc from previous round. | |
| *(sc, hdc)* 8 times. [16] | |||
| Rnd 3 | *(sc, hdc), sc, (hdc, sc), hdc,* 4 times [24] | ||
| Rnd 4 | *(hdc, sc), hdc, sc* 8 times. [32] | ||
| Rnd 5 | *(hdc, sc), hdc, sc, hdc, (sc, hdc), sc, hdc, sc* 4 times [40] | ||
| Rnd 6 | * (hdc, sc), hdc, sc, hdc, sc * 8 times. [48] | ||
| Rnd 7 | *(hdc, sc), hdc, sc, hdc, sc hdc * 8 times. [56] | ||
| Rnd 8 | *(sc, hdc), sc, hdc, sc, hdc, sc hdc* 8 times. [64] | ||
| Rnd 9 | *(sc, hdc), sc, hdc, sc, hdc, sc hdc, sc * 8 times. [72] | ||
| Rnd 10 | *(hdc, sc), hdc, sc, hdc, sc hdc, sc, hdc, sc * 8 times. [80] | ||
| Rnd 11 -13 | *hdc, sc* around [80] | ||
| Change to black, ch 1, sl st in the last stitch created, ch 1 | |||
| Rnd 14 | through front loops only, *hdc, sc* around [80] | ||
| Rnd 15 -16 | through both loops, *hdc, sc* around [80] | ||
| Change to yellow, ch 1, sl st in the last stitch created, ch 1 | |||
| Rnd 17 | through back loops only, *hdc, sc* around [80] | ||
| Rnd 18 - 25 | through both loops, *hdc, sc* around [80] | ||
| Earflaps Row Instructions: Using Bright Yellow yarn Notes | |||
| From the back of hat, count 10 stitches to each side of | |||
| back of hat (left and right), place stitch marker. | |||
| sl st till the first stitch marker | |||
| Row 1 Row 2 | *sc, hdc* x7, ch1 and turn [14] | ||
| Row 3 | sc2tog, *hdc, sc* x5, sc2tog, ch1 and turn [12] | ||
| Row 4 | sc2tog, *hdc, sc* x4, sc2tog, ch1 and turn [10] | ||
| Row 5 | sc2tog, *hdc, sc* x3, sc2tog, ch1 and turn [8] | ||
| sc2tog, hdc, sc, hdc, sc, sc2tog. ch1 and turn [6] | |||
| Row 6 | sc2tog, hdc in next 2 sts, sc2tog. ch1 and turn [4] | ||
| Row 7 | sc2tog twice [2] | ||
| f/o | |||
| For second earflap | count 14 stitches after the second stitch marker placed | ||
| and place another stitch marker here (this is where you will sl st to start off your second earflap. | |||
| Join yarn on the wrong side of the hat, and work toward | |||
| the first stitch marker placed on this side | |||
| of the hat. | *FOLLOW INSTRUCTIONS FOR FIRST EARFLAP* | ||
| Edging | center back of the hat | Instructions: Using Bright Yellow: join with sl st at the Notes | |
| sc around, sl st to | |||
| join, f/o and weave in ends. | |||
| Eye(s) | Rnd | Instructions: Starting with Black yarn and 2.75mm hook | Notes | |
| make 2 (unless you are making a one eyed minion) | Rnd 1 | 6 sc in magic ring, sl st join [6] | The eye will be slightly curved outward.Ifit is too curved,yourgauge is too tight. | |
| change to brown | ||||
| Rnd 2 | ch 1, *sc, 2 sc in next st*, sl st join [9] | |||
| change to white | ||||
| Rnd 3 | ch 1, *sc, 2 sc in next st*, sl st join [15] | |||
| Rnd 4 | ch 1, *sc, 2 sc in next st*, sl st join [21] | |||
| change to Light Peach | ||||
| Rnd 5 Rnd 6 | ch 1, sc around [21] | |||
| f/o and weave in loosepeachendso itwill stay tucked inside the eye. |
| inside the eye. | |||
| Goggle(s) | Rnd | Instructions: Attach Heather Grey yarn to the outer edge of the eye, through front loop only, and using the 2.75 mm hook: | Notes |
| Do the same for both eyes (unless you are only making one). | Rnd 1 | sc around, through front loop only, sl st join, ch 1 [21] | * Stuffing is optional. 1 did not stuff mine, as there really is no need to. The goggles hold their shape very well on their own. |
| Rnd 2 | Now working through both loops: 2 sc in each st around, sl st join, ch 1 [42] | ||
| Rnd 3 | Working through back loops only: | ||
| sc in each st around, sl st join [42] Change to Light Grey | |||
| Rnd 4 | sc in each st around, sl st join, ch 1 [42] | ||
| Rnd 5 | Working through back loops only: sc in each st around, sl st join [42] | ||
| Rnd 6 | sc in each st around, sl st join, ch 1 [42] | ||
| sc in next 6 sts, ch 1, turn [6] | |||
| sc in next 6 sts, ch 1, turn [6] | |||
| f/o leaving a long tail for sewing. Using Heather Grey, stitch lines, evenly spaced, around the | |||
| goggles to represent the raised sections on the goggles edge. If making 2, stitch the goggles together with a few stitches | |||
| through both thicknesses of the inner center of each goggle. Sew the goggles to the center front of the hat, lining the | |||
| for the goggles. | side tabs to the black stripe so that it becomes the band | ||
| Mouth | Step | Instructions: Using Black yarn and 2.75 mm hook Notes | |
| Mouth | Step | Instructions:Using Black Kyarnand2.75 mmhook | Notes |
| Step 1 | ch 5,t turn | 米 Where your yarn tails are represents the top ofthecornerofthe | |
| Step 2 | sl st into f first 3, ch 12, turn | ||
| Step 3 sl st in | the 12 ch, sl st in remaining 2 ch from step 1. | ||
| f/o, leaving a tail for sewing. | mouth. |
| Tongue | Rnd | Instructions: Using Red yarn and 2.75 mm hook | Notes |
| Attach yarn, using a sl st, to the back loop of the fourth ch from the corner on the underside of the mouth. ch 1 | |||
| Rnd 1 | sc in same st, and in the next 5 sts (through back loops |
| only), ch 1, turn [6] | |||
| Rnd 2 | sc across, ch 1, turn [6] | ||
| Rnd 3 | sc 2 tog, scin next 2 sts, sc 2 tog, ch 1 turn [4] | ||
| Rnd 4 | sc across, ch 1, turn [4] | ||
| Rnd 5 | sc 2 tog twice [2] f/o, and weave in loose end. | ||
| Using black yarn, sew a curved line in the center of the tongue. | |||
| Finishing mouth: | Using the tail left on the mouth, sew finished piece to hat with top of mouth corner positioned one row below the center of the left goggle, arcing downward until it is just slightly past the center of the goggles and approximately | ||
| two rows above the edge of the hat. The tongue will hang lower than the edge of the hat by about two rows. |
| Hair | Rnd | Instructions: Using Bright Yellow yarn, and 2.75mm hook: | Notes |
| Rnd 1 | 6 sc in magic ring | * You could also tie in your hair strands, or use thelatchhookmethod. | |
| Change toBlackyarn | |||
| Rnd 2 | *2sc in first st, Is* x6 (9) | ||
| Rnd 3 | sl st around [9] | ||
| Cut the loop stitches tocreate 2 strands per loop.I also tied a strand in the center because I found the spacing to be too much (that is optional). | |||
| Place the piece inside the hat, strands facing up, and pull the strands through the top of the hat as desired. | |||
| Sew the piece into place using bright yellow yarn. Make sure to sew on the inside of the hat, using small stitches so they are not visible from the outside of the hat. weaveinanylooseendssotheyarenotvisible. |
| Ties | Steps | Instructions: Using Bright Yellow and Black: | Notes |
| Step 1 | Cut4-30"strandsofeachcolourofyarnforeachtie. If using only one colour -cut 8 strands for each tie. | ||
| Step 2 | Using the strands for one tie, pull the strands through middle 2 sts on the last row of the earflap. | ||
| Step 3 | Separatethecolours and tieaknot. | ||
| Step4 | Twist each colour separately (if using 2 colours), turning theyarninaclockwisedirection | ||
| Step 5 | Twist both colours together, turning the yarn in a counter- clockwise direction | ||
| Step6 | Formaknotattheend andtrimedges. |


