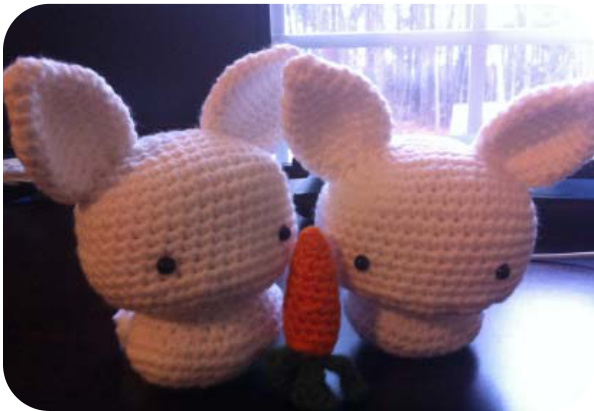
BUNNY To welcome in Jpring!
Maerials:
· Some white, green, and orange yarn (worsted weight). I used all Red Heart Super Saver. · E hook (3.5 mm) ·Tapestry needle · Pliers - this will make sewing the pieces together easier · Some way to mark stitches (l use regular safety pins)
Notes: Counting stitches is something I'm not particularly careful about so some of the references made will not be by stitch count but by position. The end of each round is not necessarily in the same spot as the beginning - I've added some pictures in hopes of being helpful
HEAD construcvion:
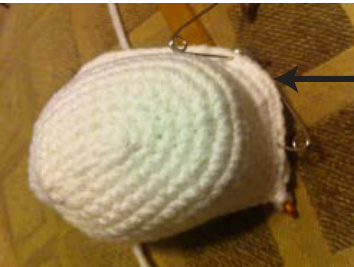
1) To start chain 8 (8) 2) 2 sc in 2nd chain from hk, sc in next 5 sc, 3 sc in last sc continuing down other side of main chain (from first step): sc in next 6 sc. do not join (do not sl st) (17) Now working in continuous rounds on the oval (note that this does not follow the standard formula for making an oval) 3) \*3 sc in 1st sc, sc in next 7 sc\* 2 times (20) 4) 2 sc in each of next 3 sc, sc in next 7 sc, 2 sc in each of next 3 sc, sc in next 8 sc (27) 5) 2 sc in each of next 4 sc, sc in next 10 sc, 2 sc in each of next 4 sc, sc in next 11 sc (37) 6) (\*2 sc in next sc, sc in next sc\* 3 times, sc in next 12 sc) 2 times (42) 7) (\*2 sc in next sc, sc in next sc\* 3 times, 2 sc in next sc, sc in next 13 sc) 2 times (48) 8-14) sc around (48) This is where position matters, sc to where round 15 starts: 16) Mark the middle \~8-10 stitches of what will be the front of the bunny head (see figure). Sc to the first marker, then in the marked section continue with \*2sc in next sc, sc in nex sc\* until you reach the second marker then sc all the way around 18) dec where the inc were in rounds 15 and 16 (so at the front of the head and at the cheek sides), sc in any other sc 19) \*sc in next 3 sc, inv dec\* repeat around 20) \*sc in next 2 sc, inv dec\* repeat around 21) \*sc in next sc, inv dec\* repeat around, stuff head firmly, and place eyes (if you are using plastic safety eyes) 22-23) inv dec all around. FO and weave in end Note: the head will seem a bit lumpy but once stuffed and assembled with some slight shaping will even out Marking spot for row 16

BUNNY by choppi BODY consirucion:
1) To start chain 5 (5) 2) 2 sc in 2nd chain from hk, sc in next 2 sc, 3sc in last sc, working on opposite side of chain to make oval sc in next 4 sc, do not join round (11) Working in continuous rounds: 3) 3 sc in 1st sc, sc in next 4 sc, 3 sc in next sc, sc in next 5 sc (15) 4) \*2 sc in next 3 sc, sc in next 5 sc\* 2 times (22) 5) (\*2 sc in next sc, sc in next sc\* 3 times, sc in next 6 sc) 2 times (30) 6) (\*2 sc in next sc, sc in next sc\* 3 times, sc in next 8 sc) 2 times, sc in next 2 sc (36) 7-9) sc all around (36) 10) \*sc in next 3 sc, inv dec\* repeat all the way around, you will end on the 3 sc (not on inv dec) 11) \*inv dec, sc in next 2 sc\* allthe way around, you will end on a single sc, sl st in next sc FO and leave long tail for sewing on to body. Stuff gently (not super packed) - this will help bunny sit properly. Collapse ear and fold in half, shape the tip if desired
EARY (make 2):
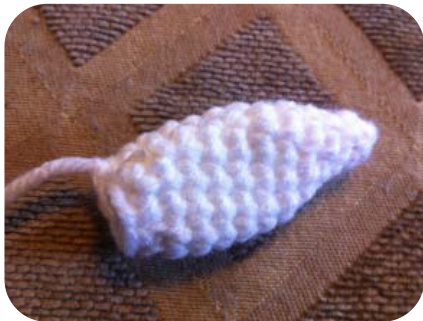
1) 6 sc in magic ring (6), again working in continuous rounds 2) sc in each sc (6) 3) \*sc in first sc, 2 sc in next sc\* 3 times (9) 4) \*sc in next 2 sc, 2 sc in next sc\* 3 times (12) 5) \*sc in next sc, 2 sc in next sc\* 6 times (18) 6-11) sc all around (18) 12) \*sc in next sc, inv dec\* 6 times (12) Sl st to next sc, FO, leave long tail for sewing. Fold ears in half to help in shaping (see figure)
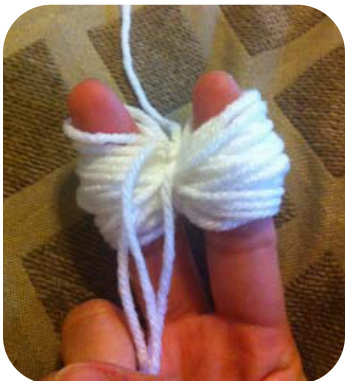
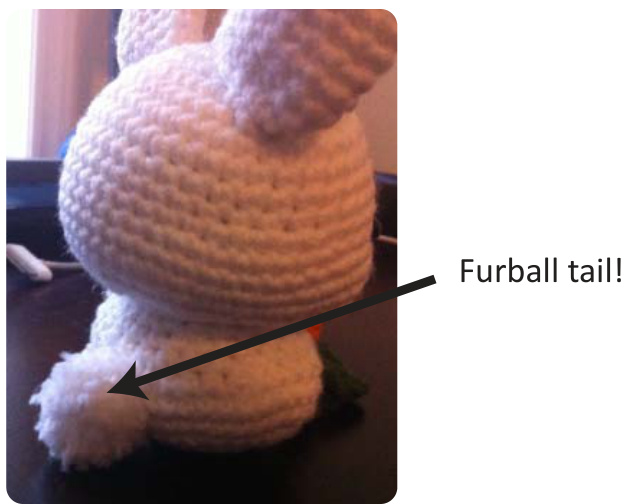
TAIL:
Make a very small pom-pom for the tail. I wrap the yarn around my index and middle finger to make a pom-pom... You can do it however you think worksbest Cut side loops and trim trim trim trim trim trim trim trim! down to desired size Attach ears to head, body to head, then tail to body You could add a facial expression (l prefer expresionless) or add bows to the ears to make girl bunnies! Or add appendages - again prefer appendage-less bodies -
Please do not sell goods made from this pattern, unless it's for charity.
BUNNY by choppi
CARROT (hawever manY fe lat).
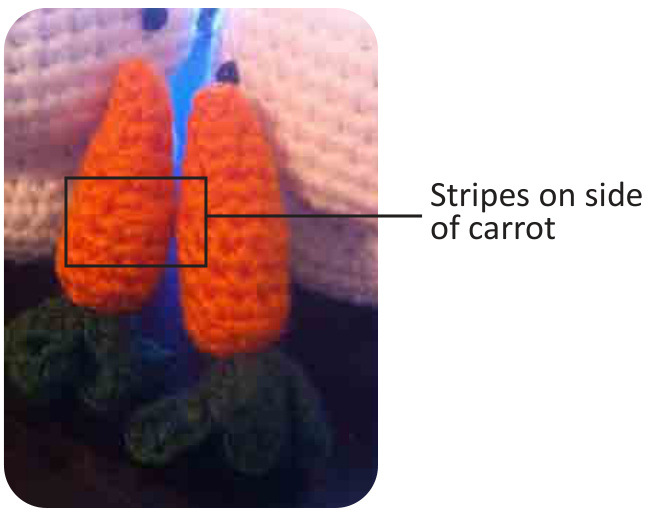
IN ORANGE: 1) 4 sc in magic ring (4) 2) \*sc in next sc, 2 sc in next sc\* 2 times (6) 3) sc around (6) 4) \*sc in next 2 sc, 2 sc in next sc\* 2 times (8) 5-6) sc around (8) 7) \*sc in next 3 sc, 2 sc in next sc\* 2 times (10) 8) sc around (10) 9) \*sc in next 4 sc, 2 sc in next sc\* 2 times (12) 10-11) sc around (12) 12) \*sc in next sc, inv dec\* 4 times (8) - stuff here 13) inv dec around (4) FO and leave long tail to make stripes on side (figure)
IN GREEN:
IlIs pait lldy ue veiy Luusllig - Il uuesll L llave tu pelel ley die just julliuieu ieaves! dut lis is how I did it... 1) chain 5 2) (sc, sc, sc) in 2nd chain from hk, sl st in next chain, (sc, hdc, sc) in next chain, sl st in last chain 3) chain 5 4) (sc, hdc, hdc, sc) in 2nd chain from hk, sc in next chain, 2 sc in next chain, sl st 5) chain 4 6) (sc, hdc, dc) in 2nd chain from hk, (hdc, sc) in next chain, hdc in next chain, sl st to main center body 7) chain 5 8) (sc, hdc, hdc) in 2nd chain from hk, (sc, hdc) in next chain, sc in next chain, sl st in last chain 9) working up the other side of the first chain 5 from step 1, (sc, hdc) in chain, (sc, hdc) in next chain, hdc in next chain, sl st to the top of the “leaf" FO and leave long tail for sewing to carrot body. Weave long tail through leaf down to center and sew onto carrot.
Please do not sell goods made from this pattern, unless it's for charity.


