Wedded Bliss
An original pattern by E.K. King, @ 2005
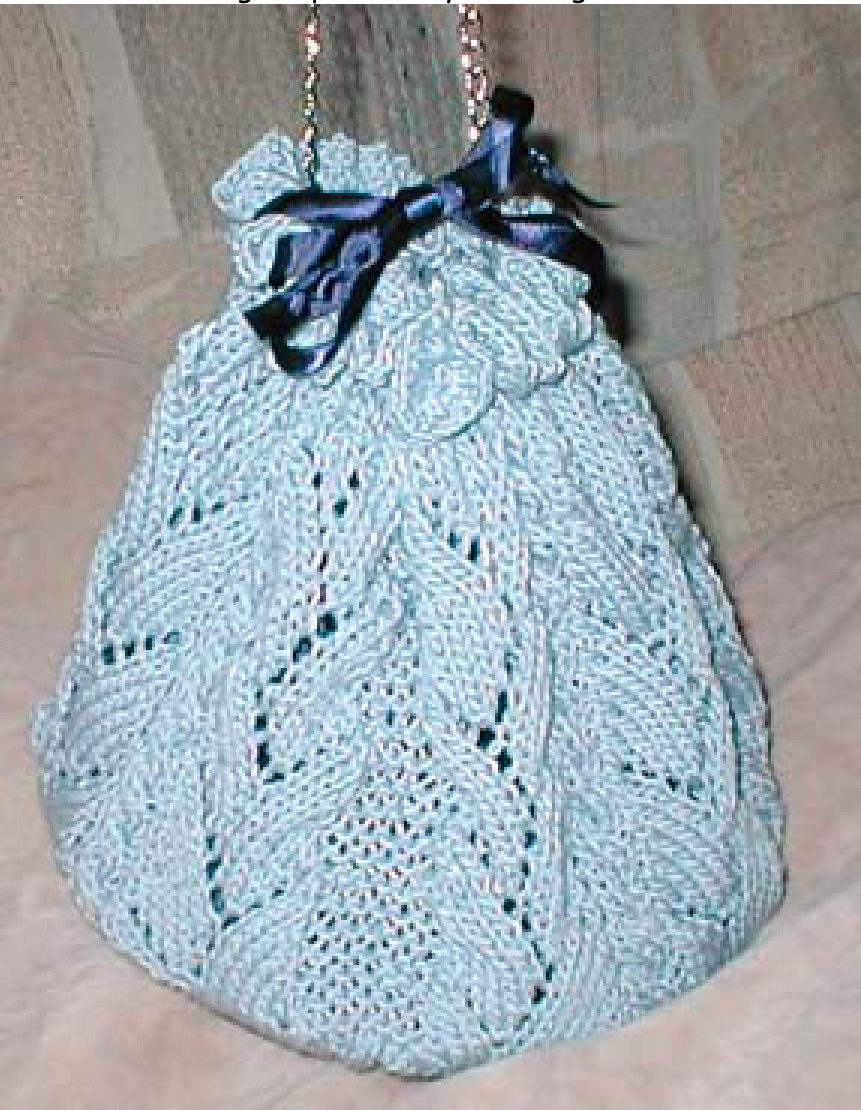
A dainty, lady-like purse with simple lace and cables to compliment dressier attire
Supplies:
Royaletm Silkessence Microfiber (Article 165, Sport Weight), 2 balls, "Periwinkle" Size 5 needles - both a set of 5 double point needles (dpns) and a circular needle Cable needle (this is optional - by the time you start doing the cables you'll have switched to the circulal needle so you can use one of the dpns) Size D crochet hook Stitch marker 8" round 1/8" thick plexiglass 18" large silver necklace chain, clasp ends removed Dark blue stretch velvet fabric, approx 1/4 yard 3/8" dark blue satin ribbon, approx 2 yards Sewing thread to match your yarn (not your fabric!) Sewing machine (optional - you can sew the lining entirely by hand) Tapestry and sewing needles Fabric glue Fray Check (optional - used on ribbon ends to keep them from unraveling, could also use fabric glue) Scissors Tape measure Gauge: Not terribly important, but the round of plexiglass should fit comfortably in the bottom of the purse without stretching it or seeming too small. I'd recommend measuring the bottom of your purse prior to having the plexiglass cut, just to be on the safe side. This is intended to be purse size, not tote bag size.
Notes:
I have a real issue with the idea of labeling patterns as "easy" or "intermediate" and the like because I don't want to discourage anyone from trying something. I will however tell you that you'll need to be familiar with the following stitches - knit, purl, yarn over, make 1, knit into the front and back of a stitch, and knit two stitches together. If you've done something with cables before that's a plus, but it isn't essential. You will also need some basic knowledge of crochet to do the top ruffled edge. If you don't crochet and would prefer not to learn right now, you could substitute the crochet ruffle with a few additional rows of plain knitting, but you won't get the same effect. In addition, a very basic understanding of sewing is required for the lining. I would encourage you to try this even if you are a fairly new knitter, just take it slow and read the pattern through before starting to make sure that you have a good understanding of what you're doing. Abbreviations & Explanations: cO - cast one BO - bind off K- knit P-purl Kfb - knit into the front of the stitch as normal but don't slide it off the left needle, knit into the back of that same stitch and then slide it off; one new stitch made Yo - yarn over K2tog - knit next two stitches together M1 - make one stitch; pick up the horizontal bar that is between the two knit stitches on the row below the one you're work on and place that on the left needle then knit that stitch as you normally would; one new stitch made Cn - cable needle Dpns - double pointed needles Sl - slip (all stitches in this pattern are slipped knitwise) St or sts - stitch or stitches Ch - chain Dc - double crochet Bottom: Using dpns, CO 8 sts, putting 2 sts on each needle R1 - k into the back of each st R2 - kfb each st around R3 -kall sts R4 - \*m1, k to last st on needle, m1\*, repeat on each needle Continue repeating R3 and R4 until there are 36 sts on each needle Switch to circular needle and k one round; place marker at start of round. Weave in tail from CO at this time. Sides - Lace & Cable pattern: Each R in this section represents one side of the purse and should be worked a total of four times. The directions in the [] represent the cable that is formed between the lace panels. You don't need to do anything special with these stitches, I just found it easier to have the cable directions visually separated in the pattern.
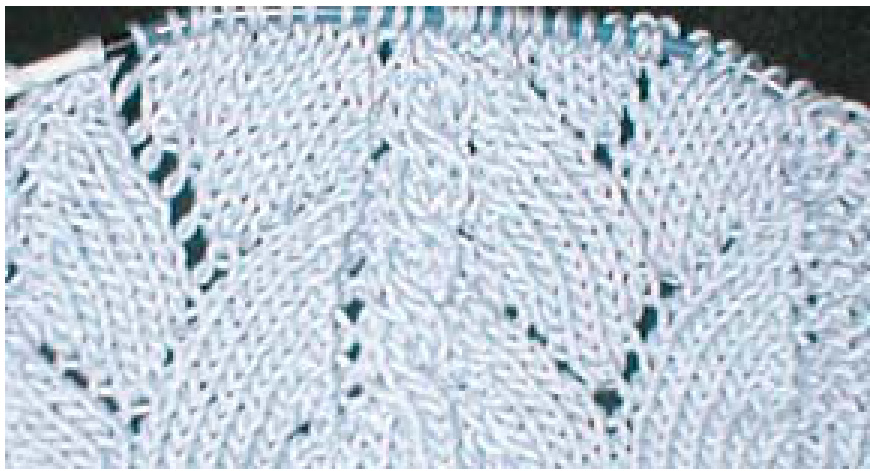
R1 - k3, k2tog, yo, k5, yo, k3, skp, k1, [k4], k1, k2tog, yo, k5, yo, k3, skp, k3 R2 - p3, k12, p1, [k4], p1, k12, p3 R3 - k3, k2tog, k5, yo, k1, yo, k2, skp, k1, [k4], k1, k2tog, k5, yo, k1, yo, k2, skp, k3 R4 - p3, k12, p1, [sl next 2 sts to cn & hold in front, k2, k2 from cn], p1, k12, p3 R5 - k3, k2tog, k4, yo, k3, yo, k1, skp, k1, [k4], k1, k2tog, k4, yo, k3, yo, k1, skp, k3 R6 - p3, k12, p1, [k4], p1, k12, p3 R7 - k3, k2tog, k3, yo, k5, yo, skp, k1, [k4], k1, k2tog, k3, yo, k5, yo, skp, k3 R8 - p3, k12, p1, [sl next 2 sts to cn & hold in front, k2, k2 from cn], p1, k12, p3 R9 - k3, k2tog, k2, yo, k1, yo, k5, skp, k1, [k4], k1, k2tog, k2, yo, k1, yo, k5, skp, k3 R10 - p3, k12, p1, [k4], p1, k12, p3 R11 - k3, k2tog, k1, yo, k3, yo, k4, skp, k1, [k4], k1, k2tog, k1, yo, k3, yo, k4, skp, k3 R12 - p3, k12, p1, [sl next 2 sts to cn & hold in front, k2, k2 from cn], p1, k12, p3 Repeat R1 through R12 three more times. Knit one round. \*k2tog, yo\* repeat around entire piece Knit one round; remove marker. BO using a standard knit BO until you have one stitch remaining: switch to crochet hook.
Ruffled Edge: Ch3, in same st work (1 dc, ch2, 2 dc); \*skip one st, in next st work (2 dc, ch2, 2 dc)\* repeat from \* to \* around. Join with sl st to 3rd chain of starting ch3. Cut yarn and pull through: weave in yarn tail.
Lining and Finishing:
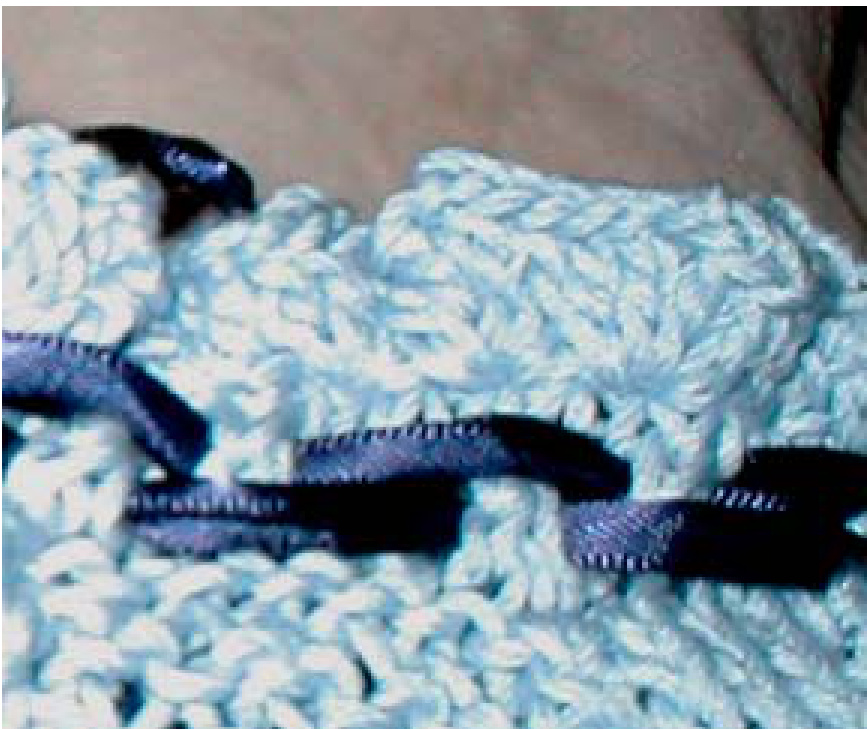
Measure the bottom of the purse to determine the size of plexiglass, allowing a bit of room for the lining fabric and ease, approximately 1/4" all the way around. Cut a circle of velvet approximately 1/2" larger than your plexiglass and glue it around the edges using the fabric glue. Set aside and allow to dry completely. Measure the purse from the bottom where the plexiglass will sit up to the eyelet round. Cut a rectangle of velvet that is as wide as this measurement and as long as the circumference of your plexiglass plus 1/2" for the seam allowance. Use the selvedge/finished edge for one of the long sides if at all possible. Sew the short sides, right sides together, either by hand or using a sewing machine. Turn the fabric tube so that the right side is facing out. Slip the plexiglass fabric side down into the tube and down to the bottom of it, stopping about 1/4" from the bottom. This should be a snug fit and the extra fabric should be laying flat on the bottom of the fabric covering the plexiglass. Hand stitch the fabric tube to the fabric on the plexiglass. This part of the lining is not going to be seen so don't worry about how neat it is. Once you have the lining sewn together, insert it into the purse keeping the right side of the fabric facing out - you want that side to show through the lace panels. Hand stitch the top edge of the lining to the inside of the purse just below the eyelet round, working in sections to keep the knitting from bunching up. First attach the lining across the top of one of the cable sections, then on the cable section directly across from the first. Attach the lining to the other two cable sections and then move onto the lace panels until the lining has been attached all the way around. Determine where you want the chain attached and then hand sew the last link on each end into the lining just as you would attach a button that has a shank on the back. You can add a drop of fabric glue to the knot when finished for extra reinforcement. Take one of the lengths of craft ribbon and weave it through the eyelet row, skipping every other hole. Tie the ends together in an overhand knot and trim the ends to about 2": apply Fray Check to the ends to prevent the ribbon from unraveling. Repeat with the other length of ribbon starting on the opposite side of the purse and using the holes you skipped with the first ribbon.


