eolly Thoughts
IN PURSUIT OF CRAFTY MATHEMATICS
Cushion Conglomeration Caper (Short Version)
CCC was originally a project for, and by, the members of the Woolly Thoughts Yahoo group, as an introduction to using the Woolly Thoughts methods. The plan was for a different member of the group to add each new shape so that there was no predetermined pattern. Some might refer to this as freeform but this was all using very precise geometric shapes. The only angles allowed in the shapes were 45, 90 and 135 degrees. The original plan broke down as some members wanted to work more quickly than others. I added the remaining shapes myself so that everyone could work at their own speed. The basic instructions for a new shape were revealed every two days but all help and advice files had to be accessed separately so as not to spoil the fun for those working more slowly. This file attempts to reproduce those original conditions. In pages 2 - 5 of this document, shapes 1 and 2 are described in detail; shapes 3 - 22 are listed just as they were given to members. If you want to make the cushion without help, use only pages 2 - 5. The longer pdf (which you can download from the Ravelry pattern page) contains detailed help and diagrams for each shape. Woolhelmina(Pat Ashforth & Steve Plummer)
www.woollythoughts.com
The Cushion Conglomeration Caper (CCC)
General instructions
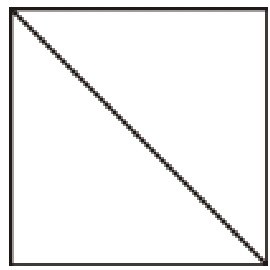
and needles. Use approximately the same thickness of yarn throughout. Gauge is unimporta Work in garter stitch. The finished cushion will be 45 cm square (approximately 18") If you find yourself doing something different from the crowd, it will be your decision whether you rip or improvise. The Caper is meant to be fun!! Shape 1 - Starting Square Draw a 7.5 cm square. Draw the diagonal. Time spent drawing is saved later as it is so much quicker to measure with this template. Cast on one stitch and increase until your triangle fits the template up to the diagonal line; then decrease at the same rate. (The Woolly Thoughts way is to knit twice into the last stitch of the row, when you are increasing, and to knit two together at the end of every row when you are decreasing. That's the easy way to teach the method but if you prefer to do the increases and decreases some other way, that's fine.) Important note: Remember how many stitches you had on the needle, at the widest point, when you reached the diagonal.
Shape 2
Instructions: Pick up the stitches along any one edge of your square and knit a triangle with the right hand-side vertical (i.e. forming a continuous straight line with one side of the square) and the other side sloping inwards at 45 degrees. These rows will be parallel to the side of your square.
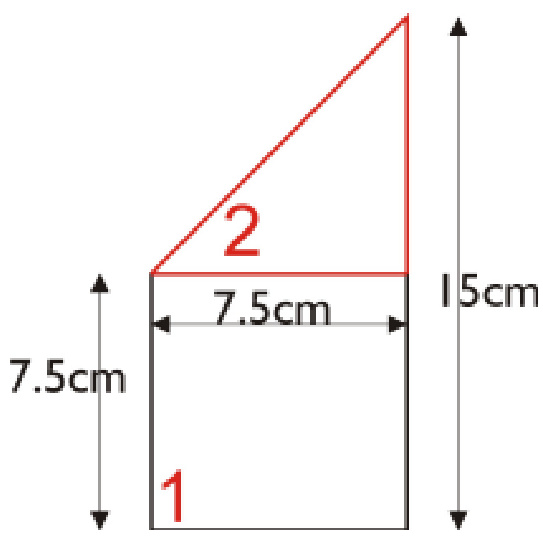
You are creating shape 2. (Shape numbers are in red; measurements are black) The number of stitches on the diagonal of the square must be divided by 1.4 to give the number of stitches to pick up along the edge of the square. (This works because of Pythagoras Theorem). Round to the nearest whole number.
Examples
| Stitches on diagonal | Divide by 1.4 | Stitches to pick up |
| 14 | 10 | |
| 18 | 13 | |
| 20 | 14 | |
| 25 | 18 |
Knit straight on wrong side row; knit two together at the end of each right (public) side row. Continue until all stitches are worked off. The new triangle should be the same height as the first square.
Helpful note
When picking up stitches from diagonal ridges (e.g. the stitches along the edge of the square for shape 2) you are basically picking up 7 stitches from every 5 ridges. It helps to have a system. Here's one that works well: ridge ridge furow ridge ridge furrow ridge Shape 3 (Cynthia's shape) A parallelogram attached to the long side of the square and triangle..It should continue the slope of the triangle (so that's a left-sloping parallelogram) ... It should be the same height as the square.
Shape 4
The new shape is to be attached to the sloping side on the right of the parallelogram you just made. It is a triangle with a 90 degree angle at the corner where it just meets the starting square. The other two angles are 45 degrees. Shape 5 (Sharron's shape) I was thinking about a trapezium with the short side being along the original square and one side on the latest triangle. I added a further instruction to make sure we all get the same shape: The trapezium will have two 135 degree angles and two 45 degree angles. The distance between the square and the long edge parallel to it will be the same as the height of the square.
Shape 6
A trapezium with two 90 degree angles, one 45 degree angle and one 135 degree angle, to be attached to Shapes 1 and 5, with its longest side parallel to the side of the square.
Shape 7
A triangle with a 45 degree angle at each side, on the long side of the trapezium you just made.
Shape 8
Pick up stitches from the lower (in relation to all the shapes knitted so far) side of Shape 7 and knit a triangle with a 90 degree angle at the right-hand side and a 45 degree angle at the left (as you are looking at the shape when you pick up the stitches).
Shape 9
Pick up stitches all along the straight edge formed by Shapes 7 and 8. Knit a triangle with a 45 degree angle at each side.
Shape 10
Pick up stitches on the left of Shape 9. Knit a triangle with a 45 degree angle at each side.
Shape 11
stitches on the lower side of Shape 10. Knit a triangle with a 45 degree angle at each side.
Shape 12
Pick up stitches from the edge of Shape 10 and knit a triangle with a 90 degree angle at its right-hand side and a 45 degree angle at the left (as you are looking at the shape when you pick up the stitches). Shape 13 Knit a parallelogram, to join to Shapes 9 and 12. (There is more than one way to do this.) Shape14 Knit a parallelogram, to join to Shapes 6 and 13. (There is more than one way to do this.) Shape15 Knit a square so that one of its corners willfit between Shapes 2 and 14. (There is more than one way to do this.)
Shape 16
This shape is a pentagon (It has 5 sides). It is not a regular pentagon (The 5 sides are not equal). It is like a house standing on the point of its roof. The roof must fill the space between Shapes 3 and 15. The rest of the “house\* is the same height as the height of the roof. (There is more than one way to do this.)
Shape 17
This shape is a hexagon (It has 6 sides). It is not a regular hexagon (The 6 sides are not equal). You might call it a lozenge. Three of its sides fit to Shapes 14, 15 and 16. The second half of the shape is a reflection of the first. (There is more than one way to do this.)
Shape 18
Pick up stitches from the top of Shape 16 and make a trapezium with a 90 degree angle at the right and a 45 degree angle at the left. The height should be the same as your starting square.
Shape 19
tangle to fit along the sides of Shapes 13 and 17. (There is more than one way to do this.)
Shape 20
Pick up stitches from the top of Shape 19. Knit a triangle with a 90 degree angle at the left and a 45 degree angle at the right.
Shape 21
A trapezium with one 45 degree, one 135 degree and two 90 degree angles. It is to fit against Shapes 17 and 20 and form the outer corner of the cushion, with Shape 20. Shape 22 Fill in the space! Done!!! You should now have a 45 cm (18") square. If you want to add a simple border allround, mitre the corners with 45 degree angles. Alternatively, continue adding in your own way.


