Ghostly Fingerless Gloves by Rosy Alice Crochet Designs @Ravelry
Pattern in UK terms, translation into US terms as follows: HTR - US hdc DC -US tr I used double knit yarn. 5mm hook. Tapestry needle.
The gloves. Make 2 as follows:
Chain 29. Turn. Row 1 - 4: htr all the way across. Row 5: 2 htr into 1st st at bottom of chain 1. Htr all the way across. 2 htr into last st. Ch 1. Row 6 - 7: htr all the way across. Row 8: 2 htr into 1st st at bottom of chain 1. Htr all the way across. 2 htr into last st. ch 1. Row 9 - 10: htr all the way across. Row 11: htr2tog into 1st st. Htr all the way across. Htr2tog into last 2 st. Row 12 - 14: htr all the way across. DC round all 4 sides. Crochet 2 dc into each corner as you go round. Crochet the 2 sides together using dc as follows: DC into each of the first 3 st. Leave 7 unworked for thumb gap. DC into remaining stitches. Fasten off. To make the ghost's head and tail, follow the instructions below but make sure you place them in the correct positions on the gloves: remember they need to be on the opposite side of each glove for your left and right hands.
Ghost head.
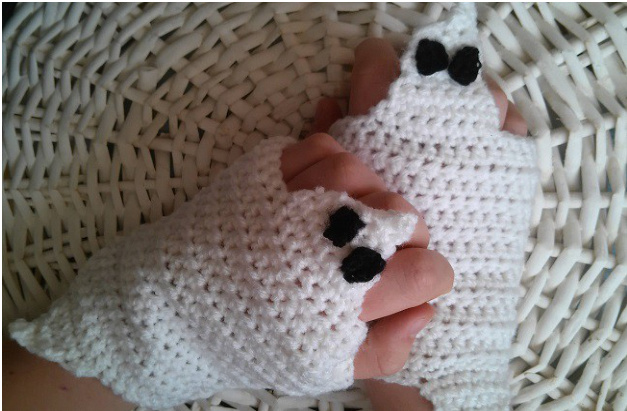
Position along top edge of glove as shown in photo above. Row 1: 8 dc, ch 1 (does not count as st while crocheting head). Row 2: 8 dc, ch 1. Row 3: dc2tog into first 2 st, dc across and dc2tog into last 2 st, ch 1. Row 4: dc2tog into first 2 st, dc across and dc2tog into last 2 st, ch 1. Row 5: dc2tog, dc2tog, ch 1. Row 6: 2dc (not dc2tog), ch 1. Row 7: dc2tog. Ch 1. Row 8: We are going to crochet another dc2tog but this one will be a bit different. Begin your stitch as usual - into the first available stitch. Then turn your work and crochet the second part of the stitch into the first space down the side of your ghost's head. It doesn't really matter which side because we're just creating a wispy bit. Chain 1 to add a little more height to wisp. Fasten off.
Ghost tail.
Position along bottom edge of glove as shown in photo above. Row 1: 7 dc, ch 1. Row 2: 7 dc, ch 1. Row 3: dc2tog, dc2tog, ch 1. Row 4: dc2tog. Ch 1. Row 5: We are going to crochet another dc2tog but this one will be a bit different. Begin your stitch as usual - into the first available stitch. Then turn your work and crochet the second part of the stitch into the first space down the side of your ghost's head. It doesn't really matter which side because we're just creating a wispy bit. Chain 1 to add a little more height to wisp. Fasten off.
Eyes. Make 4 as follows:
Make a slipknot. Chain 4 and slip stitch to join. Don't pull too tight though, and try to pull your work into a teardrop or oval shape. Sew eyes onto gloves as in picture. Fasten off and sew in all ends. Done! Enjoy your spooky hands!


