BY SUE LAZENBY

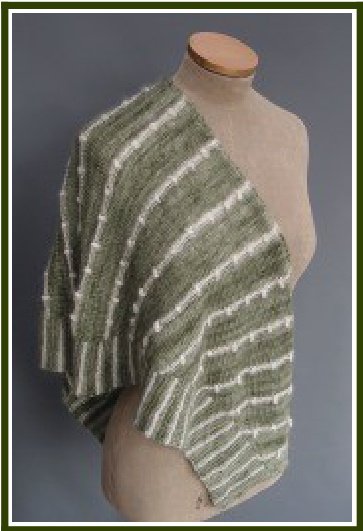
A lighthearted shawlette or scarf to celebrate spring. What could be lovelier than unexpectedly coming across a carpet of wood anemones in a shady glade? Rows of flowers cascade downwards in this sideways knitted piece to meet the deep, garter striped border. The size can easily be adjusted for different quantities of yarn and there are endless possibilities for colour combinations should you wish to gather different flowers around you. A fairly easy knit for the intermediate knitter, with just a little concentration needed when making the 'flowers'. Every knitter needs a little frivolity when spring is in the air!
Finished Measurements
Width: approx. 48" - 59"/ 122 - 150 cm (depending on how it's blocked) Depth: approx. 17 " / 43 cm at midpoint, 6" / 15cm at side edges
Materials
Approx. 437 - 450yd / 400 - 412m fingering weight yarn in main colour yd/9lmfingeringweightyarninco Shown in: Main colour: Madelinetosh tosh merino light (100% merino; 420 yd / 384 m per 100g). Colour: Thyme, 1 skein. Contrast colour: Solstice Yarns Changeling (67% Silk, 23% Mohair, 10% Nylon; 383 yd / 350 m per 100g). Colour : Snow Drift (undyed), 1 skein. US # 6 / 4.0 mm 40" / 100 cm circular needle or size to achieve desired gauge. Needle size is a recommendation only. 2 stitch markers; blocking wires & pins Gauge 23 sts / 30 rows=4"/10 cmMeasured over stocking stitch, using fingering weight on 4 m needles before blocking. 21 sts / 30 rows = 4" / 10 cm. Measured over stocking stitch, using fingering weight on 4 mm needles after blocking. Gauge is not critical and is a personal choice depending on chosen yarn, although this may change overall measurements.
Abbreviations BO: bind off MC: main colour CO: cast on CC: contrast colour p: purl decs: decreases p2tog: purl 2 sts together incs: increases k: knit pm: place marker k5tog: knit 5 sts together rpt: repeat m: marker RS: right side M1R: make 1 stitch leaning right: insert right needle into bar between stitches from slm: slip marker front to back; place stitch on left needle with leading leg at back, knit into the front ssk: slip two stitches knitwise, knit the two of stitch, twisting it. stitches together (left leaning decrease). MB: make bobble: k in front, back, front, st(s): stitches back, front of next stitch, turn, k5tog, turn & put st on right needle. WS: wrong side
Pattern notes
The shawl is worked from side to side with a 3 st garter edge (although some rows are different) and a 20 st striped garter border. Increases are made every 2 rows, before working a straight section and then decreasing every2rows. A NOTE ABOUT COLOUR CHANGES: The CC is carried up the shawl between the main part and the border. On every RS, loosely weave in the unused yarn on WS just before the stitch maker at the garter border. It works well if just after the yarn is woven in, the yarn in use is tightened very slightly (this helps to hide the unused yarn). I didn't find it necessary to weave in the unused yarn on WS rows during the increase section, but I did during the decrease section, but you might find it better to do so on both RS and WS rows throughout.
Directions
WEIGH YOUR MAIN COLOUR YARN BEFORE YOU START TO DETERMINE HOW MANY INCREASESCANBEWORKED.
(please note the 3 edge sts on rows 13 & 14 are PURL.) With MC, CO 30sts. I used the cable method, but any firm cast on will be fine. Work 5 rows garter st. (every row knit). The first counting as a WS row. INCREASE SECTION: (using MC unless otherwise stated, the places where the yarn is changed is in bold) (or INCREASE CHARTS 1 & 2) Row 1: (RS) k3, pm, k7, M1R, pm, k20 (border sts). Rows 2, 4, 8, 10, 16, 18, 20, 24, 26: knit to m, slm, purl to m, slm, k3 Rows 3, 7, 9, 11, 15, 17, 19, 23, 25, 27: k3, slm, knit to m, M1R, slm, knit to end. Row 5: k3, slm, knit to m, M1R, slm, join in CC, knit to end. Row 6: using CC knit to m, slm, using MC purl to m, slm, k3 Row 12: knit to m, slm, using CC knit to m, slm, k3 Row 13: using CC p3, slm, p6, MB, p6, M1R, slm, knit to end Row 14: using CC knit to m, slm, using MC purl to m, slm, p3 Row 21: as row 5 Row 22: as row 6 Row 28: as row 12 Row 29: using CC p3, slm, p3, \*MB, p6 rpt from \* once more, MB, p3, M1R, slm, knit to end (45 sts) Rpt rows 14 - 29, increasing every RS row as set, BUT starting ALL bobble rows with p 4 (after the edge sts) & leaving a 6 st space between the bobbles as already set. Bobbles should be incorporated into the pattern at the increase side of pattern as stitches become available. Rpt rows 14 - 29, 6 more times (8 bobbles rows in total made so far), then work rows 14 - 21 once more. (67 incs, 97 sts) My shawl measured 18" deep & 18" along top narrow garter st. edge at this point, using 38g / 160 yd (36% of yarn), leaving approx. 66g remaining (my yarn was overweight). If starting with less yardage, work one rpt less (& also in the decrease section), but still ending with row 21, adding 2 extra repeats in straight section to maintain the overall length. Work straight (no increases), maintaining the p4 start (after the edge sts) on the bobble rows, for atotal of 5 bobble rows in centre section (about 10") ending after a row 20 of pattern rpt, so that there will be a bobble row at the centre of the straight section, with 2 bobble rows either side. It's worth weighing your yarn after 3rd (centre) bobble row to check you have sufficient yarn for second half. If you have more yarn, an additional rpt can be worked, bearing in mind that using my pattern of increases and decreases I used approx. 52g (219 yd) for each half of shawl. WoodAnemonepage3 DECREASE SECTION: (using MC unless otherwise stated, the places where the yarn is changed is in bold) (or DECREASE CHARTS 1 & 2) (note the decrease is made differently on row 9 & the edge sts on rows 9 & 10 are PURL) Row 1 (RS): k3, slm, knit to 2 sts before m, ssk, slm, using CC, knit to end. Row 2: k20, slm, using MC purl to m, slm, k3. Rows 3, 5, 7, 11, 13, 15, 19, 21: k3, slm, knit to 2 sts before m, ssk, slm, k20. Rows 4, 6, 12, 14, 16, 20, 22: k20, slm, purl to m, slm, k3. Row 8: knit to m, slm, using CC knit to m, slm, k3. Row 9: using CC p3, slm, p4, \*MB, p6, rpt from \* to 3sts before m, MB,p2tog, slm, knit to end. Row 10: using CC knit to m, slm, using MC purl to m, slm, p3. Row 17: k3, slm, knit to 2 sts before m, ssk, slm, using CC, knit to end. Row 18: using CC k20, slm, using MC purl to m, slm, k3. Row 23: k3, slm, knit to 2 sts before m, ssk, slm, k20. (12 decs, 85 sts) Then rpt rows 8 - 23, 5 more times, STARTING EACH BOBBLE ROW WITH P4 (after edge sts) and maintaining pattern ie keeping 6 sts between bobbles. 6 bobble rows in decrease section. (52 decs, 45 sts) Rpt rows 8 - 23, 1 more times BUT starting the bobble row (3 bobbles) with p3 (after edge sts). ( 8 decs,37 sts) Rpt rows 8 - 21, BUT starting the bobble row with p6 (after edge sts). (Z decs, 30 sts) A total of 8 bobble rows in decrease section. After the last rpt of row 21, 7 sts remain between markers. Next WS row: knit to m, slm, purl to m, slm, k3 Knit 6 rows (no decreases), removing the markers as reached. BO purlwise on RS. Weave in loose ends, block (see below) and enjoy. :) BLOCKING: I don't block my textured shawls very strongly so that I don't flatten the stitches. I dampen it and lay it flat, smoothing it into shape. I then used blocking wires and pins inside the top garter edge, then stretched slightly and pinned along the inside edge of the garter border. It wasn't necessary to pin along the outer edge of the garter border. I blocked to 50" / 127 cm x 18" / 46 cm at midpoint & 6" / 15 cm cm at side edges to give the finished size Stated.
Work increases chart 1 once (45 sts).
WOOD ANEMONE INCREASES 1.

Repeat increase chart 2, TAKING THE INCREASE STS INTO THE BOBBLE ROW PATTERN, and starting with p4 each time (after the edge sts).
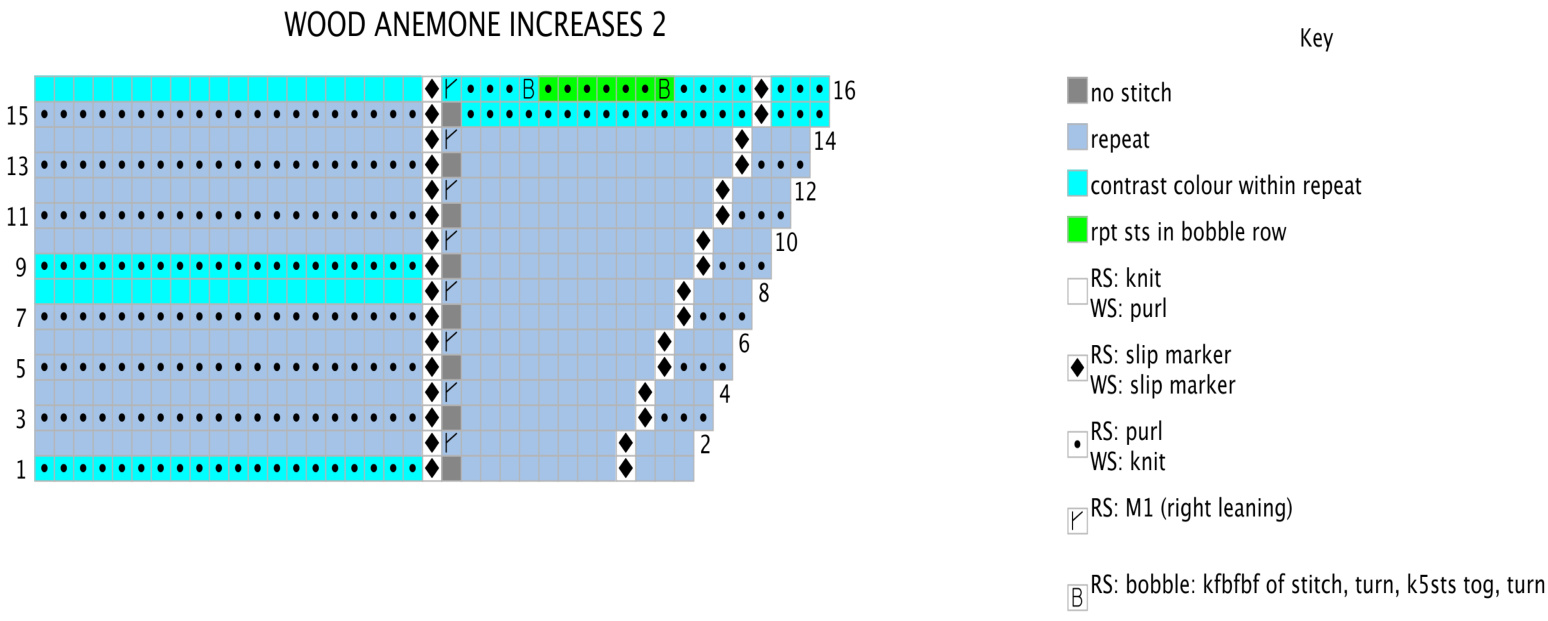
Work increases 2 chart a total of 6 times, then rows 1 - 8 again (97 sts). 8 bobble rows in total made during increase section. Working in pattern as set, but with NO FURTHER INCREASES work 5 more bobble rows (ie rows 9 - 16 once, rows 1 - 16, 4 times, then rows 1-7 again) then continue with decreases chart 1. It's worth weighing your yarn after 3rd (centre) bobble row to check you have sufficient yarn for second half.
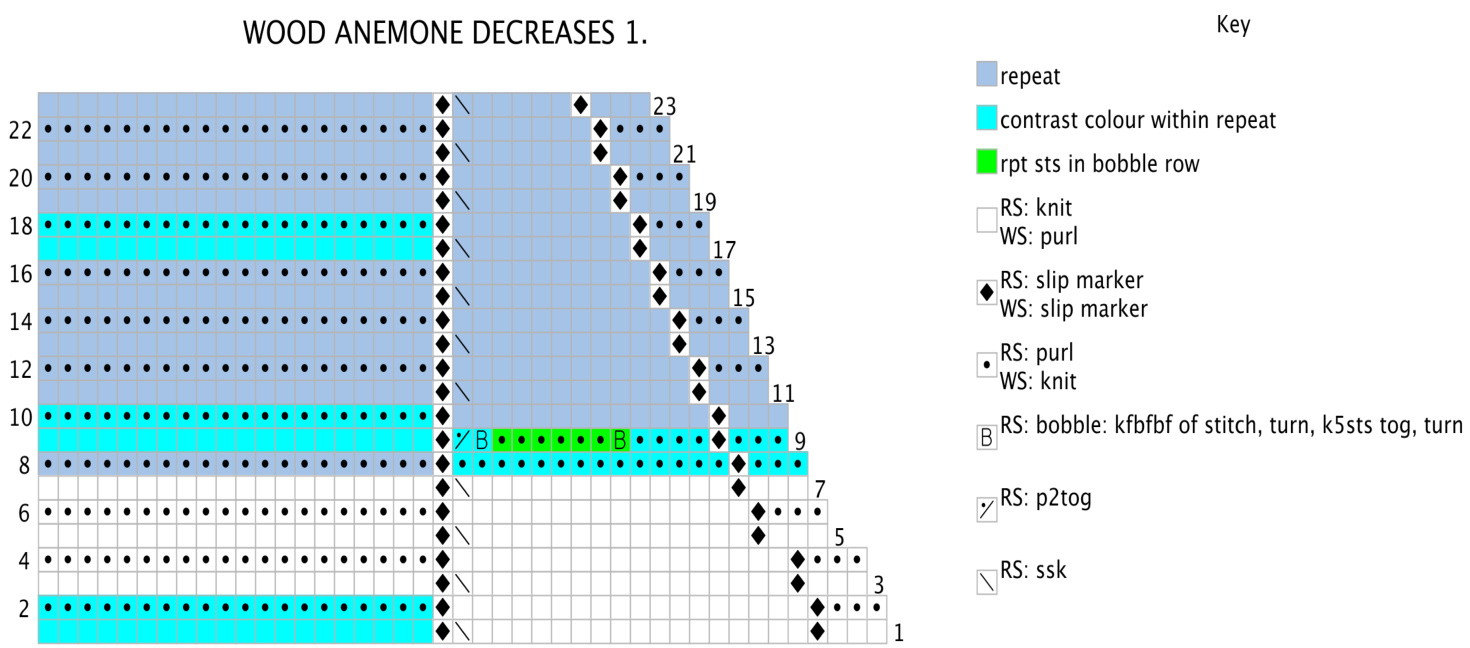
DECREASE SECTION:
Work rows 1 - 7 once, then work rows 8 - 23, 6 times in total (6 bobble rows & 45 sts ) repeating the highlighted section within bobble row and starting each bobble row (after edge sts) with p4. Continue with decreases chart 2.
Work decrease chart 2 once only, 7 sts remain between markers and 8 bobble rows made during decreasesection.
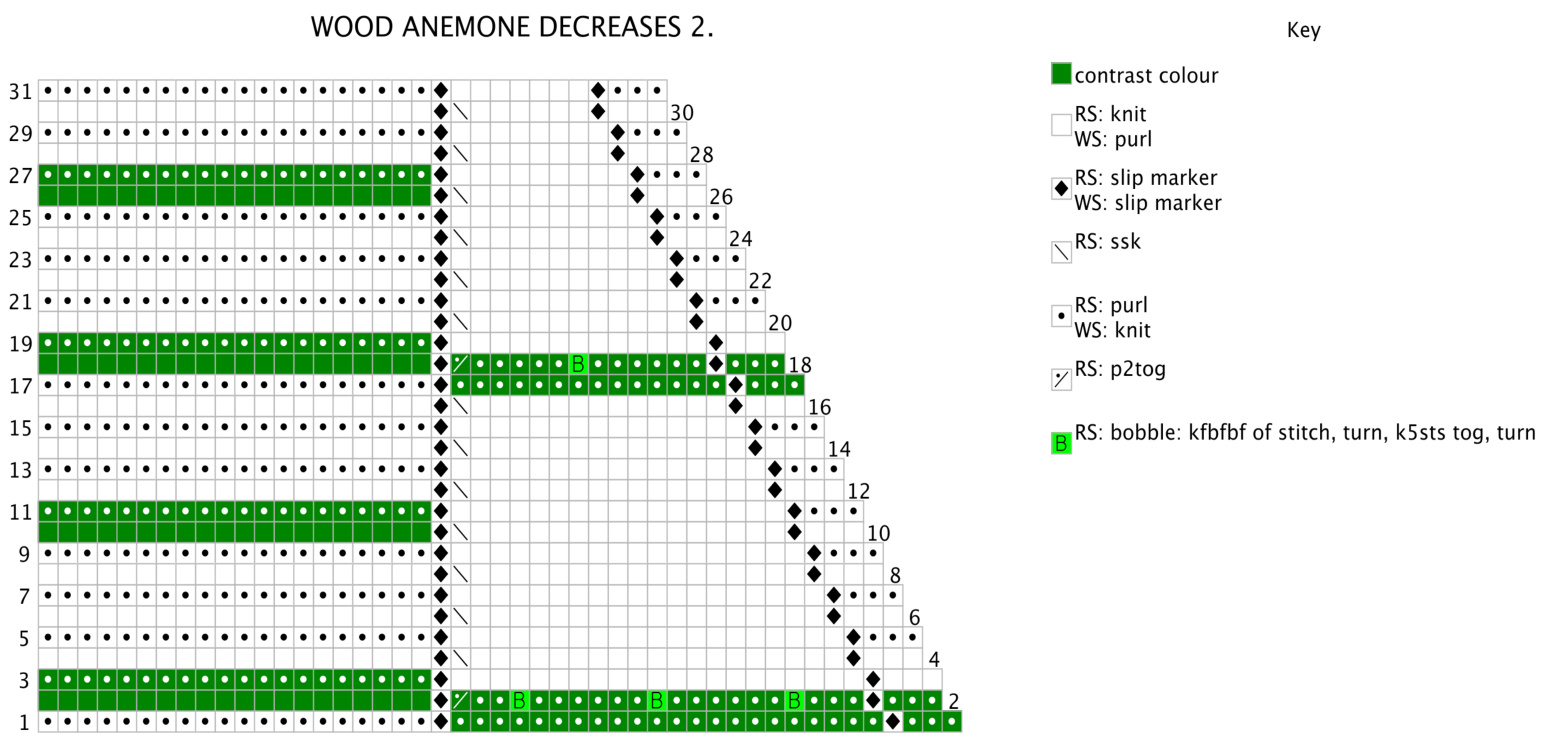
6 rows (no further decreases) & BO purlwise on Rs. weave in ends, block and enjoy.
I hope you enjoy making my patterm, if you have any queries there is pattern support in my Ravelry group htp://www.ravelry.com/groups/suseknits or I can be contacted at sue.lazenby6@gmail.com My T&Cs are here: http://www.suelazenbydesigns.com/p/the-small-print.html


