The Spiraling Distaff
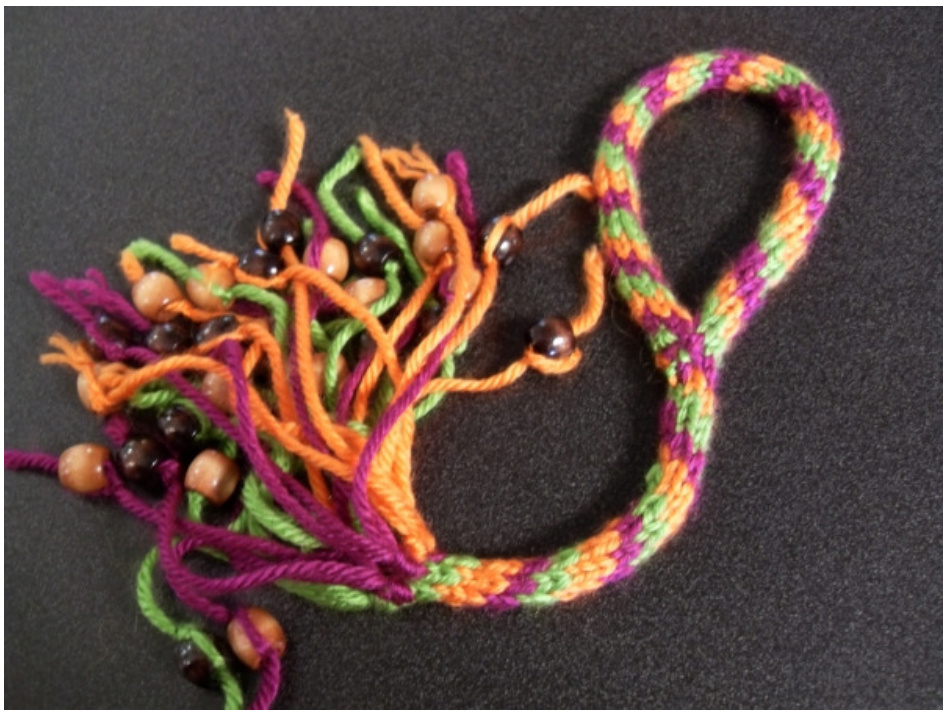
In the past I've put out a couple of patterns that people have thought of as “fidgety." This one shall rule them all. Itis an easy pattern, you don't have to keep your eyes on the instructions past the second row, and it is a quick project, but you do need to keep your eyes on the work. You will need four dpns, you could attempt doing this on magic loop but I offer you no advice for doing so. You could also try doing this as an icord with just two dpns, it is possible but I personally find that icords larger than four stitches have a wonky seam. If you want to try it as an icord, use the given cast on method. You also need a darning needle. Beads are optional but recommended (they make the end flare out a little which seems to help keep the roving on.) Bobbins are very, very helpful but not totally necessary.
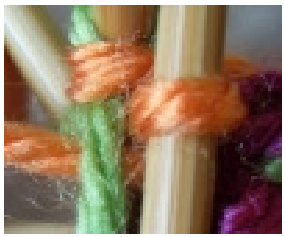
This is intarsia. I tried to work this without twisting the stitches and there were gaps (thus proving the inherent intarsia-ness,) so twist the yarn behind the stitches when switching colors. Since not everyone is familiar with intarsia, I'm demonstrating in the picture below how I “twist’ the stitches. You can just take the old color and drape it over the new strand of color before carrying on. So in this picture, the old color is green, and before carrying on with the orange I drape the green over the orange. Icord cast on: Cast on 2 of each color for a total of 6 stitches in whatever cast on method you prefer, leaving a tail long enough to stitch with. Knit one row, keeping the colors the same. Continue with the pattern.

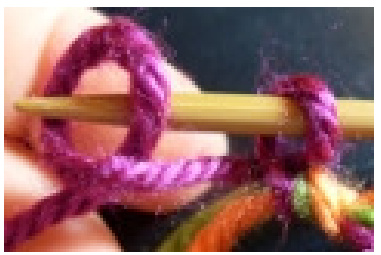
Dpn cast on: Tie the three colors together using an overhand loop (the pretzel looking knot shown to the left,) leaving a tail long enough to stitch with. Pick up one needle and cast on two stitches of one color using a backwards loop (the picture shown at the right.) Do the same with the remaining two needles and colors.
Colors are represented as c1, c2, and c3. C1 is the first color you cast on, c3 is the last color you cast on. The pattern is based off of two stitches in each color, however as you work this there will be times that you will work three stitches of a certain color. That simply means that you came to the end of one row and started another. Just keep with the idea of the slightly offset colors. Now the foreplay is out of the way - I present the world's simplest and shortest pattern: $1\sim\mathrm{K}1$ in c3, k2 in c1, k2 in c2, k1 in c3 (if using the dpn cast on, ktbl this row) 2 \~ K2 in c3, k2 in c1, k2 in c2 3 \~ K1 in c2, k2 in c3, k2 in c1, kl in c2 Right, I admit moss stitch is probably the world's simplest and shortest pattern, and (while short) this pattern might be fourth or fifth down the list of \*Simplest Knitting Patterns Ever."” However, the third row is simply to make sure you have the concept down, really you will be repeating rows 1 and 2, though switching the colors to whatever color comes next on the project. That's it really. Knit long enough to wrap around your wrist and still have about 4 inches of cord dangling down. Now keep the stitches on the needle and cut the yarn off of the bobbins, leaving about a 6 to 8 inch tail. Take the tail of all three colors and make another overhand loop, then slide it to the needles so it rests in the middle of all three needles (or about the top of the icord.) In other words, you are tying the three cords together to prevent the work from unraveling while keeping the stitches live. Now pick a bobbin and take two lengths of yarn from it that are twice the length of the tail hanging from the cord. Using the darning needle, thread both lengths of yarn through one of the loops on the needle and position so the yarn folds in half - making four strands of fringe that are equal lengths. Make yet another overhand knot and slide it to the loop on the needle. Or, restated, you are tying on fringe by looping through the live stitch and then tying it off. Now slip the loop off of the needle, the fringe will keep the stitch from “dropping" (though in this project, technically it would run up the project so it would be “rising.") Repeat with each loop on the needle. Tie beads onto the end of the fringe. Working from the other end of the cord, bend a loop large enough to comfortably slip your wrist through and use the tails of the cast on to stitch into place. All done! To use your distaff, take a length of roving (or a sliver or whatever rope like preparation of spinning fibers you have on hand) and wrap from the top to the bottom (a couple of inches above the beads) then back up to the top. Continue wrapping in such a manner, until you reach the end. Now coil in your preferred manner over your hand and spin away. To see a video of this, check out: http:/fiberartsvideo.com/spinning-videos/how-to-use-a-wrist-distaff/ to play the video, click the picture to the right of the title “How to Use a Wrist Distaff." Hopefully that video doesn't plan on going anywhere anytime soon, if it does, then google or YouTube might help. Do not attempt this project in the presence of spool knitters, as I'm sure they will laugh at you. Eh, let them laugh. They knit with a spool.


