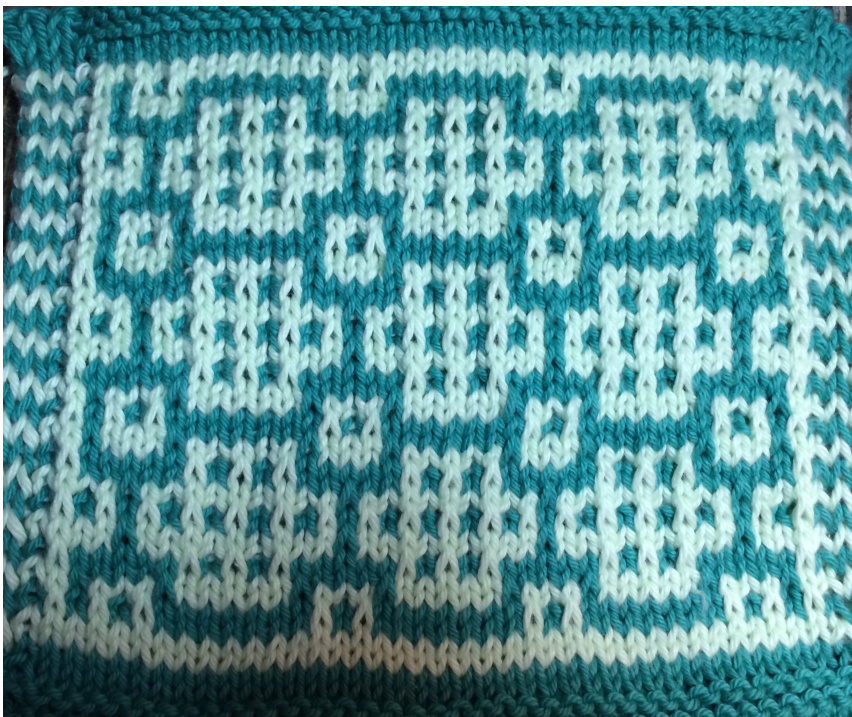
| DetailsabouttheProjectPicture/DishclothMosaic#47 | |||
| Basedon | Mydesign/39over52rows | ||
| Needle | Size 5 | ||
| Cast on | 51 | ||
| Finishedsize | approx 8.5"widex 8" long | ||
| Yarn main | KnitpicksDishie,Tranquil25405(dkmintygreen) | ||
| YarnContrast | H.L.1LoveThisCotton,258Pistacchio | ||
| Mosaic Knitting in General If you've never done Mosaic Knitting before, I recommend a little research first. It's NOT | ||||||
| in the photo looks orange and purple) which goes into a lot of detail or there are many excellent online resources. | ||||||
| http://www.ravelry.com/patterns/library/dishcloth-in-mosaic | ||||||
| A Note about Needle Size | You can do the whole pattern using the same needle size. However, since you are doing garter | |||||
| diau ln! 'ooa g do ne azis aiaau e umop oh nos fl aiddo pue sasool al e aq on puan aun 'ooa pue dot aun e shaoq s | ||||||
| Right and Wrong Sides | ||||||
| Slipping the Stitches | right side - wyib (with yarn in back) | wrong side - wyif (with yarn in front) | ||||
| Stitch Markers This pattern is divided into sections. | ||||||
| On right side rows, you will have the following: | ||||||
| 1 - a beginning border which consists of 2 iCords | ||||||
| 2 - section 1 which has 10 stitches | ||||||
| 3- section 2 which has 10 stitches | ||||||
| 4 - section 3 which has 10 stitches | ||||||
| 5-section4whichhas9stitches | ||||||
| 6-an endborderwhich consistsof 2iCords | ||||||
| uunwos o uouae ed o pasoddns wi moui I 'a e o aoo I uaum em pu | ||||||
Dishcloth Mosaic #46
| Cutting the yarn when adding new colors | Don't. You won't be cutting either color until you are completely done using it. | ||||||
| Instead, carry it up the side of the work. My original Dishcloth in Mosaic on Ravelry (a free download) has detailed explanations. | |||||||
| Side Borders and StockinetteI personally like the fancy borders and the look of stockinette. However, you may just want a | |||||||
| plainer dishcloth or don't feel like putting so much effort into it. If you don't want to mess with fancy side borders, you can just do | |||||||
| garter stitch borders on the side. Just remember, if you do stockinette, you'll need some sort of border, or it'll curl and won't lay flat. | |||||||
| If you really hate purling | If you really want to make your life easy, just do your whole cloth in garter stitch (knit, knit, knit.) | ||||||
| The process is the same, but on the WRONG side, make sure to slip stitches with yarn in front! | |||||||
| The knitted in iCords Just because of the way the stitches are, there will be a slight tendency for the iCord borders to | |||||||
| pull in a little bit. To minimize that, try to knit both iCords (on both sides) nice and loose. Don't pull tight. Loosey goosey is better. | |||||||
| Borders in this Pattern | The borders in this pattern add an additional 12 stitches to the width (6 each side). | ||||||
| Adjusting your cloth size | |||||||
| do in blocks of whatever the multiple is. For width, add or subtract another multiple of the pattern. For instance, if the pattern multiple | |||||||
| is 10+3, the edge stitches are always there. lf you want to make the cloth wider or narrower, add or subtract a multiple of 10. If you wa to change the length and the pattern multiple is 20 rows, then add or subtract 20 rows. Of course you can always make minor tweaks | |||||||
| by adjusting the width of your side borders or top and bottom borders. | |||||||
| k | knit | ||||||
| p | und | ||||||
| mc | main color | This is the color you'll start and end the cloth with. | |||||
| cC | contrast color | ||||||
| sl | slip the stitch | e.g. sl-1 would mean to slip 1 stitch from the left needle to the right needle without working it (sl-2 would mean to slip 2 stitches, etc). For this pattern, always slip purlwise | |||||
| which means the needle is facing the stitch to be slipped as if you were going to purl it. | |||||||
| wyib | on nnoge aam nos j! s ssng 'yog au ui aq oi spaau ui aun uos e ds no uaum - yog ui ue ym | ||||||
| wyif | |||||||
Dishcloth Mosaic #46
| k first iCord | Thisinvolves3stitches. | ||||||
| Whatyou do: | 1) k1 | 2) slip 1 purlwise wyif | 3) k1 | ||||
| How you do it: You knit the first stitch, move the yarn to the front like you are about to purl and slip | |||||||
| the middle stitch without working it, move the yarn to the back and knit the 3rd stitch. | |||||||
| sl-1firstiCordThisinvolves3stitches. | |||||||
| Whatyou do: | 1)slip 1 2) purlwise wyif | k1 | 3) slip 1 purlwise wyif | ||||
| Howyou do it: You slip the first stitch with the yarn in front, like you were going to purl. Then you move | |||||||
| the yarn to the back, knit the middle stitch, move the yarn to the front and slip the | |||||||
| third stitch, move the yarn to the back and you are ready to knit whatever comes next. | |||||||
| Caston | 53 with main color (l used the long tail cast on method for this pattern) |
| NeedleSize | I am using a size 4 to cast on and knit border rows, will change to size 5 for pattern rows |
Beginning Border
| BorderRow1-mc | beg border | k first iCord | sl-1 first iCord | |
| knit to last 6 | ||||
| end border | sl-1 first iCord | k first iCord | ||
| BorderRow2-mc | beg border | sl-1 first iCord | k first iCord | |
| knit tolast 6 | ||||
| endborder | k first iCord | sl-1 first iCord | ||
| BorderRow3-mc | beg border | k first iCord | sl-1 first iCord | |
| knit to last 6 | ||||
| end border | sl-1firstiCord | k first iCord | ||
| BorderRow4-mc | beg border | sl-1 first iCord | k first iCord | |
| knit to last 6 | ||||
| end border | k first iCord | sl-1 first iCord | ||
| BorderRow5-mc | beg border | k first iCord | sl-1f first iCord | |
| knit to last 6 | ||||
| end border | sl-1 f firstiCord | k first iCord | ||
Dishcloth Mosaic #46
| Littlereminder: | k 1st iCord = k1 | wyif sl-1 k1 | sl-1 1st iCord = wyif sl-1 | k1 | wyif sl-1 | |
| Border Row6 -mc | beg border | sl-1 first iCord | k first iCord | |||
| PURLtolast6 | ||||||
| end border | k first iCord | sl-1 first iCord | ||||
| !? | If you used a smaller needle for the border rows | |||||
| now is the time to change to larger needle for pattern rows | ||||||
| BorderRow 7-CC | beg border | k first iCord | sl-1 f first iCord | |
| knit tolast 6 | ||||
| end dborder | sl-1f first iCord | k first iCord | ||
| BorderF Row8-cc | beg border | sl-1 f first iCord | k first iCord | ||
| purl to last 6 | |||||
| endborder | k first iCord | sl-1 firstiCord | |||
| Row 1 - mc | beg border | k first iCord | sl-1 first iCord | place marker | |
| section 1 (10 sts) | k1 | Sl-1 k1 | sl-1 k1 | sl-1 k4 | place marker |
| section 2 (10 sts) | k3 | sl-1 k1 | sl-1 k4 | place marker | |
| section 3 (10 sts) | k3 | sl-1 k1 | sl-1 k4 | place marker | |
| section 4 (9 sts) | k3 | sl-1 k1 | sl-1 k1 | sl-1 k1 | place marker |
| end border | sl-1 first iCord | k first iCord |
| Row2 2-mc | beg border | sl-1first iCord | k first iCord | ||
| purl the mc stitches & wyif slip the cc stitches until 6 left | |||||
| endborder | k first iCord | sl-1 f firstiCord | |||
Dishcloth Mosaic #46
| Littlereminder: | k1st iCord= k1 wyif sl-1 k1 | sl-11stiCord = wyif sl-1 k1 wyif sl-1 |
| Row 3 - cC | beg border | k first iCord | sl-1 first iCord | slip marker |
| section 1 (10 sts) | k2 | sl-1 k3 | sl-1 k3 | slip marker |
| section 2 (10 sts) | k2 | sl-1 k3 | sl-1 k3 | slip marker |
| section 3 (10 sts) | k2 | sl-1 k3 | sl-1 k3 | slip marker |
| section 4 (9 sts) | k2 | sl-1 k3 | sl-1 k2 | slip marker |
| end border | sl-1 first iCord | k first iCord | ||
| Row 4 - cc | beg border | sl-1 first iCord | k first iCord | |
| purl cc stitches, & wyif, slip mc stitches until last 6 | ||||
| end border | k first iCord | sl-1 first iCord | ||
| Row 5 - mc | beg border | k first iCord | sl-1 first iCord | slip marker | |
| section 1 (10 sts) | k1 | sl-1 k5 | sl-1 k1 | sl-1 | slip marker |
| section 2(10 sts) | k1 | sl-1 k5 | sl-1 k1 | sl-1 | slip marker |
| section 3 (10 sts) | k1 | sl-1 k5 | sl-1 k1 | sl-1 | slip marker |
| section 4 (9 sts) | k1 | sl-1 k5 | sl-1 k1 | slip marker | |
| end border | sl-1 first iCord | k first iCord | |||
| Row 6 - mc | beg border | sl-1 first iCord | k first iCord | ||
| purl the mc stitches & wyif slip the cc stitches until 6 left | |||||
| end border | k first iCord | sl-1 first iCord | |||
Dishcloth Mosaic #46
| Little reminder: | k 1st iCord = k1 wyif sl-1 k1 | sl-1 1st iCord = wy | ||
| Row 7 - cc | beg border | k first iCord | sl-1 first iCord | slip marker |
| section 1 (10 sts) | k4 | sl-1 k5 | slip marker | |
| section 2 (10 sts) | k4 | sl-1 k5 | slip marker | |
| section 3 (10 sts) | k4 | Sl-1 k5 | slip marker | |
| section 4 (9 sts) | k4 | sl-1 k4 | slip marker | |
| end border | sl-1 first iCord | k first iCord | ||
| Row 8 - cc | beg border | sl-1 first iCord | k first iCord | |
| purl cc stitches, & wyif, slip mc stitches until last 6 | ||||
| end border | k first iCord | sl-1 first iCord | ||
| Row 9 - mc | beg border | k first iCord | sl-1 first iCord | slip marker | |||
| section 1 (10 sts) | k1 | sl-1 k1 | sl-1 k1 | sl-1 k1 | sl-1 k1 | sl-1 | slip marker |
| section 2(10 sts) | k1 | sl-1 k1 | sl-1 k1 | sl-1 k1 | sl-1 k1 | sl-1 | slip marker |
| section 3 (10 sts) | k1 | sl-1 k1 | sl-1 k1 | sl-1 k1 | sl-1 k1 | sl-1 | slip marker |
| section 4 (9 sts) | k1 | sl-1 k1 | sl-1 k1 | sl-1 k1 | sl-1 k1 | slip marker | |
| end border | sl-1 first iCord | k first iCord | |||||
| Row 10 - mc | beg border | sl-1 first iCord | k first iCord | ||||
| purl the mc stitches & wyif slip the cc stitches until 6 left | |||||||
| end border | k first iCord | sl-1 first iCord | |||||
| Dishcloth Mosaic #46 | |||||
| Little reminder: | k 1st iCord = k1 | wyif sl-1 k1 | sl-1 1st iCord = wyif sl-1 | k1 wy | |
| Row 11 - cC | beg border | k first iCord | sl-1 first iCord | slip marker | |
| section 1 (10 sts) | k4 | sl-1 k5 | slip marker | ||
| section 2 (10 sts) | k4 | sl-1 k5 | slip marker | ||
| section 3 (10 sts) | k4 | sl-1 k5 | slip marker | ||
| section 4 (9 sts) | k4 | sl-1 k4 | slip marker | ||
| end border | sl-1 first iCord | k first iCord | |||
| Row 12 - cc | beg border | sl-1 first iCord | k first iCord | ||
| purl cc stitches, & wyif, slip mc stitches until last 6 | |||||
| end border | k first iCord | sl-1 first iCord | |||
| Row 13 - mc | beg border | k first iCord | sl-1 first iCord | slip marker | |
| section 1(10 sts) | k1 | sl-1 k5 | sl-1 k1 | sl-1 | slip marker |
| section 2 (10 sts) | k1 | sl-1 k5 | sl-1 k1 | sl-1 | slip marker |
| section 3 (10 sts) | k1 | sl-1 k1 | slip marker | ||
| sl-1 k5 | Sl-1 | ||||
| section 4 (9 sts) | k1 | sl-1 k5 | sl-1 k1 | slip marker | |
| end border | sl-1 first iCord | k first iCord | |||
| Row 14 - mc | beg border | sl-1 first iCord | k first iCord | ||
| purl the mc stitches & wyif slip the cc stitches until 6 left | |||||
| k first iCord | sl-1 first iCord | ||||
| end border | |||||
Dishcloth Mosaic #46
| Littlereminder: | k1st iCord= K1 wyif sl-1 k1 | sl-11stiCord =wyif sl-1 k1 wyif sl-1 |
| Row 15 - cC | beg border | k first iCord | sl-1 first iCord | ||
| slip marker | |||||
| section 1 (10 sts) | k2 | sl-1 | k3 | sl-1 k3 | slip marker |
| section 2 (10 sts) | k2 | sl-1 | k3 | sl-1 k3 | slip marker |
| section 3 (10 sts) | k2 | sl-1 | k3 | sl-1 k3 | slip marker |
| section 4 (9 sts) | k2 | sl-1 | k3 | sl-1 k2 | slip marker |
| end border | sl-1 first iCord | k first iCord | |||
| Row 16 - cc | beg border | sl-1 first iCord | k first iCord | ||
| purl cc stitches, & wyif, slip mc stitches until last 6 | |||||
| end border | k first iCord | sl-1 first iCord | |||
| Rows 17-32 | Repeat rows 1-16 a second time | ||||
| Rows 33-48 | Repeat rows 1-16 a third time | ||||
| Row 49 - mc | beg border | k first iCord | sl-1 first iCord | slip marker | |
| section 1 (10 sts) | k1 | sl-1 k1 | sl-1 k1 | sl-1 k4 slip marker | |
| section 2 (10 sts) | slip marker | ||||
| k3 | sl-1 | k1 sl-1 | k4 | ||
| section 3 (10 sts) | k3 | sl-1 k1 | sl-1 | k4 | slip marker |
| section 4 (9 sts) | k3 | sl-1 k1 | sl-1 | k1 | sl-1 k1 slip marker |
| end border | sl-1 first iCord | k first iCord | |||
| Row 50 - mc | beg border | sl-1 first iCord | k first iCord | ||
| purl the mc stitches & wyif slip the cc stitches until 6 left | |||||
| end border | k first iCord | sl-1 first iCord | |||
Dishcloth Mosaic #46
| Little reminder: | k1st iCord = k1 | wyif sl-1 k1 | sl-1 1st iCord = wyif sl-1 | k1 | wyif sl-1 |
| As you go across this row you can remove all of the stitch markers except the first and last ones | |||||
| (thosedesignating youriCord borders) | |||||
| Row 51 - cc | beg border | k first iCord sl-1 first iCord | |||
| sections 1-4 | knit to last 6 | ||||
| end border | sl-1 first iCord k first iCord | ||||
| Row 52 - cc | beg border | sl-1 first iCord k first iCord | |||
| purl to last 6 | |||||
| end border | k first iCord | sl-1 first iCord | |||
End of Pattern, begin End Border
| !? | If you used a larger needle for the pattern rows, | |
| now is the time to change to a smaller needle for the border rows |
| Border Row 1 - mc | beg border | k first iCord | sl-1 first iCord | |
| knit to last 6 | ||||
| end border | sl-1 first iCord | k first iCord | ||
| Border Row 2 - mc | beg border | sl-1 first iCord | k first iCord | |
| purl to last 6 | ||||
| end border | k first iCord | sl-1 first iCord | ||
| Border Row 3 - mc | beg border | k first iCord | sl-1 first iCord | |
| knit to last 6 | ||||
| end border | sl-1 first iCord | k first iCord | ||
| BorderRow4-mc | beg border | sl-1 first iCord | k first iCord | |
| KNIT (not purl) to last 6 | ||||
| end border | kf first iCord | sl-1f firstiCord | ||
Dishcloth Mosaic #46
| Little reminder: | k1st iCord = k1 | wyif sl-1 | k1 | sl-1 1st iCord = wyif sl-1 | k1 | wyif sl-1 |
| Border Row 5 - mc | beg border | k first iCord | sl-1 first iCord | |||
| knit to last 6 | ||||||
| end border | sl-1 first iCord | k first iCord | ||||
| Border Row 6 - mc | beg border | sl-1 first iCord | k first iCord | |||
| KNIT (not purl) to last 6 | ||||||
| end border | k first iCord | sl-1 first iCord | ||||
| Border Row 7 - mc | beg border | k first iCord | sl-1 first iCord | |||
| knit to last 6 | ||||||
| end border | sl-1 first iCord | k first iCord | ||||
| Bind off and sew in ends This will be on the wrong side | ||||||
| Following is a very rough copy of the chart for those who'd like one. | ||||||
| Note that the chart does not include the top and bottom border rows or the side border stitches included | ||||||
| in the written directions. | ||||||
| If you would like directions on how to read a Mosaic Chart, I have a free download on Ravelry | ||||||
| http:/www.ravelry.com/patterns/library/mosaic-charts-explained | ||||||
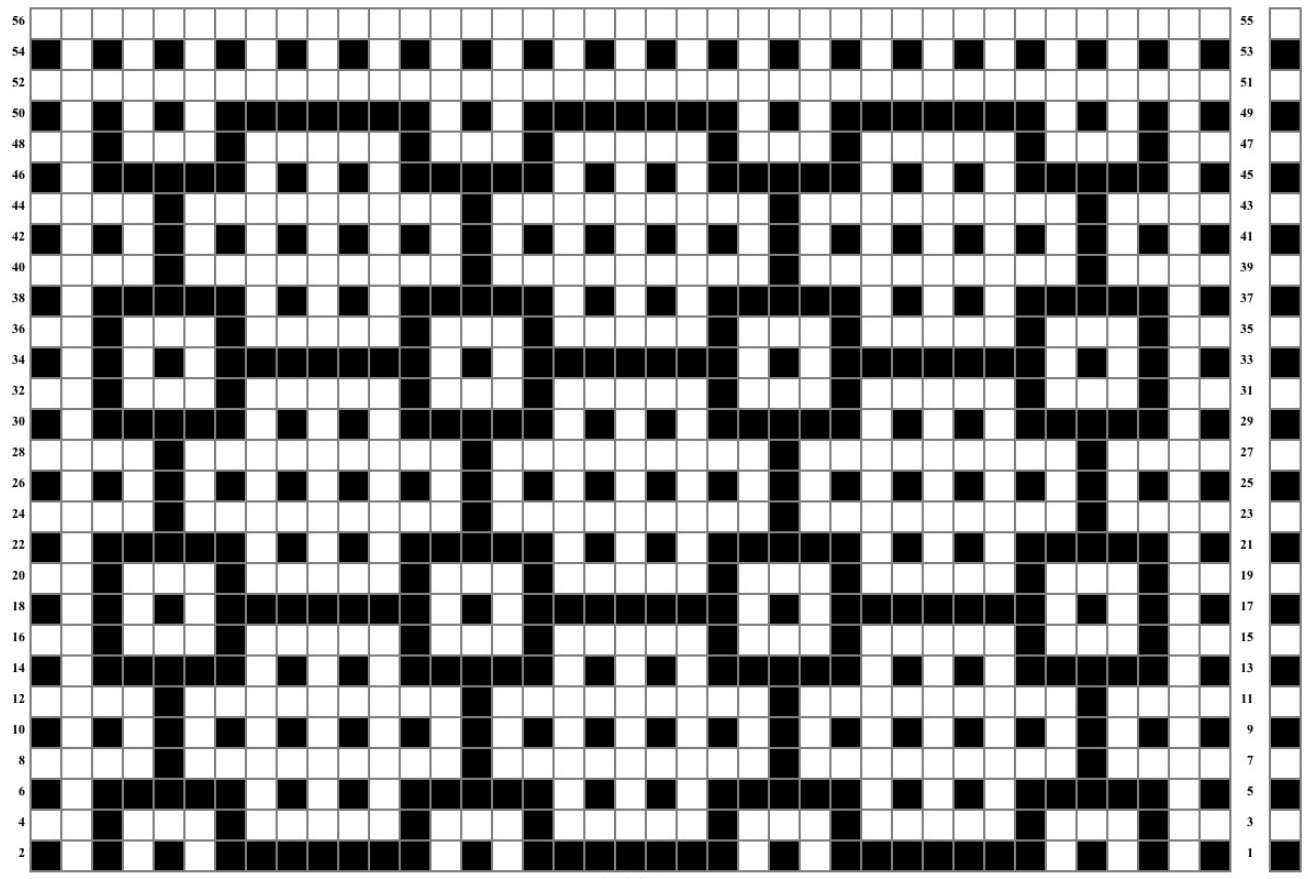
(39 stitches)


