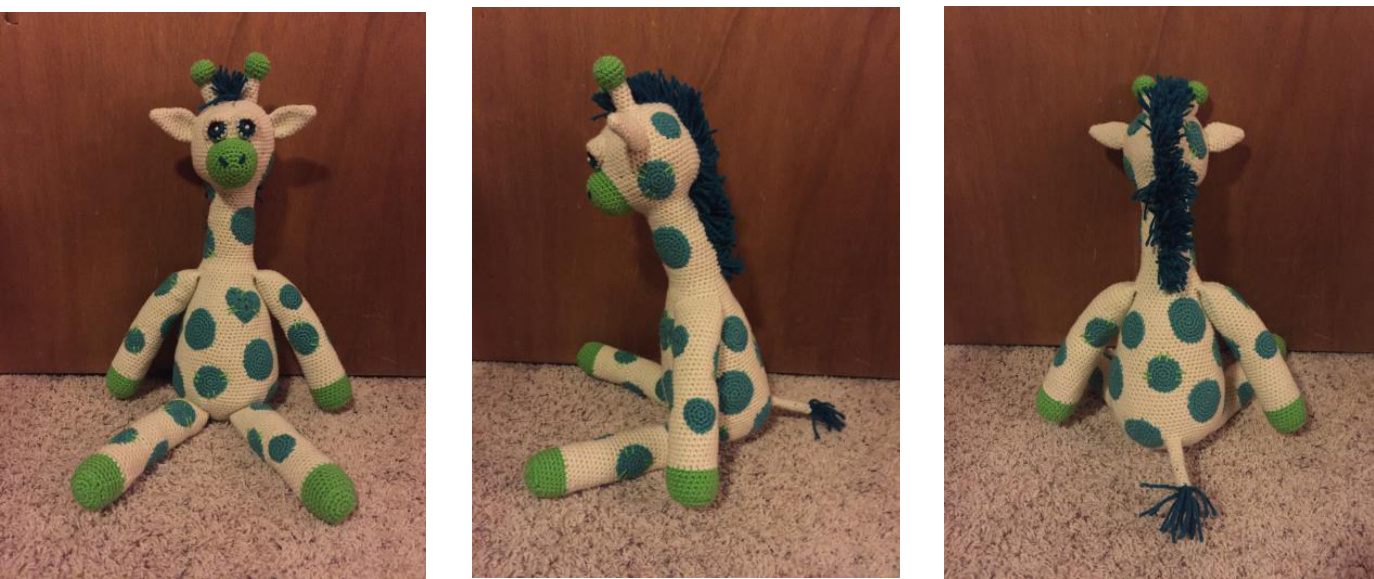
Avery's Giraffe
Feel free to enjoy my pattern, just please give me credit for it when posting/sharing. www.crochetpandemic.com
Supplies:
1.5 Skeins of Yarn in Main Body Color 0I used Red Heart Classic yarn for the whole project, but any worsted weight #4 yarn should be fine. Partial Skein of Yarn Spots Color Partial Skein of Yarn for Hooves, Nose, and Ossicones (Horns) Partial Skein of Yarn for Hair, Eyes, and Nostrils Scrap of Black Yarn Scrap of White Yarn for Eyes and Eyelids if Main Body Color is not White or Cream · 4.5mmCrochet Hook Tapestry Needle Polyfil Stuffing
Abbreviations:
DAR: Double Adjustable Ring You can find a good tutorial here: http://www.crochetme.com/forums/t/28881.aspx · St: Stitch Sc: Single Crochet SI St: Slip Stitch Ch: Chain Stitch Dec2tog: Decrease Stitch Joining 2 Stitches BLO: Back Loop Only Loop St: Loop Stitch You can find a good tutorial here: http:/www.freshstitches.com/loop-stitch-crochet-tutorial/ Hdc:Half Double Crochet Dc:DoubleCrochet Htr: Half Treble Crochet Sp: Space (used to refer to the hold created by ch st) []: Number of Stitches per Round
Pattern:
Legs: Make 4 Join with sl st after each round, then ch 1 before starting the next round. With Hoof Color: Rnd 1: 6sc in DAR [6] Rnd 2: 2sc each st around [12] Rnd 3: (2sc next st, sc next st) around [18] Rnd 4: (2sc next st, sc next 2 st) around [24] Rnd 5: BLO sc around [24] Rnd 6-10: Sc around [24] Switch to main color. Join with hoof color, then chain with main color. rounds forms the length of leg. Start to stuff, and continue stuffing the leg as you f Rnd 11-46: sc around [24] Rnd 47: (dec2tog, sc next 2 st) around [18] Stuff the top of the leg lightly so it will attach more smoothly to the body. Set asid
Head and Body:
With main body color: Rnd 1: 6sc in DAR [6] Rnd 2: 2sc each st around [12] Rnd 3: (2sc next st, sc next st) around [18] Rnd 4: (2sc next st, sc next 2 st) around [24] Rnd 5: (2sc next st, sc next 3 st) around [30] Rnd 6: (2sc next st, sc next 4 st) around [36] Rnd 7: (2sc next st, sc next 5 st) around [42] Rnd 8: (2sc next st, sc next 6 st) around [48] Rnd 9: (2sc next st, sc next 7 st) around [54] Rnd 10: (2sc next st, sc next 8 st) around [60] Rnd 11-23: sc around [60] Rnd 24: (dec2tog, sc next 8 st) around [54] Rnd 25: (dec2tog, sc next 7 st) around [48] Rnd 26: (dec2tog, sc next 6 st) around [42] Rnd 27: (dec2tog, sc next 5 st) around [36] Rnd 28: (dec2tog, sc next 4 st) around [30] The next set of rounds form the neck, do a couple rounds then stuff head and continue stuffing the neck as you go. You will want to stuff the neck to be little stiff to hold up the head better. Rnd 29-50: sc around [30] Rnd 51: (2sc next st, sc next 4 st) around [36] Rnd 52: sc around [36] Rnd 53: (2sc next st, sc next 5 st) around [42] Rnd 54: Attach that first two feet this round. Fold two feet in half. Attach as you go with this round by inserting the hook through both layers of the foot and then through the work of rnd 53, sc normally like allthree layers are just one. Begin stuffing the body, and continue stuffing as you go. Make sure there is plenty of stuffing near the bottom of the neck to help support the head. Rnd 98: (dec2tog, sc next 5 st) around [36] Rnd 99: (dec2tog, sc next 4 st) around [30] Rnd 100: (dec2tog, sc next 3 st) around [24] Rnd 101: (dec2tog, sc next 2 st) around [18] Rnd 102: (dec2tog, sc next st) around [12] Rnd 103: dec2tog around [6] Fasten off, leaving a tail long enough to sew up the hole.
Nose:
With Nose Color: Rnd 1: 6sc in DAR [6] Rnd 2: 2sc each st around [12] Rnd 3: (2sc next st, sc next st) around [18] Rnd 4: (2sc next st, sc next 2 st) around [24] Rnd 5: (2sc next st, sc next 3 st) around [30] Rnd 6-9: sc around [30] Fasten off, leaving tail long for sewing. Use nostril color yarn to form the nostrils using a "lazy daisy" stitch. You can find a good tutorial for the lazy daisy here: http://www.thirtyhandmadedays.com/2012/06/embroidery stitches/
Eye Lids:
Make 2 In Main Body Color: Rnd 1: 6sc in DAR Rnd 2: 2sc each st around [12] Rnd 3: (2sc next st, sc next st) around [18] Rnd 4: (2sc next st, sc next 2 st) around [24] Fasten off, leaving tail long for sewing. Fold in Half Eyes: Make 2 With Black: Rnd 1: 6sc in DAR [6] Switch to Eye Color: Rnd 2: 2sc each st around [12] Switch to White: Rnd 3: sc around [12] Rnd 4: dec2tog around [6] Fasten off, leaving tail long for sewing. Stuff lightly. Use white yarn to make the "eye sparkle" dots using the french knot stitch. Find a good tutorial for french knots here: http://www.purlbee.com/2007/07/20/french-knot/
Ossicones:
Make 2 With Hoof Color: Rnd 1: 6sc in DAR [6] Rnd 2: 2sc each st around [12] Rnd 3: (2sc next st, sc next st) around [18] Rnd 4-5: sc around [18] Rnd 6-7: (dec2tog, sc next st) around [12,8] Switch to Main Body Color: Rnd 8-13: sc around [8] Fasten off, leaving tail long for sewing. Ears: Make 2 With Main Body Color: Rnd 1: 6sc in DAR [6] Rnd 2: sc around [6] Rnd 3: (2sc next st, sc next st) around [9] Rnd 4-5: sc around [9] Rnd 6: (2sc next st, sc next 2 st) around [12] Rnd 7-8: sc around [12] Rnd 9: (2sc next st, sc next 3 st) around [15] Rnd 10-12: sc around [15] Rnd 13: (dec2tog, sc next 3 st) around [12] Fasten off, leaving tail long for sewing. Tail: In Hair Color: Rnd 1: 4 sc in DAR [4] Rnd 2-3: Loop st each st around [4] Fasten off. Cut the end of the loops. In Main Body Color: Rnd 1: Ch 2. 6sc in 2nd ch from hook [6] Rnd 2: sc around [6] Insert the hair color end into the hole created by the ch sts with the stands of yarn hanging out the end. Sew into place on the back side of the body color. Continue with the main body color. Rnd 3-14: sc around [6] Fasten off. Leaving tail long for sewing.
Assembly:
Now that all the parts of the giraffe are made, other than the spots, sew all the pieces in the appropriate places. Refer to the pictures for reference if necessary. Start with the nose, stuff lightly then sew most of the way on. When almost done sewing all the way around, finish stuffing the nose, then finish sewing it to the face. Next sew on the eyes, then the eyelids.
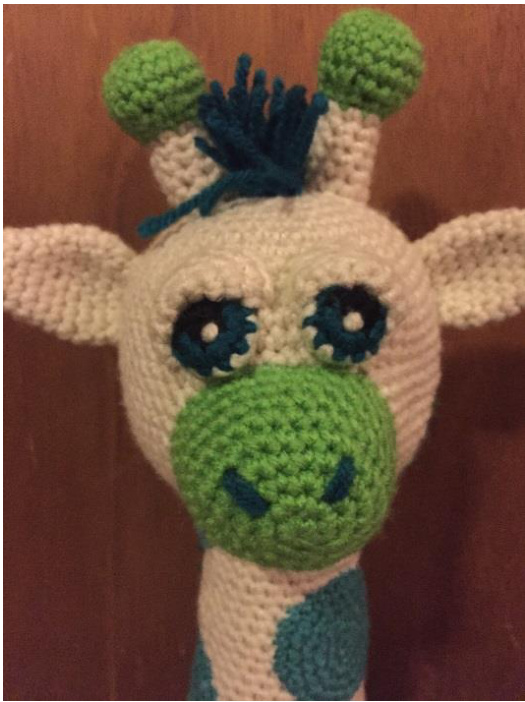
Sew the ossicones to the top of the head and the ears slightly below. Sew the tail to the back of the body.
Mane:
Cut short strips of yarn and fold in half. Use a smaller crochet hook to pull the yarn through desired stitched so the loop is sticking out one side and the two ends of the yarn sticking out the other side of the stitch. Pull the two ends of the yarn through the loop and pull to secure. Continue this technique down the back of the head and neck. The mane should be 3 yarn strips (attached to stitches) wide all the way down.
Spots:
I leave my starting yarn sticking out the back of the work and start making an assortment of spots. I use the starting the yarn and push through the body of the giraffe so the spots stay in place but are not yet sewn on. This way I can move the spots around but still have them on the body to make sure I like the placement before I sew them on. When I get all the spots on in places I like, I will sew the spots to the body with yarn left from fastening off. I used the large and medium sized spots for the main body and the small and medium spots for the head and legs. In Spots Color: Small Spots: Rnd 1: 6sc in DAR [6] Rnd 2: 2sc each st around [12] Rnd 3: (2sc next st, sc next st) around [18] Fasten off, leaving tail long for sewing. Medium Spots: Rnd 1: 6sc in DAR [6] Rnd 2: 2sc each st around [12] Rnd 3: (2sc next st, sc next st) around [18] Rnd 4: (2sc next st, sc next 2 st) around [24] Fasten off, leaving tail long for sewing. Large Spots: Rnd 1: 6sc in DAR [6] Rnd 2: 2sc each st around [12] Rnd 3: (2sc next st, sc next st) around [18] Rnd 4: (2sc next st, sc next 2 st) around [24] Rnd 5: (2sc next st, sc next 3 st) around [30]
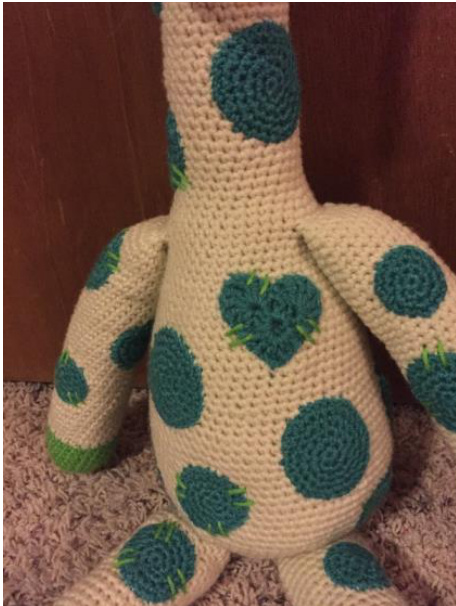
Fasten off, leaving tail long for sewing. Heart Spot: Rnd 1: Ch 4. Join with sl st to 1st ch to form a ring. Ch 1, (3hdc in ring, ch 2) 4 times. Join with sl st to 1st hdc Rnd 2: (dc, 5htr, dc) in center of next 3-hdc group, sl st in next ch-2 sp. Repeat. Fasten off. After sewing all the spots onto the giraffe, I went through with the hoof/nose color and added "stitch lines" to some of the spots. I just did 2 little dashes in three different areas on the spots. I did not do it to all the spots, just some here and there until it look like I wanted.


