Clothepins' baa
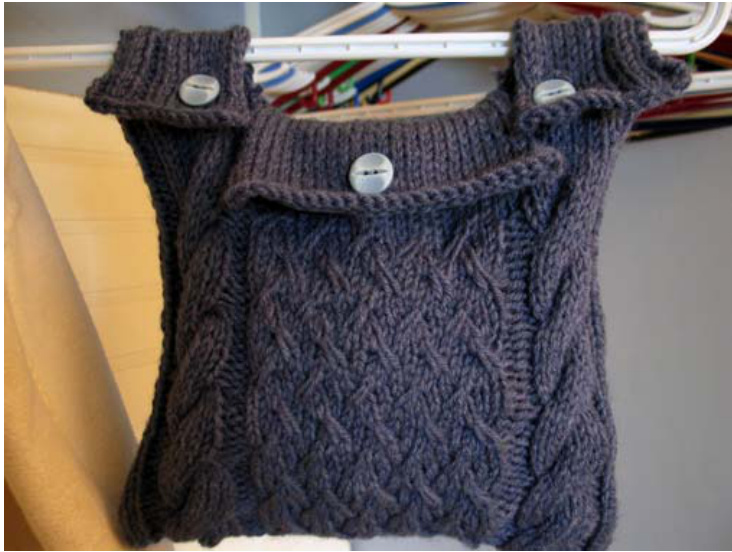
Design: CGNM, www.catherine.marcoux.ca This bag allows you to store clothespins easily and cleanly. It can be fixed to a hanger or a clothesline. This project willallow you to learn and understand different models of cables and buttonholes.
Material
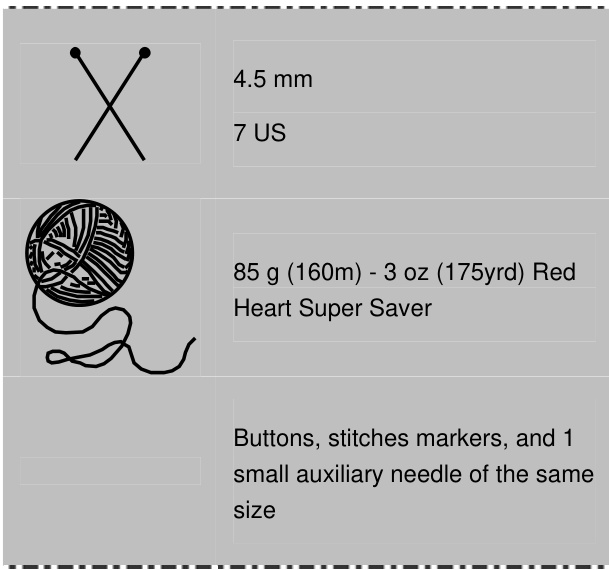
Abbreviations
| auxneedle | auxiliaryneedle | sl | Slip |
| st | Stiches | tog | together |
| k | Knit | PM1, PM2, PM3... | Place marker 1,2,3.. |
| rep | Repeat | Pt1,Pt2,Pt3... | Part 1,2,3... |
Instructions
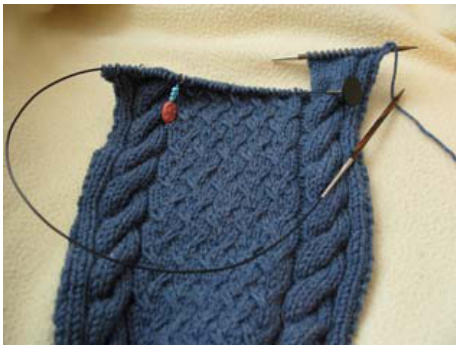
Note: Markers are indicated on each row, to help beginners knowing were they areexactly.For intermediateor advance knitters, I apologize for the inconvenience. Cast on 53 sts. Rows 1, 3, 5, 7, and 9: p2, k2, p2, PM1, knit to the last 6sts, PM4, p2, k2, p2. Rows 2, 4, 6, 8, and 10: k2, p2, k2, Marker 4, purl to the last 6sts, Marker 1, k2, p2, k2. Row 11: p2, k2, p2, Marker 1, k8, PM2, p2 \*k2, sl 1st, k1, rep from \* to the last 17sts. k1, p2, PM3, k8, Marker 4, p2, k2, p2. Row 12: k2, p2, k2, Marker 4, p8, Marker 3, k2, p1, \* p1, sl 1st, p2, rep from \* to the last 2sts from marker, k2, Marker 2, p8, Marker 1, k2, p2, k2. Row 13: p2, k2, p2, Marker 1, k8, Marker 2, p2, \* sl 2sts on aux needle placed behing work. K sl st from previous rows, k 2sts from aux needle, k next 1st, rep from \* to the last 3sts from marker, k1, p2, Marker 3, k8, Marker 4, p2, k2, p2. Row 14: k2, p2, k2, Marker 4, p8, Marker 3, k2, purl to the last 2sts from marker, k2, Marker 2, p8, Marker 1, k2, p2, k2. Row 15:p2,k2,p2,Marker 1,sl 4 sts on aux needle placed behind work, k next 4 sts, k 4 sts from aux needle, Marker 2, p2 \*k2, sl 1 st, k1, rep from \* to the last 3 sts from marker, k1, p2, Marker 3, sl 4 sts on aux needle placed behind work,k next 4 sts, k 4 sts from aux needle, Marker 4, p2, k2, p2. Row 16: k2, p2, k2, Marker 1, p8, Marker 2, k2 \*p2, sl 1st, p1, rep from \* to the last 3sts, p1, k2, Marker 3, p8, Marker 4, k2, p2,k2. Row 17: p2, k2, p2, Marker 4, k8, Marker 3, p2, k1, \* k1, place sl st on aux needle placed in front of work, k2, k sl st, rep from \* to the last 2sts from marker, p2, Marker 2, k8, Marker 1, p2, k2, p2. Version 1.2 Copyright @ 2013, for personal use only. Row 18: k2, p2, k2, Marker 4, p8, Marker 3, k2, purl to the last 2sts from marker, k2, Marker 2, p8, Marker 1, k2, p2, k2. Repeat 12 times rows 11 to 18 or till you have reached the desired length. The work is then separated into 3 parts: the first 14 sts (Pt1), the central 25 sts (Pt2) and the last 14 sts (Pt3). On Pt1 and Pt3 (don't forget to put the unused sts on a separated needle, cord or pin), repeat the edging pattern (the first 6 sts of each rows). Knit odd rows and purl even rows. Add a buttonhole to the 11th row from the separation,like showed below or like your favorite method. Bind off sts. For Pt2, knit odd rows and purl even rows, with oneortwobuttonholesatrow11th.Bind offsts.
Buttonholes
Check the button width in comparison with the stitches. From this number of stitches,remove one stitch.Ex:a 18mm (14")button corresponds to3stsinstockinette st,buttonhole stitcheswill be 2wide. 1. On right side of work. 2. Knit to the desired spot for the buttonhole. With yarn in front of work, sl the 1st st from left needle to right needle, as if to purl. Place yarn in back of work. 4. Sl next st from left needle to right needle, as if to purl. Pass 1s st over 2"d st. Repeat until the calculated number of sts is binded. Sl last sl st from right needle to left needle. 5. Turn work (wrong side). Cast the calculated number of st plus one with your favorite method or the one shown here: a. With yarn in the back of work b. Insert right needle between the first 2 sts on left needle. Yarn over right needle and draw through a loop. Sl the new st on left needle. C. Repeat till you have the calculated number of sts plus one. d. For the extra st, put yarn in front of work before sl st on left needle. 6. Turn work (right side). With yarn behind work, sl 1st st from left needle to right needle. Pass 2"d st on right needle over sl st to close the buttonhole. 7. Continue knitting with next st.
Finishina
Weave in ends, wash and block work (or kill for acry Fold work in two on right side. Align the beginning of work with the end of the cables. Sew each side to close the bag. Sew the buttons in the center of the first 10 rows by making sure they are aligned with the buttonholes.
Cables descriptions and instructions
Here are the instructions for the two types of cable shown in the project, given as independent instructions.
Simple cable ( on each sides of the baq)
First 4 rows: k8 on right side, p8 on wrong side. 5tm row: sl 4 sts on aux needle placed behind work, k next 4 sts, k 4 sts from aux needle. Repeat these 5 rows.
Cable fabric ( center part of the baq)
p2 \*k2, sl 1st, k1, rep from \* to the last 3sts. k1, p2 k2, p1, \* p1, sl 1st, p2, rep from \* to the last 2sts, k2 p2, \* sl 2sts on aux needle placed behing work. K sl st from previous rows, k 2sts from aux needle, k next 1st, rep from \* to the last 3sts, k1, p2 k2, purl to the last 2sts from marker, k2 p2 \*k2, sl 1 st, k1, rep from \* to the last 3 sts, k1, p2 k2 \*p2, sl 1st, p1, rep from \* to the last 3sts, p1, k2 · p2, k1, \* k1, place sl st on aux needle placed in front of work, k2, k sl st, rep from \* to the last 2sts, p2 k2, purl to the last 2sts from marker, k2
Variants
Replace the 8sts cables by 2 times (k1, p1), k4 on right side of work (P4, 2 times (p1, k1) on wrong side) from beginning of row. Replace P2, K2, P2 with P3, K1, P2 on right side (K2, P1, K3 on wrong side) from beginning of row. Etc.