Special Terms
BLO: Back Loop Only Sc2tog: Single crochet 2 together Sc3tog: Single crochet 3 together
Ribbing
NOTE: You can make the ribbing wider or narrower by working more or fewer starting chains. Ch 11 Row 1: Sc in second ch from hook, sc across. Ch 1, turn. Row 2: Working in BLO, sc in each sc across. Ch 1, turn. Rep Row 2 until desired length is reached. Generally, you want your ribbing to be about 80% of the circumference of the widest part of your foot unstretched. Make sure you work an even number of rows. If you end up with a number divisible by 3, it makes dividing the heel easier but it's not necessary. Slip stitch two short ends of ribbing together.
Leg
NOTE: Mark first st of round and move up as work progresses. Working in row ends of ribbing, hdc in each row end around. Do Round 2: Hdc in each st around. Do not join. Rep Round 2 until desired leg length is reached.
Divide For Heel
Now, you need to divide your stitches for the heel. The heel is large and worked over 2/3 of the leg stitches. Take your number of leg stitches, divide by three and then multiply by 2 (or you can simply multiply your original number by 0.67). If you end up with a decimal, round to the nearest whole number. Chain this number, skip the same number of stitches and hdc in remaining stitches. Do not join. Continue to mark the first stitch of the round.
Foot
each ch and st around. Do not join. Move stitch marker up as wor Round 2: Hdc in each st around. Do not join. Rep round 2 until work measures 1.5 to 2 inches from the tip of the big toe, depending on how deep you want your toe to be. You may have to try your sock on to get this measurement. NOTE: It may be helpful to skip ahead at this point and work the heel before you work the toe. This is especially helpful if you are making the socks for someone else and are unable to have them try it on. If you work your heel first, you will be able to get a more accurate measurement ofwhat thelength currently is. Fold your sock so that your heel opening is centered. Place a stitch marker at each end of the opening. Make sure there is an equal number of stitches between your markers. Hdc to the nearest stitch marker.
Toe
Mark your decrease stitches and move stitch markers up as work progresses. Round 1: Sc in marked st and in each st around. Do not join. Round 2: Sc2tog using marked st and next st. Sc in each st to next st marker. Sc2tog using marked st and next st. Sc across to first st marker. Do not join. Rep round 2 until work is long enough to close over toe with a little stretching. Sl st in next st and fasten off, leaving a tail to sew closed. Turn sock inside out and whipstitch toe closed.
Heel
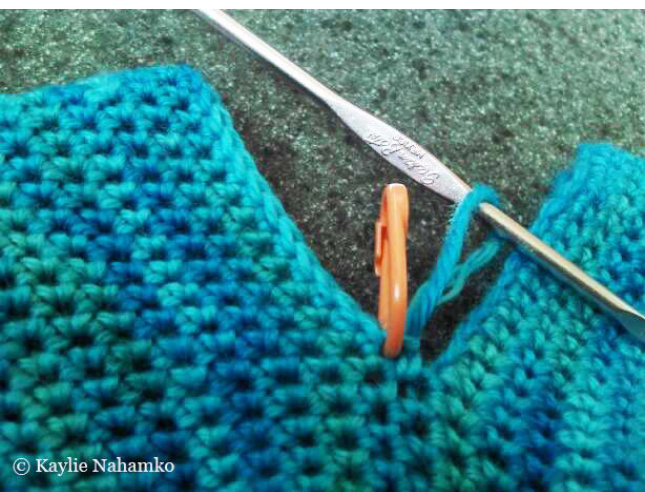
Mark decreases and move stitch markers up as work progresses Round 1: Join yarn in first skipped stitch of leg. Sc in each skipped stitch. Sc in side of next hdc and mark this st. (see picture). Pivot work, sc in between stitches made in the chain you made to divide for the heel. Sc in side of next hdc. Mark this st. Do not join.
(Make note of how many stitches you have here, you'll need this number to calculate where to stop yourheel decreases.) Round 2: Sc in each st around, stopping before first st marker. Do not join. NOTE: If you have a large heel, it may be helpful to rep round 2 once before moving onto round 3. Round 3: Sc2tog using marked st and next st. Sc across to next st marker. Sc2tog using marked st and next st. Sc across to next st marker. Do not join. Rep round 3 until 45% of your heel stitches remain (round to the nearest even number). On your last round, stop one stitch before your first marked st. Round 4: Sc3tog using stitch before marker, marked stitch, and next st. Sc to one stitch before next marker, sc3tog. Sc to first st marker. Sl st in marked st. Fasten off, leaving a long tail for sewing. Turn heel inside out and whipstitch closed. Weave in all ends.


