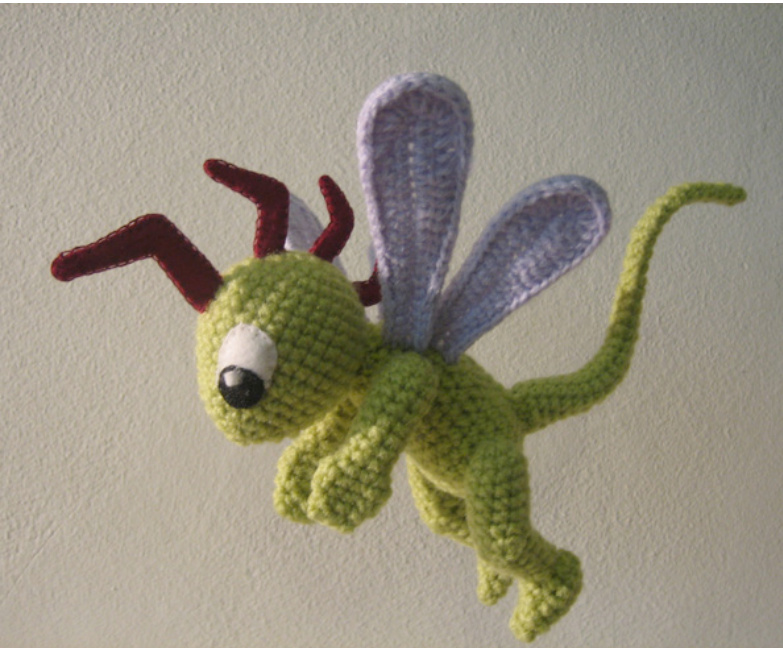
DINO-BUG
Materials:
8ply yarn in two colours. One for the wings and one for the rest 3mm crochet hook Wire to stiffen the tail, wings and head-spikes. Black and white felt for the eyes. Coloured felt for the head spikes. Matching cotton for eyes and head-spikes. A Tapestry needle and a Sharp needle for assembly Polyester filling
Abbreviations (UK)
ch = chain dc = double crochet htr = half treble ss = slip stitch inc = increase dec = decrease
Instructions
Head
Row 1: 6dc into loop (6st) Row 2: inc 6 times (12st) Row 3: (inc dc) x6 (18st) Row 4: (inc 2dc) x6 (24st) Row 5: (inc 3dc) x6 (30st) Rows 6-11: 30dc Row 12: (3dc dec) x6 (24st) Row 13:24dc Row 14: (2dc dec) x6 (18st) Row 15: 18dc Add some stuffing Row 16: (dc dec) x6 (12st) Row 17: dec 6 times (6st) Finish off Top up stuffing and sew up gap.
Body
DINO-BUG PATTERN Row 1: 6dc into loop Row 2: inc 6 times (12st) Row 3:(inc, dc) x6 (18st) Row 4: (inc, 2dc) x6 (24st) Row 5-9: 24dc Row 10: 6htr, dc, dec, 6dc, dec, dc, 6htr (22st) Row 11: 7dc, dec, 4dc, dec, 7dc (20st) Row 12: 6htr, 8dc, 6htr (20st) Row 13: 20dc Row 14: 5htr, 10dc, 5htr (20st) Row 15: 5dc, dec, 6dc, dec, 5dc (18st) Row 16: 18dc Add some stuffing Row 17: (dec, dc) x6 (12st) Row 18: dec 6 times (6st) Finish off Top up stuffing and sew up gap
Arms (make 2)
Row 1: 6dc into loop Row 2: (inc, dc) x3 (9st) Row 3: 9dc Row 4: 9dc Row 5: 7dc, dec (8st) Row 6: 8dc Row 7: 6dc, dec (7st) Row 8: 7dc Row 9: 5dc, dec (6st) Row 10: dc, inc, inc, dc, inc, inc (10st) Row 11: 10dc Row 12: 2dc, dec, 3dc, dec, dc (8st) Row 13: dc dec, 2dc, dec, dc (6dc) Finish off Stuff the arm, leaving the hand part empty. This makes the hands flatter and more hand like. Sew up the open end.
Legs (make 2)
Row 1: 6dc into loop Row 2: (inc, dc) x6 (9st) Row 3: inc, 9dc (10st) Row 4: 10dc Row 5: dec, 7dc (9st) Row 6: 9dc Hold last stitch Turn for knee Row 1: skip 2dc and attach a piece of the same coloured yarn, 6dc, Row 2: Turn ch skip 1st dc, 2dc, dec in last two stitches. Row 3: Turn ch skip 1st dc, dec in last two stitches. End Pick up held stitch from Row 6 Row 7: dc, dec, pick up 5dc around knee, dec, dc (9st) Row 8: 7dc, dec (8st) Row 9: 8dc Row 10: 6dc, dec (7st) Row 11: 5dc, dec (6st) Finish off Stuff leg Feet (make 2) Row 1: 6dc into loop Row 2: inc, inc, 4dc (8st) Row 3 & 4: 8dc Row 5: dc, dec, 5dc (7dc) Row 6: dc, dec, 4dc (6dc) Row 7: dc, dec, 3dc (5dc) Finish off. Stuff foot and sew up gap.
Tail
This is tricky to start with, but looks really good if you persevere. Row 1: 3dc into loop Row 2-9: 3dc Row 10: inc, 3dc (4st) Row 11-16: 4dc Row 17: inc, 4dc (5st) Row 18-22 5dc Row 23: inc, 5dc (6st) Row 24-27: 6dc Row 28: inc 6dc (7dc) Row 29-31: 7dc Row 32: inc, 7dc (8st) Row 33& 34:8dc Row 35: inc, 8dc (9st) Row 36: inc, 9dc (10st) Insert a length of wire so that about 1.5cm sticks out from the open end. Add a little stuffing.
Large wing (make 2)
Row 1: ch 21 Row 2: dc into 2nd ch from hook, dc 18 along ch, 3dc into last ch, turn 19dc along other side of ch. Row 3: turn, 5ss, 5dc, 5htr, 4tr, (3tr into dc) x3, 4tr, 5htr, 5dc, 5ss End. Sew wire around edge of wing to stiffen. It helps to leave about 1.5cm of wire sticking out at the flat end of the wings.
Small Wing (make 2)
Row 1: ch 17 Row 2: dc into 2nd ch from hook, dc 14 along ch, 3dc into last ch, turn 15 dc along other side of ch. Row 3: Turn, 4ss, 4dc, 4htr, 3tr, (3tr into dc)x3, 3tr, 3htr, 3dc, 3ss, End. Sew wire around edge of wing to stiffen.
Assembly:
Sew feet to legs, then sew head arms, legs. To attach the tail poke the wire into the body where you want the tail to attach, then sew around the base of the tail. You may want to add a little extra stuffing before closing the gap completely. Attach wings at the shoulders with the big wing at the top. As with the tail, poke the wire into the body to give the wings extra support. (If you're worried about the sharp ends of the wire twist them into a small loop with some pliers)
Head-spikes.
Cut two of each spike from the coloured felt, using the pattern below. Using matching cotton blanket stitch around the edge of the two pieces. Insert some wire to stiffen and then sew onto the head.

Eyes
Cut two ovals from the white felt and two smaller circles from the black felt. Use black cotton to attach the black felt circle to the white oval. Then use white cotton to sew the eye to the head. (The eyes can also be glued on)
@2011 by illanon
This pattern is free and for personal use only. Please do not reproduce, resell or use this pattern to make money.


