Knitted Desiqns
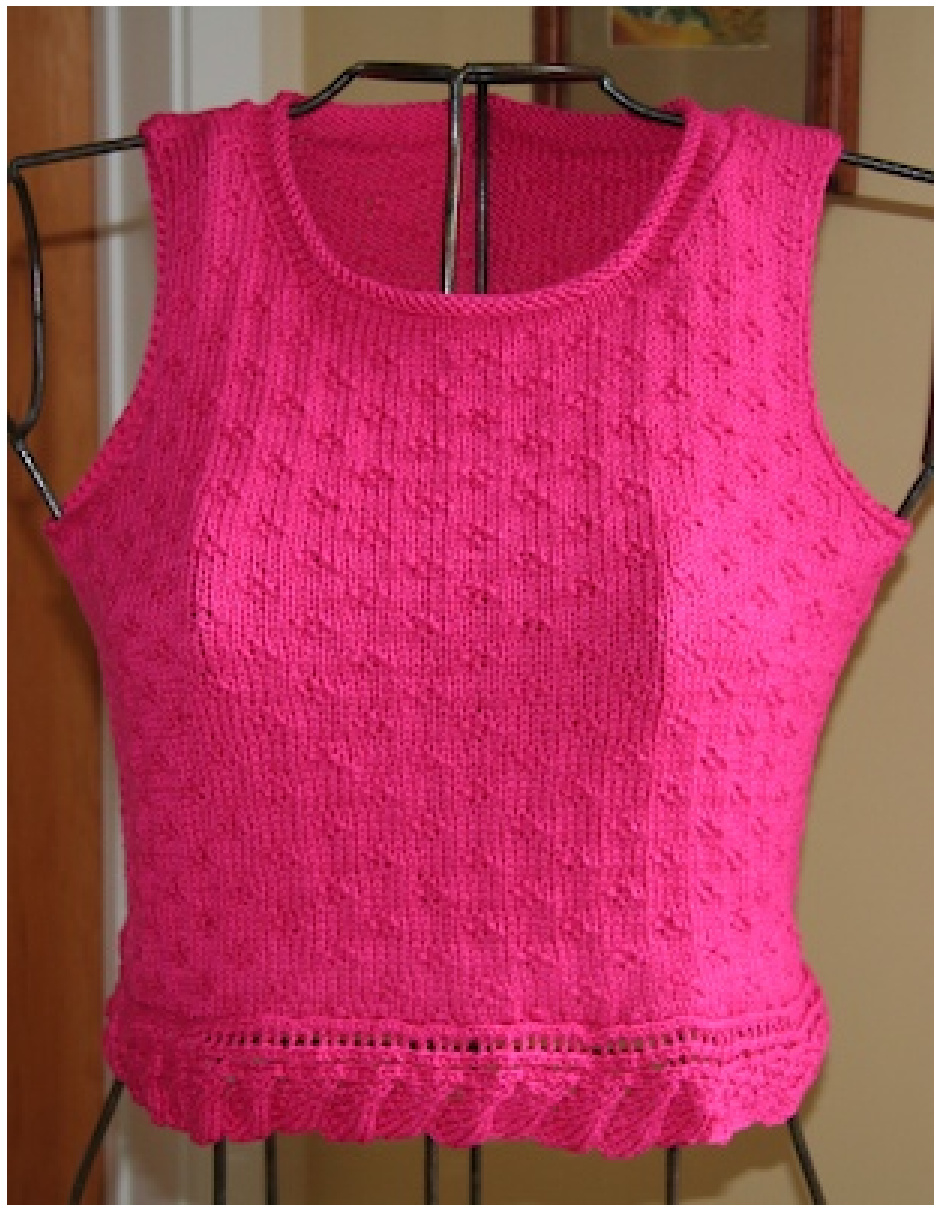
Tropical Tank The scoop: Bamboo and bamboo combos! This newer fiber and fiber combo has many unique assets - naturally hypoallergenic, antibacterial and breathable (perfect for warmer temperatures). Most of all, we love that bamboo is silky to the touch with a fluid drape. So what do you do with it? The result of our admiration is this spring/summer top. A simple pattern that uses just the purl and knit stitches for a unique look, plus two edgings - one has a ruffle, the other a leaf pattern - you choose the finishing touches! Recommended Fiber/Quantity: $100\%$ Bamboo or bamboo blends (As shown, worked with Classic Elite's Bamboo) For sizes XS,(S, M, L, XL) you'll need approximately 539, (539, 616, 693, 693). This may differ depending on the finish you choose. Sizing: Choose closest to your bust size: XS $30^{\prime\prime}$ $s.32^{\prime\prime}$ M $34^{\prime\prime}$ , L-36", XL-38" Recommended tools: Size 5 to size 7 needles, size 5 to 7 circular $16"$ needle and a blunt tapestry needle and crochet hook (3.5mm) for finishing. A row counter would also be helpful. Gauge: approx. 5 sts/inch on #7 needles according to the manufacturer - this is a light weight fiber. We suggest doing two different swatches, one in smaller size needles and the other depending on how your gauge is. You want to pick the gauge that has the firmer feel with the right count. So work a swatch! Pattern: Squaredot: worked ona multiple of 8 plus 1st. Row 1: K1,P1,K5, $\mathsf{\star p1}$ ,K1,P1,K5, repeat from \* ending with P1K1 Row 2: K1, \*P7,K1, repeat from \* Row 3: Knit Row 4: P4, K1, \*P7,K1, repeat from \*, ending P4 Row 5: K3,P1,K1,P1, \*K5,P1,K1,P1, repeat from \*, ending with K3 Row 6: same as Row 4 Row 7: Knit Row 8: same as Row 2 Instructions: Use a cable cast on for all pieces. Sizes will appear as follows: x-smal(small, medium, large, XL) For easy use, highlight desired size. The decorative edging is added later. If you see \*pattern\* that means throughout the instructions to follow the pattern sequence for that row within the "\*_ \*” Back: Cast on 73(81,89,89,97) sts in the cable cast on method. Work the Squaredot pattern until the piece measures approximately $9,(9,9,9\ \frac{3}{4},10\ \frac{1}{2})$ in ending with Row 8 of pattern. This would mean a repeat of the pattern for 7,(7,7,8,9) times. (You may make this a bit longer - but remember you'll be adding the edging to this length.) Armhole shaping: (RS) Bind off 5 sts and work the pattern as follows - this is Row 1 of the Squaredot pattern. K1, then work Row 1 from \*. (WS) Bind off 5, then P2,K1, then work pattern from \*, ending P3. (RS) Bind off 3, knit across. (WS) Bind off 3, P3,K1 \*pattern, row $4^{\star}$ , ending P4. (RS) Size Xs - Follow Row 5 of Squaredot pattern and continue in the pattern until the armhole measures $7\frac{1}{2}$ in. (RS) Sizes Small, Medium, Large and XL - There is an additional bind off sequence. For small, there will be a bind off of 1 st at the beginning of the next 6 rows, then pattern until armhole measures 8 in. For medium and large, there will be a bind off of 1 st at the beginning of each row for 10 rows. Work until the armhole measures 8 and 8 $\textstyle{\frac{1}{4}}$ respectively. For the $\times\mathsf{L}$ , there will be a bind off of 1 st at the end of each row for 16 rows, work until the armhole measures $8\frac{1}{2}$ in. (RS)(You are in Row 5 of pattern sequence) Bind off 1 st at the beginning of the row. Then K1,P1,K1,P1, \*row 5 pattern\* , ending with K3. (WS) Row 6 pattern: Bind off 1, then P2,K1, \* pattern\*, ending P3. (RS) Row 7 pattern: Bind off 1, Knit.
www.spyradesigns.com
(WS) Row 8 pattern: Bind off 1, P5,K1, \* pattern\* ending P6. (RS) Row 1: Bind off 1, K3,\*pattern\* to end. (WS) Row 2: Bind off 1, P4,K1, \*pattern\* ending P5. For medium, large and XL - jump ahead to additional bind off. (below) For small: no more additional bind offs - follow the pattern below until armhole measures 8 in (hang to measure) then follow directions for shoulder and neck shaping. Small Row 3: Knit (WS) Row 4: P1,K1, \*pattern\* ending P1 (RS) Row 5: P1,K1,P1, \*pattern\* until end (WS) Row 6: P1,K1, \*pattern\* ending P1 (RS) Row 7: Knit (WS) Row 8: P5,K1, \*pattern\* ending P5 (RS) Row 1: K4, \*pattern\* (8 times) ending P1,K1,P1,K4 (WS) Row 2: P5,K1,\*pattern\* ending P5
Jump ahead section for M,L,XL
(RS) Row 3: Bind off 1 and Knit (WS) Row 4: Bind off 1, \*pattern\* ending P1 (RS) Row 5: Bind off 1, \*pattern\* ending with K5,P1,K1 (WS) Row 6: Bind off 1, P6,K1, \*pattern\* ending P7 This is the end of the armhole decrease for Medium and Large . XL jump ahead. M and L follow the adjusted pattern sequence until armhole measures $8\frac{1}{4}$ in (hang to measure) then follow directions for shoulder and neck shaping. (RS) Pattern Row 7: Knit (WS) Row 8: P3,K1, \*pattern\* ending P3 (RS) Row 1: K2, \*pattern\*, ending P1,K1,P1,K2 (WS) Row 2: P3,K1, \*pattern\* ending P3 (RS) Row 3: Knit (WS) Row 4: \*pattern\*, ending P7 (RS) Row 5: K6,P1,K1,P1, \*pattern\* ending K6 (WS) Row 6: \*pattern\*, ending P7 For XL: (RS) Pattern Row 7: Bind off 1, Knit (WS) Pattern Row 8: Bind off 1, P1,K1, \*pattern\* ending P2 Follow pattern sequence as follows until armhole measures $8\ \frac{1}{2}$ in (hanging) or desired length. Pattern sequence for XL (RS) Row 1: K1, \*pattern\*, ending P1,K1,P1,K1 (WS) Row 2: P2,K1, \*pattern\* ending P2 (RS) Row 3: Knit (WS) Row 4: P6,K1, \*pattern\* ending P6 (RS) Row 5: \*pattern\* ending K5 (WS) Row 6: P6,K1 \*pattern\* ending P6 All sizes - shoulder and neck shaping: Maintain pattern (make sure you know what pattern sequence row you are in) (Rs)Work 12(12,13,13,13) sts in pattern. Slip the next 35(35,37,37,39) sts to a holder. With a second ball of yarn, work the second shoulder (the remaining 12 sts) in the stitch pattern. Work both sides at the same time as follows: (WS) Follow the established pattern across the 12 sts working both shoulders. (RS) Begin neck decrease. Work pattern on right shoulder, to last 3 sts, then K2tog, K1. On the neck edge of the left shoulder, K1, ssk, then work pattern. (WS) Purl all sts on both shoulders. (or continue pattern sequence) (RS) right shoulder: knit to last 3 sts, K2tog,K1 On left shoulder, K1,ssk, K all sts. (WS) Purl all sts on both shoulders (RS) right shoulder: K to last 3 sts, K2tog, K1. Left shoulder: K1, sk, K all sts. You should have 9(9,10,10,10) sts left on each shoulder. Place the sts on a stitch holder and cut a long tail for seaming. You will use a 3 needle bind off to make the shoulder seams once the front is completed. $5\div(5\div5\frac{1}{2},5\frac{1}{2},5\frac{1}{2})$ (hang to measure) At this time, you start to shape neck. Shoulder and neck shaping: Maintain pattern and make sure you know what row you are in. You will be working both sides at the same time. Work 17(17,18,18,18) sts. Slip the next 25(25,27,27,29) to a holder. With a second ballof yarn, work the remaining 17(17,18,18,19) sts in pattern. At Neck:Decrease 1 every (RS) row 8 times until 9,(9,10,10,10) sts remain. Work the decreases with ssk for left slanting decrease (K1,ssk) and K2tog for right slanting decrease (K2tog,K1). Work until armhole measures 8, $(8,8\,\frac{1}{4},8\,\frac{1}{2})$ inches or same as back. Place shoulder sts on stitch holder and cut a long tail for seaming. Left shoulder seam: Use 3 needle bind off for left shoulder. If you prefer to do the neck edge with a circular needle, bind off the right shoulder as well. Rolled edge collar: (Use size 5 needle) With the right side facing, pick up 3(3,3,4,4)sts from right back edge, 35(35,37,37,39) sts from back neck holder, 3(3,3,4,4) sts from left back neck edge, 17(17,17,18,19) sts from left front neck edge, 25(25,27,27,29) sts from front holder and 17(17,17,18,19) sts from right front neck edge. For α total of 100(100,104,108,114) sts. Knit for $2\frac{1}{2}$ in or desired length. Bind off LOOSELy. Collar may be left to roll naturally or may be tacked in place. Sew other shoulder seam if left open to finish with 3 needle bind off and sew collar seam with an invisible seam. Finishing: Sew side seams. Weave in loose ends with tapestry needle. Crochet the armhole openings with a backwards single crochet with 1 or 2 strands of yarn for desired finish. Finishing tip: Whenweavin in theloose ndsof aslippery yarn,yumay want toactually pierce the stitch and as you work it through a few loops. It will offer a more secure anchoring for your ends. EDGINGS (work with size 5 needles for both types) Ruffle - Pick up 73,(81,89,89,97) sts along the cable cast on edge on the front and also the same amount on the back. Knit in stockinette st. On the first (WS) row, knit in the front and back of every stitch. You now have double the amount of sts. This will form the ruffle. Work for 8 rows then bind off. If you want to add the squaredot pattern to the ruffle - after the first (Ws) then use rows 3 to 6 of Squaredot pattern, then continue in stockinette to finish. Please note that it is not easily seen in the ruffle. (Ruffle: approx. $1\ \frac{1}{4}$ inch in length) Leaf Pattern - This will be knitted separately until the desired length is reached. It will form a scalloped edge with a leaf pattern. Once you complete this, you willatach it to the bottom edge of the garment. Take care with seaming these two pieces together. Ease the top in a little to prevent flaring of the leaf edge. (Leaf edge: approx. $2\frac{1}{4}$ inches in length) Cast on 14 sts. (RS) Row 1: yo, K1, yo, K2, K2tog twice, K2, [yo, K2tog] twice, K1 (WS) Row 2: Purl (RS) Row 3: yo, K3, yo, K1, K2tog twice, K1, [yo, K2tog] twice, K1 (WS) Row 4: Purl (RS) Row 5: yo, K5, yo, K2tog twice, [yo, K2tog] twice, K1 (WS) Row 6: Purl (RS) Row 7: yo, K3, K2tog, K2, yo, K2tog, [yo, K2tog] twice, K1 (WS) Row 8: Purl Repeat rows 1 to 8 until you have the desired length, then bind off.
Skill level: INTERMEDIATE
Care Instructions: Hand wash in cold/cool water with mild soap. Dry flat.


