BRUNEHILDE CARDIGAN full tutorial
ABOUT Brunehilde is an oversized, comfy and warm cardigan. It's a top-down seamless knitted garment. The main part is knitted in stockinette with some parts of intarsia. Collar and raglan sleeves are made with ribs. Sleeves cover the hands and the sides are long enough to wrap round yourself. LEVEL Intermediate
MATERIAL:
· Lima, Drops for the main color ( Col A) 9 - 10 - 11 - 12 - 13 skeins ( 90m/ 50g or 98yds/1.76oz) · Lima, Drops for the second color ( Col B ) 5 - 6 - 6 - 7 -7 skeins (90m/50g or 98yds/1.76oz ) · Circular needles : US6 (4 mm ), Us9 (5.5mm), and three cables ( 2 shorts and one long ) ·Markers :8 · 3/8 in (1 cm) button : 1 ( optional ) · 8 bobbins for intarsia
ABBREVIATIONS :
K1 = knit one P1 =purl one PM =place a marker SM = slip marker S2 = slip two stitches from the left needle to the right needle purlwise M1L = Increase. Make one left by inserting the right needle under the bar between the needles from the back and lifting it onto the left needle so the right side is at the front, then knit into the back of it. M1R = Increase. Make one right by inserting the right needle under the bar between the needles from the front and lifing it over the left needle so the left side is in the front, then knit into the front of it. SSK = Left - decrease. Slip slip knit. Slip 2 stitches individually as if to knit, then knit through back loops. K2tog = Right - decrease. Knit two together. St(s) = Stitch (es)
WHAT'S YOUR SIZE?:
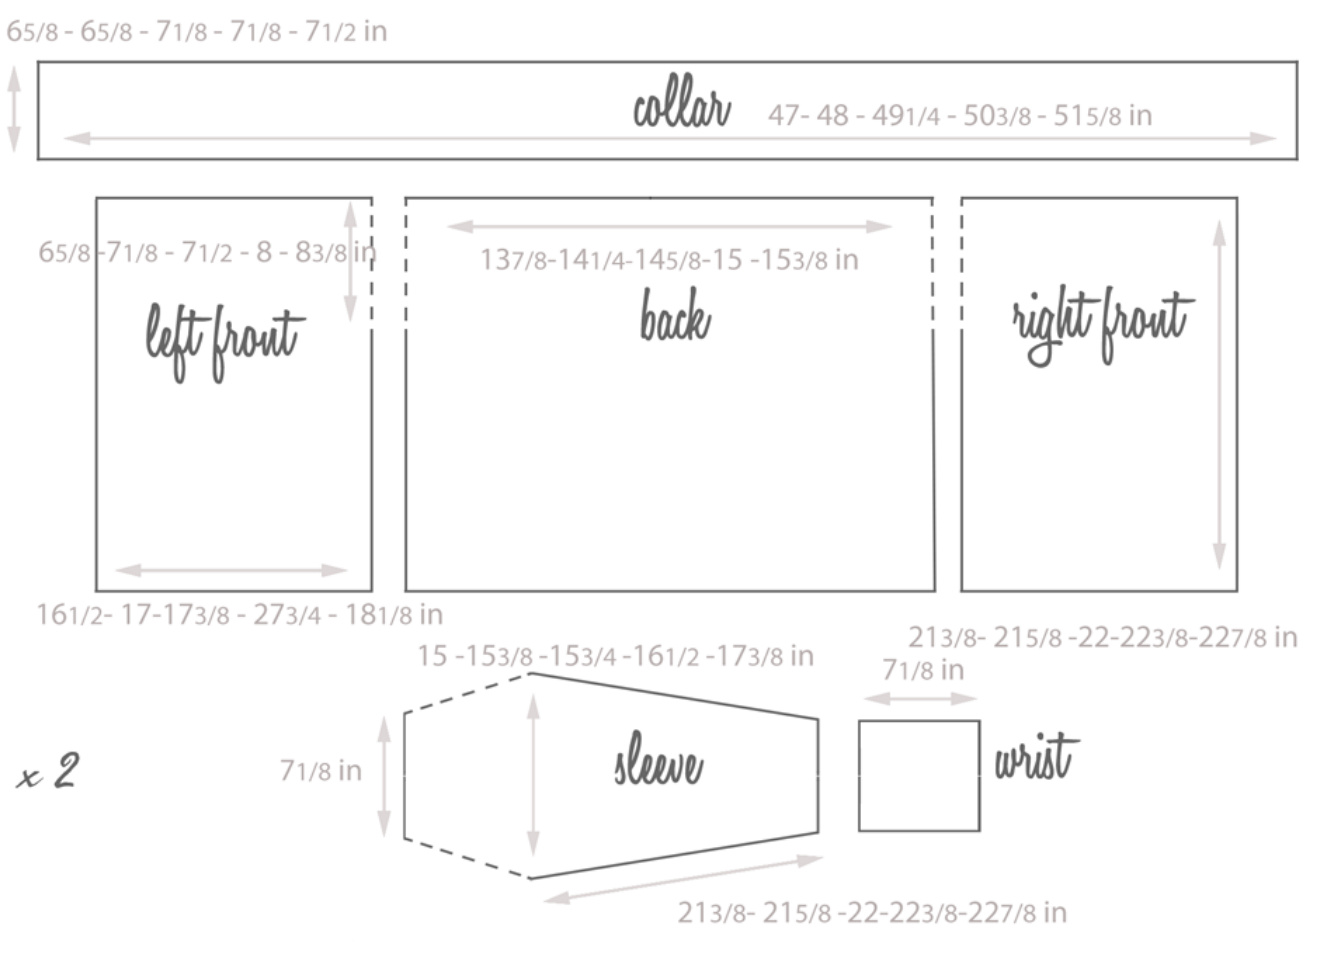
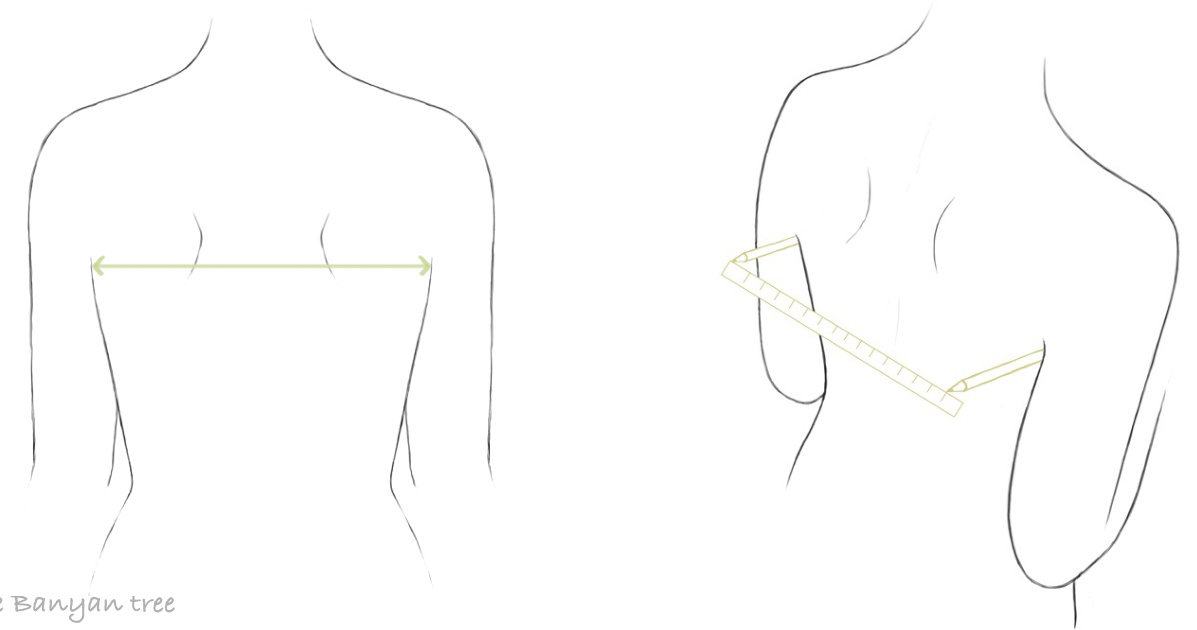
Your size is determined according the back width, armhole to armhole. · Size 1 back width 13 3/8 to 14 in (35-35.5 cm) · Size 2 back width 14 1/4 to 14 3/8 in (36-36.5 cm ) · Size 3 back width 14 5/8 to 14 7/8 in ( 37-37.5 cm ) ·Size 4 back width 15 to 15 1/4 in ( 38- 38.5 cm · Size 5 back width 15 3/8 to 15 5/8 in ( 39-39.5 cm )
TENSION :
Cast on 25 stitches with US 9 (5,5 mm) needles. knit 30 rows in stockinette stitch ( stocking stitch ). With a damp cloth, block it by applying it on the swatch then iron it ( don't stretch it ) 15 stitches x 23 rows = 10 x 10 cm.( 4in x 4in )
CONSTRUCTION :
Thanks to the top-down method, you can try on the garment while knitting each step.
HOWTOREADTHEPATTERN?
Numbers between brackets are for sizes (size1 - size2 - size3 - size4 - size5). Choose the one corresponding to the size you want to knit. 1 (216-222-228-234-240) stitches using the Col A yarn and US 9 (5.5mm) needle - Odd rows (Right Side facing): Slip 2 stitches purlwise with yarn in back - For even rows (Wrong side): Slip 2 stitches knitwise with yarn in front The abbreviation for this technique is S2.
2, K(62-64-66-68-70), M, K18, M, K(52-54-56-58-60), M, K18, M, K(64-66-68-70-72)
(Translation: Slip the first 2 stitches pulwise with yarn in back, knit (62-64-66-68-70) stitches for the right front of the cardigan, add the 1st stitch marker on your right needle, knit 18 stitches for the right sleeve, add the 2nd stitch marker on your right needle, knit (52-54-56-58-60) stitches for the back, add the 3rd stitch marker, knit 18 stitches for the left sleeve, add the 4th stitch marker and knit (64-66-68-70-72) Stitches for the left front). · Row 2 and all even rows : S2, P each stitch until the end of row.
Increasing sleeves :
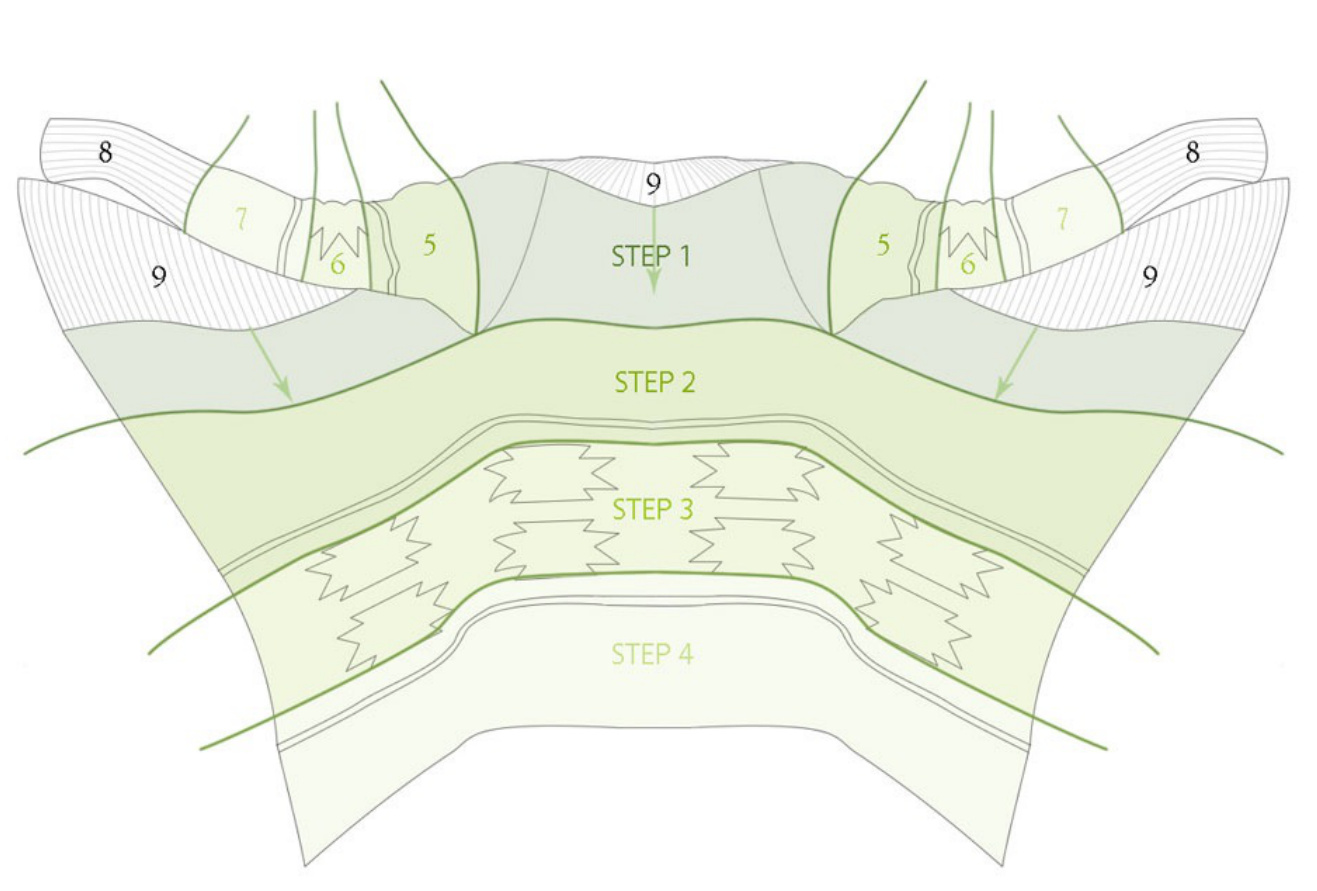
● Row 3 : S2, K until 1st M, SM, M1L, K until 2nd M, M1R, SM, K until 3rd M, SM, M1L, K until 4th M, M1R, SM, K until end of row. (You have (220-226-232-240-244) stitches on your needles). Repeat this every even rows until you have : Size 1: Step 1 ends at row 40. You must have 292 stitches on your needles. (you started with 216 then increased76sts). Size 2 : Step 1 ends at row 42. You must have 302 stitches on your needles. (you started with 222 then increased80sts). Size 3 : Step 1 ends at row 44. You must have 312 stitches on your needles. (you started with 228 then increased84sts). Size 4 : Step 1 ends at row 46. You must have 322 stitches on your needles. (you started with 234 then increased88sts). Size 5 : Step 1 ends at row 48. You must have 332 stitches on your needles. (you started with 240 then increased92sts). Now, it's time try on the garment and check if it suits you well. Place it on your shoulders and pinch the stitch markers. Check the position of the armhole. ● row 1 : S2, K K until the 1st M, hold the sts between the 1st and the 2nd marker on the short cable, K until the 3rd marker, hold the sts between the 3rd maker and the 4th on a small cable, K Next step is about building sleeves. You'll knit the right front of the garment then the back and finally the left front. I recommend you to knit tight from a part to another to avoid holes on the armscyes. You'll make the sleeves later. until the end of row. ●row 2 : S2, P until the end of row. You must have (180-186-192-198-204) stitches on your needles and you must hold (56-58-60-62-64)
stitches on each sleevecable. Now, you can put away your markers. STEP 2: STOCKINETTE STITCHES (18 rows, included 2 with ColB) It's time to make the part in stockinette before making the intarsia, with Col A. 10 rows in stockinette stitch : ● row 1, 3, 5, 7, 9 : S2, K until the end of row. ● row 2, 4, 6, 8, 10 : S2, P until the end of row. Now, it's time to attach Col B yarn ! Don't cut the Col A strand and make 2 rows in stockinette stitch with Col B yarn : ● row 11 : K until the end of row (You don't slip the first 2 sts ) ●row 12: S2, P until the end of row. Cut the Col B strand, leave enough length to weave in end gradually along the edg Then 6 rows in stockinette stitch with Col A yarn: ●row 13 : K ALL until the end of row. ●row 14,16,18 : S2, P until the end of row. ●row 15 et 17 : S2, K until the end of row.
STEP3:INTARSIA
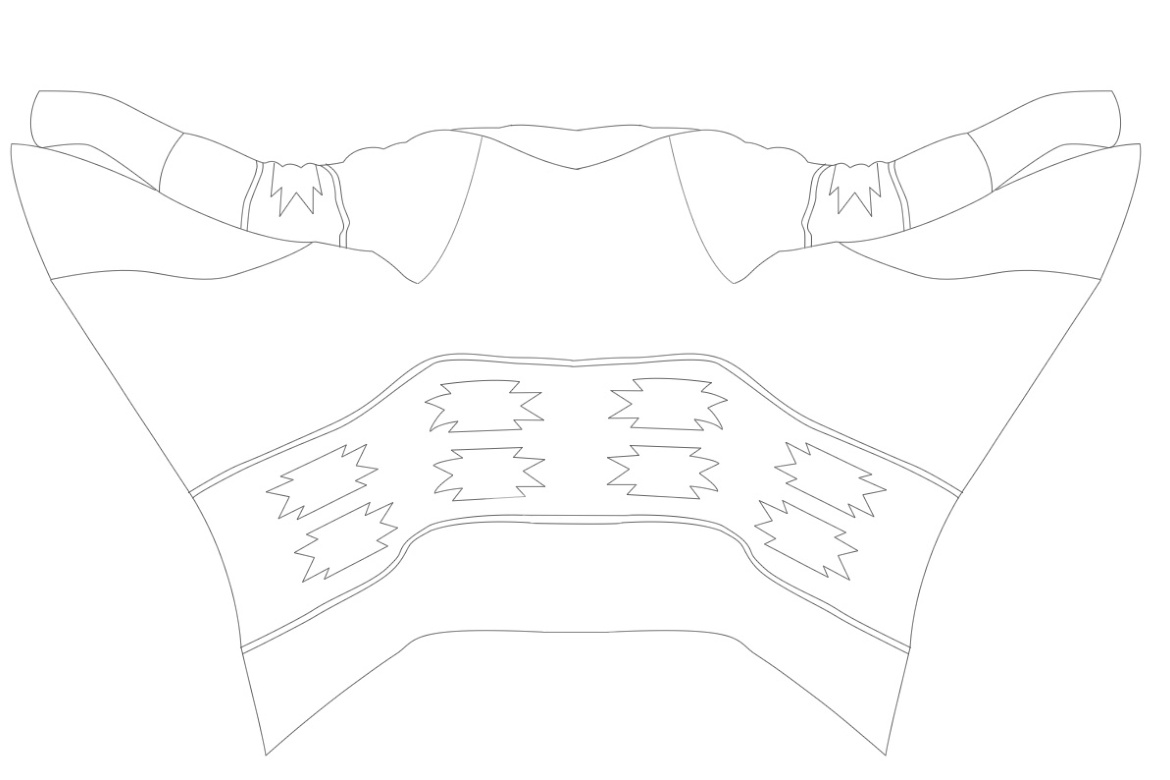
We use wool bobbins to wind some yarn around for intarsia. The bobbins should be kept close to the knitting : don't unwind until you need the yarn or you'll get into a tangle !
Wool bobbins :
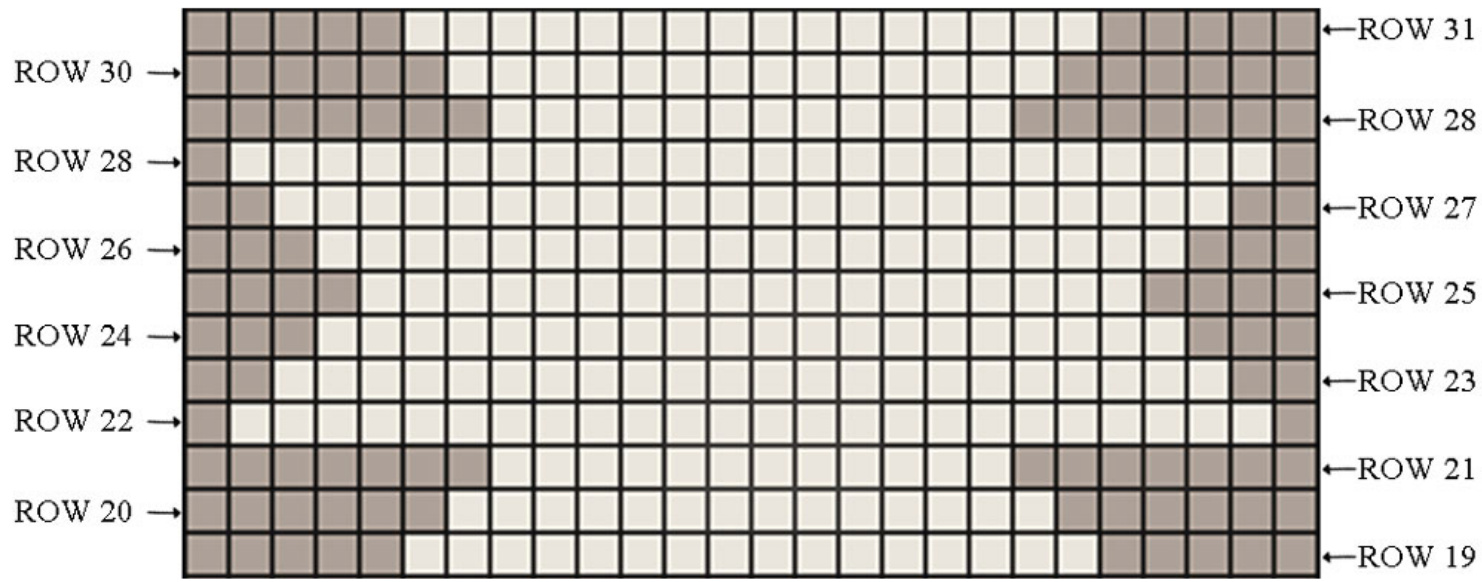
Wind 4 bobbins with a few yards of Col A yarn Wind 4 bobbins with a few yards of Col B yarn How to read the intarsia chart ? Each box stands for a stitch. Each line stands for a row so you can visualize the final motif ( right side facing ). As you know, stockinette is made up of alternate rows of knit ( odd lines in the chart ) and purl stitches ( even lines in the chart ) So you start reading and knitting from the bottom line from right to left, the line above from left to right and so on.. You'll repeat 6 times the motif, then knit 6 rows in stockinette stitch with ColA and finally repeat themotif again. Now, it's time to attach each bobbin as you knit the row 19 to start the motif. ( how-to video on http://l www.thebanyantree.fr/videos-gilet/) ●Row 19 : S2, (K22-K22-K24)[K26-K28], insert wool bobbin 1: K16, insert wool bobbin 2 : (K22-K24-K24)[K26-K28], insert wool bobbin 3 : K16, insert wool bobbin 4 : (K22-K26-K28)[K30-K32], insert wool bobbin 5 : K16, insert wool bobbin 6 : (K22-K24-K24)[K26-K28], insertwool bobbin7 :K16, insert wool bobbin 8 : (K24-K24-K26)[K28-K30]. ● row 20 : S2, P following the chart. As you change color, put the new strand under the previous one so therewon'tbe anyholes. ● row 21: S2, follow the chart. A video is available here : http://www.thebanyantree.fr/videos-gilet/ to avoid threads on the wrong side of the intarsia. Follow the chart on page 8, and work the intarsia part until row 31. ● row 32 : S2, P until the end of row with the last Col A Bobbin. Now, you can cut strands of each bobbin and weave in ends as you knit. ● row 33 : With Col A: S2, K until the end of row. (weave in the yarn of the last bobbin). ·row 34 : S2, P until the end of row. ●row35:S2,Kuntiltheendof row. ●row 36: S2,P until the end of row. row 37 to 49 : repeat motifs with bobbins Col B(row 50 is the same as row 33 ) ● row 50 : S2, P until the end of row with the last Col A bobbin. Cut strands of each bobbin and weave in ends asyouknit.
m g
| left front right front | iusert herw (22-23-24)[25 -26)[27-28 | |||||||||||||
| -25. | ||||||||||||||
| back | ||||||||||||||
| iuert here (20-22-24)[26-28] stthes | ||||||||||||||
| -26][27-28] | ||||||||||||||
| 25 | ||||||||||||||
| iuert here (22-23-24)[25-26] stthes | ||||||||||||||
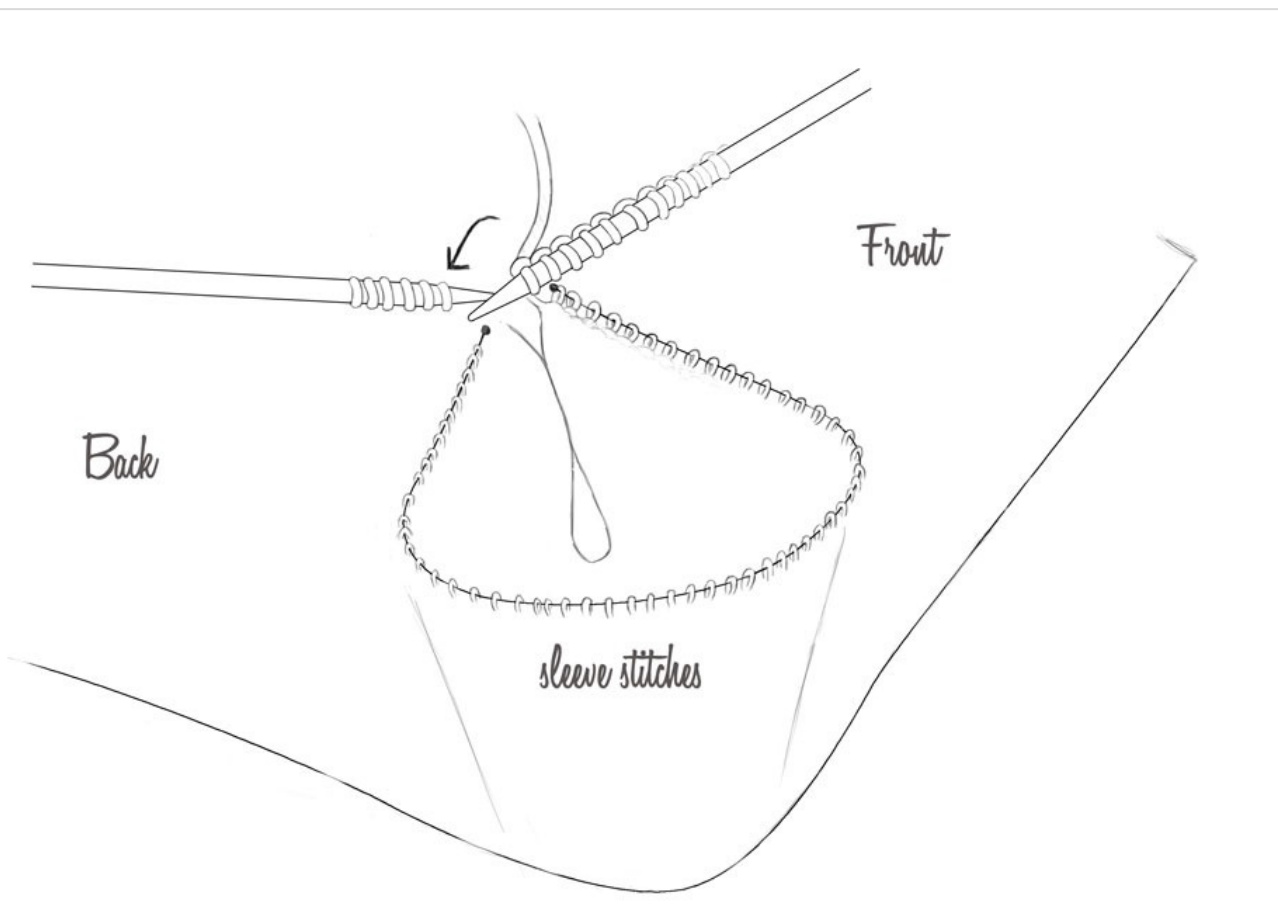
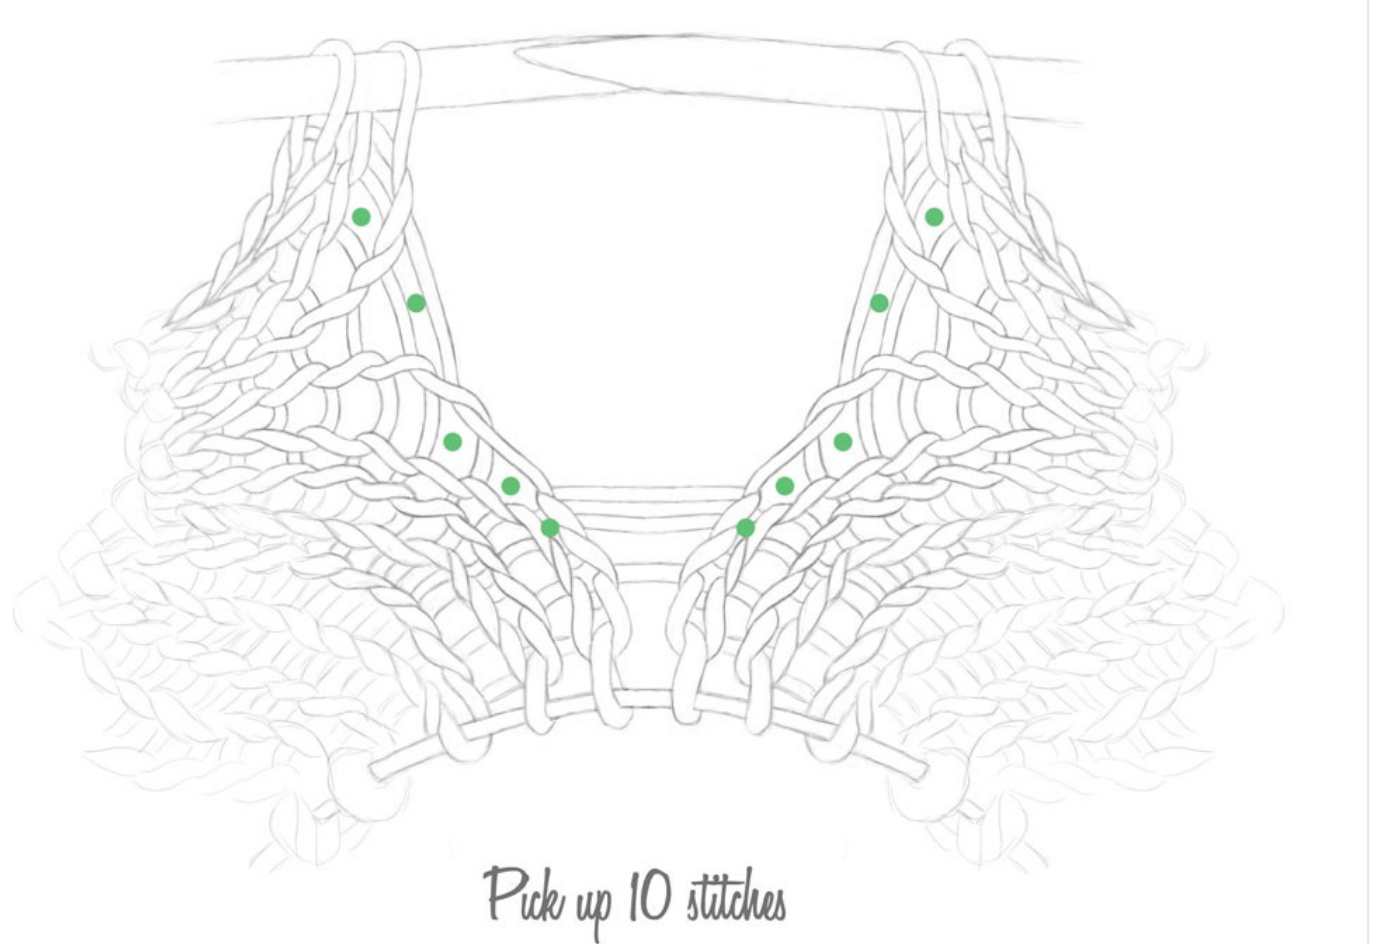
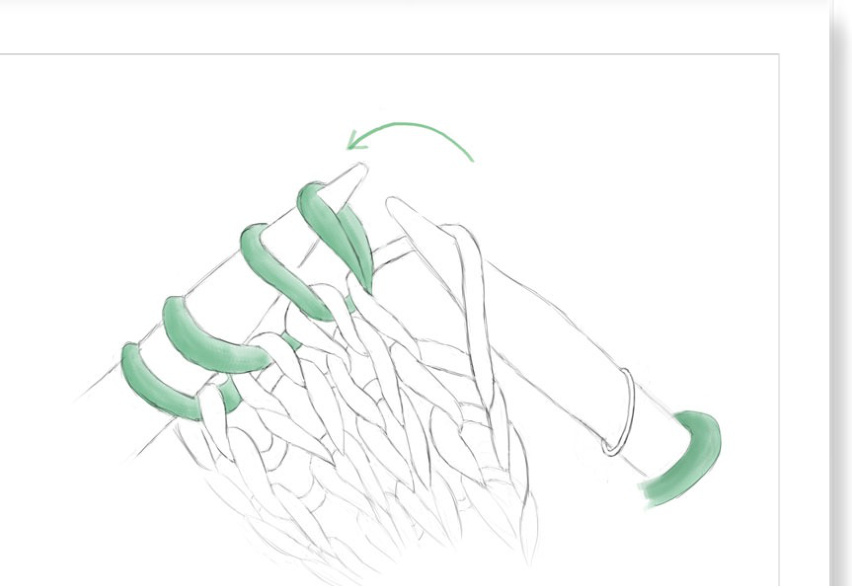
● row 1 : with Col A : S2, K until the end of row. (weave in the yarn of the last bobbin). ● row 2 and 4 : S2, P until the end of row. ●row 3 and 5 : S2, K until the end of row. ● row 6 with Col B : P to the end of row. ● row 7 with Col B : S2, K until the end of row (Cut Col B yarn) ·row 8 with Col A: P until the end of row. ● row 9 and following odd rows : S2, K until the end of row. ● row 10 and following even rows : S2, P until the end of row. Step 4 ends at row 26. Try on the garment to check if the length is ok before making the border. I-cord border: Cast-on 3 stitches at the beginning of row. a)K thefirst 2stitches b) Knit 2 sts together from the back of the loop. c) You have 3 sts on the right needle. Slip them on the left needle. lepeat a) b) c) until you have 3 sts on the left needle then knit the last 3 sts together. Sleeves are made by the magic loop method. Each round is knitted. Put back the (56-58-60-62-64) sts on hold on the circular needles US 9. Put a marker at the beginning of round. ● Row 1 : Pick up 10 stitches between the sleeve and the bodice.(green dots on the drawing). Knit to the end of the round, until the marker. (66-68-70-72-74 stitches on your needles.) ● Row 2 : SM, SSK, SSK, K2, K2tog, K2tog, K until the end of round.(64-66-68-70-72 stitches left on yourneedles). · Row 3 : SM, K until the end of round. ● Row 4 : SM, SSK, K2, K2tog, K until the end of round. (62-64-66-68-70 stitches left).
Remove the marker, slip 10 sts from the right to the left needle. Then replace the marker. Then slide back from the left to the right needle those 10 sts. ● Row 5 : K until the end of round. (until the marker). ● Row 6 : SM, K9, SSK, K2, K2tog, K until the end of round. (60-62-64-66-68 stitches left). · Row 7 : SM, K until the end of row. ● Row 8 : SM, K8, SSK, K2, K2tog, K until the end of round. (58-60-62-64-68 stitches left). ● Row 9 and 10 : SM, K until the end of round. ● Row 11 : SM, K7, SSK, K2, K2tog, K until the end of round. (56-58-60-62-64 stitches left). ● Row 12 and 13 : SM, K until the end of round. ● Row 14 : SM, K6, SSK, K2, K2tog, K until the end of round. (54-56-58-60-62 stitches left). · Row 15 and 16 : SM, K until the end of round. ● Row 17 : SM, K5, SSK, K2, K2tog, K until the end of round. (52-54-56-58-60 stitches left). ● Row 18 and 19 : SM, K until the end of round. ● Row 20 : SM, K4, SSK, K2, K2tog, K until the end of round. (50-52-54-56-58 stitches left). ● Row 21 and 22 : SM, K until the end of round. ● Row 23 : SM, K3, SSK, K2, K2tog, K until the end of round. (48-50-52-54-56 stitches left). With Col B: ( it's not necessary to wind another bobbin ) ·Row 24 : SM, K until the end of round. ● SM, put the ColA yarn above the the ColB strand ( to align the stripes ), Pick up the st below and knit it together with the sts on the needle. Then K until the end of round. With Col A( don't cut the ColB strand ) ·Row 26: SM, K until the end of round. ● Row 27 : SM, put the ColB yarn above the ColA strand ( to align the stripes ). Pick up the st below and knit it together with the sts on the needle. Then K until the end of round. ·Row 28 : SM, K until the end of round. ● Row 29 : SM, bring the secondary color up from underneath the main color, K until the end of
round. ● Row 30 : SM, bring the secondary color up from underneath the main color, K until the end of round. · Row 31 : SM, K until the end of round.
STEP6:SLEEVEFAIRISLEIN MAGICLOOP
Unlike the motifs you made previously ( step 3 ), those for the sleeves are not made using bobbins. Youll have to make them according the fair isle knitting technique. Yarns that are not being used have to be carried accross the back of the work. Now, you'll have to work with the Col A yarn in the right hand and the ColB yarn in the left hand... at the same time. As the secondary color strand is not cut, you will have to knit with the main color strand in the right hand and thesecondarycolorstrand in theleft hand.
YOU MUST READ THE CHART FROM RIGHT TO LEFT, FOR EACH RO
Rows 1 to 13 : follow the chart page 13. To achieve the fair isle, you will have to use 4 different stitches : - knit Col A with your right hand. This stitch is represented by a beige square on the chart. - knit Col A with your right hand and weave the secondary color at the back of the work. Represented by a beige square with a vertical line on the chart. - knit Col B with your left hand. Represented by a brown square on the chart. - knit Col B with your left hand and weave the main color at the back of the work. Represented by a brown square with an horizontal line on the chart. ( How-to video on : https://www.philosopherswool.com/Pages/Twohandedvideo.htm ) With Col A : ● Row 14 ( don't cut the Col B yarn ) : SM, K until the end of round with Col A. ● Row 15 : SM, put the Col B yarn above the Col A yarn. K until the end of round. ● Row 16 : SM, K until the end of round. ● Row 17 : SM, put the Col B yarn above the Col A yarn. K until the end of round. ·Row 18 : SM, K until the end of round. ● Row 19 : SM, put the Col B yarn above the Col A yarn. K until the end of round.
With Col B :
· Row 20 ( don't cut the Col A yarn ) : SM, K until the end of round. ● Row 21 : SM, Pick up the st below and knit it together with the one on the needle. K to the end of row. Cut Col B yarn. ● Row 1 : SM, put the ColB yarn above the ColA yarn, K until the end of round
| - | |||||
● Row 2 : SM, pick up the st below and knit it together with the st on the needle. K until the end of round. · Row 3 to 30 : SM, K until the end of round. knit in stockinette stitch to row 32. Try on the garment to check if the sleeve is 1/3 long on the forearm.
STEP8:SINGLERIB-SLEEVE
This part can be easily modified to fit perfectly your arms length. Don't hesitate to shorten or lengthen with few rows if necessary. Using the US6 ( 4mm ) needles : ● Row 1 to 40 : SM, \*K1, P1\*. Repeat the instructions between \* \* until the end of row. ·Bind off loosely. Make the other sleeve.
STEP 9: SINGLE RIB-COLLAR
Using Us9 ( 5,5mm ) circular needles : ● Pick-up (216-222-228-234-240) stitches with secondary color. ● Row 1 to 40 : \*K1, P1\*. Repeat the instructions between \* \* until the end of row. Size 2 : work in single rib until row 40 Size 3 : work in single rib until row 42 Size 4 : work in single rib until row 42 Size 5 : work in single rib until row 44 Now, it's time to sew the button on the border of the collar ( between the rib part and the Stst part ). Stitches are large enough to stand for a buttonhole. Block the garment using a damp cloth, but don't stretch it. Stretch the collar enough with pins so the rectangle is as wide as the front sides and the back. If you're about to use another yarn than the one I recommand, use measurements below to adapt your gauge swatch.