Spirit Band
Materials:
Yarn: Worsted weight yarn in red, white and blue or choice of colors for patriotic variation: Lavender, grey, white, black, yellow, blue for character variation. Hooks: G, H, I Miscellaneous: 2 - 3/4" - 1" buttons, 3 small black buttons for eyes (optional), sewing needle & thread, 1 large button for center of star (optional) Gauge: 2" = 7 hdc and 4 rows : 3-3.25" x 18.5" for toddler-small child size, 3-3.25" x 21" for child-adult size; This headband is made in two parts, and then seamed together. Both pieces are very similar. The main difference is row 3, creating openings for the button. Make sure to attach the button to the first band piece so the second band piece will slip over it. e are two variations available, both include two sizes and vary slightly in size
Directions for first band piece:
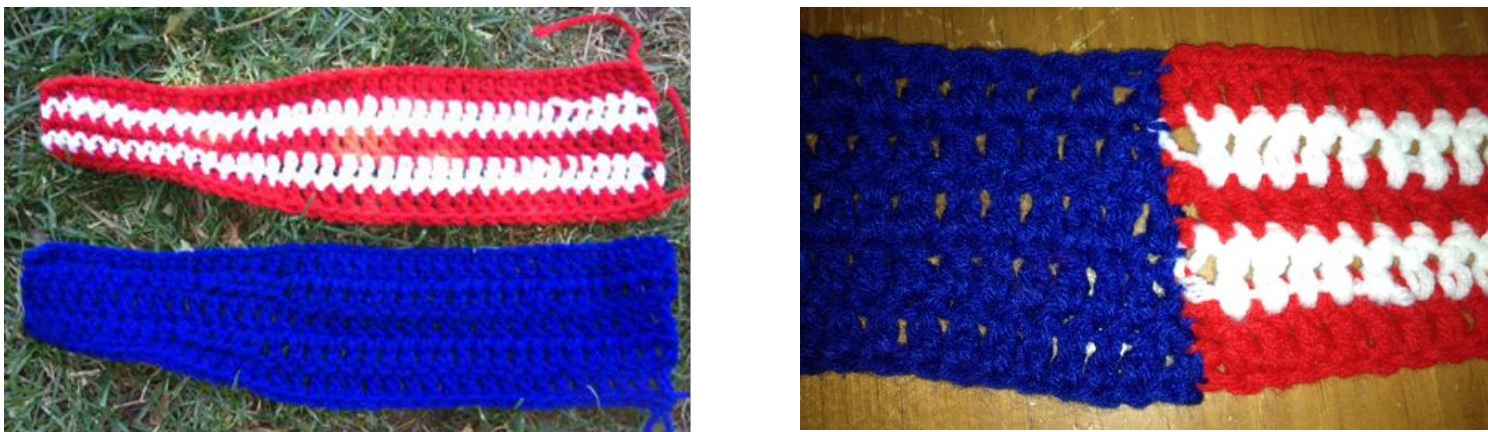
structions written for toddler-small child size, with child-adult size in () With I hook and red yarn, ch 31 (36). 1. Sc in second ch from hook and in the next 9 chs, Hdc 3, Dc 17 (22). (30/35sts) Change to white. Cl 2,turn. 2. Dc in same st and next 16 (21) sts, Hdc 3, Sc 10. Change to red. Ch 1, turn. 3. Sc in same st and next 9 sts, Hdc 3, Dc 17 (22). (30/35sts). Change to white. Ch 2, turn. 4-5. Repeat rows 2 and 3. Finish off and weave in all ends. Piece should measure approximately 3.25" (at widest end) x 8" for toddler/child, 3.25" x 9" for childadult.
Directions for second band piece:
With I hook and blue yarn, ch 36 (41). 1. Sc in second ch from hook and in the next 19 chs, Hdc 3, Dc 12 (17). (35/40sts) Ch 2, turn. 2. Dc in same st and next 11 (16) sts, Hdc 3, Sc 20. Ch 2, turn. 3. This row creates the buttons loops for closure. Dc in each st to end of row. Ch 2, turn. 4.Repeat row 2. 5. Sc in same st and next 19 sts, Hdc 3, Dc 12 (17). (35/40sts) Finish off and weave in all ends. Piece should measure approximately 3.25" (at widest end) x 10.5" for toddler/child, 3.25" x 12" for childadult. When both parts have been made, lay one on top of the other, right sides together. With a yarn needle and matching yarn, join the two widest ENDS together. Star will be sewn over seam. Note: For option without star, see "character variation" below. This variation joins the two bands in a different way.
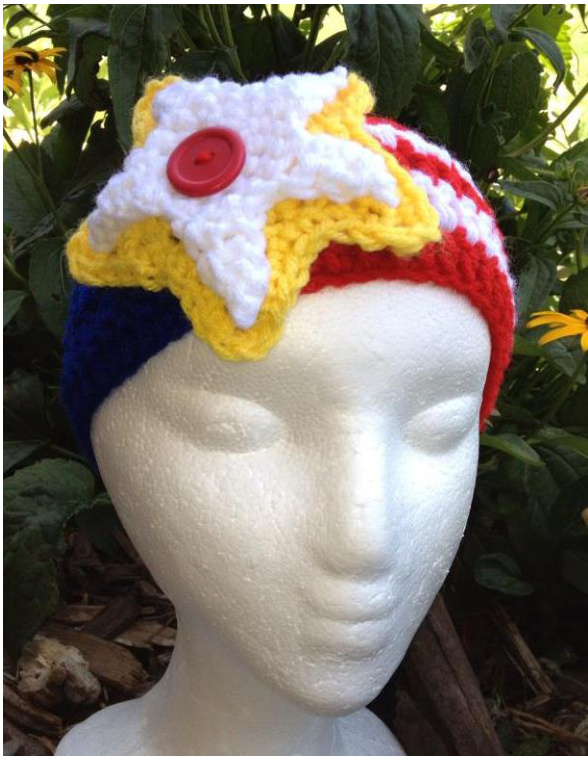
Button Closure: Sew two buttons to the first band piece near short end. If adjustable band is not desired, check placement and attach only one button. Buttons will slip between dc posts on opposite end of band. Large star (yellow in photo): For toddler size, use an I hook. 1. With J hook and yellow yarn, Ch 5 (or magic loop of 5sts), join and pull closed. 2. 2 hdc in each stitch to end of round. (10sts) 3. \*Hdc, 2 hdc in next st\* repeat to end of round. Join with sl st. (15 sts) 4. Sl st in sc. \*Ch5, sl st in 2nd ch from hook, (working down the ch 5) sc, hdc, dc, sk 1 sc on circle and sl st 2\*, repeat from \* to \* to end of round. 5. Sc in ea st around star with ch 1 at the tip of each point. Finish off, leaving a long tail for attaching star to band.
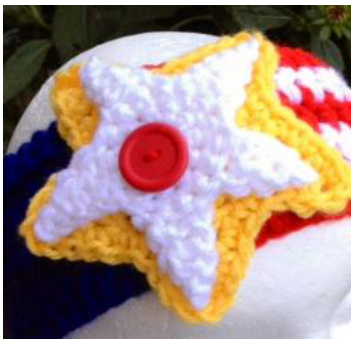
Front star (white in photo): For toddler size, use an H hook 1. With I hook and white yarn, Ch 5, join, do NOT pull closed for interchangeable star (with hole in center to slip over button). 2. 2 sc in each stitch to end of round. (10sts) 3. \*sc, 2 sc in next st\* repeat to end of round. Join with sl st. (15 sts) 4. Sl st in sc. \*Ch5, sl st in 2nd ch from hook, (working down the ch 5) sc, hdc, dc, sk 1 sc on circle and sl st 2\*, repeat from \* to \* to end of round. Finish off and weave in ends. Place the yellow star on the band, overlapping the seam, and stitch in place. Sew the button to the center of the YELLOW star. Slip the white star over the button. Note: I place the star over the button with the wrong side facing out. The tips of the star tend to curl up on the right side. Placing it on the band this way helps keep the points from curling up.
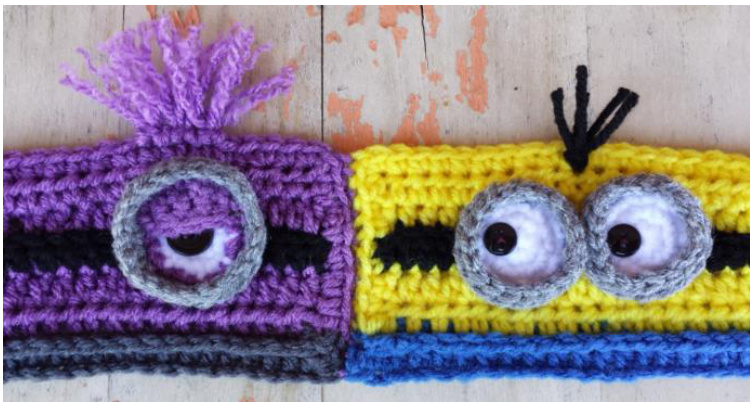
\~\~ \~ Character Variation \~ \~\~ \~
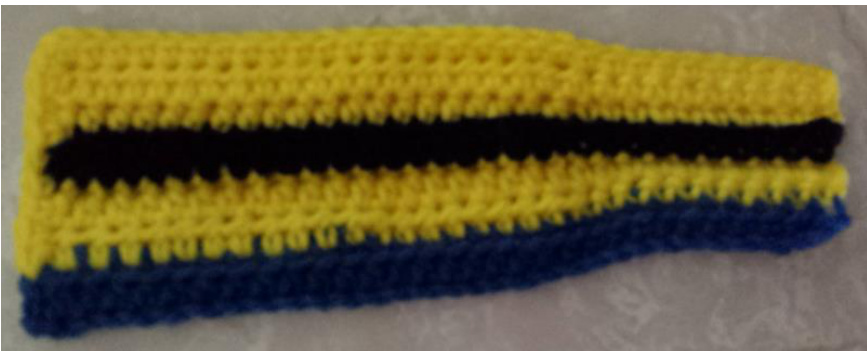
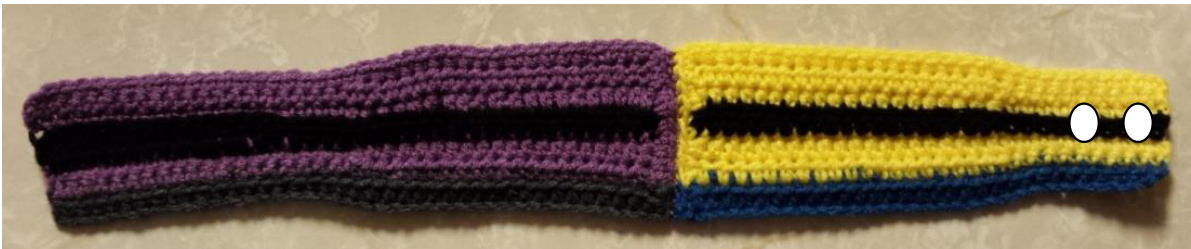
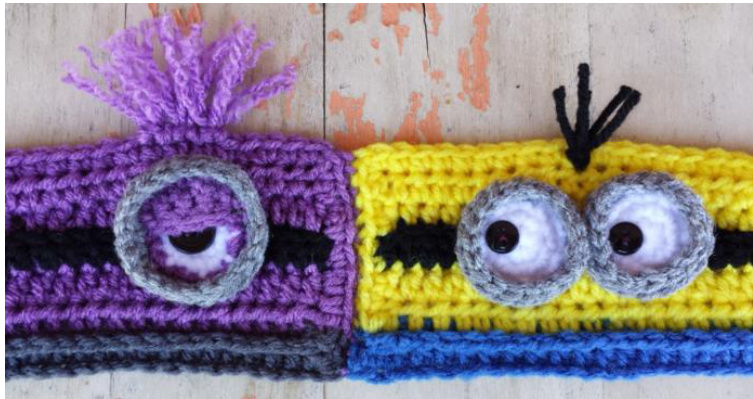
A lot of characters have a best buddy, or enemy they are associated with. This band is perfect for thoseduos. Instructions written for toddler-small child size, with child-adult size in ( ). Directions for right half piece: With I hook and blue yarn, ch 31 (36). 1. Sc in second ch from hook and in the next 9 chs, hdc 20 (25). Change to yellow yarn. Ch 2, turn. (30/35sts) 2. Work in FLO for this row. Hdc in same st and next 19 (24) sts, sc 10. Ch 1, turn. 3. Sc in same st and next 9 sts, hdc 20 (25). Change to black yarn. Ch 2, turn. (30/35sts) 4. Work in BLO for this row. Hdc in same st and next 19 (24) sts, sc 10. Change to yellow yarn. Ch 1, turn. 5. Work in BLO for this row. Sc in same st and next 9 sts, hdc 20 (25), ch 2, turn. (30/35sts) 6. Hdc in same st and next 19 (24) sts, sc 10, ch 1, turn. 7. Sc in same st and in each st to end of row. Ch 1, sc in same st (at corner). Working across end of band, sc evenly across yellow section (approximately 9sts), then change to blue and sc 2. Finish off an weave in all ends. See photo. Ire approximately 3" (at widest end) x 8" for toddler/child, 3" x 9" for child-adt
Directions for left half piece:
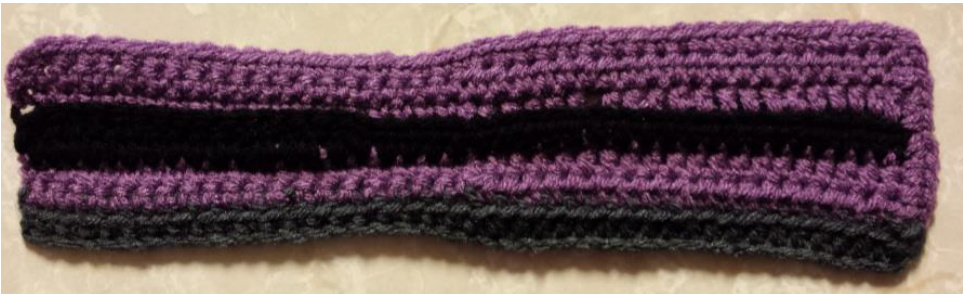
With I hook and grey or black yarn, ch 37 (42). 1. Hdc in third ch from hook and in next 14 (19) chs, sc 20. Change to purple yarn. Ch 1, turn. (35/40sts) 2. Work in FLO for this row. Sc in same st and next 19 sts, hdc 15 (20). Ch 2, turn. (35/40sts) 3. Hdc in same st and next 14 (19) sts, sc 20. Change to black yarn. Ch 2, turn. 4. This row creates the buttons loops for closure. Work in BLO for this row. Dc in same st and next sts, hdc 20 (25). Change to purple yarn. Ch 2, turn. 5. Work in BLO for this row. Hdc in same st and in next 14 (19), sc 20, ch 1, turn. 6. Sc in same st and next 14 (19) sts, hdc 20. (35/40 sts) Finish off and weave in all ends. 7. With right side facing (black row should stand up slightly on right side), attach grey yarn to right corner of center edge. Sc 2, change to purple. Sc evenly across purple section (approximately 9 sts). Ch 1, sc in same st (at corner), sc in each st to end of row. Finish off and weave in all end. See photo. Piece should measure approximately 3" (at widest end) x 10.5" for toddler/child, 3" x 12" for child-adult. When both parts have been made, lay one on top of the other, right sides together. With a yarn needle and matching yarn, seam the two widest ENDS together. Button Closure: Sew two buttons to the first band piece near short end. See white circles in photo below for placement. If adjustable band is not desired, check placement and attach only one button. Buttons will slip between dc posts on opposite end of band.
Goggles/Eyes:
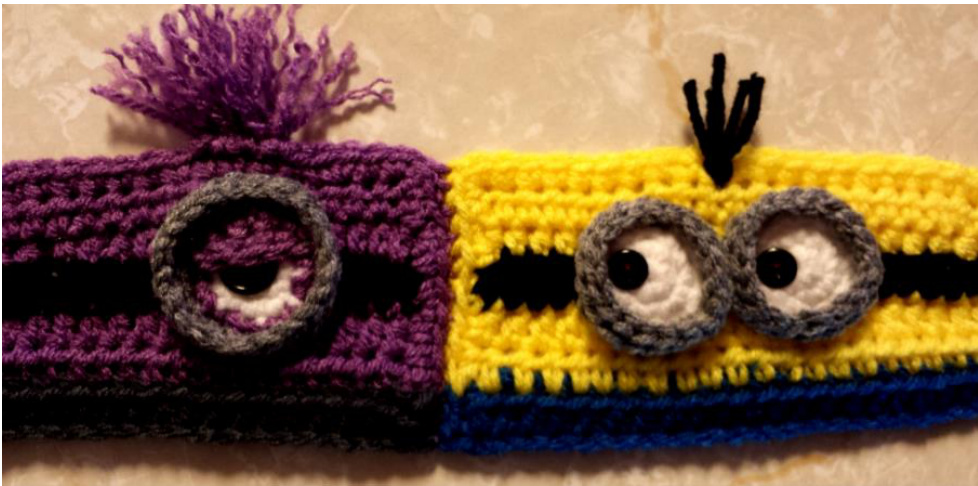
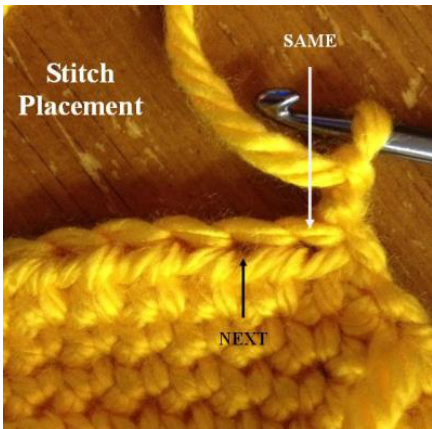
Purple guy has one eye and yellow guy has two. Yellow guy's goggles (make 2): With G hook and white yarn, start with a magic circle of 6 sts (or preferred method for starting a circle of 6 sc sts), sl st to join. 1. 2sc in each stitch to end of round, sl st to join. (12sts) 2. \*sc, 2sc in next st\*, repeat to end of round. (18 sts) Finish off, leaving a long tail for attaching to band. 3. With H hook, attach grey yarn to any st on last round. Sc in each st to end of round. 4. In FLO, sl st in each st to end of round. Finish off and weave in grey ends. Purple eyelid: With G hook and purple yarn, ch 6 (not loose), sc in 2nd ch from hook and in each ch across. (5sts) Note: See graphic at end of pattern for "same" and "next" placement. 1. Ch 1, turn, sc2tog (same and next sts), sc 3. (4sts) 2. Ch 1, turn, sc2tog (same and next sts), sc 2. (3sts) Finish off, leaving a tail for sewing to eye. Give eyelid a tug to create desired shape. Set aside. Purple guy's goggle: With G hook and white yarn, start with a magic circle of 6 sts (or preferred method for starting a circle of 6 sc sts), sl st to join. 1. 2sc in each stitch to end of round, sl st to join. Change to purple. (12sts) 2. \*sc, 2sc in next st\*, repeat to end of round. (18sts) Finish off, leaving a long tail for attaching to band. 3. Place eyelid on top of goggle,lining up top edges. With yarn needle and purple yarn, sew outer edges together, leaving center (straight) edge unattached. 4. With H hook, attach grey yarn to any st on last round. Sc in each st to end of round, working through both layers (eyelid and eye). This will be a little tricky. Make sure to end with 18 sts this round. 5. In FLO, sl st in each st to end of round. Finish off and weave in grey ends. Attach all goggles: Center goggles on top of black strap. See photo for placement. With yarn needle and white yarn (purple for purple guy), attach each goggle to band by sewing around outer edge of white (purple) part. After all goggle pieces are sewn in place, sew buttons to eye with a needle and black thread. Hair: Cut 3 pieces of black yarn and 9 pieces of purple yarn, approximately 5" long. Note: allthree black pieces are grouped together on yeliow guy. The purple guy's hair is 3 sets ot 3 strands pulled through sts next to each other. Fold pieces in half, insert hook under a stitch on the band above the goggles. Pull ends through loop (created by folding strand in half), then pull snug. See photo. Pull apart the purple strands for a fuller, wild look.
Pant Edging (optional): Attach blue yarn to right edge of last blue row (remaining loops). LOOSELY sl st in each st to end of blue row. Finish off and weave in ends. Attach grey yarn to right edge of last grey row (remaining loops). LOOSELY sl st in each st to end of grey row. Finish off and weave in ends.
\~ \~Helpful Tips \~\~ \~
| nCrochetAbbreviations | |
| ain | decrease, single crochet 2 sts together |
| decrease,doublecrochet2ststogether | |
| ace;sps-spaces | ht post |
| glecrochet | ck post |
| alfdoublecrochet | rontpost doublecrochet |
| ublecrochet | packpostdoublecrochet |
| ginning | ack loop only |
| lip stitch | ont loop only |
| n over | at instructions between, as many timesasindicated |
HEADANDHATSIZECHART newbabiestoadultmen Iprefer to make hats approximately 1”smaller than the head circumference so they will stretch and not be too big.Note: All measurements are approximate and based on“average”head sizes according to several online sources.Hat“height”is themeasurement from top of crowm to bottomedge.
| Brand new babies | Head Circ:12"-13"Hat Circ:11-12"Hat Height:5"-5.5" |
| Newborm Head Circ:13"-14"Hat Circ:11.5"-13"Hat Height:5.5"to 6” | |
| Baby-3to6months Head Circ: 14"-17"Hat Circ:13"-16"Hat Height:6.5" | |
| Head Circ:16"-19"Hat Circ:15"-18"Hat Height:7"” | Baby-6to12months |
| Head Circ:18"-20"Hat Circ:17"-19"Hat Height:7.5" | Toddler(1-3years) |
| Head Circ:19"-20.5"Hat Circ:18"-19.5"Hat Height:8 | Child(3-10years) |
| Preteen/Teen Head Circ:20.5"-22"Hat Circ:19.5"-21"Hat Height:8.5" | |
| Head Circ:21.5"-22.5"Hat Circ:20.5”-21.5"Hat Height:9" | Adult Woman |
| Head Circ:23"-24"Hat Circ:22"-23"Hat Height:10" Snappy-tots.com | AdultMan |
If you have any questions, comments or suggestions please email heidi@snappy-tots.com. This pattern has been tested. It is very important to me that information is easy to understand and accurate. I would appreciate knowing any errors found so they could be fixed. Thank you in advance. This pattern is copyrighted to snappytots and may not be copied for resale in part or whole. It is illegal to post this pattern online or share with others without written consent from Heidi Yates. Items created from this pattern MAY be sold. Please include a link to snappy-tots.com if selling Online. Visit Snappy Tots on facebook for giveaways, new release announcements, events and fun.


