Airbending
By Sara Galley
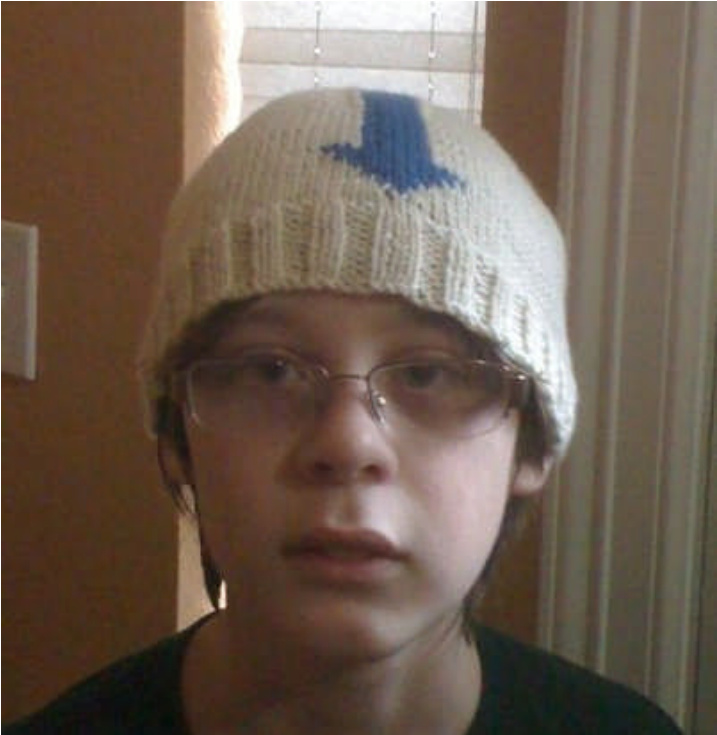
Here's a pattern for a hat inspired by the character Aang in the animated series Avatar: The Last Airbender. To avoid the complications of intarsia in the round, the hat is worked flat, with seams up the sides. Besides the basics, you should be familiar with the following techniques to work this hat: intarsia, mattress stitch, Kitchener stitch. The yarn selected should be blockable; superwash wool is suggested.
Materials:
Main color (MC): Cascade 220 Superwash, color 1915, % ball Contrast color (CC): Cascade 220 Superwash, color 1925, approximately 20 yards 1 pair circular or straight needles in size to obtain gauge (US size 7 is suggested starting point) 1 pair circular or straight needles 2 sizes smaller than that used to obtain gauge Tapestry needle Stitch markers and stitch holders may be useful; scrap yarn may be substituted. Gauge: 20 sts and 28 rows per $4^{\prime\prime}$
Sizing:
Finished size is $21^{\prime\prime}$ , to fit head sized $22^{\prime\prime}$ to $24^{\prime\prime}$ Finished front-to-back measurement per instructions is $15^{\prime\prime}$ ; hat pictured is $14^{\prime\prime}$ . To adjust fit, measure from forehead to the nape of the neck, over the top of the head, and see sizing-adjustment instructions below.
Instructions:
Front
If desired, wind off about half the MC yarn into a second ball;this is not required, as you may use the two ends of the MC ball to work the intarsia sections, but it will make matters easier. With smaller needles and MC, cast on 55 stitches. Row 1 (RS): k1, p1, (k2, p2) 6 times, k3, (p2, k2) 6 times, p1, k1. Row 2 (Ws): p1, k1,(p2, k2) 6 times, p3, (k2, p2) 6 times, k1, p1. Repeat the above two rows 4 more times.It may be usefulto place stitch markers on either side of the central 3 stitches. Row 11: Change to larger needles and knit all stitches. Row 12: Purl all stitches. Row 13: k27with MC, k1 with C, k27with MC;use intarsia techniques for color changes, twisting strands when switching colors and introducing a second strand of MC. Row 14: p26 with MC, p3 with CC, p26 with MC Row 15: k25 with MC, k5 with CC, k25 with MC Row 16: p24 with MC, p7 with CC, p24 with MC Row 17: k23 with MC, k9 with CC, k23 with MC Row 18: p22 with MC, p11 with CC, p22 with MC Row 19: k25 with MC, k5 with CC, k25 with MC Row 20: p25 with MC, p5 with CC, p25 with MC Repeat the last two rows until the hat is $4^{\prime\prime}$ long from the cast-on edge. Sizing adjustments: the length of the hat from this point to the top is approximately $3.5^{\prime\prime}$ To adjust sizing, take your forehead-to-neck measurement, subtract 7", and divide the result by 2; knit to that length rather than $4^{\prime\prime}$ before starting decreases. Note down the number of rows worked to this point, for use when knitting the back of hat. \*\* Decrease row: with MC, k1, SSK, knit to last 2 in first MC section, k2tog; with CC, k5; with MC, SK, knit to last 3, k2tog, k1. Purl row: purl across, keeping middle 5 stitches in CC and remainder in MC. Plain row: knit across, keeping middle 5 stitches in CC and remainder in MC. Repeat Purl row. Repeat the last four rows once more, and then repeat Decrease row and Purl row until 15 sts remain. Next row (RS): with MC, k1, SSK, k2tog; with CC, k5; with MC, SSK, k2tog, k1. Next row (Ws): with MC, bind off3 in purl; with CC, p5; with MC, bind off3 in purl. Do not twist strands together when changing colors on this row. Next row: with CC, knit 5. \*\*
Back
Using smaller needles, cast on 25 with MC, 5 with CC, and 25 with a second strand of MC. Row 1 (RS): with MC, k1, p1, (k2, p2)5 times, k2, p1; with CC, p1, k3, p1; with MC, p1, (k2, p2)5 times, k2, p1, k1. Row 2 (Ws): with MC, p1, k1, (p2, k2)5 times, p2, k1; with CC, k1, p3, k2; with MC, k1, (p2, k2) 5 times, p2, k1, p1. Note that color changes occur between two purl stitches on the RS and between two knit stitches on the WS. The yarn will be on the RS of the work when working these stitches; however, to properly hide the color changes, bring the strand of the first color to the Ws after finishing the first stitch, twist the colors together on the WS, and take the strand of the second color to the RS to work the second stitch. Repeat the first two rows 4 more times. Change to larger needles. Row 11: k25 with MC, k5 with CC, k25 with MC Row 12: p25 with MC, p5 with CC, p25 with MC. Repeat these two rows until the hat is the same length as the front before decreasing. Repeat instructions for front from \*\* to \*\*. 5 sts remain.
Finishing
Cut yarn, allowing enough length for Kitchener stitch grafting and weaving in ends, and thread onto a tapestry needle. Return the held stitches from the front of the hat to a needle, and hold the needle with the front of the hat in front of the needle with the back of the hat. Graft these stitches together. Lightly block the edges of the hat to make seaming easier. Use mattress stitch to seam the side seams of the hat. In the ribbing section, make sure that your stitches are taken through the bars between the knit selvedge stitch and the purl stitch;if properly done, the purl stitches on each side will come together to form uninterrupted ribbing. Check alignment when you reach the decrease sections; the row with the first decrease on one half should be seamed to the row with the first decrease on the other half, which will insure proper alignment at the top of the seam. At the top of the hat, whipstitch the top of the MC sections to the side of the CC strip. Weave in all ends. Block. Fninvl


